Fuel Injection upgrade
|
Was doing some browsing online and came across this through a link posted in the Muscle Ford forum on valve train geometry.
http://www.mid-lift.com/PUB/PUB050206PA.pdf This guy who pioneered the mid lift process states to rotate the cam till the lifter lifts to half lobe lift. Then adjust your pushrod and tighten the nut down till your valve is half valve lift. Way I did it was as presented in a video on youtube where you are on the base circle of the cam and you adjust the rocker arm till the center line of the roller tip pin and the pivot pin are horizontal then adjust down half the lift of the cam to locate the center of the pivot pin at half lift. This is really making me question if I should just go with the 6.50" pushrod length and get it in 0.080" wall thickness and let it ride. I dont believe I will be able to do a sweep test to verify cause the hydraulic roller lifter will compress without oil pressure when exposed to spring pressure. I am not going to destroy a single $40 - $60 head gasket to do this verification cause to do it right I will have to install a test lifter that had the guts removed to make it a solid lifter. I cant pull the lifters out with the heads installed for cylinder 1 hence why I really want to do the math on it. I mean sheesh its just geometry which is a form of math there has to be a math way to get this down without having to rely on the sweep test method. Well what am I saying in the video the 1/2 lift method or the 2/3 lift method are the math based way of doing this without the sweep test. 1/2 lift I know will give the smallest sweep and I dont know about 2/3 lift that is still fairly new but still none the less popular. On the other side I placed an amazon order for a pair of my Felpro 1011-2 0.039" head gaskets these have a preflattened copper wire while the 1011-1 which I currently have is 0.041" with a preflattened steel wire. Engine builder I know told me to stay away form the copper but there is no Felpro head gasket in 0.039" with a steel wire. I also ordered my Felpro 1415 header gasket to fit my heads properly.
"Old Blue" - '56 Fairlane Town Sedan - 292-4V, Ford-O-Matic transmission, 3.22:1
'63 Belair 2dr sdn - 283-4V, Powerglide transmission, 4.56:1 '78 Cougar XR7 - 351-2V, FMX transmission, 2.75:1 9inch "Bruno" - '82 F150 Flareside - 302-2V, C6 transmission, 2.75:1 9inch, 31x10.50-15 BFG KO2 |
|
I have yet to get a email reply to my tech question from Scorpion asking what method do they recommend for their rocker arms for setting up rocker arm geometry.
In the mean time I started thinking I never accounted for preload to the length which I have to account for as if I don't it will make my rocker arm short. I need to find a exact spec for the R302H roller lifters on what recommended preload is but on Summit one question on preload was answered by another individual that stated preload is 0.020" to 0.060". With 7/16-20 rocker arm studs I know 1 full turn of the polylock equals 0.050". Traditionally it is 1/2 turn to 3/4 turn past zero lash is where you set hydraulic lifters. How ever in my browsing I found a posting on Ford Muscle Forums on March 30, 2005 from a Crane website posting from January 3, 2005. This post talks about hydraulic roller cams and how their phone techs are getting more questions on proper adjustment of hydraulic roller valve trains. The article goes on about the extra weight of a roller lifter vs a flat tappet lifter, the quicker opening rates avaliable to roller cams and higher valve spring on seat pressure and open pressure. This article states that hydraulic roller lifters will perform best with at least 1 turn of preload. They state R&D has shown best performance occurs with preload set at 1 1/4 to 1 1/2 turns from zero lash, that this adjustment will maximize power throughout the rpm range and increase the useable topend by 200-300 rpm. Problem with this article is it doesn't state what rocker arm stud is being used. Using a 7/16"-20 rocker arm will give you 0.050" for every 1 turn of the poly nut. If using the 3/8"-24 rocker arm stud it gives you 0.042" for every 1 turn of the poly nut. So if Crane was using 7/16" studs then 1 1/4 to 1 1/2 turn would be 0.0625" to 0.075" preload. If using 3/8" studs that would be 0.0525" to 0.063" preload. That is outside of what the individual on summits product page stated as an answer to a question with the R302H being 0.020" - 0.060" preload. So I am thinking 0.050" preload to shoot for which is simply a whole even 1 turn. Doing the math at 2/3 lift for just intake where I rounded from 6.92 turns to 7.00 turns and ignoring the exhausts 7.22 turns I calculated 6.3125" length pushrod, adding in the 0.039" headgasket thickness gives me 6.3515" length which is where I stopped at with trying to decide between 6.35" and 6.40" length. Throwing in the extra 0.050" preload would give me 6.4015" length or might as well say 6.40" length. But I dont think I will buy the 6.40" pushrod just yet. I am thinking about pulling my engine out tomorrow after work if I am not too tired and see what I get on the exhaust side doing 7.25 turns as 7.22 to 7.25 is close enough. I am curious if the exhaust could possibly fall up a size to 6.45" length even though thats not offered in 0.120" wall thickness. I think I want to do this cause if the exhaust calculates to that I may consider running two different lengths of pushrod between intake and exhaust vs letting it ride on a single length pushrod. But I am leaning towards 6.40" which is what the old crane catalog listed as one option for my camshaft. The hardware I ordered from Jegs for my timing cover and water pump should be here tomorrow. The pair of 0.039" headgaskets and the correct exhaust header gaskets shipped from amazon today should be here tomorrow or thursday. Pushrods wouldnt ship from jegs till August 10 or from summit till August 18 so I have time to do a little more precise 2/3 lift measurement and see what I come up with.
"Old Blue" - '56 Fairlane Town Sedan - 292-4V, Ford-O-Matic transmission, 3.22:1
'63 Belair 2dr sdn - 283-4V, Powerglide transmission, 4.56:1 '78 Cougar XR7 - 351-2V, FMX transmission, 2.75:1 9inch "Bruno" - '82 F150 Flareside - 302-2V, C6 transmission, 2.75:1 9inch, 31x10.50-15 BFG KO2 |
|
Administrator
|
Man, this is complicated stuff. I'm following and I understand, but I sure don't know what to suggest. But keep on keeping on.
Gary, AKA "Gary fellow": Profile
Dad's: '81 F150 Ranger XLT 4x4: Down for restomod: Full-roller "stroked 351M" w/Trick Flow heads & intake, EEC-V SEFI/E4OD/3.50 gears w/Kevlar clutches
|
|
This post was updated on .
It can be complicated when you go a bit more in depth than probably is needed. It is why I decided to settle on the 6.40" length pushrod as it was listed in the old Crane Cam PDF catalog as one option for pushrod length. I ended up buying from Jegs on August 5 the Manley Swedged 5/16" x 6.40" x 0.120" wall thickness pushrods for $244.63 after shipping/handling and tax. It was supposed to be shipped out August 12 but was emailed that Manley has such a high volume of orders that it wont be till October till my order will ship. I could cancel my Jegs order and place the order via Summit to save the shipping as Summit doesnt charge shipping on orders over $100 but I dont want to lose my spot in the off chance that Jegs can get it to me sooner. Today how ever I installed the grease seal in my Ford Performance timing cover and then dry fit my Felpro timing cover gasket and used a black sharpie pen to mark where the timing cover sits to trim excess gasket material away. Since I will be painting the whole engine after assembly I dont want excessive gasket material blocking paint to the block. It also would look tacky to have the gasket material painted engine color as well. I found out in the process that the ARP bolt kit may not include all the bolts I will need. I went to go install the water pump to see what bolt goes where only to find out my Cardone OE replacement water pump was not an aluminum water pump like the listing on RockAuto stated but is in fact cast iron which I wont use as it is not correct for an '80s model 302/5.0L. I found a GMB High performance aluminum water pump for $61.79 on Rock Auto that states pump pressure increased up to 300%, increased flow from idle through the rpm range, and increased cooling capacity to reduce engine temp by 15-30 degrees. I really dont think I need this but there really isnt many options for water pumps when it comes to aluminum. The standard GMB Aluminum body water pump is $46.79 so only a $15 difference in cost. So I decided to buy the GMB one even though I cant find any information on what the actual difference is between the standard and the high performance one. I looked at AirTex which they have a high performance HD one for $55.99 and is listed as having 8 blades on the impeller but cant find any information on how many blades a stock 302/5.0L water pump has. Summit has a review on the GMB unit claiming it didnt help cool his over heating engine down and it appears to have a stock 8 blade impeller. I did have a Stewart High Volume water pump I bought for my '78 Mercury I pulled out brand new in the box from 9 years ago or so. I cant use it even though it says it fits 75 - 85, the problem with it is it cant be used on a street vehicle unless you want to lose your power steering pump and A/C compressor brackets as there is no mounting points for these units. It probably would work fine on a older bracket setup that uses the stud bolts to attach the brackets but it is totally useless on a later model setup. The unit I have coming in has all the mounting bosses to screw the brackets for the AC compressor and the powersteering pump to and it was fairly cheap from Rock Auto. The other item I ordered is a PowerBond dampner, its made by Dayco. I ended up splurging for the Race Performance balancer over the Street Performance. The differences between the two is the Street Performance uses a Cast Iron ring while the Race Performance uses a Steel ring. The second difference is the Race Performance balancer is SFI approved while the Street Performance isnt. Another is the Race Series is CNC machined AISI 1045 Forged steel hub bonded to a steel inertia ring, even though this is a steel unit it states in most cases its only marginally heavier than the OE cast iron unit and lighter than other units made out of steel. It also is protected positively against forward and backward movement which looking at the photo it appears there is a snap ring on the front side holding the inner steel hub tightly against the back of steel inertia ring. Then what holds it in place Dayco states the PowerBond Race Series uses a high pressure low cure that they developed. Supposedly Dayco states that they have tested these Race Performance balancers beyond 21,000 rpm without failure. For me what sold me on it is the SFI 18.1 specification they meet. Ever engine builder I chatted with told me to get a balancer that is SFI approved as they are better than your standard replacement. This was in response to me looking at balancers such as fluidamper and other performance balancers which I was informed I didnt need on a daily driven truck with a performance 302 that will never see past 6,000 rpm. I ended up paying a couple dollars more for this balancer through Rock Auto over summit but for the water pump and the balancer I actually saved $22.07 buying from Rock Auto over buying from Summit. So I am delayed till next weekend to do more. The head gaskets I ordered Monday from Amazon didnt ship out till Thursday and isnt listed to be delivered till Monday. I had hope they would come in today or tomorrow when I placed my order Monday so I could clean the deck surface with brake clean and install the AFR heads and torque them in place. I might pull my NOS Ford oil pan out and try and strip the paint off it. I looked online for a paint stripper to remove most of it then I can hit stubborn areas with a wire brush. Couldnt find anything that would work, everything I kept finding says to wrap it in plastic to keep the gel from drying out so it works. I dont know what that is about, paint strippers I used in the past took about 10 minutes and the paint would start bubbling up. Close up photo of the mating surface of the timing cover to block. Most that have used the Fel-Pro timing cover gaskets know of the raised solid piece of gasket material on the driverside and the cut out webbing on the passenger side. These two areas along with any area hanging out on either side below the water passages were marked and trimmed out for a more OE look. Even the Ford gasket was too thick and would require cutting. I had a gasket with my Dorman timing cover I initially bought that fit nice but it had a horrible semi cut punch out for the dowels that resulted in the gasket ripping when trying to punch these pieces out. 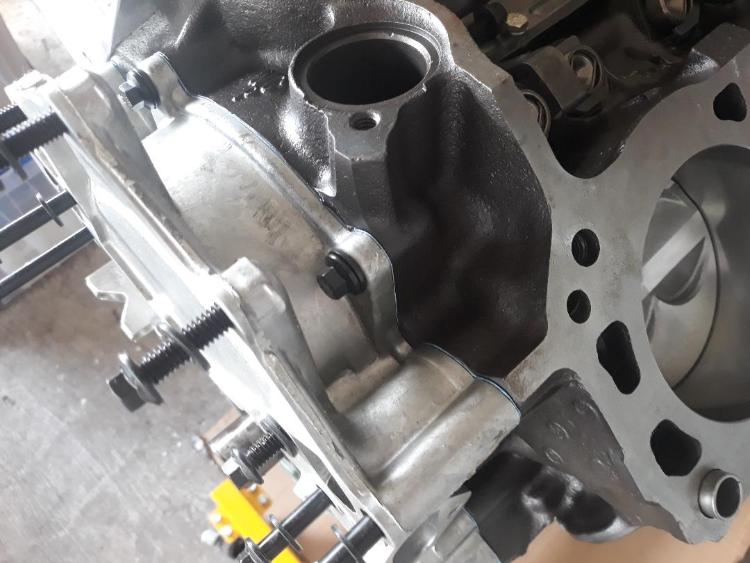 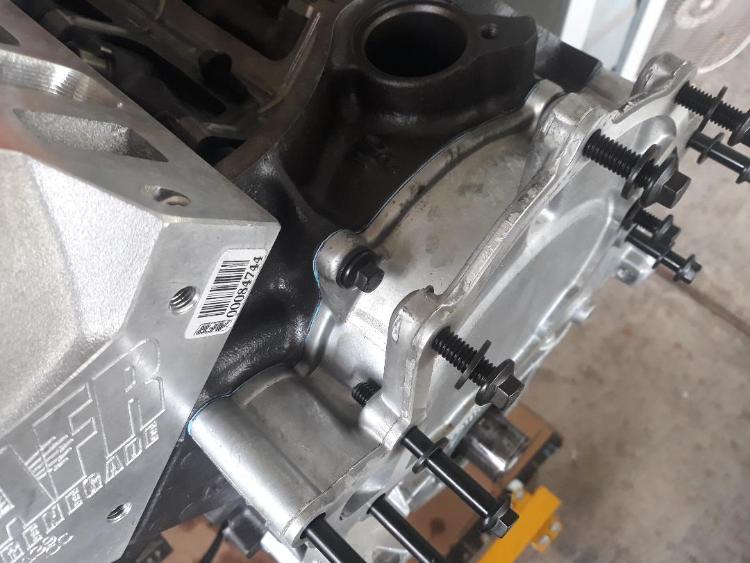 The timing cover is not torqued in place how ever, just enough to hold the gasket snugly against the bead of Ultra Black I put on the block.
"Old Blue" - '56 Fairlane Town Sedan - 292-4V, Ford-O-Matic transmission, 3.22:1
'63 Belair 2dr sdn - 283-4V, Powerglide transmission, 4.56:1 '78 Cougar XR7 - 351-2V, FMX transmission, 2.75:1 9inch "Bruno" - '82 F150 Flareside - 302-2V, C6 transmission, 2.75:1 9inch, 31x10.50-15 BFG KO2 |
|
Administrator
|
Looks like you have a plan. A well thought out plan, at that.
 But that October date is going to slow you down a bit. Maybe they'll speed up a bit? On the pan, the "aircraft" paint stripper that I have does a pretty good job of taking powder coating off. It is just the run-of-the-mill stripper from O'Reilly's or Walmart. But if you are stripping the inside of the pan then you could put a piece of plastic wrap over the top of the pan to keep the stuff from drying out so fast.
Gary, AKA "Gary fellow": Profile
Dad's: '81 F150 Ranger XLT 4x4: Down for restomod: Full-roller "stroked 351M" w/Trick Flow heads & intake, EEC-V SEFI/E4OD/3.50 gears w/Kevlar clutches
|
Im hopeful that they will catch up and ship it out sooner. But I can wait on the pushrods and continue assembly else where and even mask and paint the engine. I really dont need the intake manifold off to set preload its just something I would like to do just to make life a little easier. I actually bought one can of the Dupli-Color industrial stripper that should come in Monday-Tuesday. I looked online and none of the local autopart stores have it. It basically straight acetone with a thickening agent to make it a spray gel that wont run. States paint will bubble up and can be removed in 30 minutes or less. If it works as good as they say and how reviews state then I should cut my time drastically for stripping it down. Then I can either spray wd40 on the inside to stop rust till I get the oil put in or I could use some oil and just smear it into the metal on the inside of the pan. Outside I will spray with WD40 unless the pan is one of the last things to go on and I can actually start priming and paining. In that case I will just hose the engine off with some brake clean to wash away the WD40 on the block and then start my masking and painting. I havent decided how I want to mask the aluminum heads off around the exhaust ports. Part of me is tempted to just stuff some blue shop paper towels in the exhaust ports and spray everything then let the paint act as an extra layer to help seal the header to the head. Or I could tape up my painted headers and bolt them to the head and use it as a mask in of itself. Headers will be sent out for ceramic coating just dont know what color to do.
"Old Blue" - '56 Fairlane Town Sedan - 292-4V, Ford-O-Matic transmission, 3.22:1
'63 Belair 2dr sdn - 283-4V, Powerglide transmission, 4.56:1 '78 Cougar XR7 - 351-2V, FMX transmission, 2.75:1 9inch "Bruno" - '82 F150 Flareside - 302-2V, C6 transmission, 2.75:1 9inch, 31x10.50-15 BFG KO2 |
|
Administrator
|
I stuffed blue paper towels in the ports and painted everything, including the exhaust flanges. So far, not problems.
On the color of the headers, I didn't have a lot of options with Jet Hot when I had mine coated. Once I worked through what the options were on the type of coating I was pretty limited in colors. But bear in mind that one of the reasons for coating is to hold the heat in. And since dark colors radiate heat the best you want to go with a light color.
Gary, AKA "Gary fellow": Profile
Dad's: '81 F150 Ranger XLT 4x4: Down for restomod: Full-roller "stroked 351M" w/Trick Flow heads & intake, EEC-V SEFI/E4OD/3.50 gears w/Kevlar clutches
|
Thats what I was thinking of doing as well. It would be easier and I could just simply thread some cheapie bolts in the exhaust side of the head just to keep paint out of the threads. I found a ceramic coater up in Oregon state few years back they had a whole line up of ceramic coating colors. I was looking for something that had more of a bare steel look to it either unpolished stainless or just plain steel. I was at the time looking at the Titanium they offered as shown below third from the left. 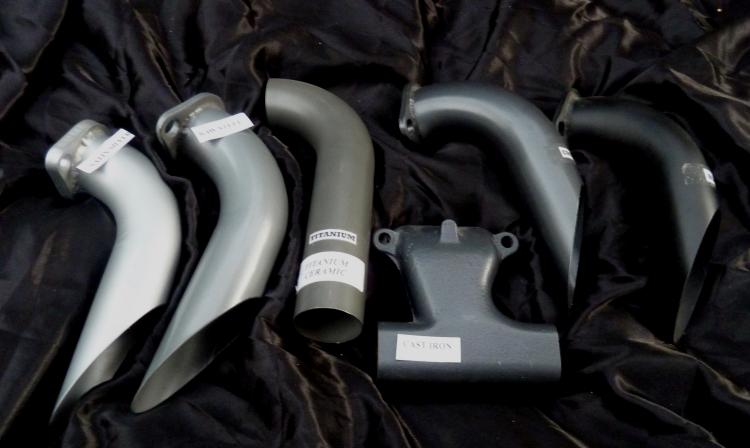 But for me after paying for shipping to and from Oregon state and then the cost of the ceramic coating itself I was quite pricy for shorty tube headers like I have. I was quoted $250 - $275 price range for the shorty headers back in 2018 not including the cost to ship to and from Oregon state. But they ceramic coat the inside and outside of the headers which I found out from a more local ceramic coater you dont coat the inside of the headers just the outside. From the more local guy he is quoting $168 to $185 depending on if you go with black (cheapest) or a silver metallic (most expensive). Shipping would also be cheaper as its with in the state as well. Only thing is he only offers the silver which I dont like so is out of the question, black which I am unsure about, or the Zirconia which is a greenish grey color that many restoration people use for a OE look. Below is a pair of full length headers in the Zirconia coating. 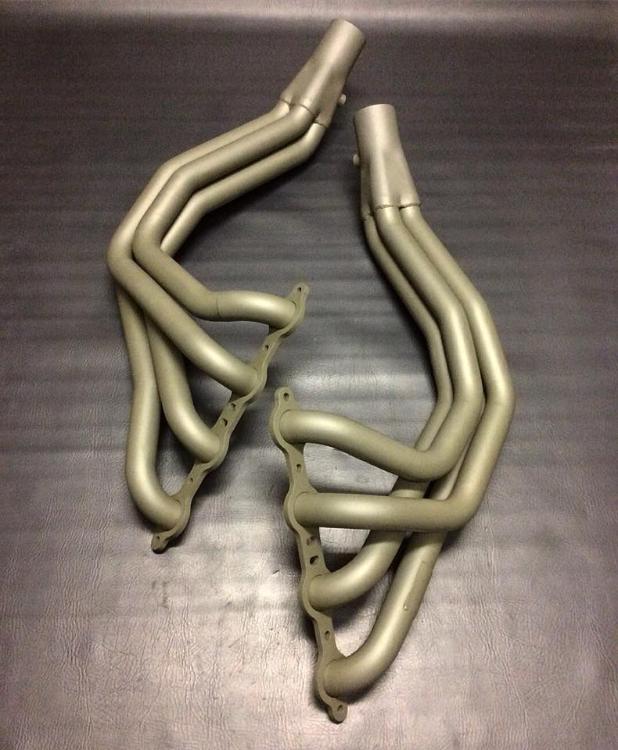 That may be the color I end up going with cause I just think black headers with black accessory brackets would just blend in too easily along with the dark Ford Corporate blue I will be painting everything. I could go the silver but Ive installed them at work, they discolor so easily from scratches from installation to simple handling and to me they just look like very cheap chrome plating. The local guy here in Texas that I found up in Borne told me that what I want is a stable thermal coating on the exterior and solid carbon build up on the interior of the header to work together at keeping the heat inside. He also informed me the colors he offers have different heat ratings. Silver is only good to 1,600 degrees, black is good to 2,000 degrees, and zirconia is good to 3,000 degrees. I did look at Jet Hot as well but its been 3 years now since I clicked "get a quote" and never got an email from them. I sent the quote in back in 2018 along with a quote to Finish Line Coatings in Oregon state and to Cradin Industries here in Texas. So far I am leaning towards Cradin Industries as he not only does automotive stuff but he does coatings for aerospace as well including some work for Pratt & Whitney and Lockheed Martin. That tells me he has to know what he is doing as a coater to be used by some big names like that. If Jet Hot would give me a price quote I would consider them cause they did come out in 1981 and my truck is an '82 so it would be fitting. It also appears they have many different color options that one can have applied to the Off Road 2000 coating which is the one I would be looking at for a truck application. It also is only coated on the outside which is what Cradin Industries informed me is the proper way to do ceramic coating.
"Old Blue" - '56 Fairlane Town Sedan - 292-4V, Ford-O-Matic transmission, 3.22:1
'63 Belair 2dr sdn - 283-4V, Powerglide transmission, 4.56:1 '78 Cougar XR7 - 351-2V, FMX transmission, 2.75:1 9inch "Bruno" - '82 F150 Flareside - 302-2V, C6 transmission, 2.75:1 9inch, 31x10.50-15 BFG KO2 |
|
Administrator
|
I talked with Roger at Jet Hot in OKC. Just called them up.
Gary, AKA "Gary fellow": Profile
Dad's: '81 F150 Ranger XLT 4x4: Down for restomod: Full-roller "stroked 351M" w/Trick Flow heads & intake, EEC-V SEFI/E4OD/3.50 gears w/Kevlar clutches
|
Ill give them a call. Im not in a rush just yet to send the headers out, I really want to bolt them up to the engine loosely after paint and see how they look in black and then I can use the photo and photoshop to try different colors offered to see what I think would look good. I dont mind paying $400 for ceramic coating for these headers. I got them uncoated cause the only coatings offered from Hedman was the tacky looking silver or the black. I got them painted so I could have them done in a color that I like.
"Old Blue" - '56 Fairlane Town Sedan - 292-4V, Ford-O-Matic transmission, 3.22:1
'63 Belair 2dr sdn - 283-4V, Powerglide transmission, 4.56:1 '78 Cougar XR7 - 351-2V, FMX transmission, 2.75:1 9inch "Bruno" - '82 F150 Flareside - 302-2V, C6 transmission, 2.75:1 9inch, 31x10.50-15 BFG KO2 |
|
Administrator
|
I think I paid $450 for Jet Hot coating my full L&L headers.
Gary, AKA "Gary fellow": Profile
Dad's: '81 F150 Ranger XLT 4x4: Down for restomod: Full-roller "stroked 351M" w/Trick Flow heads & intake, EEC-V SEFI/E4OD/3.50 gears w/Kevlar clutches
|
|
In reply to this post by Rusty_S85
Made some progress and delayed at the same time.
First off I installed the head gaskets and torqued the heads down to 70ft lbs as ARP stated in their head bolt kit. My felpro gasket set stated to torque the bottom bolts to 70ft lbs and the upper bolts under the valve cover to 80 ft lbs. Sorry I dont see the need of doing that and ARP stresses to use their torque specs unless they state to use OE torque specs. The gasket also stated to make sure the sealing ring doesnt over hang into the combustion chamber or the chamfer. Well it looks like the top part of the chamfer it is hanging over just slightly which I dont know how a 4.100" bore head gasket would do that on a 4.040" bore but I let it ride cause it was located on the dowels and everything else lined up. Secondly I used the duplicolor industrial strength paint stripper on my NOS Ford oil pan that was painted engine grey inside and outside. I just cant trust that paint not softening up over time from the oil and letting go and clogging up the pickup on my oil pump. It took half a can to bubble up the paint on the inside of the pan but it is bare metal clean now. I sprayed the last half of the can on the exterior but after 2 1/2 hours of sitting the paint was still bubbling up so I tossed it in the garage to let it continue bubbling up over night so I can get it fully stripped down as well. Third I put the GMB high performance aluminum water pump on but found out the ARP bolt kit lacks the proper bolts for its listed application. 9 of the bolts in the 15 bolt kit are the wrong size, they are either too short or too long. The longest bolt in the kit which should have been for the passengerside lower water pump bolt through the cover to the block which is where the alternator adjuster mounts to. Well placing the bolt and washer on the outside of the water pump I found out the bolt is 1 1/2" away from even touching the block. But it fits perfectly on the driver side lower water pump mount to the block. Then the four bolts through the aluminum water pump into the aluminum timing cover are only engaging 3 threads which is not enough. The aluminum timing cover would strip out trying to tighten the water pump up with bolts that short. So I sent a customer support message to ARP to see what they say. For the cost of this kit I feel they should send me individual bolts in the lengths I need cause the package states for small block fords with aluminum timing cover and aluminum water pump but wont work on serpentine reverse rotation water pumps. Thats what I have to the letter, aluminum ford motorsport timing cover which is the OE timing cover under the Ford Motorsport brand, and an aluminum GMP high performance water pump for a '82 F150 standard rotation. I honestly dont believe ARP is going to help me on this cause they just brushed me off when I asked about the 7/16" cam bolt my aftermarket roller cam had they basically said we dont offer anything in that size for a Ford Cam bolt. But maybe they will help me and get me the right bolts for this application since it is all OE spec parts. As of now I have to wait cause my pushrods havent been shipped yet, the ARP timing cover/water pump bolt kit isnt working out so I cant even torque the front of the engine down, I cant put the oil pan on, at least I cant torque it down till the timing cover is located and torqued in place first. So I am in limbo till I can get this straightened out. I know I measured the depth of the bolt holes as well as the depth from the water pump/timing cover to the block itself. Working in order clock wise around the water pump with #1 starting the upper left water pump to timing cover bolt. #1 2.9095" bolt depth / 2.1790" depth to block #2 didnt measure the depth as it should be similar / 1.0365" depth to block #3 didnt measure the depth as it should be similar / 1.0625" depth to block #4 bolt in kit fit properly #5 bolt in kit fit properly #6 5.0620" bolt depth / 4.2850" depth to block #7 bolt in kit fit properly #8 bolt in kit fit properly For the timing cover itself starting with the upper timing pointer bolt going counter clock wise, starts with #9. #9 2.35" bolt depth / 1.5205" depth to block #10 2.62" bolt depth / didnt measure assumes to be same as #9 #11 2.349" bolt depth / 1.4675" depth to block #12 2.485" bolt depth / 1.0429" depth to block some of the measurements that should be the same but vary I contribute to the fact its not torqued down and the water pump plate is concaved slightly causing a slight rock. I feel the measurements are close enough to get an idea of what length bolt I should have. How ever I refuse to buy the 9 bolts I need as ARP sells bolts in bulk packs of 5 and the cost of those 9 bolts unless I can get them in two lengths would surpass the cost of the kit I bought so I expect ARP to do right and resolve this as this is unacceptable to sell a product that doesnt fit its listed application.
"Old Blue" - '56 Fairlane Town Sedan - 292-4V, Ford-O-Matic transmission, 3.22:1
'63 Belair 2dr sdn - 283-4V, Powerglide transmission, 4.56:1 '78 Cougar XR7 - 351-2V, FMX transmission, 2.75:1 9inch "Bruno" - '82 F150 Flareside - 302-2V, C6 transmission, 2.75:1 9inch, 31x10.50-15 BFG KO2 |
|
Administrator
|
Well, that's some progress even if you got stopped. At least the stripper is working on the pan.
As for the bolts, I feel for ARP as there are a myriad of different water pumps & timing covers, as well as different accessory mounts. So having just the right bolt lengths has got to be tough. But hopefully they will work with you to get the right ones. However, what are you going to coat those bolts with to make sure they don't corrode?
Gary, AKA "Gary fellow": Profile
Dad's: '81 F150 Ranger XLT 4x4: Down for restomod: Full-roller "stroked 351M" w/Trick Flow heads & intake, EEC-V SEFI/E4OD/3.50 gears w/Kevlar clutches
|
Problem is ARP only offers two kits with no specific listing for years on the application just what time of timing cover and water pump you have. The kit I bought is 154-1504 with a note on summits site of "Designed to fit models with an aluminum timing cover and water pump. Will not fit reverse rotation (serpentine drive) water pumps." It also has a listing on summits site for application, 1963 - 1968 289 V8 and 1968 - 1986 5.0L / 302 V8 The other kit that ARP offers is 154-3204 with a note on summits site of "Designed to fit models with an aluminum timing cover and cast iron water pump. Will not fit reverse rotation (serpentine drive) water pumps." It also has a listing on summits site for application, 1963 - 1968 289 V8 and 1968 - 1979 5.0L / 302 V8. It sounds like the kit I bought 154-1504 will fit any 302 / 5.0L from 1980 - 1986 where ford used the aluminum timing cover with aluminum water pump. Below is a photo I took with colored circles pointing out the issues I am having with the ARP bolts, It was late when I sent my customer support ticket in last night and I didnt create this till today. If need be I will provide this to try and get them to help me if they are willing but I have a feeling they wont cause they didnt help me with the 7/16-20 cam bolt that most aftermarkets are using on Ford roller cam cores. In case its hard to read the text I put in the break down is as follows. Green : bolt has more than 5/16" thread engagement Orange : bolt has right at or just below 5/16" thread engagement Yellow : bolt has 1/16" to 1/8" thread engagement (feels like a few threads) Red : Longest bolt in supplied kit is about 1 1/2" short of touching block 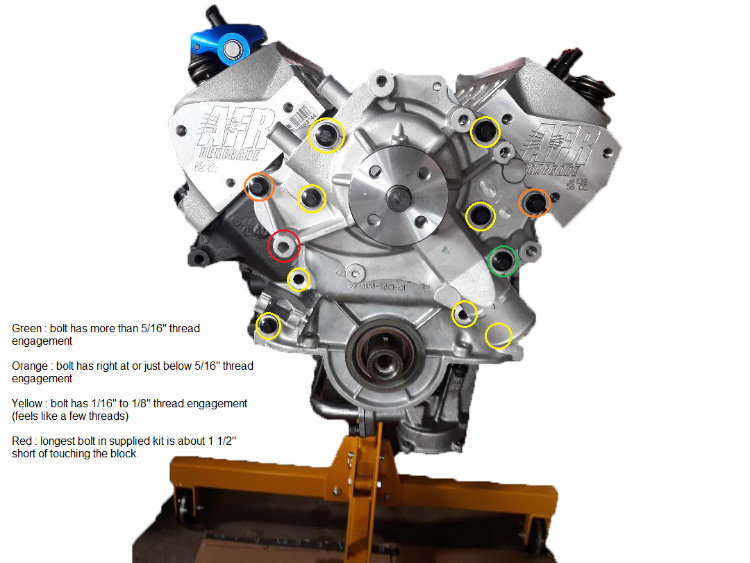 I could get by with the orange bolts but I would like a little more thread engagement like the green bolt has. The Yellow bolts I cant use as there is so little thread engagement that I just know it will pull the threads out of the timing cover and probably the iron block as well. The red bolt I measured the depth of the opening through the water pump and I got 5.0620" might as well say 5" even as the water pump back cover is not compressed flat. From the water pump to the block I got 4.2850" so I figured some where around 4.5" to 4.75" bolt length I would need to account for ideal thread engagement once the alternator tension bracket is added to the height. On the stripper it worked great. The inside it took multiple coats to get it fully stripped to prevent any worry of my oil pump pickup screen getting clogged with paint down the road. This picture is the inside of the pan as I finished last night before starting on the outside. 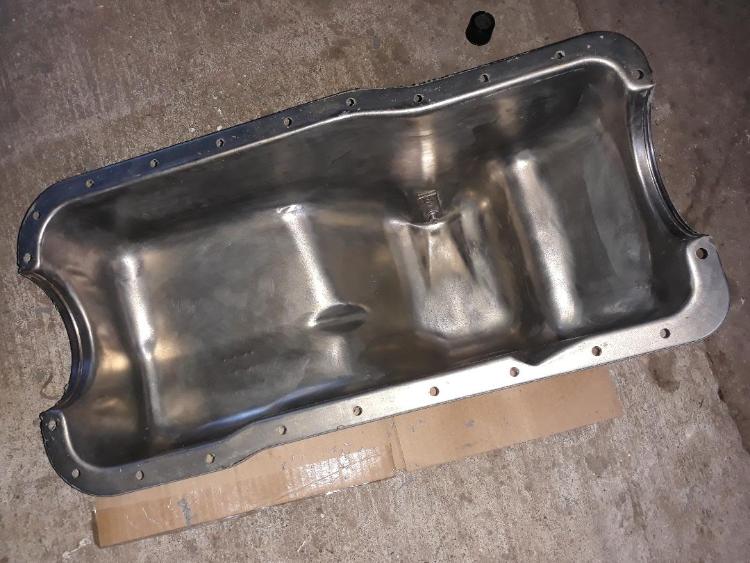 On the outside I sprayed it and let it sit over night as after 2 hours the paint was still slowly bubbling up in new areas and I wanted to have it easy to remove it with all the tight corners I couldnt get a wire brush wheel into. This photo is the outside sprayed with the stripper. 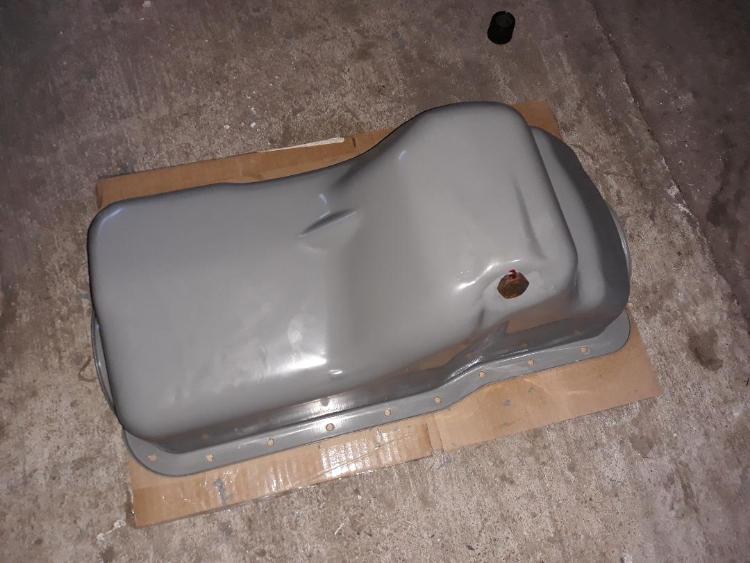 This photo shows after 10 hours of letting the stripper work 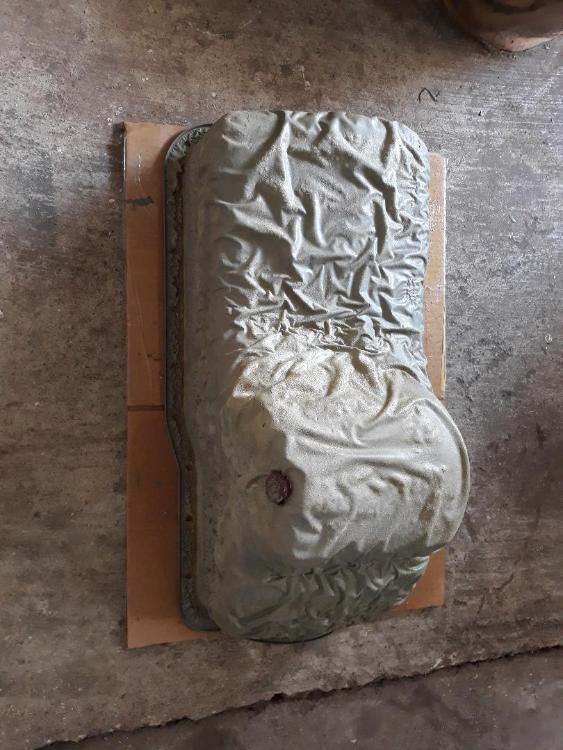 And how the paint actually started to harden back up after the stripper dried out but was able to cut it and pull it off in sheets like a skin. 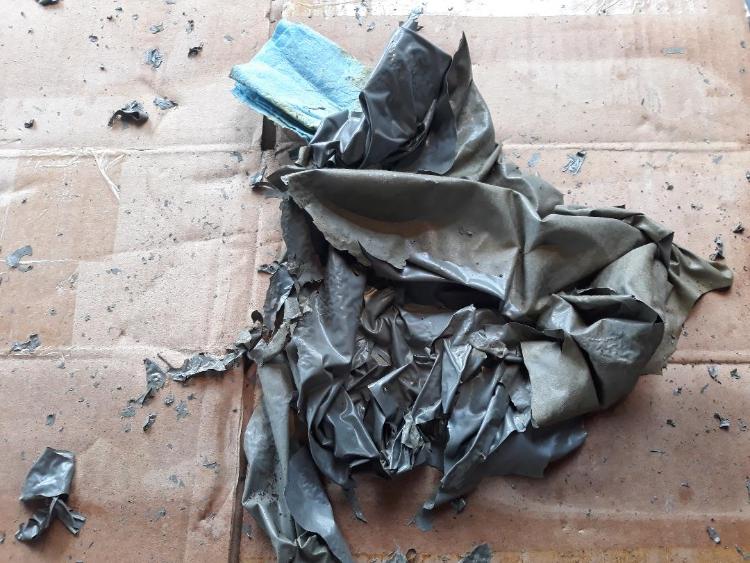 This is how the inside ended up after I finished cleaning the whole pan and spraying it with WD40 to stop rust from forming. 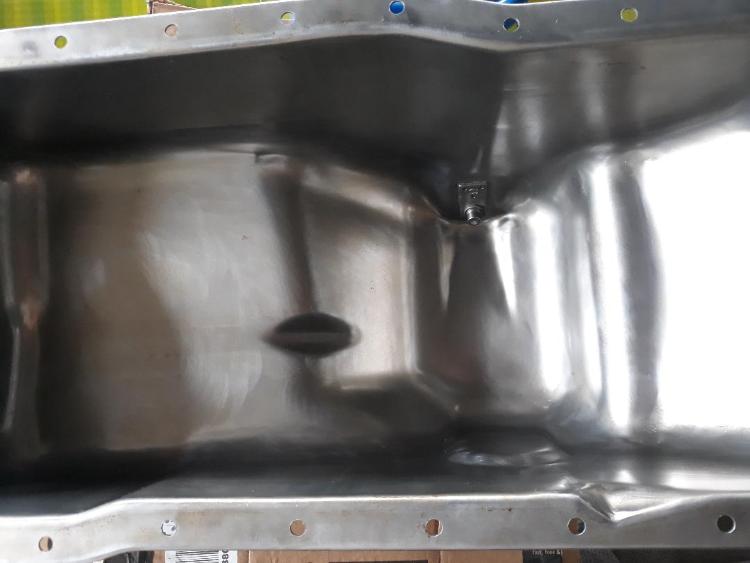 and how the pan looks just lightly installed on the engine. I didnt torque it down for a couple reasons. First reason is the Fel Pro instructions for the one piece gasket is very confusing on if I should or shouldnt be using ultra black in the corners. The other reason is I have Ford pan rail stiffeners and dont like the idea of not having the pan under the stiffeners painted so I am thinking possibly masking off the oil pan rail on the block and painting the oil pan separate from the block. Draw back of this is the pan rail will be painted black and the ARP black oxide bolts will be un painted as well. 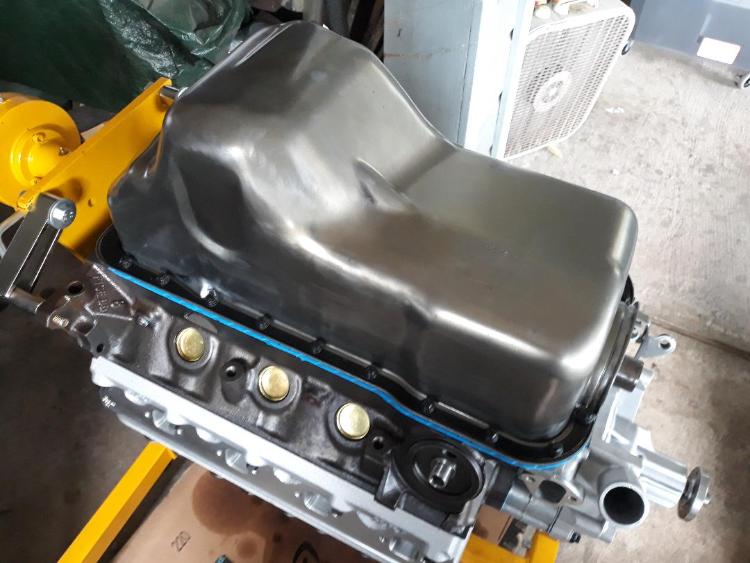 And a photo of my Powerbond SFI Race balancer partially installed to check the timing marks. Looks like true TDC is going to register as 2* advance on this balancer. I will double check it again once I get it fully pressed in place on the crank as its possible it may shift slightly. 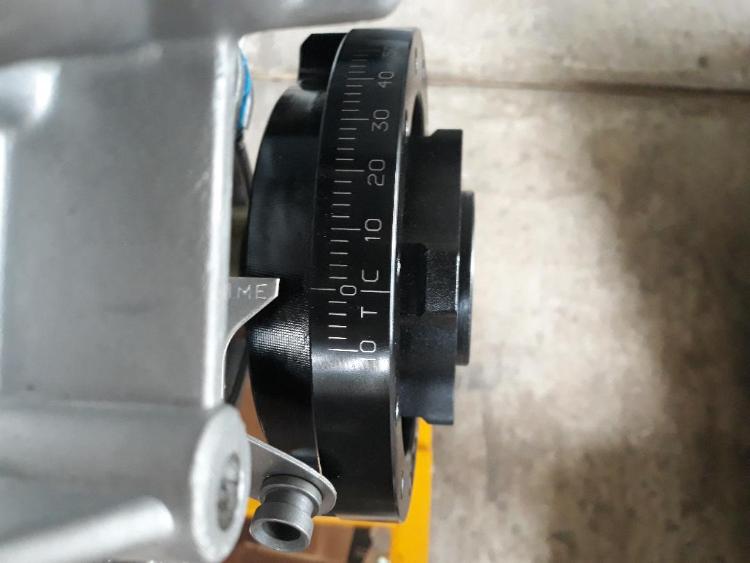 On the fel pro one piece gasket this is what the paper says that is confusing me. "On skirted engine blocks, those applications where the oil pan mating surfaces are all on the same plane, the oil pan gasket should be installed dry with no chemical adhesives or supplementary sealants. Non skirted engines, those engines where the oil pan side rails and the end seal surfaces are not on the same plane, require the use of a small amount of RTV sealant applied to each of the 4 corners on the block side of the gasket." The confusing part is my 292 Y8 is a skirted block, the crankshaft sits above the oil pan rail. Windsor small blocks are not skirted blocks as the oil pan rail bisects the center of the crankshaft. But the way Fel Pro is describing it makes it sound like they are calling the Windsor a skirted block and doesnt need any RTV in the corners. So I need to email Fel Pro and get clarification cause it sounds like they want me to install this dry but I hate to install it dry and it leaks on me cause they explained it horribly in a contradictory way. On the bolts they will be primered and painted in Eastwoods 2K epoxy primer and epoxy Dark Ford Corporate blue. The oil pan is the only spot I am unsure about cause I dont want bare metal under the pan rail stiffeners being able to rust but I also dont want to paint the bolts separate as the paint will come off when tightening in place. Ideally it would be best to paint assembled but I also dont want to get paint on the Fel Pro one piece rubber gasket.
"Old Blue" - '56 Fairlane Town Sedan - 292-4V, Ford-O-Matic transmission, 3.22:1
'63 Belair 2dr sdn - 283-4V, Powerglide transmission, 4.56:1 '78 Cougar XR7 - 351-2V, FMX transmission, 2.75:1 9inch "Bruno" - '82 F150 Flareside - 302-2V, C6 transmission, 2.75:1 9inch, 31x10.50-15 BFG KO2 |
|
Administrator
|
I'm reading the instructions differently. I think when they say "On skirted engine blocks, those applications where the oil pan mating surfaces are all on the same plane" they are including the timing cover. And on a Windsor the pan has a big dip in it to accommodate the timing cover. That tells me the Windsor is "non-skirted" and you'll need the "small amount of RTV" in the four corners.
Speaking of the pan, that came out amazingly clean.  But on the bolts into the engine for the water pump, I always use some kind of sealant to protect the bolts from corrosion. Jim has gotten me using Loctite PST for that.
Gary, AKA "Gary fellow": Profile
Dad's: '81 F150 Ranger XLT 4x4: Down for restomod: Full-roller "stroked 351M" w/Trick Flow heads & intake, EEC-V SEFI/E4OD/3.50 gears w/Kevlar clutches
|
See the more I read it it sounds like now it means if the oil pan is flat all around without the hump as you said. Its just vague some what cause the front and back are on the same plane its just where the crank is its not on the same plane. Ah you mean for sealing the coolant. I have to double check with my light I dont think on this E1 block goes into coolant but if it does I am using ARP thread sealer on the threads and ARP bolt assembly lube on the under side of the bolt head. Thats how I did the lower head bolts while the upper head bolts being blind holes just got the ARP bolt assembly lube on the threads and the under side of the bolt head. The pan did come out way better than I thought. Only thing I am not too happy with is in the corners by the front and rear arch I couldnt get the wire brush wheel in there to clean. Im going to see if I can scrape that paint off with my pick set I have at work but if not I dont think it will be that noticeable with the pan rail stiffener right in the same area.
"Old Blue" - '56 Fairlane Town Sedan - 292-4V, Ford-O-Matic transmission, 3.22:1
'63 Belair 2dr sdn - 283-4V, Powerglide transmission, 4.56:1 '78 Cougar XR7 - 351-2V, FMX transmission, 2.75:1 9inch "Bruno" - '82 F150 Flareside - 302-2V, C6 transmission, 2.75:1 9inch, 31x10.50-15 BFG KO2 |
|
Administrator
|
Yes, I think the difference is a pan that is flat all the way around vs those with a divot for the crank. Flat doesn't need the RTV, but with a divot there's the joint that needs the RTV.
As for the bolts, if you are coating their threads then that should work well.
Gary, AKA "Gary fellow": Profile
Dad's: '81 F150 Ranger XLT 4x4: Down for restomod: Full-roller "stroked 351M" w/Trick Flow heads & intake, EEC-V SEFI/E4OD/3.50 gears w/Kevlar clutches
|
Yep, the ARP thread sealer is a pfte I think it said teflon based paste for automotive applications for sealing fittings for gasoline, oil, and coolant. I use it on all pipe fittings be it fuel, oil, or coolant and it works great. The only thing I dont have is I cant find my old bottle of antiseize compound which I am sure after 15 years that stuff is probably no good anyways but I need to get antiseize for all the bolts screwing into aluminum. I have to check and see if the ARP thread lubricant will work in the place of antiseize as I am unsure but I know I will need it for the very least the spark plug threads.
"Old Blue" - '56 Fairlane Town Sedan - 292-4V, Ford-O-Matic transmission, 3.22:1
'63 Belair 2dr sdn - 283-4V, Powerglide transmission, 4.56:1 '78 Cougar XR7 - 351-2V, FMX transmission, 2.75:1 9inch "Bruno" - '82 F150 Flareside - 302-2V, C6 transmission, 2.75:1 9inch, 31x10.50-15 BFG KO2 |
|
Administrator
|
Check out Loctite PST, aka 567. The writeup says "Henkel Loctite 567 Thread Sealant is a high viscosity, low strength acrylic instant sealant for tapered and straight fittings. Its high lubricating properties prevent galling on stainless steel, aluminum and all other metal pipe threads and fittings."
Gary, AKA "Gary fellow": Profile
Dad's: '81 F150 Ranger XLT 4x4: Down for restomod: Full-roller "stroked 351M" w/Trick Flow heads & intake, EEC-V SEFI/E4OD/3.50 gears w/Kevlar clutches
|
|
This post was updated on .
In reply to this post by Rusty_S85
Got a email from ARP, they offered to replace the incorrect bolts at no cost. Normally they said they request the incorrect ones back to put back in circulation as a out right trade but was told due to how few I need that they will wave that. Im going to offer sending them back cause I am thinking of having them send me two of the longer bolts I have that do work but have them a little longer to give me more thread engagement.
Right now I am in the parts and illustration guide trying to get the lengths they list but there just isnt enough bolts listed for the timing cover in the guide which is mind boggling. ~Update~ Well I did not request those bolts I have circled in orange I am going to attempt to use them mainly cause I cant get a clear measurement to the block so I can figure up how long the bolt would have to be for a min of 5/16" thread engagement. Sitting the bolt in place with the washer my caliper is indicating the two bolts have 13/64" and 15/64" thread engagement. I am hopeful this is enough thread engagement for proper clamping as these two are bolts that clamp at the coolant port through the timing cover. Bolts I requested how ever from my figuring is as follows. 5/16"-18 x 2.00" x4 (these are the timing cover to block bolts at the crankshaft) 5/16"-18 x 1.50" x3 (these are the three water pump to timing cover bolts) 5/16"-18 x 2.50" x1 (this is the remaining water pump to timing cover bolt) 5/16"-18 x 5.00" x1 (this was initially 4.75" but I bumped it up to 5" as I believe the alternator tensioner bracket is 1/4" thick which would bring me back down to 4.75" then the washer bringing me just below 4.75" which would still have me with more than 5/16" thread engagement) If those two bolts from the water pump to the block doesnt appear to work I will get a better measurement and then just buy those bolts. Long as ARP makes majority of these errors right I dont mind buying a pack of 5 of just one size. I will have to buy some for my alternator to block bracket anyways since they will be more noticeable without the airpump.
"Old Blue" - '56 Fairlane Town Sedan - 292-4V, Ford-O-Matic transmission, 3.22:1
'63 Belair 2dr sdn - 283-4V, Powerglide transmission, 4.56:1 '78 Cougar XR7 - 351-2V, FMX transmission, 2.75:1 9inch "Bruno" - '82 F150 Flareside - 302-2V, C6 transmission, 2.75:1 9inch, 31x10.50-15 BFG KO2 |
| Edit this page |

