Fuel Injection upgrade
I dont think I will really need sealant on the aluminum components. I would have to double check my intake manifold how ever when I get to that stage. I dont know if the Performer intake I bought has blind holes or not for the thermostat. But I will keep that in mind how ever. I need to make sure on this cause if I ever have to take this engine apart I dont want to be destroying threads in aluminum castings because I didnt put lubricant on the threads during installation.
"Old Blue" - '56 Fairlane Town Sedan - 292-4V, Ford-O-Matic transmission, 3.22:1
'63 Belair 2dr sdn - 283-4V, Powerglide transmission, 4.56:1 '78 Cougar XR7 - 351-2V, FMX transmission, 2.75:1 9inch "Bruno" - '82 F150 Flareside - 302-2V, C6 transmission, 2.75:1 9inch, 31x10.50-15 BFG KO2 |
|
Administrator
|
That's the issue. You don't want to destroy anything taking it apart. And it is so easy to do that on water pumps.
Gary, AKA "Gary fellow": Profile
Dad's: '81 F150 Ranger XLT 4x4: Down for restomod: Full-roller "stroked 351M" w/Trick Flow heads & intake, EEC-V SEFI/E4OD/3.50 gears w/Kevlar clutches
|
Correct, which is why I wont be using any kind of thread locker on them. Its a big reason why I am having ARP send me longer bolts cause I want as much thread engagement as I can get. Only area I am going to attempt to use what came in the kit is the two orange circled bolts. Im hopeful that 13/64" and 15/64" thread engagement is enough not to pose a risk of stripping out when tightening to spec. OE spec is 12 - 18 ft lbs and ARP states 24 ft lbs for their 5/16" 180k psi bolts. I know 24 ft lbs is not a whole lot but it is something I will have to ponder on those two orange bolts as I know the general rule of thumb is to have thread engagement of at least the thickness of the bolt.
"Old Blue" - '56 Fairlane Town Sedan - 292-4V, Ford-O-Matic transmission, 3.22:1
'63 Belair 2dr sdn - 283-4V, Powerglide transmission, 4.56:1 '78 Cougar XR7 - 351-2V, FMX transmission, 2.75:1 9inch "Bruno" - '82 F150 Flareside - 302-2V, C6 transmission, 2.75:1 9inch, 31x10.50-15 BFG KO2 |
|
Administrator
|
This isn't a thread locker, even though it's made by Loctite.
It's a Pipe Sealant with Teflon meant to be used in the chemical and refining industries, where you find a lot of pressure, heat, corrosive or flammable chemicals and stainless steel threads that like to gall and weld themselves together. You're right on thread engagement. 24 lb/ft may be fine for ARP's fastener threads, but the threads they're going into might not be up to the task. Good luck with your build! 
Jim,
Lil'Red is a '87 F250 HD, 4.10's, 1356 4x4, Zf-5, 3G, PMGR, Saginaw PS, desmogged with a Holley 80508 and Performer intake. Too much other stuff to mention. |
Yep I found that out on my cam. I torqued the 7/16 fine thread bolt to 50 ft lbs then tried 60ft lbs and the threads felt like they were pulling as it took less effort to turn the bolt then I stopped. Im hopeful it is still enough clamping force to hold it as I do have blue thread locker on it since its fine threads. I dont see how ARP can state to use 70 ft lbs on that bolt. For theses I will just use the OE spec for the torque on the timing cover and water pump to prevent further headache. Outside of the cam issue I had with the cam pin and the cam bolt that I am now letting ride everything has gone together nicely. Just waiting on the Manley pushrods I got so I can set the lifter preload rotate the engine and mark off the sweep pattern to make sure 6.40" is where I want it then I can throw the intake on and hose the whole assembly off with brake clean and prep it for 2k urethane primer and paint.
"Old Blue" - '56 Fairlane Town Sedan - 292-4V, Ford-O-Matic transmission, 3.22:1
'63 Belair 2dr sdn - 283-4V, Powerglide transmission, 4.56:1 '78 Cougar XR7 - 351-2V, FMX transmission, 2.75:1 9inch "Bruno" - '82 F150 Flareside - 302-2V, C6 transmission, 2.75:1 9inch, 31x10.50-15 BFG KO2 |
|
Not much to update on.
I got the bolt situation squared away after pulling the starting threads out of the block and the timing cover on two bolts that I thought had enough engagement for 15 ft/lbs. I sourced longer ARP bolts and was able to hit 15 ft/lbs easily as I removed the washer from each of those bolts and was able to hit 15 ft/lbs. I also sourced a pack of 1" long 3/8 bolts for use on the heads for mounting my alternator bracket as well as fuel pump block off plate. I how ever found out two of the mounting points on the passenger side head are 7/16" bolts and not sure if my alternator bracket mounts using those two or not. I also wont know till I get my power steering pump bracket mounted but I think I can use the 3/8" x 1" bolt for mounting the support bracket for my power steering pump to water pump. I got the chrome Ford oval block off plate mounted in place with a dry paper felpro gasket, Im thinking of pulling it off when it comes time to paint and leave the chrome plate bare. I was thinking of painting it with the rest of the engine as I wont be able to polish it but I am hopeful with me driving the truck daily the heat would keep the chrome from rusting. I also sourced off ebay a new oil pressure sending unit log that threads into the block, sadly I couldnt source a NOS ford unit but was able to source a proper 4 1/2" long unit made out of stainless steel the ebay ad stated for $15 with free shipping. I dont think I will polish it but will see if there is a way I can verify it is stainless steel and not a zinc coated steel piece like the shorter 3" units I found were. This will be installed after painting how ever as I will install a 1/4 npt plug in the oil port for painting. Pushrods I am still waiting on, Jegs hasnt emailed me an update so I assume I am still scheduled to have the Manley swedged end pushrods on Oct 29. When looking at the product page on jegs site it also states to ship directly from the manufacturer on Oct 29. Once I get them I can set the 0.050" pre load and get my aluminum performer intake out drill and tap the marked boss for my sniper temp sensor and install the intake manifold and I am ready to start cleaning the wd40 off and prep for paint. Im hopeful the wd40 washes off the cast iron block good cause it looks to be soaked into the cast iron good as the cast iron actually looks to be painted black. Im going to try carb cleaner to hose it all off but if not I have some Eastwood Paint Pre in a quart bottle that I will put in my sure shot sprayer and try and keep it off the gasket material including the rubber oil pan gasket as much as possible since its from what I hear a acetone mix to remove grease, oil and wax for prepping the surface for paint. I got two new cans of engine primer grey and two new cans of Ford dark Corporate blue to do the whole assembly from oil pan to intake manifold. Once done there I will install the valve covers and install the sniper and start working on plumbing up the hardline down to the mechanical fuel pump block off plate. Im still trying to decide how I want to attach the hardline, Ive been looking at hard line clips but couldnt find anything that I could bend at a 90 degree angle with a 3/8" bolt opening so I can just simply bolt it down through one of the fuel pump bolts. I also did a little reading and it looks like the F1SE-BB blocks were designed for use on the Tbird, some sources stated supercharged Tbirds and that they had considerably thicker cylinder walls. I know with 0.040" over bore it looks like the cylinder walls on my block were still quite beefy. I also looked at the date code and it looks like the block was cast March 11, 1993. I could post some current photos but there really isnt much difference now than in the last photos I posted outside of a few bolts added in or the block off plate being mounted. I will update with photos once I get more of the assembly together.
"Old Blue" - '56 Fairlane Town Sedan - 292-4V, Ford-O-Matic transmission, 3.22:1
'63 Belair 2dr sdn - 283-4V, Powerglide transmission, 4.56:1 '78 Cougar XR7 - 351-2V, FMX transmission, 2.75:1 9inch "Bruno" - '82 F150 Flareside - 302-2V, C6 transmission, 2.75:1 9inch, 31x10.50-15 BFG KO2 |
|
Pushrods are still not in, called jegs up to get on their rear about it and there is nothing they can do about it outside of trying to source me another pushrod in a different brand of the same specs. I cant do that cause there is no other brands of pushrods in 6.40" length with 0.120" wall thickness which is why I bought theses. Customer service at jegs stated that they are told by Manley that the pushrods will ship form their warehouse on Oct 31. Should take a few days for me to get it so I should get it by Nov 6 hopefully.
Considering that I am wary of if the weather will remain favorable for painting I went ahead and masked off what I could and primered and painted the engine now as its painting range is 60 - 80 degrees and less than 50% humidity. I think by the time the pushrods get here it will be below 60 degrees. I also installed the intake manifold but only lightly as I want to let the ultra black silicone on the china walls to fully cure before I torque to spec of 18 ft/lbs which is what I find from a Ford Racing document for intake manifold installation with aluminum heads. Using a 1/4" drive ratchet and going over the bolts multiple times to lightly seat the intake to the silicone I dont think I even got near 18 ft/lbs as I really didnt put any force on the 1/4" drive ratchet. I also finger tight installed the sniper just to try and get an idea of how I may route the fuel line seeing as how close it will be to the coil. I really need to source a new DSII coil and a new coil bracket so I can mount it and get the proper mock up. I masked off the Intake manifold and the thermostat housing and shot two coats of Eastwood 2K Urethane engine primer 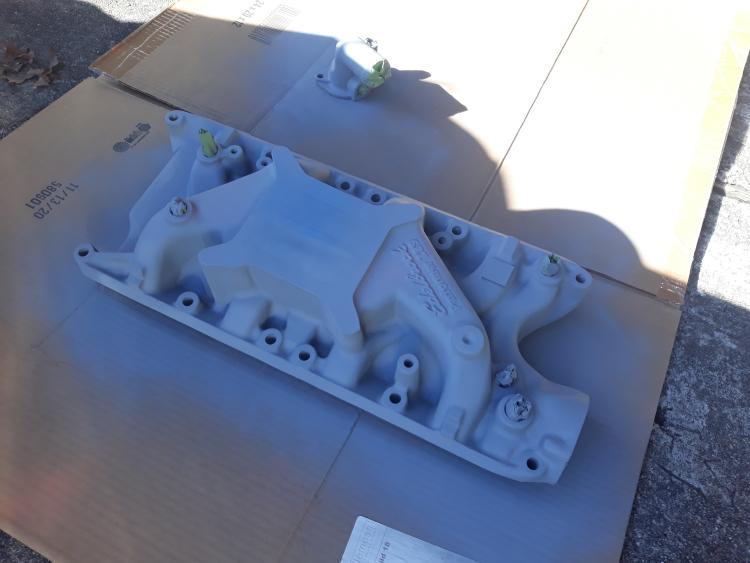 I also applied 2 coats of Eastwood 2K Urethane engine primer on the engine assembly as well after I hosed it off with a whole can of carb clean to remove the wd40 that was sprayed to prevent rust till I was ready to paint. 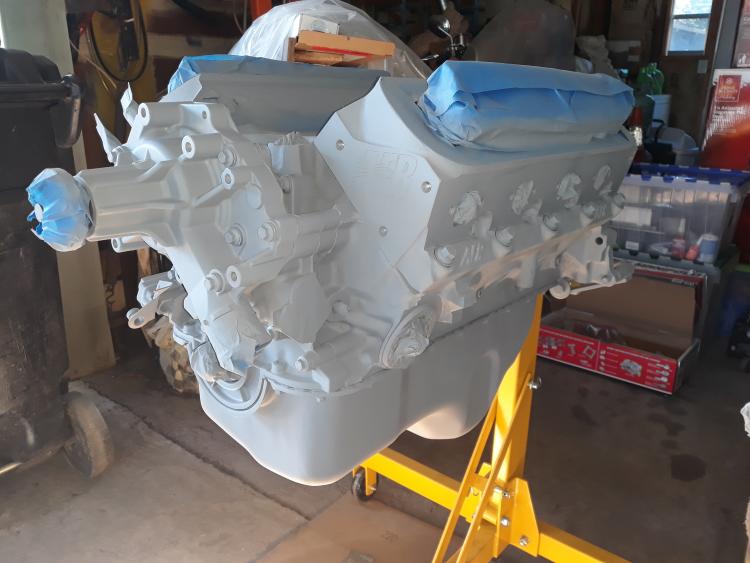 I also applied two coats of Eastwood 2K Urethane Ford Corporate Blue engine paint on the intake manifold and thermostat housing. The second opening in the coolant port next to the heater hose fitting port, I drilled it out and tapped it for the sniper temp sensor so it will fit properly with the temp sensor tip sitting in coolant flow unlike with an adapter bushing which would take it out of the coolant flow. 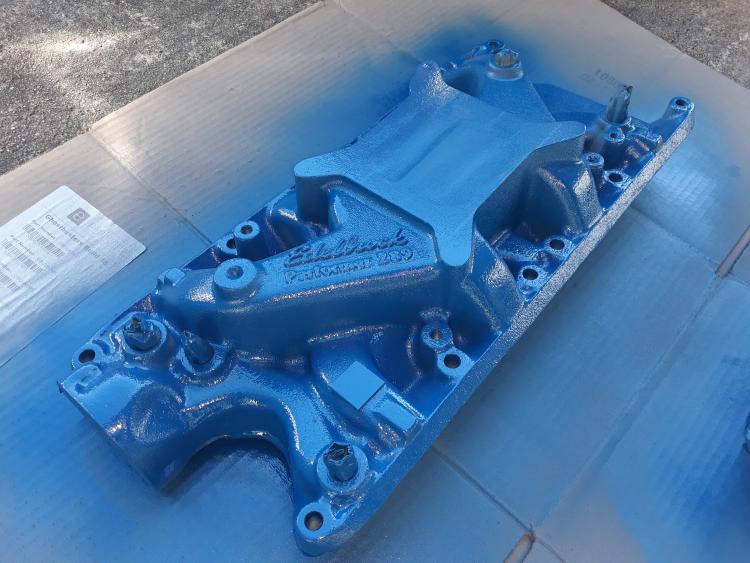 And the block 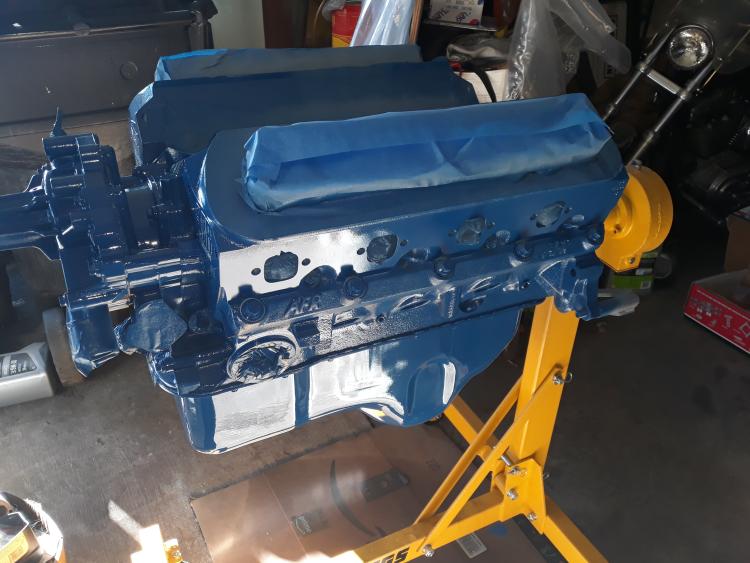 This was taken today after I removed all the masking from the engine, intake manifold, and thermostat housing. I have the Felpro intake gaskets sitting in place in this photo as well as reinstallation of the chrome Ford fuel pump block off plate. 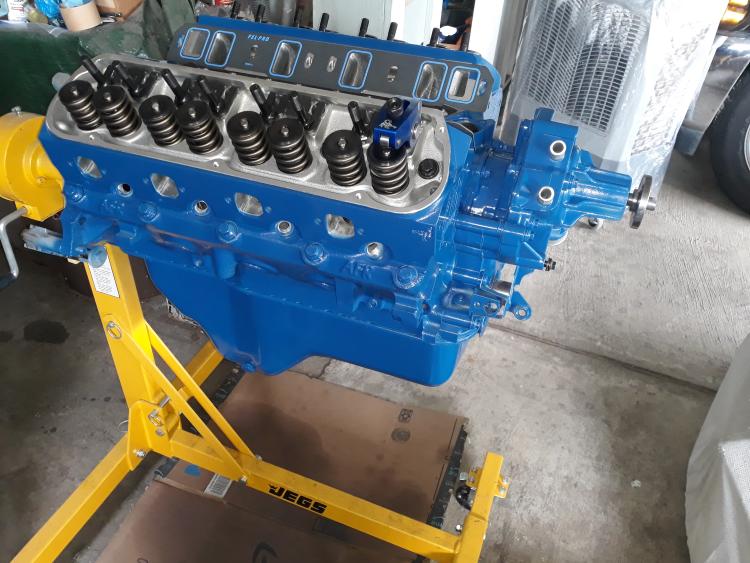 This was after spending almost two hours trying to find a spacer as my harmonic balancer tool I got through Matco at work didnt have the spacer so I couldnt get to the nut to install the balancer. I used a couple 1" shank balljoint nuts to act as spacers to install my Powerbond SFI 18.1 approved 50oz imbalance race balancer. It was more money than the street one but when I looked on Rockauto it was actually as cheap as the street version from Summit. I figured the SFI approved balancer should be over kill which is what I am going for. I also have many of the items just loosely installed such as coil bolt and the distributor hold down stud. I will be pulling them out for final assembly and applying some ARP assembly lube on the threads. 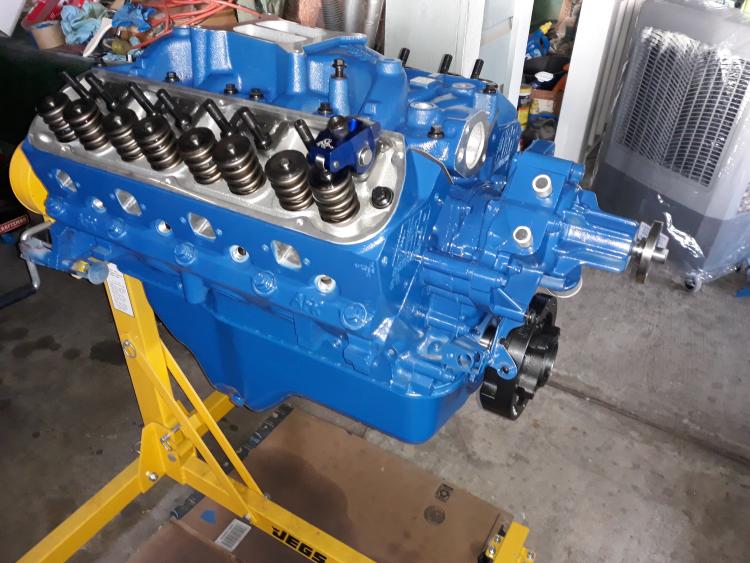 Close up showing the reason why I went with this style of balancer, the easy to read laser etched timing mark which goes to 50* btdc and 90* btdc which if I ever decide to go to full timing control through the sniper it will make life easy for me as you have to install the distributor pointed to #1 cylinder terminal at 50* btdc to sync it. 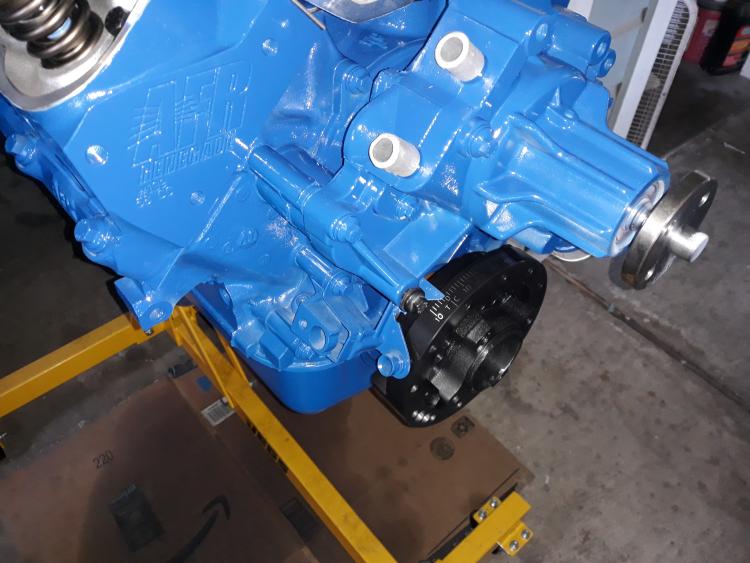 And the final photo I took today which is with the Ford Racing valve cover set in place with one ARP polished stainless steel bolt in the middle along with the 1" Holley Phenolic spacer to take place of the OE EGR plate, and the 1/4" thick heat insulating gasket that would go between the carb and the EGR plate. This in theory should put the Sniper at or very close to OE heigth to ensure proper throttle cable geometry. I wont know till I actually get the engine set in the truck and mock it all up. I also might move the heat insulating gasket to the intake manifold then place the phenolic plastic spacer atop it. I do know I want to trim the paper gasket how ever as its a dual pattern generic gasket and I dont like the gasket sticking out like it is. 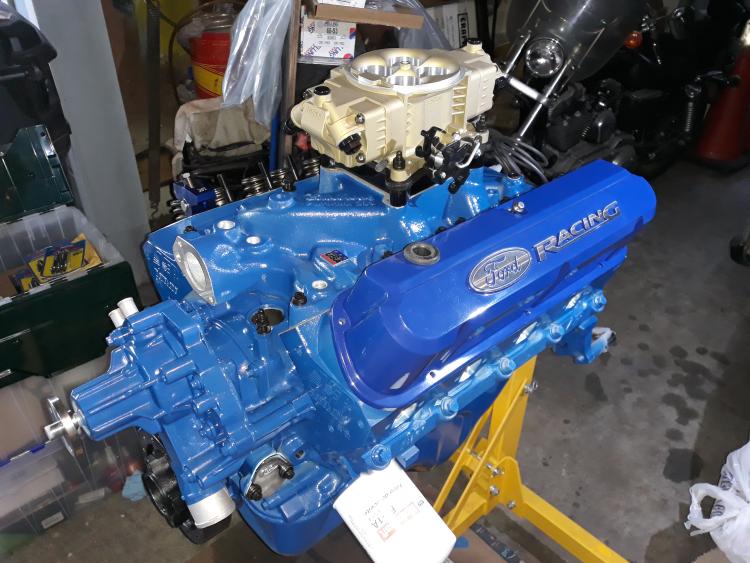 I know in some areas the paint is a little thin but its really not that noticeable unless you have a bright light. Plus a lot of the engine will not be seen once installed and you have things such as alternator brackets, powersteering brackets, ac compressor brackets, headers, etc all bolted to the motor. Most of what is thin will be obscured. In the mean time while waiting for the pushrods so I can install the valve covers and be done with that I am thinking about seeing if the engine builder I know at work if he will be running his bead blaster this week and have him bead blast my two crank pullies and the water pump pulley as well as the alternator bracket I modified by chopping off the air pump ears and I am thinking about pulling the A/C compressor bracket and powersteering support brackets off. I am thinking about getting Eastwood`s 2K Urethane engine paint but get it in black so I can coat the brackets in black. Either that or just get plain under hood black for a more OE satin black and spray it with that. For the thermostat housing I wont be installing that till I get my thermostat in, I had a NOS 195*F motorcraft thermostat but I bought it 2 years ago when I started getting the parts for this project and I dont know where it got moved to. Not only that but the water pump I have is a GMP Heavy Duty water pump which is supposedly high volume. No mention of if you need a high volume thermostat and my email from 3 months ago to GMP customer service has never been answered on if I need a high volume thermostat. So I bought from Rockauto two Motorad 195*F high volume thermostats under their failsafe brand. These thermostats have a two chamber design where the first chamber functions as a normal thermostat and in a over heat condition the second chamber will open the thermostat more than usual where it will engage locking tangs to lock the thermostat open to prevent overheating. I know when thermostats fail they fail in the closed position usually as the wax pellet leaks out of the chamber and thus the thermostat stays closed. I rather have a thermostat that will in a over heat condition fail in the open position so I dont burn up this high dollar motor I am building. That thermostat should be here this week, along with a pair of motor mounts I got so I can bolt them up so I dont forget about them like I have twice already. From there I will be dropping the new distributor in to try and mock up how to route the 3/8" fuel hardline to clear the distributor as well as to clear the A/C compressor bracket. I still need to figure out how I plan on attaching the 3/8" fuel line to the block. I am thinking of using a 3/8" hardline clamp off the rear most fuel pump bolt to rigidly mount the hardline in place. Then for the hardline up atop the intake manifold I do not know how I plan to mount it. I could mount it off the coil mount bolt but I have to get all the parts in place so I can figure it all out. I might have to see if I can get a different style fitting for the sniper as I do not know if I can bend the forward hardline short enough to clear the ignition coil. I also need to look at my truck and see how the oil pressure sender adapter is angled and I can thread my new stainless steel one in place. From there all I need is just the pushrods and I can dump a couple quarts of 30w break in oil and prime the oil system and check oil pressure and make sure every thing is oiling. I hope to have the motor at a point to install it in my truck spring 2022 but I dont know with the way how supplies and products are right now with everything out of stock or on extreme back order it might be longer. I still need to dig my headers out and mock them up to see if I want to have them ceramic coated in black or the zirconia color which would be a little more greyish tint than the holley gold. I also need to get in touch with that guy up in washington state with the sun machine and send him my new dorman distributor and let him work his magic on it recurving the advance for this build so I can get the most out of this build as well as hopefully be able to run regular grade gas without detonation with my 9.45:1 compression.
"Old Blue" - '56 Fairlane Town Sedan - 292-4V, Ford-O-Matic transmission, 3.22:1
'63 Belair 2dr sdn - 283-4V, Powerglide transmission, 4.56:1 '78 Cougar XR7 - 351-2V, FMX transmission, 2.75:1 9inch "Bruno" - '82 F150 Flareside - 302-2V, C6 transmission, 2.75:1 9inch, 31x10.50-15 BFG KO2 |
|
Administrator
|
Engine looks fantastic! Hopefully it will run as good as it looks.
Bill AKA "LOBO" Profile
"Getting old is inevitable, growing up is optional" Darth Vader 1986 F350 460 converted to MAF/SEFI, E4OD 12X3 1/2 rear brakes, traction loc 3:55 gear, 160 amp 3G alternator Wife's 2011 Flex Limited Daily Driver 2009 Flex Limited with factory tow package Project car 1986 Chrysler LeBaron convertible 2.2L Turbo II, modified A413 |
|
Administrator
|
I agree, it looks fantastic! Well done!
 And I like the idea of the brackets, pulleys, etc being black. Maybe the coil as well? Shame that the supply chain has gotten so clogged up and you can't get the push rods. And from what I'm seeing it'll be quite some time before things get back to normal. Still, this will give you time to do the other things, like the brackets, fuel line routing, etc. It'll be great when you are done. 
Gary, AKA "Gary fellow": Profile
Dad's: '81 F150 Ranger XLT 4x4: Down for restomod: Full-roller "stroked 351M" w/Trick Flow heads & intake, EEC-V SEFI/E4OD/3.50 gears w/Kevlar clutches
|
Hope so too. Based off the so called dyno specs for the 302 that blueprint sells I could very well make between 375 - 400 hp. They rate theirs at 380 hp I think but they are using in house heads that flow 9 cfm less than my heads at the same lift but using 2.02"/1.60" valves with a 60cc chamber where my CNC machined AFRs are running 1.95"/1.60" valves with a 58cc chamber. The cam is a little smaller than what blueprint offers but that shouldnt hinder performance that much considering the extra flow my heads have over theirs. The coil bracket will be black along with the coil itself, the coil will be a OE DSII coil as I am retaining DSII for now. I have been thinking about tossing the 1/4" thick heat isolator gasket to try and drop the throttle body down some the more I look at it the more I think its a little too high. I also didnt get to torque the intake manifold down to 20ft lbs, I need to do it though so I can check the ultra black silicone on the china walls and make sure it is squishing the dried silicone when I torque it down. My paperwork for the intake states to run a 1/4" tall bead and I dont think I was at 1/4" thick. At least now if I have to redo it the only thing I would be out is the some $20 for the fel pro intake gaskets and just clean off the silicone and redo it. I did buy two heater hose fittings for the intake manifold off amazon, I was looking at a black edelbrock fitting to go with the black arp bolts and the black pipe plugs in the intake. But I just couldnt justify spending $35 for just one fitting. So I bought two off amazon an AC Delco Professional brand one that looks OE looking at least OE looking for Chevrolet not so much for Ford but its a steel fitting that I will have to paint to prevent rust. 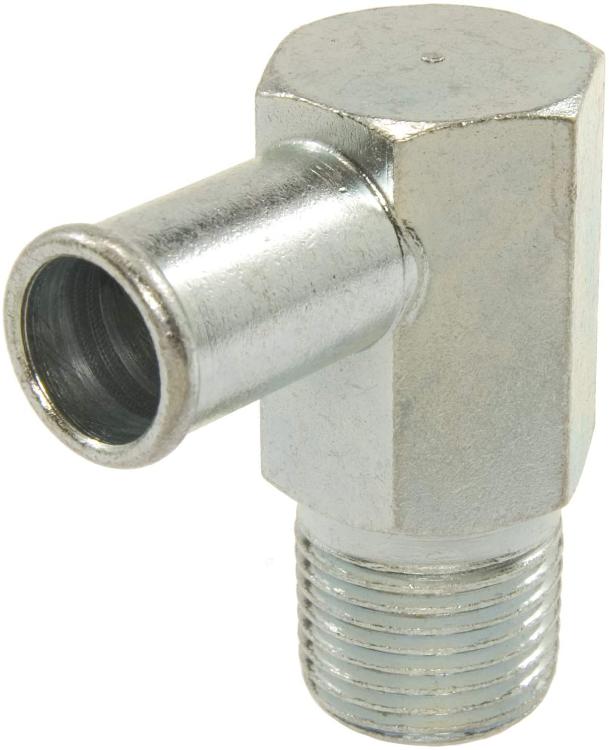 Then I picked up this one which is clear anodized aluminum, this is the one I want to use but if it hits the intake manifold then I will use the AC Delco one. If I dont use the AC Delco one I can take it to work and sell it to a customer on another job and get my money back so its no loss. 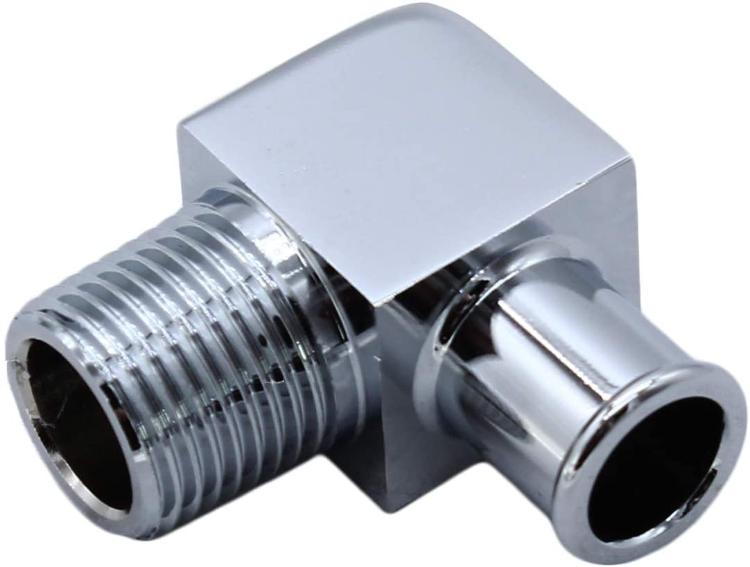 I tried looking up a NOS factory one but the number I got from the parts book kept bringing up 45* elbows for 1950s and 1960s Ford engines which I know is not correct, the OE one on my truck is a 90* fitting so my only other option was a stainless steel one that looked similar to the second image above but they are out of stock till December. I should get these fittings by this weekend so I can install it and then start taking measurements and deciding how I want to proceed as far as the spacers goes and the routing of the stainless steel hardline. I got enough coiled hardline I can start making some but I am still trying to source a new coil bracket but all I am finding is generic replacements not one like my OE one that has the raised platform for the noise capacitor
"Old Blue" - '56 Fairlane Town Sedan - 292-4V, Ford-O-Matic transmission, 3.22:1
'63 Belair 2dr sdn - 283-4V, Powerglide transmission, 4.56:1 '78 Cougar XR7 - 351-2V, FMX transmission, 2.75:1 9inch "Bruno" - '82 F150 Flareside - 302-2V, C6 transmission, 2.75:1 9inch, 31x10.50-15 BFG KO2 |
|
Administrator
|
The top hose fitting looks OE to me, even for a Ford. The 2nd one is prettier, but if you are going to paint it anyway I think the top one would be my pick.
On the china wall seal, look it over VERY closely. As you know, it'll be far easier to redo it now than when you've installed the engine and find a leak. And leak? Those things leak badly! I think before I torqued it down I'd go poking on the RTV. See if it has adhered to the intake. If not, I'd redo it as you want it stuck to both top and bottom, not just the bottom and touching the top.
Gary, AKA "Gary fellow": Profile
Dad's: '81 F150 Ranger XLT 4x4: Down for restomod: Full-roller "stroked 351M" w/Trick Flow heads & intake, EEC-V SEFI/E4OD/3.50 gears w/Kevlar clutches
|
Only the top one would be painted if I use it cause its bare steel and I know it will rust. The clear anodized aluminum one if I use that it will be left as is. Thats the thing I am afraid of I just got in from going over the intake at first 10 ft lbs and then 20ft lbs and its hard to tell if the silicone compressed or not. What I did was ran the bead then set the intake down and lightly snug the bolts down to get the intake to touch the silicone then let cure over night before torquing to spec. The rear I could see squeezed out a good amount but I didnt see no squeeze out on the front like I did on the back but that doesnt mean anything. Not sure how I could go about checking it without damaging it and forcing it to have to be redone. Both front and rear were done with silicone at the same height so they should both be sealed. I also rather fix it now if there is a problem cause sure it wouldnt be hard in the truck but you now have coolant that is going to pour out and get into the crank case and its just less hassle now. Thats the only thing that sucks cause I put a thick bead, no thicker/thinner than I do at work and never had a problem with sealing. But then I saw the paperwork and it said 1/4" tall bead and I am like jesus I think my bead wasnt 1/4 inch unless I am thinking 5/16 inch and I actually had 1/4 inch.
"Old Blue" - '56 Fairlane Town Sedan - 292-4V, Ford-O-Matic transmission, 3.22:1
'63 Belair 2dr sdn - 283-4V, Powerglide transmission, 4.56:1 '78 Cougar XR7 - 351-2V, FMX transmission, 2.75:1 9inch "Bruno" - '82 F150 Flareside - 302-2V, C6 transmission, 2.75:1 9inch, 31x10.50-15 BFG KO2 |
|
I got my two heater hose fittings in today, I am going to use the anodized aluminum one as it matches in appearance very close to the raw stainless steel oil pressure sending unit extension.
The Anodized Aluminum fitting, I like the look as well as the low profile nature that will keep the heater hose low. 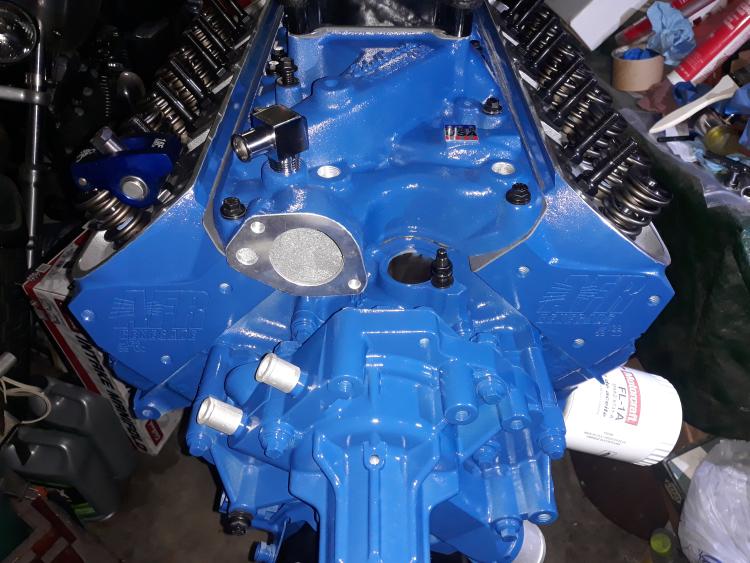 This is the AC Delco bare steel fitting which if I use it I will paint it the same as the rest of the motor 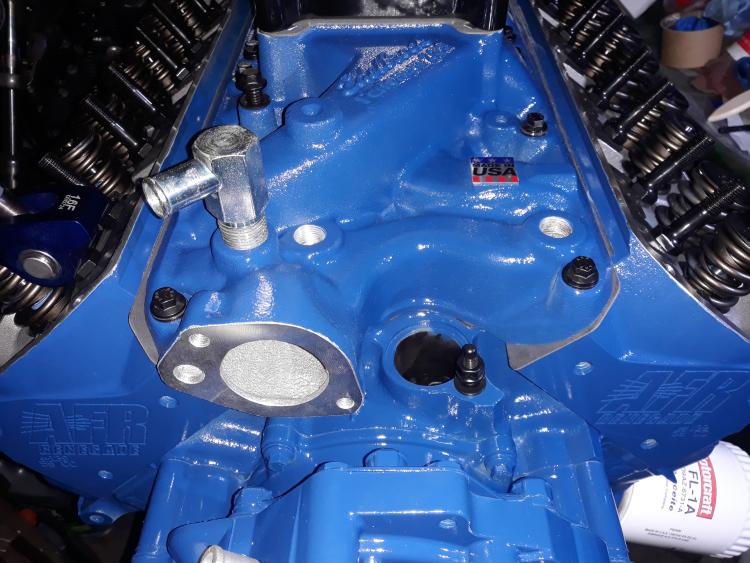 While the AC Delco one does look more OE looking it just doesnt look that good to me compared to the lower profile nature of the Anodized Aluminum fitting. Photo of the raw stainless steel 6" long oil pressure extension that I lightly threaded in. Will apply ARP thread sealer and tighten in place this weekend. 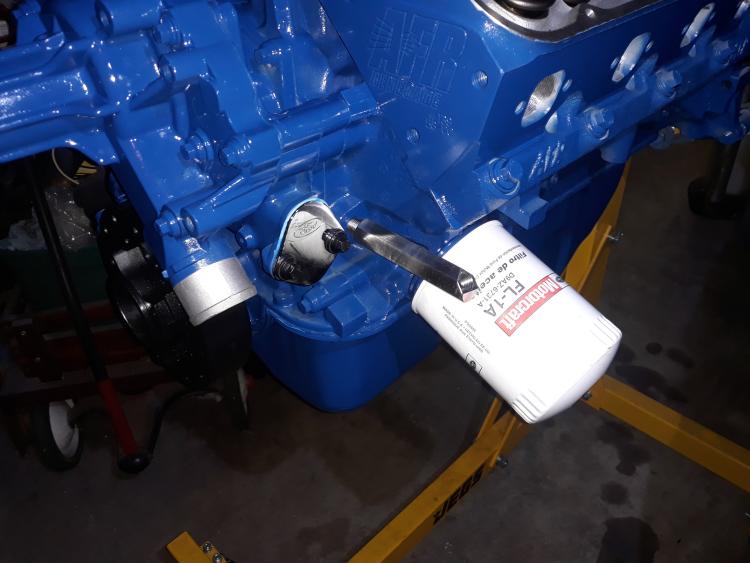 And this last photo is the NOS motorcraft temp sensor that I lightly threaded in as I was curious if it was the right size or if I would need a bushing. I lucked out as all fittings wont need a bushing and because I drilled and tapped the sniper temp sensor location the right size it too will not have a bushing and will have a more factory look. 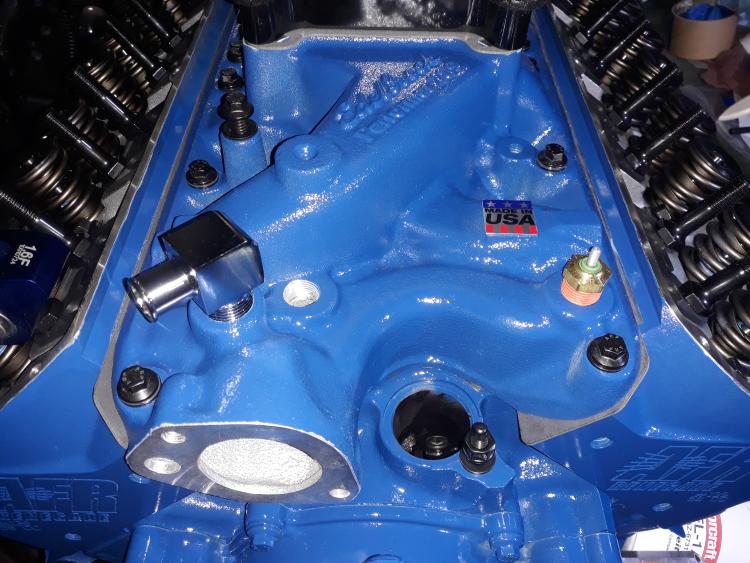 Im waiting how ever on my two engine mounts, transmission mount and high flow failsafe thermostat to come in so I can bolt the engine mounts on and install the thermostat and housing. I still am trying to decide what I want to do as far as hose clamps goes. Part of me wanted to run the spring clamps like late model OE vehicles use but not sure how well it will work on the water pump bypass. Like wise I havent even tried to see if I can find them in the radiator hose sizes. Today I ordered from rockauto cause it didnt show up the other day when I ordered the mounts and thermostat but it does now, they had a motorcraft oil pressure sending unit, part number doesnt match the one listed for my truck in the parts and illustration book which is D4AZ-9278-A where as the one I ordered from Rock Auto is E6ZF-9D290-CA. Im hopeful its a updated replacement and its not a simple on/off where my oil pressure gauge will just sit in the middle regardless of pressure. I know Ford brought sensors like that out after lots of people complained about low reading on the oil pressure gauge even though it was still with in normal range. But I wanted NOS and this was the cheapest priced one listed for my truck with gauge.
"Old Blue" - '56 Fairlane Town Sedan - 292-4V, Ford-O-Matic transmission, 3.22:1
'63 Belair 2dr sdn - 283-4V, Powerglide transmission, 4.56:1 '78 Cougar XR7 - 351-2V, FMX transmission, 2.75:1 9inch "Bruno" - '82 F150 Flareside - 302-2V, C6 transmission, 2.75:1 9inch, 31x10.50-15 BFG KO2 |
|
Administrator
|
I do like the lower hose fitting.
But is the ARP stuff really thread sealer? Or is it their lube? On the sending unit, I can't find the E6 # anywhere, so can't help you there. But it is looking good!
Gary, AKA "Gary fellow": Profile
Dad's: '81 F150 Ranger XLT 4x4: Down for restomod: Full-roller "stroked 351M" w/Trick Flow heads & intake, EEC-V SEFI/E4OD/3.50 gears w/Kevlar clutches
|
ARP has two, they have lube which I have in the bottle and they have thread sealer in a tube which I have also that I use for pipe plugs and any bolts that thread into coolant. I actually used it on the head bolts on the inside of the valve cover as all of those on this late model F1SE block go into coolant while the outside ones are blind. This is the liquid thread sealer. https://www.summitracing.com/parts/arp-100-9904 This is the thread lubricant https://www.summitracing.com/parts/arp-100-9910 Yep that number isnt in the book but on rockauto it also has SW1547B as the rockauto number and I see that number listed under the part number E4ZZ-9278-A which appears to fit 1988 E150/350 7.3L, 82/83 F150 230 I6, 80/87 E-F150/350 F(Super Duty) U150 8 cyl all, 88/ E150/350 4.9L, and 86/87 A 140 I4 and 171 I6. It is also all under the oil pressure gauge and not under the light.
"Old Blue" - '56 Fairlane Town Sedan - 292-4V, Ford-O-Matic transmission, 3.22:1
'63 Belair 2dr sdn - 283-4V, Powerglide transmission, 4.56:1 '78 Cougar XR7 - 351-2V, FMX transmission, 2.75:1 9inch "Bruno" - '82 F150 Flareside - 302-2V, C6 transmission, 2.75:1 9inch, 31x10.50-15 BFG KO2 |
|
Administrator
|
Thanks for the clarification. Hadn't seen the ARP sealer.
 As for the sender, that says the E-Series van didn't go to the new gauge & sending units in 88 when the F-Series did. 
Gary, AKA "Gary fellow": Profile
Dad's: '81 F150 Ranger XLT 4x4: Down for restomod: Full-roller "stroked 351M" w/Trick Flow heads & intake, EEC-V SEFI/E4OD/3.50 gears w/Kevlar clutches
|
The sealer I never heard off till some 8 years ago when I started at my current job and that stuff works great the only thing is its hard to prevent squeeze out when you install the fitting and its also hard to wipe up cause it likes to smear till you get it all wiped up. Yep but it also says for the I6`s the same sender was used on vans 88 and up. Its very confusing just like I have heard it go both ways with the later senders basically being an oil activated switch for the later models that above x psi the switch sends a steady resistance so the oil pressure gauge will read in the middle. Some people claim this was a real legit thing and ive seen some state it wasnt.
"Old Blue" - '56 Fairlane Town Sedan - 292-4V, Ford-O-Matic transmission, 3.22:1
'63 Belair 2dr sdn - 283-4V, Powerglide transmission, 4.56:1 '78 Cougar XR7 - 351-2V, FMX transmission, 2.75:1 9inch "Bruno" - '82 F150 Flareside - 302-2V, C6 transmission, 2.75:1 9inch, 31x10.50-15 BFG KO2 |
|
Administrator
|
See what you think of TSB 88-05-14.
Gary, AKA "Gary fellow": Profile
Dad's: '81 F150 Ranger XLT 4x4: Down for restomod: Full-roller "stroked 351M" w/Trick Flow heads & intake, EEC-V SEFI/E4OD/3.50 gears w/Kevlar clutches
|
So that is exactly what I have heard mentioned before that so many people complained about the oil pressure gauge reading on the low side of normal when they expect it to ride on the high side so the fix was a new sender that operates more like a on off switch like with an indiciator light that would put the pressure gauge in the middle to comfort the people. Looks like the sender they used is E6SZ-9278-A which is not the number of the sender that I ordered. It also seems like this fix only applies to the 87 and up trucks not the 80-86 truck. Hopefully it reads and works like a regular gauge sender and not the later on-off switch sender. This is only going to be a temporary setup till I can get Dakota Digital to offer a retro cluster for our trucks. I have plans to get a sniper to dakota digital module where my temp gauge will run off the sniper temp sensor, rpm will be off the sniper rpm signal, etc. I also want to use a module for air fuel ratio and fuel pressure that way I can have it throw a warning up on the dakota digital cluster to inform me when my O2 sensor fails by going full rich as well as warning me when the fuel pressure falls outside of the 55 to 65 psi pressure range. That way I can diagnosis my sniper on the road without the hand held. If I see no tach movement when cranking then I know the sniper has lost rpm signal for example and is why its not starting.
"Old Blue" - '56 Fairlane Town Sedan - 292-4V, Ford-O-Matic transmission, 3.22:1
'63 Belair 2dr sdn - 283-4V, Powerglide transmission, 4.56:1 '78 Cougar XR7 - 351-2V, FMX transmission, 2.75:1 9inch "Bruno" - '82 F150 Flareside - 302-2V, C6 transmission, 2.75:1 9inch, 31x10.50-15 BFG KO2 |
|
Administrator
|
Sounds like a good plan.

Gary, AKA "Gary fellow": Profile
Dad's: '81 F150 Ranger XLT 4x4: Down for restomod: Full-roller "stroked 351M" w/Trick Flow heads & intake, EEC-V SEFI/E4OD/3.50 gears w/Kevlar clutches
|
| Edit this page |

