Ferdinand - '85 Bronco 351W XLT "Phoenix" rebuild project...
|
Progress report:
Things are moving along pretty nicely (5 transmission bolt-ups later 🙃) (That's now 9 total) I did get the TC and new Flywheel indexed properly and it went very smoothly. I decided to unbolt all but the two lowest bell housing bolts and just backed them out to about the last 2 threads and that was enough space for the TC studs to clear the Flywheel. It went very smooth. I was so grateful!  Transmission is back in, driveshafts back together, T-case and tranny linkage done, cross-member & brackets installed, neutral safety switch, speedo cable and shift indicator wiring finished, power steering & fuel pumps back on, and Carb and spacer mounted. I’m hoping to get the alternator bracket figured out tomorrow and get to the core support, so I can hook coolant back up and test fire this sucker! I'm a pretty big fan of Carb spacers, but I haven't tried this one. We will see how it does: 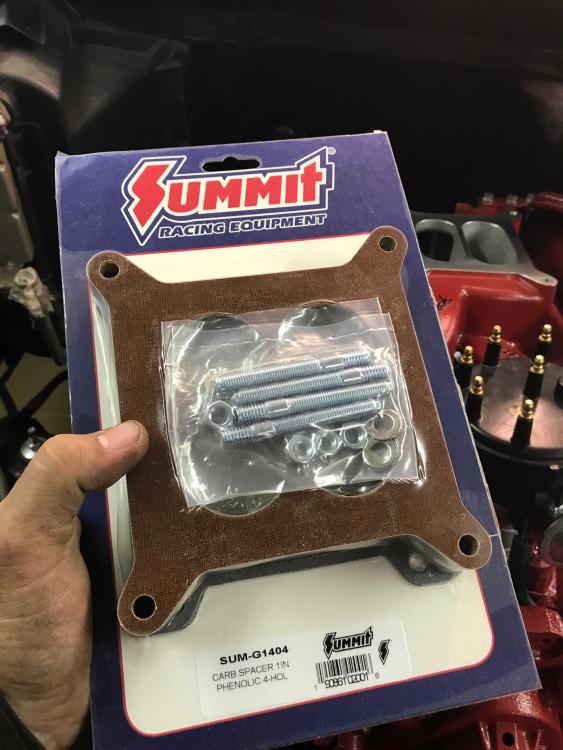 I am looking forward to trying out one of these High Torque starters. Supposed to way outperform factory equipment. I am also hoping for a little more space between my headers and the starter which I am thinking will lead to less heat-soak 🤞🏼. 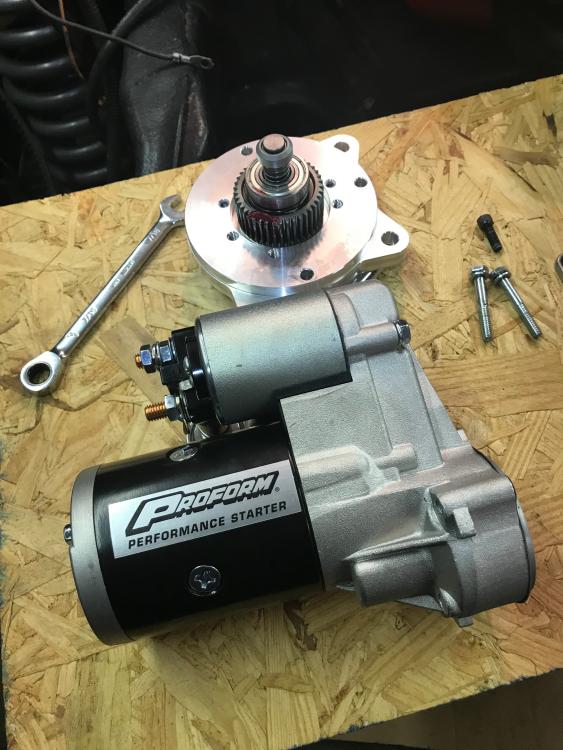 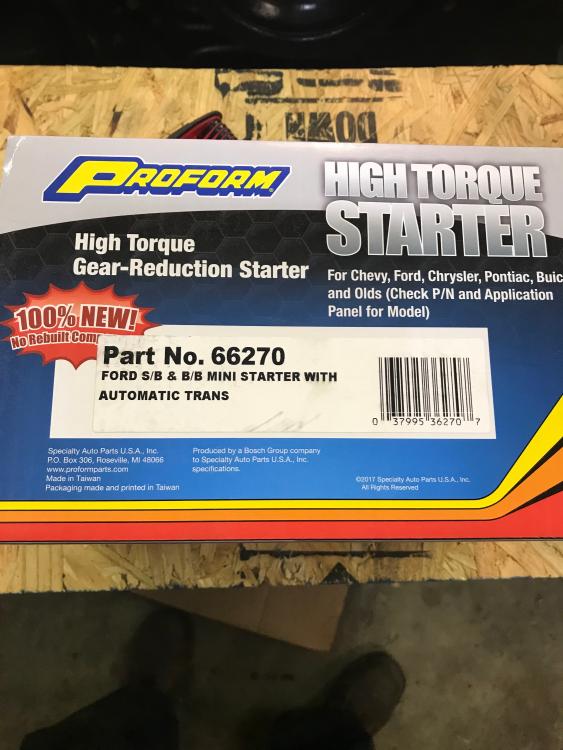 I’m still hung up on the alternator bracket. Not sure what to do between modifying the DNA kit or modifying Factory bracket. 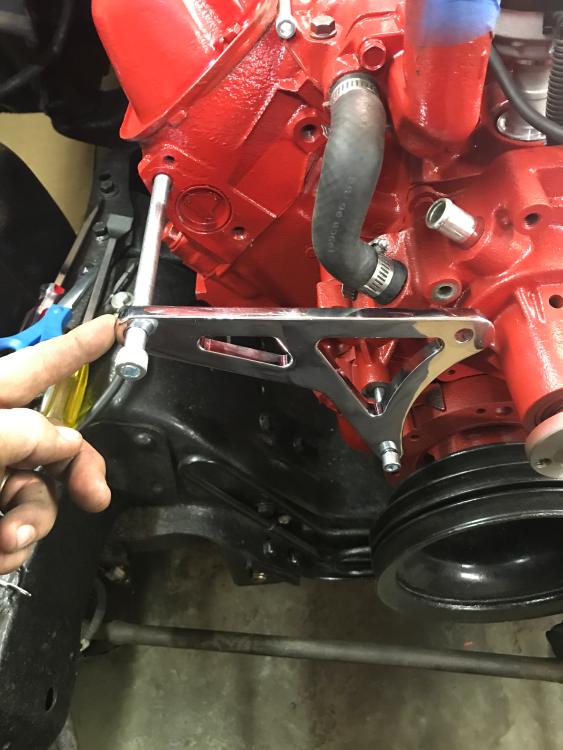 I just don't understand why the factory bracket crowds the bypass hose so much! You can see in the picture below that the holes don't line up. 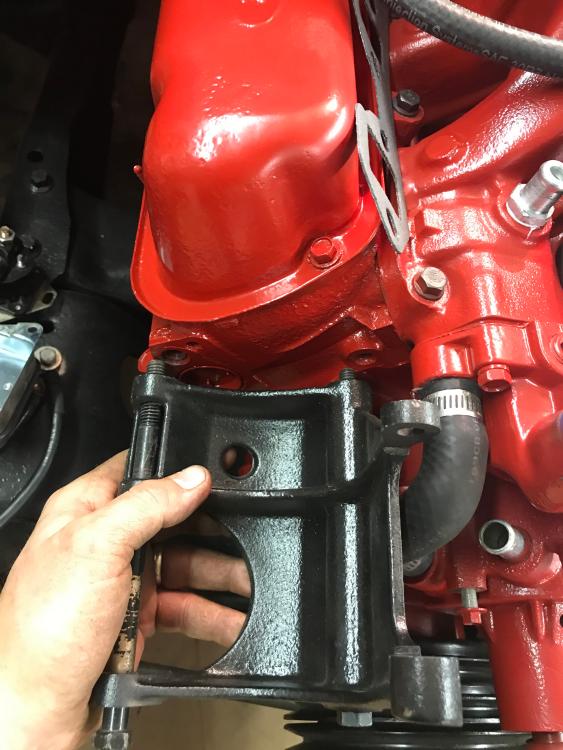
Jamie Helmick
'85 Bronco 351W HO, C6, 4X4, Full rebuild @ 51k original miles (fire), Edelbrock air gap intake & 600 cfm carb. w/elec. choke. 4" RC lift w/35's. Check the Projects Page if you're interested. |
|
In reply to this post by Ferdinand
Ya know, in hindsight, it's easy to see that it was a missing rear main seal. It was leaking so badly, it had to be a gaping hole like that. BUT...we were looking for a coolant leak, not an oil leak! In any case, at least it is cleared up now. Very happy for you. The guy that built my engine said he used some sort of Shellac on the coolant ports on the intake and cylinder heads. He told me that that was all he ever used, and all they do is build engines...mostly performance stuff.
1994 F150 4x2 Flareside. 5.0 w/MAF, 4R70W, stock.
1984 F150 4X2 Flareside. Mild 302 w/ 5spd. Sold. 1980 F150 4X4 Flareside. 300i6 w/ 5spd. Sold in 2021. 1980 F100 4X2 Flareside. 351w/2bbl w/NP435. Sold in 1995 |
Re: Ferdinand - '85 Bronco 351W XLT "Phoenix" rebuild project...
|
Administrator
|
In reply to this post by Ferdinand
You are SO CLOSE to firing it! I'd have been dreaming about it all night.
I think the phenolic spacer is a good idea. Get a bunch of heat away from the carb. And that's a serious looking starter. I assume that in the first pic of it the drive has been unbolted from the rear of the starter? But I'm lost on the alternator bracket. What mod's does the DNA one need? It looks way better than the factory one, and it doesn't crowd the bypass hose. However, might you have the factory one on backwards? Might the ears for the alternator go down? And, wouldn't that un-crowd the bypass hose?
Gary, AKA "Gary fellow": Profile
Dad's: '81 F150 Ranger XLT 4x4: Down for restomod: Full-roller "stroked 351M" w/Trick Flow heads & intake, EEC-V SEFI/E4OD/3.50 gears w/Kevlar clutches
|
|
I didn't realize that Fords w/Edelbrock carbs had issues sometimes with fuel boiling, but with the Airgap and 1" spacer I should be in the clear. I've even heard of a few HP gains with each 🤞🏼😉
I did unbolt the face of the starter just so I could check gear lash and to determine the best position for the starter body. There are bolt holes all around the rim of the mounting face so I have several options. I was thinking/hoping the assembly all together would be a bit shorter as well since that is one of my clearance concerns but you can see here its not going to give me much advantage: 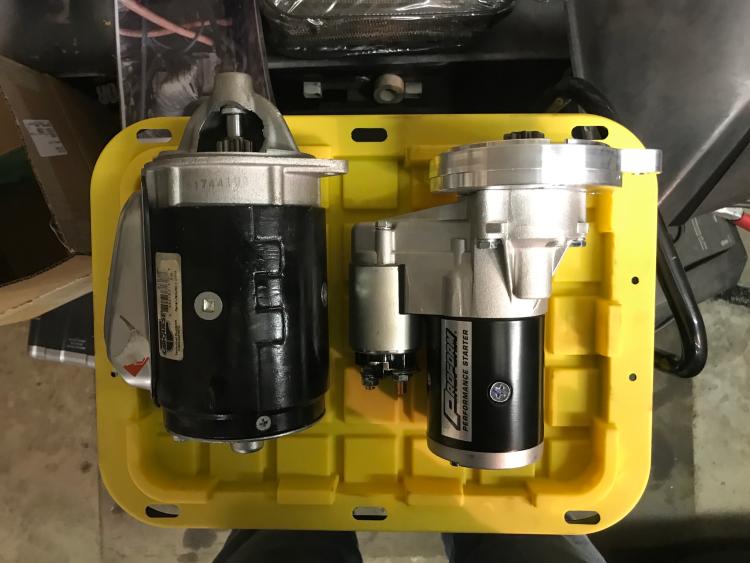 As far as the Alternator bracket, it is a combination bracket so the alternator sleeve sits in that recess on the left side where the 7/16" bolt s and hangs below and the Thermactor pump sets in the cradle with the 5/16" bolt. I am considering cutting off the perches for the Thermactor pump, but the long bolt at the right is actually the pinch point for the Bypass Hose. The DNA Motoring bracket is considerably better and MUCH lighter. It has recessed holes for the socket head cap screws to set in flush with the face. So, when I flip it, I am thinking it would be good to find little filler sleeves to put in the voids that are machined out so the spacing sleeves will have more to rest against when tightened down. The other issue is that top right bolt hole doesnt line up but I may just drill it out and see how it looks.
Jamie Helmick
'85 Bronco 351W HO, C6, 4X4, Full rebuild @ 51k original miles (fire), Edelbrock air gap intake & 600 cfm carb. w/elec. choke. 4" RC lift w/35's. Check the Projects Page if you're interested. |
|
In reply to this post by Gary Lewis
And YES! I am super anxious to get him fired back up!!!

Jamie Helmick
'85 Bronco 351W HO, C6, 4X4, Full rebuild @ 51k original miles (fire), Edelbrock air gap intake & 600 cfm carb. w/elec. choke. 4" RC lift w/35's. Check the Projects Page if you're interested. |
Re: Ferdinand - '85 Bronco 351W XLT "Phoenix" rebuild project...
|
Administrator
|
In reply to this post by Ferdinand
Ok, I think I understand on the factory bracket. As for modifying it, this post on FTE shows how I did it on a very different bracket. Doubt it'll be helpful, but just in case.
On the DNA bracket, can you use washers as the "filler sleeves"?
Gary, AKA "Gary fellow": Profile
Dad's: '81 F150 Ranger XLT 4x4: Down for restomod: Full-roller "stroked 351M" w/Trick Flow heads & intake, EEC-V SEFI/E4OD/3.50 gears w/Kevlar clutches
|
|
Banned User
|
In reply to this post by Ferdinand
Did you consider/check a factory '92-96 PMGR starter? It's more-compact than that aftermarket one because it uses (stronger) planetary reduction instead of spur.  Do you have any "before" pics showing how that bracket was originally installed? I'm with Gary - it looks like you should rotate it 180° (about the bolts' axes) so the crescent cutout is toward the water pump, and the interfering bolt ear is pointing down beside the exhaust manifold. The bypass hose would then be against the bolt with the crackling paint, right where your hand is. |
|
In reply to this post by Ferdinand
Hey Ferdinand, The Graphite Grey you used on the air cleaner cover, is it a color match paint for a specific vehicle, or an engine paint, etc? I went looking for it, and there were several versions there, mostly manufacturer specific touch up paints. If you still have any, can you tell me what code it is? I've tried to refinish my 5.0 H.0. cover, and I'm still not happy with it. I think blast and paint is going to be a much better solution.
1994 F150 4x2 Flareside. 5.0 w/MAF, 4R70W, stock.
1984 F150 4X2 Flareside. Mild 302 w/ 5spd. Sold. 1980 F150 4X4 Flareside. 300i6 w/ 5spd. Sold in 2021. 1980 F100 4X2 Flareside. 351w/2bbl w/NP435. Sold in 1995 |
|
This post was updated on .
Evening Rembrant,
Here is the barcode for what I used. Believe it or not it is just rattle can Duplicolor for wheels... 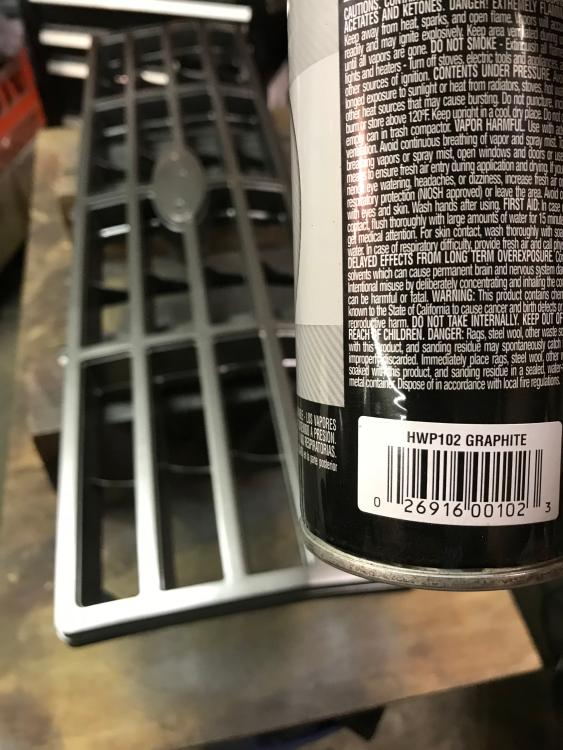 Here is the link to get it from AMZ, but I buy it locally for a little less: https://www.amazon.com/dp/B06Y6HMH92/ref=cm_sw_em_r_mt_dp_U_fKfkCbEZD3WAA I did use adhesion promoter for everything I shot that was plastic. Hope this helps. Good luck! I absolutely love the color. PS- I have never heard of using Shellac on gaskets but I did go ahead and RTV the coolant passages this time with Ultra Black. I am sure they know their stuff 😉.
Jamie Helmick
'85 Bronco 351W HO, C6, 4X4, Full rebuild @ 51k original miles (fire), Edelbrock air gap intake & 600 cfm carb. w/elec. choke. 4" RC lift w/35's. Check the Projects Page if you're interested. |
|
In reply to this post by Ferdinand
So I started with trying to decide what to do with the alternator and bracket. The factory mount was way too crowded as you can see in the following pics:
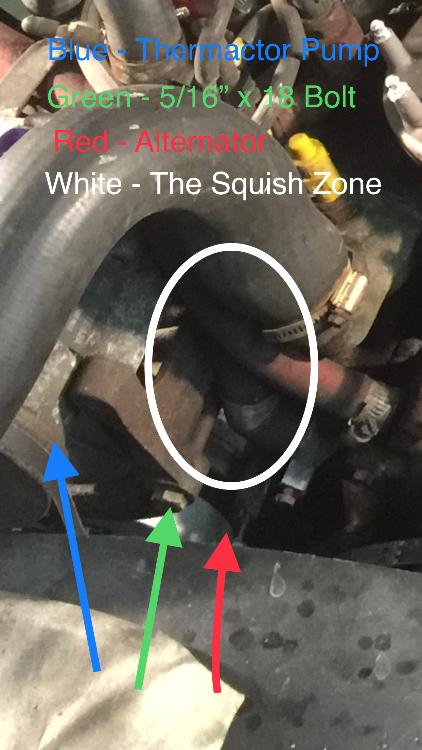 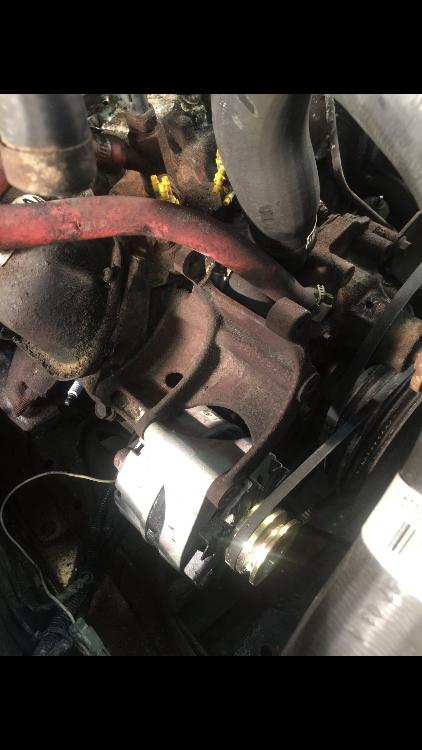 *My original alternator (the one I started out with which you can tell was new) got destroyed by the 400 gallons of water they used to put out the fire 😣 but it was also a double pulley. Since I am not putting the Thermactor Pump back on I opted for a single pulley. Evidently Ford figured out the crowding issue and changed the configuration all together. I am SUPER fortunate to have a boneyard Bronco setting in my yard. (My wife would state that differently, I am sure 😉) So, I thought it was the same bracket but I wanted to double check and man am I glad I did! Turns out the bracket is a completely different configuration. The large bolt (7/16"X14 thread, 6 1/2" long) is the main support bolt and pivot. It mounts to the upper, outer-most hole in the head. All the factory brackets (that I have seen) have a 3-point footing on the head. This helps with awesome support but I suppose it keeps you from flipping it around the wrong way to. 😬 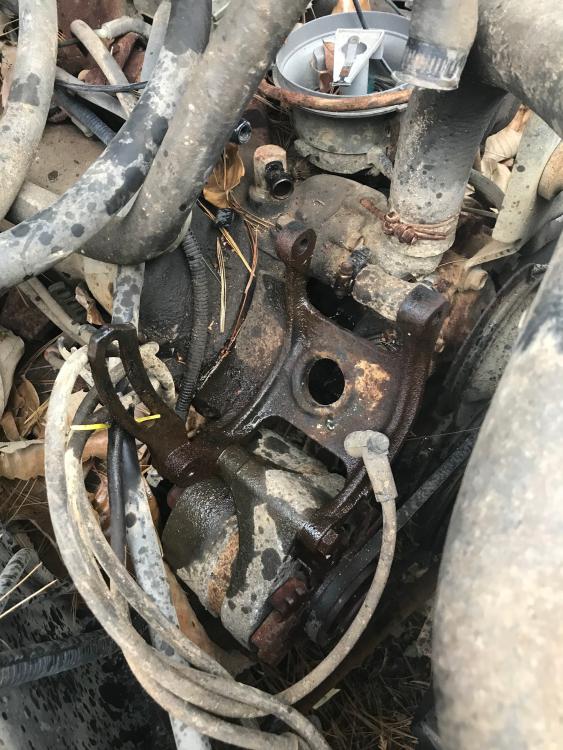 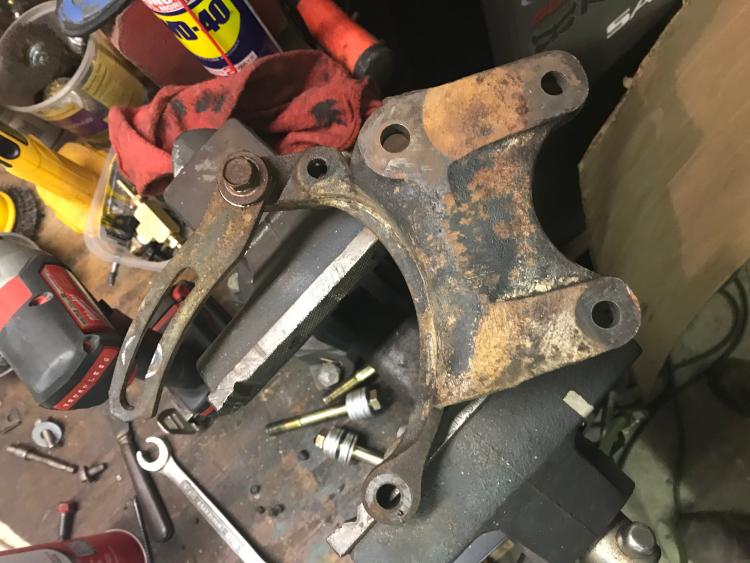 I did a little trimming and modification. (Thanks for the inspiration Gary!!) And I feel like it will be a good work around. 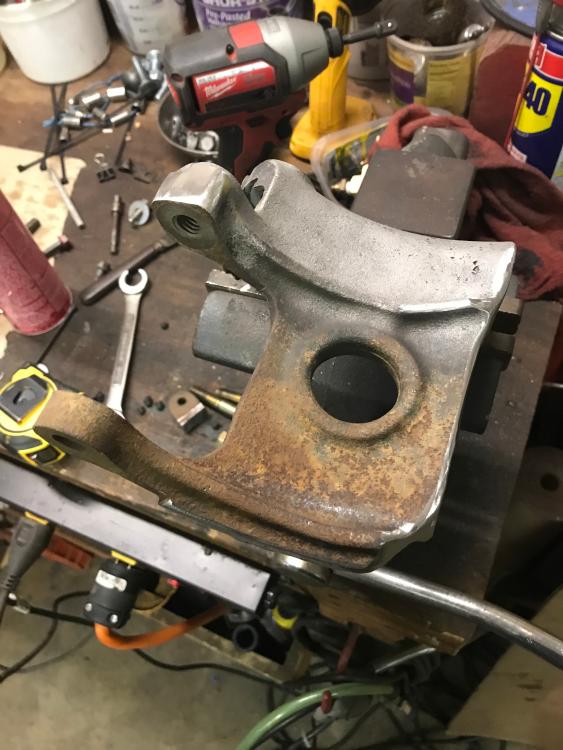 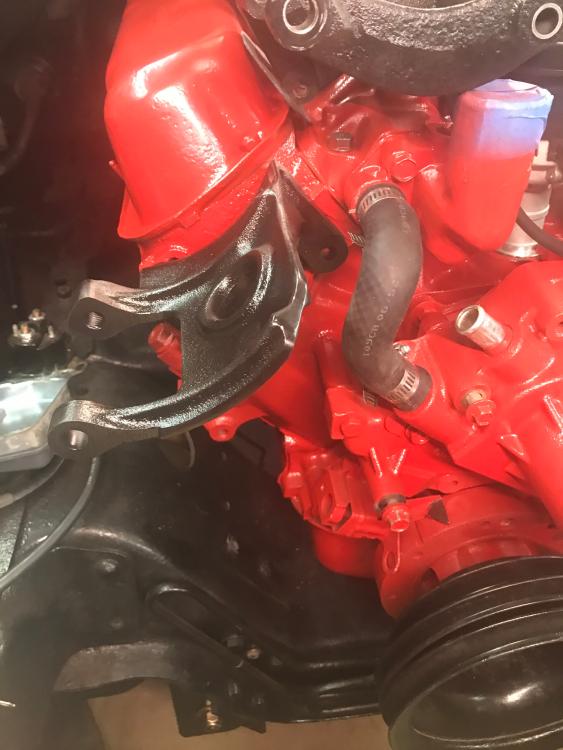 I am very pleased with the end result and it is in no way crowding the bypass hose now! 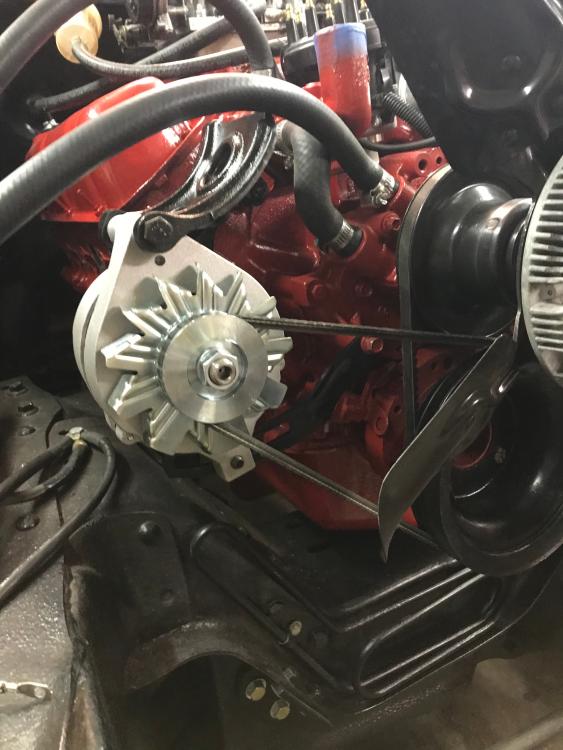 I have a few pics if anyone is interested in the comparison between the two brackets. I did have to go get a 1" longer belt since the pivot point is about 1" further away from the centerline. I also was able to ditch a few of the clunky/shoddy bandaid brackets that Ford had on my application. 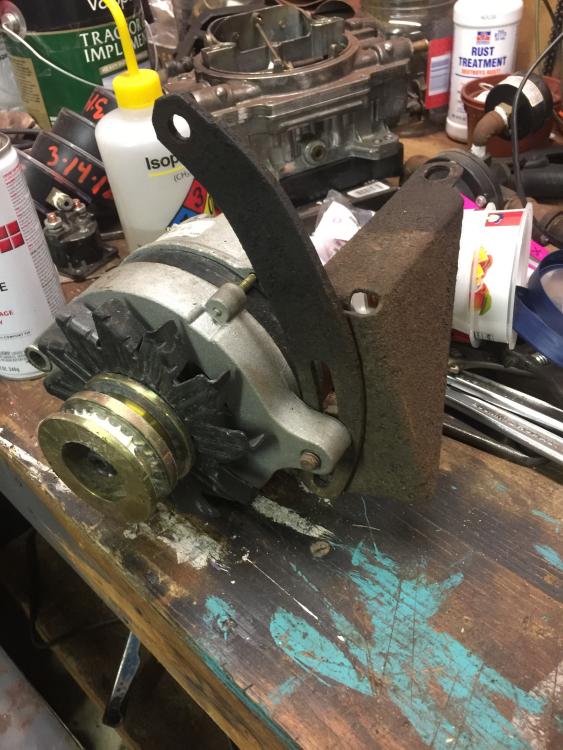 The new mount and tensioner arm are much cleaner. I also got to work on the starter tonight. I was anxious to see if the High Torque mini-starter would give me more clearance: Pardon me while I park a Mac truck between my starter and header! WooHoo! Man that clearance is awesome! Not to mention how much easier it is to install the header! 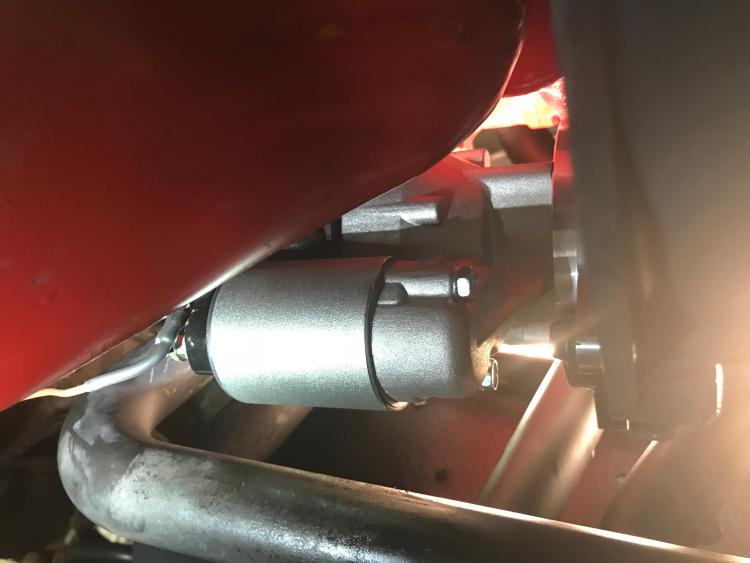 I did go ahead and rotate the assembly so I would have maximum clearance. I doing so though, you have to take the mounting flange off and put the one starter bolt in then bolt it back together because the bolt is too long to fit under the casting gusset of the starter housing: 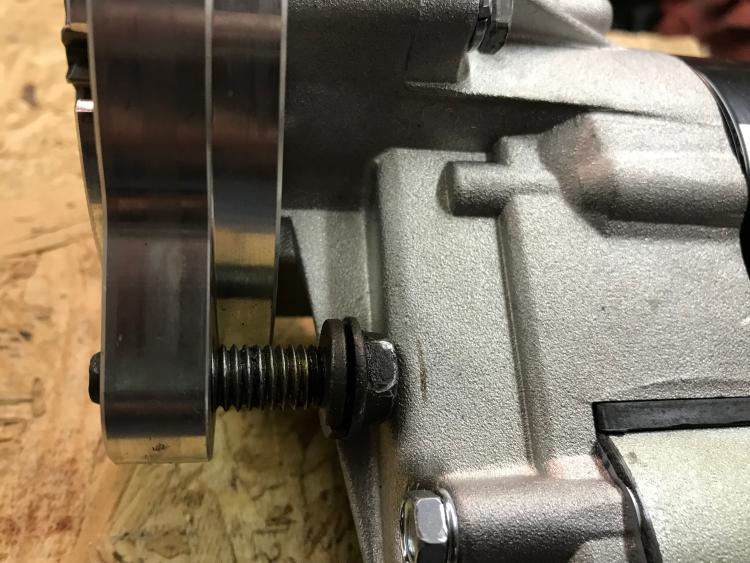 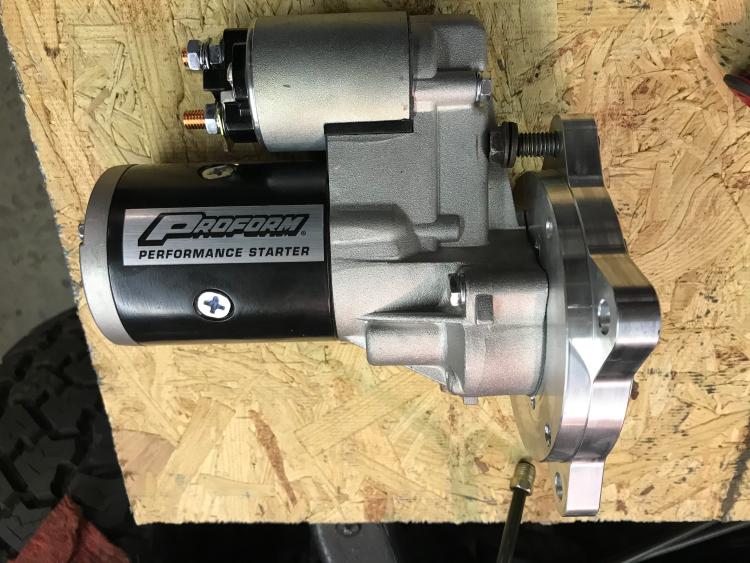 So the tally for the day is: starter, alternator, belts, hoses, headers, transmission lines, grounds & wiring hooked back up, core support installed, radiator & shroud, motor and transmission fill tubes, and I got all my fluids in (except the oil 🙃) A pic of where I finally stopped tonight:  Man! am I excited to be making this kind of progress. I wanted to actually fire her up today, but of all things, I can't find the oil and additives I bought the other day! 🙄 I am hoping to turn the key tomorrow between church services. 🤞🏼
Jamie Helmick
'85 Bronco 351W HO, C6, 4X4, Full rebuild @ 51k original miles (fire), Edelbrock air gap intake & 600 cfm carb. w/elec. choke. 4" RC lift w/35's. Check the Projects Page if you're interested. |
|
This post was updated on .
Well that's interesting. I remember dealing with this and rerouting the bypass hose never occurred to me. I ran it straight up, same as stock, and then ran the lower hose right through the hole in that bracket. 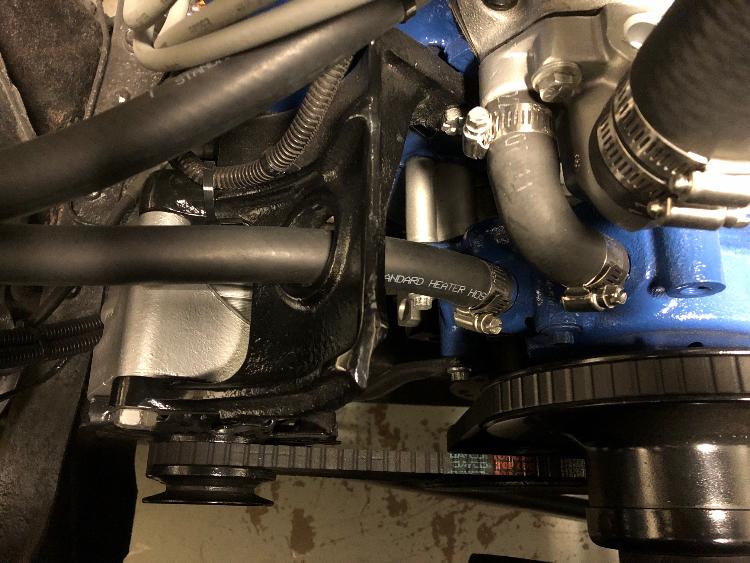
1994 F150 4x2 Flareside. 5.0 w/MAF, 4R70W, stock.
1984 F150 4X2 Flareside. Mild 302 w/ 5spd. Sold. 1980 F150 4X4 Flareside. 300i6 w/ 5spd. Sold in 2021. 1980 F100 4X2 Flareside. 351w/2bbl w/NP435. Sold in 1995 |
|
In reply to this post by Ferdinand
Excellent, thank you! I've been using a rattle can of DupliColor engine paint in the color of cast aluminum, and it has been really good. I've been using it for years on brackets and just about anything in general that is cast aluminum, and it hasn't let me down yet. Just have to make sure that the parts are clean. However, for this air cleaner cover, I thought yours looked great and has a bit more of a metallic look to it, which I like. I'm going to try it on a spare cover first and see how I like it in person. Thanks for the info, that's great!
1994 F150 4x2 Flareside. 5.0 w/MAF, 4R70W, stock.
1984 F150 4X2 Flareside. Mild 302 w/ 5spd. Sold. 1980 F150 4X4 Flareside. 300i6 w/ 5spd. Sold in 2021. 1980 F100 4X2 Flareside. 351w/2bbl w/NP435. Sold in 1995 |
Re: Ferdinand - '85 Bronco 351W XLT "Phoenix" rebuild project...
|
Administrator
|
In reply to this post by Ferdinand
Wow! That's a LOT of work! Very well done! And I like the alternator bracket. It turned out well. Sure glad your wife is so accommodating about the spare.
 After a good night's sleep I'll bet you remember where you put the oil and additives, and you will get it fired today. Can't wait!!!!
Gary, AKA "Gary fellow": Profile
Dad's: '81 F150 Ranger XLT 4x4: Down for restomod: Full-roller "stroked 351M" w/Trick Flow heads & intake, EEC-V SEFI/E4OD/3.50 gears w/Kevlar clutches
|
|
In reply to this post by Rembrant
Rembrant,
(And Gary) Quick question, In my application, which is the inlet and outlet on my water pump setup? My heater core outlets are horizontal so, if I understand it correctly I'm thinking the one closest to the motor is the side that should come from the intake (hottest coolant). However, Rembrant, your hookup looks like it would reverse the loop or path the heated coolant is taking... Am I overthinking this? Things would get waaaay easier if I could just switch the two hoses at the pump and let the upper fitting from the water pump go to the intake (rerouting the bypass hose). That was one of the things I labeled well when I tore everything down, but I then realized that the hoses had been replaced and I'd like to verify from a factory perspective which is correct. It does seem odd that they conflict as badly as they do, but I thought that was correct since Ford seemed to have noticed and fixed that. With the donor bracket though, I can't easily run my heater core hose through the hole in the bracket like Rembrant did. (The donor Bronco had the hose through there as well but I forgot to look at that before I disconnected them. 🙃 Guidance would be appreciated. It seemed to run well before (not overheating anyway) and I've hooked it all back up the same way, but I want this to be dead right. More later. Thanks a million gentlemen!!!
Jamie Helmick
'85 Bronco 351W HO, C6, 4X4, Full rebuild @ 51k original miles (fire), Edelbrock air gap intake & 600 cfm carb. w/elec. choke. 4" RC lift w/35's. Check the Projects Page if you're interested. |
I don't know which one is the inlet or the outlet, but the way my hoses are connected at the pump is the stock routing. If you look at your earlier pictures, your bypass hose originally went to the other fitting on the pump. Is that what you're asking?
1994 F150 4x2 Flareside. 5.0 w/MAF, 4R70W, stock.
1984 F150 4X2 Flareside. Mild 302 w/ 5spd. Sold. 1980 F150 4X4 Flareside. 300i6 w/ 5spd. Sold in 2021. 1980 F100 4X2 Flareside. 351w/2bbl w/NP435. Sold in 1995 |
Re: Ferdinand - '85 Bronco 351W XLT "Phoenix" rebuild project...
|
Administrator
|
In reply to this post by Ferdinand
I get confused with the terminology of "inlet" and "outlet". On the water pump you have two fittings, one for the bypass hose and one for the heater hose. I don't know which way the water is flowing at that point, but I agree that Cory/Remrant has his bypass hose connected the factory way. However, I'm not sure if it matters.
As for the heater, it doesn't matter which way those hoses are connected as there's no flow direction given on the heater core.
Gary, AKA "Gary fellow": Profile
Dad's: '81 F150 Ranger XLT 4x4: Down for restomod: Full-roller "stroked 351M" w/Trick Flow heads & intake, EEC-V SEFI/E4OD/3.50 gears w/Kevlar clutches
|
|
Banned User
|
This post was updated on .
In reply to this post by Ferdinand
All the nipples on the WP are "in" to the pump. It doesn't matter which direction coolant flows through the core. But one hose MUST go to the pump, and the other MUST come from somewhere else on the engine (intake). |
|
You got a lot done.
Good to see you got the converter bolted up right and sounded like with out to much work. You / we going to hear it run this year?  Dave ----
Dave G.
81 F100 flare side 300 six / AA OD / NP435 / 2.75 gear http://cars.grantskingdom1.com/index.php/1980-Ford-F100?page=1 81 F100 style side 300 six/SROD parts truck -RIP http://cars.grantskingdom1.com/index.php/1981-Ford-F100 |
|
This post was updated on .
In reply to this post by Ferdinand
This afternoon...

Jamie Helmick
'85 Bronco 351W HO, C6, 4X4, Full rebuild @ 51k original miles (fire), Edelbrock air gap intake & 600 cfm carb. w/elec. choke. 4" RC lift w/35's. Check the Projects Page if you're interested. |
Re: Ferdinand - '85 Bronco 351W XLT "Phoenix" rebuild project...
|
Administrator
|
It lives!!!! Congrat's!!!!
 (By the way, you can embed the Youtube video here. Just go to it, click Share then Embed, and then click Copy to put the code on the clipboard. On here, click Embed and then Embed Tags and it'll insert Nabble embed tags where your cursor was. Click between the ">" and the "<" and paste the code there.)
Gary, AKA "Gary fellow": Profile
Dad's: '81 F150 Ranger XLT 4x4: Down for restomod: Full-roller "stroked 351M" w/Trick Flow heads & intake, EEC-V SEFI/E4OD/3.50 gears w/Kevlar clutches
|
| Edit this page |


