Ferdinand - '85 Bronco 351W XLT "Phoenix" rebuild project...
Re: Ferdinand - '85 Bronco 351W XLT "Phoenix" rebuild project...
|
Administrator
|
Years ago I used Indian Head a bunch, and it worked well. But you are right that its "work time" isn't long enough for something like an intake manifold - especially when using my trick of letting the RTV sit overnight.
As for E6000, I haven't used it. But I'm seeing a max temp of from 150 to 180 degrees depending on whose writeup I read, and that seems low for engine use. Am I reading about the wrong thing? On the other hand, The Right Stuff may well be "the right stuff" for the end walls. I've used it for other things, quite successfully, and since it seals "instantly" according to the instructions you wouldn't have to wait overnight. But, the part that has worried me is the "assemble parts within 5 minutes" in the instructions. If the engine is on a stand then I can see getting the intake manifold down w/in that time. But if the engine is still in the vehicle it might be dicey. However, I'm old and slow, so maybe I'm being too cautious? And Copper Coat is my go-to for head gaskets. But I've not tried it on intake manifold gaskets.
Gary, AKA "Gary fellow": Profile
Dad's: '81 F150 Ranger XLT 4x4: Down for restomod: Full-roller "stroked 351M" w/Trick Flow heads & intake, EEC-V SEFI/E4OD/3.50 gears w/Kevlar clutches
|
|
Banned User
|
I never put anything on head gaskets, or let silicone fully-cure before assembly (I just let it skin over in some applications). The only time I've had to remove RightStuff was when I went to lunch before assembling the parts - its working time seems to be slightly longer than described. And we used a LOT of it at the LR dealership. I'll let you know if the E6000 creates any problems, but it could be a while. One of those 5.8s is in my '93EB Bronco project (which is dragging out due to other priorities, of course), and the other is just a spare to go in the junkpile.
|
|
In reply to this post by Ferdinand
Thanks for all the feedback on gaskets gentlemen.
I can't believe there are so many options out there!! I think I am going to try Fel Pro Performance gaskets with printoseal. I will let you know if it works out 👍🏼 Another question: 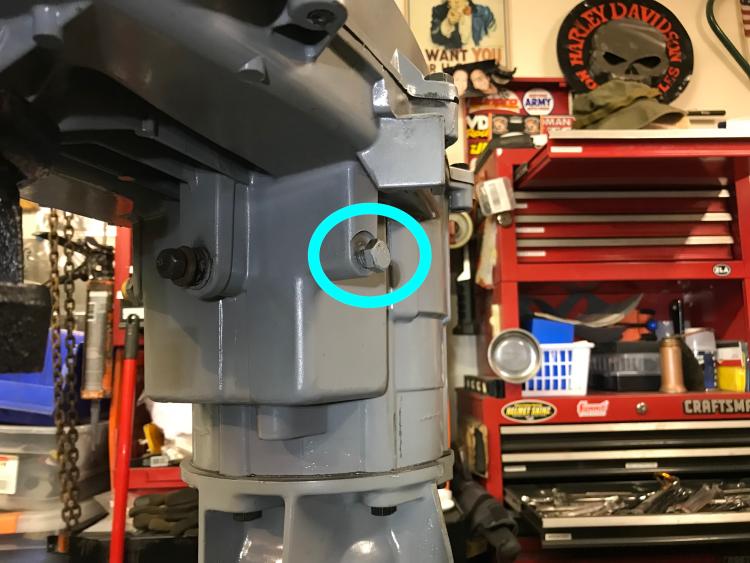 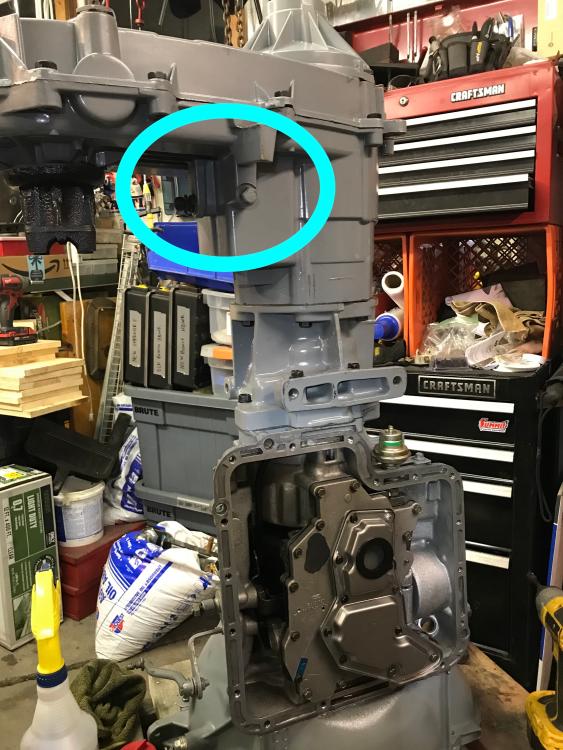 This bolt seems to be integrated into the shifting blade inside the T-Case. I am curious as to what it really does, what its proper name is, and do I need to run it all the way in and does it have a torque spec?
Jamie Helmick
'85 Bronco 351W HO, C6, 4X4, Full rebuild @ 51k original miles (fire), Edelbrock air gap intake & 600 cfm carb. w/elec. choke. 4" RC lift w/35's. Check the Projects Page if you're interested. |
Re: Ferdinand - '85 Bronco 351W XLT "Phoenix" rebuild project...
|
Administrator
|
I can't tell for sure, but if that is an NP208 then I suspect that is # 7233 on the Illustration tab here: Driveline/Transfer Cases. It shows on the Parts List tab as the poppet screw, and on the Instructions tab as being torqued to 20 - 25 lb-ft.
But don't take my word for it, please check it out to make sure.
Gary, AKA "Gary fellow": Profile
Dad's: '81 F150 Ranger XLT 4x4: Down for restomod: Full-roller "stroked 351M" w/Trick Flow heads & intake, EEC-V SEFI/E4OD/3.50 gears w/Kevlar clutches
|
|
Banned User
|
Yes, it preloads the index sping, and seals that bore.
|
|
Thanks for the info Gary & Steve. It is an NP208 so I will get that thing torqued down!
Jamie Helmick
'85 Bronco 351W HO, C6, 4X4, Full rebuild @ 51k original miles (fire), Edelbrock air gap intake & 600 cfm carb. w/elec. choke. 4" RC lift w/35's. Check the Projects Page if you're interested. |
|
In reply to this post by Ferdinand
Hope everyone had a very Merry Christmas!!
Progress update: Only way to get some use out of the Bronco right now... 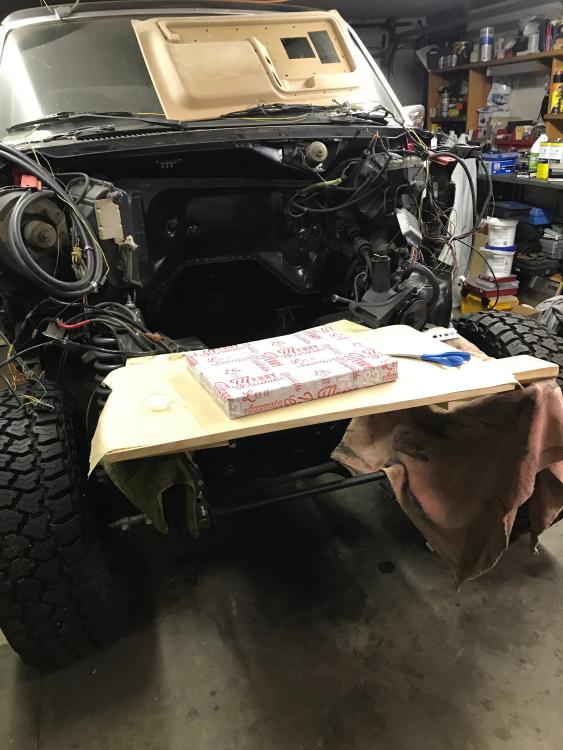 Made some good progress today though. Got everything prepped yesterday afternoon. 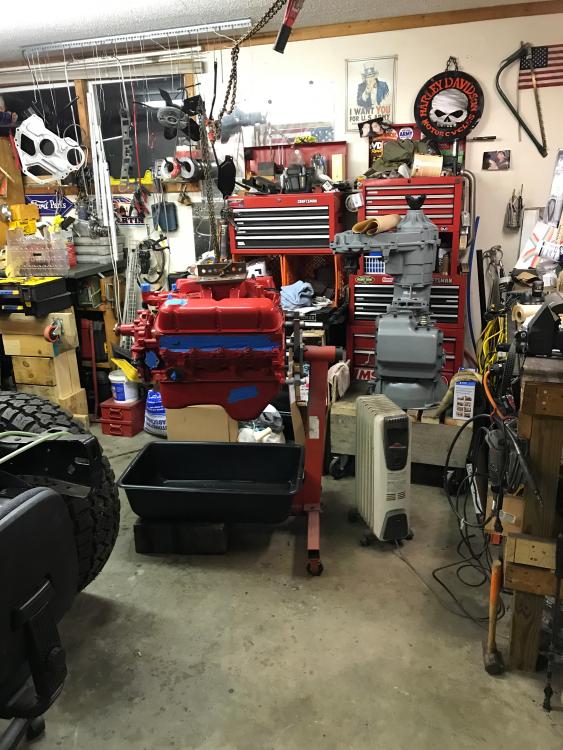 The set went smooth for the motor. 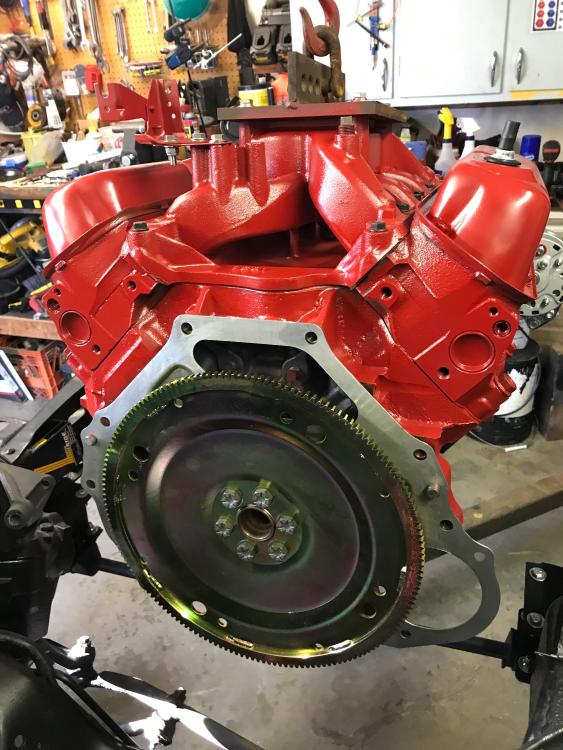 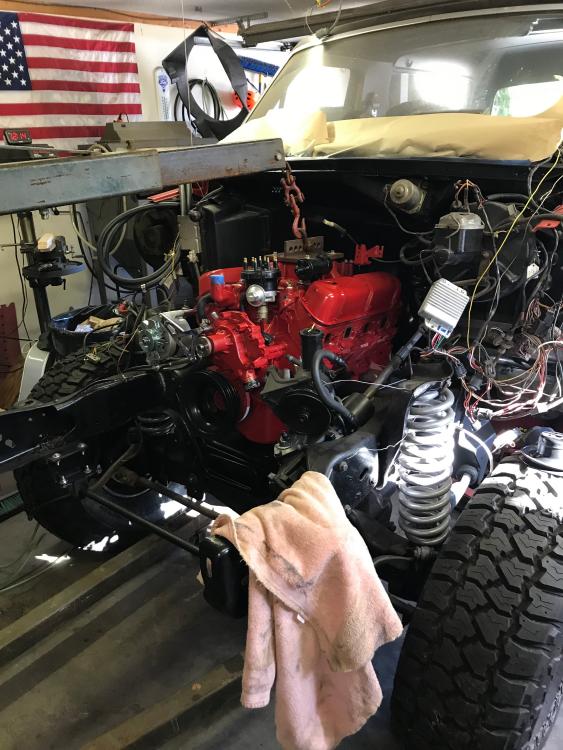 The transmission was another story. I bolted and unbolted it 4 times. I couldn't figure out why once it was all bolted together why I couldn't get the motor to turn. In desperation I lowered it for the third time and checked the Torque Converter (TC from here on out). Sure enough, there was a tiny little bit of travel left to go to FULLY seat it and after I wiggled it around for a good 4-5 minutes it finally slid back a little further. 4th and final time I raised it up and bolted it together we are good to go. I do have a question though: 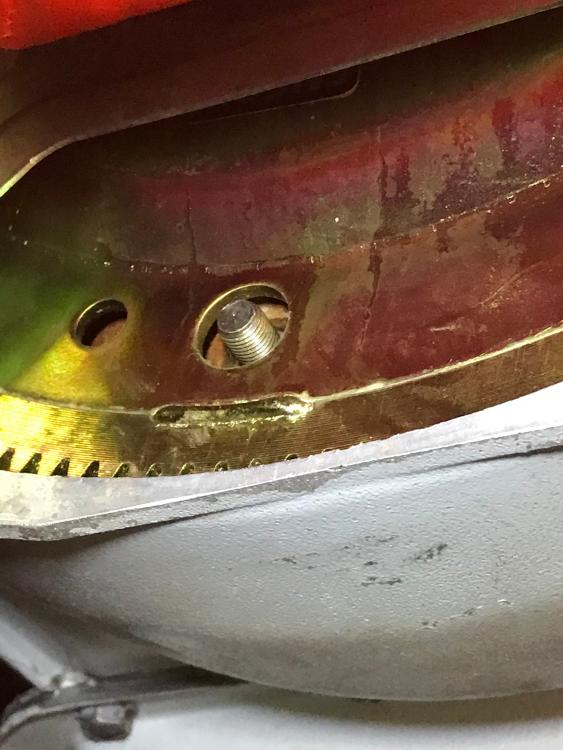 Once I finally got everything bolted back together, I noticed the difference the depth at which the TC was sitting in relation to the new flywheel. My question is has anyone else seen/experienced this? Is it ok to now pull the TC forward with the bolts as they tighten against the face of the flywheel? I certainly don't want to risk a leak! As always any help or advice is greatly appreciated!
Jamie Helmick
'85 Bronco 351W HO, C6, 4X4, Full rebuild @ 51k original miles (fire), Edelbrock air gap intake & 600 cfm carb. w/elec. choke. 4" RC lift w/35's. Check the Projects Page if you're interested. |
Re: Ferdinand - '85 Bronco 351W XLT "Phoenix" rebuild project...
|
Administrator
|
You are making excellent progress! Congrat's!
As for the torque converter, it is ok to pull it forward with the bolts. BUT, the bolts should not take much force to turn them. You should snug them down in a pattern where #2 is across from #1, and go around that way so you don't cock the thing and cause the knob on the front to bind in the pilot hole.
Gary, AKA "Gary fellow": Profile
Dad's: '81 F150 Ranger XLT 4x4: Down for restomod: Full-roller "stroked 351M" w/Trick Flow heads & intake, EEC-V SEFI/E4OD/3.50 gears w/Kevlar clutches
|
|
Excellent! Thanks Gary.
I'm telling you, from what I see on here you really take helping people seriously. I am sure I am not alone when I say this but you and this site are a wealth of information and my most valuable resource to this project!!! Have a great day sir.
Jamie Helmick
'85 Bronco 351W HO, C6, 4X4, Full rebuild @ 51k original miles (fire), Edelbrock air gap intake & 600 cfm carb. w/elec. choke. 4" RC lift w/35's. Check the Projects Page if you're interested. |
|
In reply to this post by Ferdinand
Let me throw this out there too...
Some of you may have noticed my jacked up install for my alternator (if you didn't, I'm working through deciding to modify an alternator bracket or buy something else). Does anyone have a recommendation for an aftermarket alternator bracket for a 351W, Passenger side alternator? I was just using the stock bracket even though I'm not running my thermactor pump but it really seems to crowd my bypass hose. I annotated in the pic below right where the bracket was pushing on the hose: 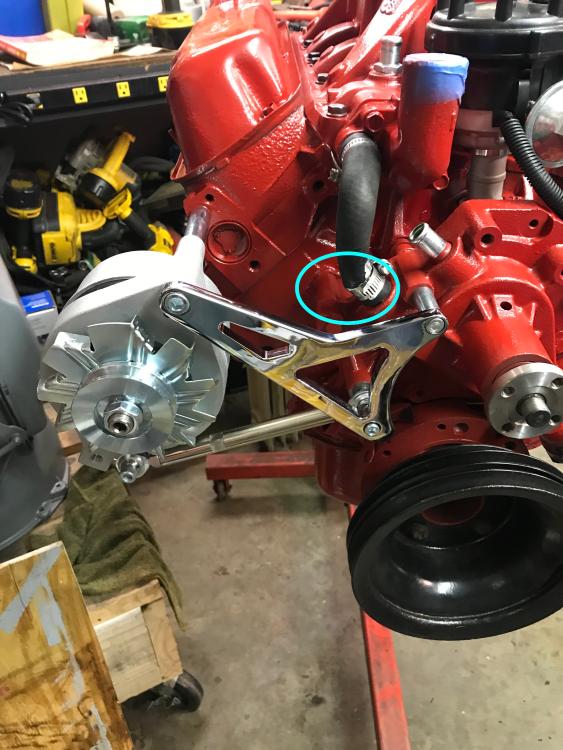 I purchased a new hose, but I am having a devil of a time finding a reasonably priced alternator bracket. Sound off if you have a favorite!
Jamie Helmick
'85 Bronco 351W HO, C6, 4X4, Full rebuild @ 51k original miles (fire), Edelbrock air gap intake & 600 cfm carb. w/elec. choke. 4" RC lift w/35's. Check the Projects Page if you're interested. |
Re: Ferdinand - '85 Bronco 351W XLT "Phoenix" rebuild project...
|
In reply to this post by Ferdinand
I have a little issue with this TC stud and the hole on the flex plate.
 That stud should fit tighter than that in the hole. It looks like it should go in the other smaller hole in the picture. It looks like you have a 3/8" stud in a 1/2" hole and that is not good. As said it is ok to pull the TC up to the flex but should not come forward a lot as it can be pulled out of the front pump. Looking good Dave ---- edit: could that be the hole for the TC drain plug?
Dave G.
81 F100 flare side 300 six / AA OD / NP435 / 2.75 gear http://cars.grantskingdom1.com/index.php/1980-Ford-F100?page=1 81 F100 style side 300 six/SROD parts truck -RIP http://cars.grantskingdom1.com/index.php/1981-Ford-F100 |
Re: Ferdinand - '85 Bronco 351W XLT "Phoenix" rebuild project...
|
Administrator
|
Yes! That's what it is. That is the hole for the drain plug. It seems you have the TC incorrectly indexed.
Gary, AKA "Gary fellow": Profile
Dad's: '81 F150 Ranger XLT 4x4: Down for restomod: Full-roller "stroked 351M" w/Trick Flow heads & intake, EEC-V SEFI/E4OD/3.50 gears w/Kevlar clutches
|
|
Banned User
|
In reply to this post by Ferdinand
Note that there is a larger hole beside each of the small TC stud holes in the flexplate - you got your TC into the wrong ones. You need to back the trans away from the block enough to rotate one of them into the correct alignment. For every model of slushbox, there's a spec on how deep the face of the TC must be in the bellhousing for it to be fully-seated in the pump. This shows the E4OD spec, which is probably the same as the C6:  If you tighten the trans to the block when it's NOT aligned (and you did that 3x), you CAN damage the pump. Yes, it has to be. There has to be some extra room in there, which means the TC will always start off slightly deeper than the flexplate. I always tighten them sequentially. The studs/bolts are always shorter than the pilot, which means the pilot MUST be in the crank socket before the fasteners can start. So there's no chance of cocking it. I've done it that way for decades on Fords, Land Rovers, Saabs, Nissans, Mitsubishis, GMs, Toyotas, Jeeps, Dodges... Never a problem. |
|
In reply to this post by Gary Lewis
Good eye!
As for the alternator brackets, I searched a lot online for aftermarket A/C brackets. The easiest thing I think is to find them at a Pick n Pull or JY. I found one local in our small town. I did like the looks of these. https://www.cvfracing.com/ford/ford-289-302-351w-small-block/v-belt-brackets/
Dane
1986 F250HD SC XLT Lariat 4x4 460 C6-Sold 1992 Bronco XLT 4x4 351W E4OD 1998 GMC Sierra SLE K1500 350 4L60E Arizona |
|
This post was updated on .
In reply to this post by Ferdinand
Good eye gentlemen! on probably my 2nd attempt, I tried to get the studs to come through the smaller holes and could not get them through. I thought they were about the thread space too small. (There is also a shoulder around the studs that I was thinking may pull through the hole and fill the larger diameter hole in the Flywheel.) But after looking at this closer tonight and after carefully snugging the bolts up tonight I pulled one through the larger hole.
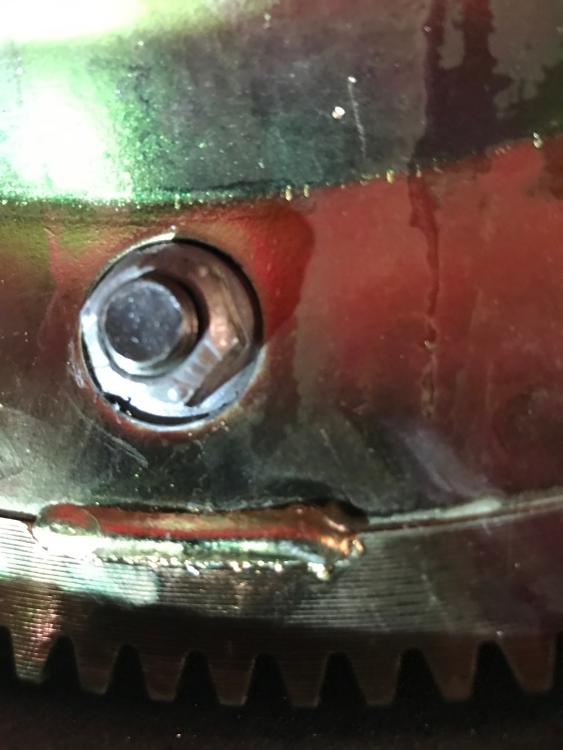 Then I got my dial caliper out and was able to verify they will fit. (Of course). I think my issue was the TC wasn't seated properly and that created the misalignment issue so they wouldn't go through the smaller holes. I wish I would have read my thread before heading out tonight, but I only worked from 12:00 to 12:30 when I realized I have to pull the transmission apart AGAIN‼️ 🙄 (At this point, I'm about to install wing nuts on the bell housing! 🙃 I sure hope I didn't damage my pump when tightening the bell housing down... I hope to get it re-indexed tomorrow night. I would love to fire this thing back up this weekend and check for NO leaks 😉 Thanks for all the input guys!! ONWARD!
Jamie Helmick
'85 Bronco 351W HO, C6, 4X4, Full rebuild @ 51k original miles (fire), Edelbrock air gap intake & 600 cfm carb. w/elec. choke. 4" RC lift w/35's. Check the Projects Page if you're interested. |
|
In reply to this post by grumpin
-Alternator Bracket-
Thanks for the link Grumpin! I am looking at the one I bought. (Nice kit! Only paid $35 for it new but its for the wrong side.) Looking at modifying it, but if I lose heart I'll look these guys up!
Jamie Helmick
'85 Bronco 351W HO, C6, 4X4, Full rebuild @ 51k original miles (fire), Edelbrock air gap intake & 600 cfm carb. w/elec. choke. 4" RC lift w/35's. Check the Projects Page if you're interested. |
|
In reply to this post by 1986F150Six
Thanks for the legwork and the links 1986F150Six!
Man it is amazing how readily available and cheap most Chevy parts are... FORD, not so much. 😬
Jamie Helmick
'85 Bronco 351W HO, C6, 4X4, Full rebuild @ 51k original miles (fire), Edelbrock air gap intake & 600 cfm carb. w/elec. choke. 4" RC lift w/35's. Check the Projects Page if you're interested. |
You think Ford is bad then don't try ANYTHING for an AMC V8! Dave ----
Dave G.
81 F100 flare side 300 six / AA OD / NP435 / 2.75 gear http://cars.grantskingdom1.com/index.php/1980-Ford-F100?page=1 81 F100 style side 300 six/SROD parts truck -RIP http://cars.grantskingdom1.com/index.php/1981-Ford-F100 |
| Edit this page |


