Dad's Truck Build
|
Administrator
|
In reply to this post by Gary Lewis
Gary, am I understanding right that your rebuild 1356 has has a slip yoke eliminator kit put in, and is now a fixed rear yoke?
I did a quick tape measure check on my trucks. From the center of the axle tube to the bottom of the yoke cup is 15” on the sterling and 11” on the Ford 9”... so a 4” difference. If your 1356 is now a fixed yoke, your easiest route is probably to use Dad’s driveshaft and have it shortened to accommodate the E4OD. That is just a cut and weld of the fixed end which should be cheaper than lengthening Huck’s driveshaft to reach the 9” yoke (even if you did re-buy the slip yoke 1356). 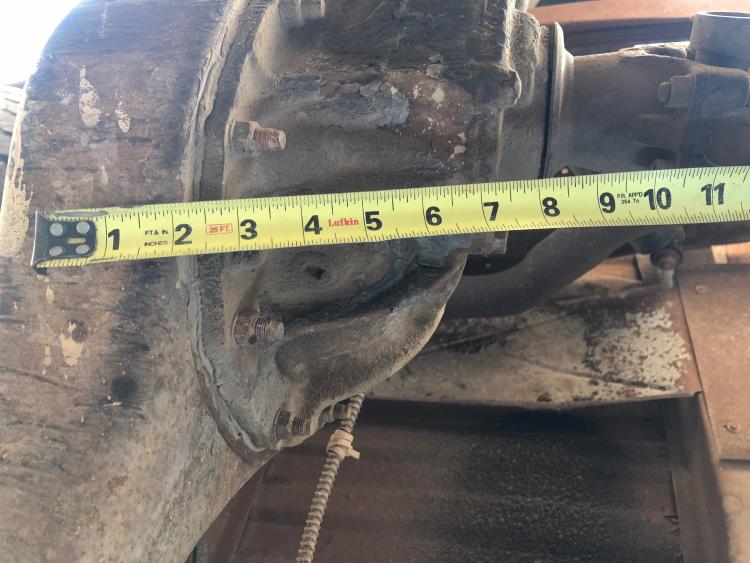 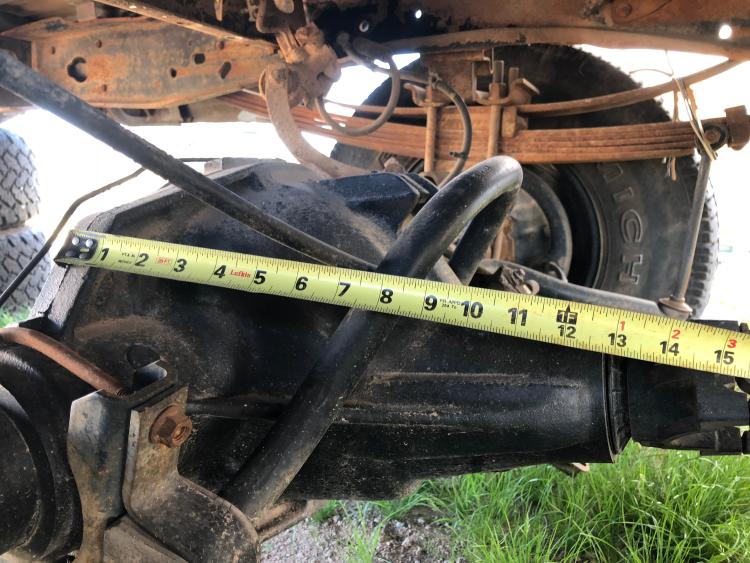
SHORT BED 4-DOOR DIESEL: 1986 F350 4x4 under construction-- 7.3 IDIT ZF5+GVOD
STRAIGHT SIX 4X4: 1981 F150 2wd to 4x4-- 300 I6 close ratio diesel T19, hydroboost brakes, Saginaw steering BIG F: 1995 F-Superduty under construction— converting to 6.9L IDI diesel ZF5+DNE2 |
|
Administrator
|
Steve - I'll reply to your post after while. Right now I'm sitting in the waiting room at the hospital and it has been 2 hours since they took Janey back - on a 1 1/2 hour surgery. My head is splitting and it is hard to concentrate.
 But, I do see the measuring directions, and those will come in very handy. Thanks. But, I do see the measuring directions, and those will come in very handy. Thanks.
Jonathan - You are right, the 1356 I had built has a fixed rear yoke, which may be a slip yoke eliminator? I found someone in town with those parts and had the t-case built that way. Is that unusual in a 1356? Is that good or bad? And, thanks for all the measurements. I think I can get my head around them, and I agree - cutting Dad's new driveshaft down should be easy and cheap. I'll use Steve's measuring directions when I can and figure out how long it needs to be, exactly, and take it in someplace to have it shortened. Thanks, guys.
Gary, AKA "Gary fellow": Profile
Dad's: '81 F150 Ranger XLT 4x4: Down for restomod: Full-roller "stroked 351M" w/Trick Flow heads & intake, EEC-V SEFI/E4OD/3.50 gears w/Kevlar clutches
|
|
Administrator
|
Gary, prayers for Janey at this moment. Please let us know when you hear something.
Fixed rear yoke 1356 was evidently standard on the later Broncos, but is also sold as an expensive kit to get rid of it on the pickup versions. It is stronger. I’m guessing it is cheaper or simpler than having it in the driveshaft, but won’t work with the Bronco’s short wheelbase and double cardan. The slip has to be at the axle end. I personally would consider it a “good” thing.
SHORT BED 4-DOOR DIESEL: 1986 F350 4x4 under construction-- 7.3 IDIT ZF5+GVOD
STRAIGHT SIX 4X4: 1981 F150 2wd to 4x4-- 300 I6 close ratio diesel T19, hydroboost brakes, Saginaw steering BIG F: 1995 F-Superduty under construction— converting to 6.9L IDI diesel ZF5+DNE2 |
|
Administrator
|
In reply to this post by Steve83
Ok folks, I talked to the doctor and the surgery was a success. Janey and I are home, she's had lunch, we've had a nap, and I've had another cup of coffee. So things are starting to be less confusing.
Steve - Good to know I can put the slip yoke on the t-case, but given what Jonathan found I don't think that will be necessary as I should be able to have the new rear driveshaft shortened by roughly 2". As for the question of the front yoke's position, that was a poorly thought out question. Huck had a D44/E4OD/1345 combo. Dad's truck will have a D44/E4OD/1356 combo. So if F150's and F250's have the front axle in the same place, then Huck's front driveshaft should be perfect. But I'll spend some time perusing the new Driveshaft page to see if I can figure out the answer to that question. Unless y'all know. But, the mythology info doesn't really answer my questions. First, I doubt that I'll have angle problems by shortening a long-bed's driveshaft ~2", although I will check the angles. Instead, what I need to know is how to measure for a driveshaft. And, I think it is:
Perhaps on #3 I need to measure Dad's driveshaft and then see what the Driveshaft page says it should be. And, I could do the same on Big Blue. That would tell me where they position the splines for measurement. Right?
Gary, AKA "Gary fellow": Profile
Dad's: '81 F150 Ranger XLT 4x4: Down for restomod: Full-roller "stroked 351M" w/Trick Flow heads & intake, EEC-V SEFI/E4OD/3.50 gears w/Kevlar clutches
|
|
Administrator
|
Gary, I am relieved to hear that the surgery went well, and I hope Janey has a swift recovery.
From what I have experienced with the front axles, Huck’s front shaft should be exactly right. My front shaft was bad (from the F150 donor) and my replacement came from a leaf spring F250 and was identical. Of course both were D44’s if I remember right. Huck wasn’t a D50 was it? That might be the only reason if the snout length was different... I thought I remembered measuring and even the D50 trucks were the same but it’s been a while.
SHORT BED 4-DOOR DIESEL: 1986 F350 4x4 under construction-- 7.3 IDIT ZF5+GVOD
STRAIGHT SIX 4X4: 1981 F150 2wd to 4x4-- 300 I6 close ratio diesel T19, hydroboost brakes, Saginaw steering BIG F: 1995 F-Superduty under construction— converting to 6.9L IDI diesel ZF5+DNE2 |
|
Administrator
|
Thanks, Jonathan. I was SO relieved when the doctor finally came to tell me how the surgery had gone. It was supposed to be 1 1/2 hours and it was 2 3/4 hours.
 Anyway, she's home and doing fairly well.  As for the front driveshaft, Huck had a D44 so the shaft should be perfect for Dad's truck. 
Gary, AKA "Gary fellow": Profile
Dad's: '81 F150 Ranger XLT 4x4: Down for restomod: Full-roller "stroked 351M" w/Trick Flow heads & intake, EEC-V SEFI/E4OD/3.50 gears w/Kevlar clutches
|
|
In reply to this post by Gary Lewis
I've had 2 driveshafts cut down for $250 a few years ago. I think you ought to be able to do a lot better than $300 to cut down one.
Bob
Sorry, no '80 - '86 Ford trucks "Oswald": 1997 F-250HD crew cab short box, 460, E4OD, 4.10 gears "Pluto": 1971 Bronco, 302, NV3550 5 speed, Atlas 4.3:1 transfer case, 33" tires "the motorhome": 2015 E-450-based 28' class C motorhome, 6.8L V-10 "the Dodge": 2007 Dodge 2500, 6.7L Cummins |
|
Administrator
|
I agree. I had one totally rebuilt for that price.
Just perused the Driveshaft page and they don't seem to have used the E4OD in F150 4wd trucks in '89. The F250 4wd's did get them. But I was hoping to compare front driveshaft lengths just to see if they were different. No can do. But, in '88 they used the same front driveshaft (E8TZ 4A376-B) for many trucks, including all F150's & F250's with a C6, regardless of engine. So, there should be no worries about the front driveshaft. Given that, I think we are just about "there" with the plan: Use the BW1356 I had built for the truck and get the "new" rear driveshaft cut down about 2".  Thanks, guys! This has really helped.
Gary, AKA "Gary fellow": Profile
Dad's: '81 F150 Ranger XLT 4x4: Down for restomod: Full-roller "stroked 351M" w/Trick Flow heads & intake, EEC-V SEFI/E4OD/3.50 gears w/Kevlar clutches
|
|
Administrator
|
Maybe hit Trent up for that ‘87 shift linkage... even if you have to stretch the one arm a bit?
SHORT BED 4-DOOR DIESEL: 1986 F350 4x4 under construction-- 7.3 IDIT ZF5+GVOD
STRAIGHT SIX 4X4: 1981 F150 2wd to 4x4-- 300 I6 close ratio diesel T19, hydroboost brakes, Saginaw steering BIG F: 1995 F-Superduty under construction— converting to 6.9L IDI diesel ZF5+DNE2 |
|
In reply to this post by Gary Lewis
Gary. First, I admit, I am not a POR 15 fan. However, I am a moisture cured urethane fan. So here is what I use, Master Series Silver. I may have spoken to this before. . . MS Silver is a moisture cured primer, that is intended to be top coated. It has better adhesion properties than POR, can be used on new or rusted metal ( unlike POR ) and I have been using it for nearly 20 years. I love it. I use it to seal all my welds, any rusted metal, etc. It doesn't have the advertising of POR . .but IMO, it is much better.
http://www.nomorerust.com/gallery/_data/i/upload/2018/02/06/20180206114309-4877762f-me.jpg
Pete's Ponies
Mustang RUSToration & Performance 1982 F100 Flareside 1983 Bronco |
|
Administrator
|
Jonathan - You and I have first dibbs on anything on the truck, and my name is in the hat for the t-case shifter.
Pete - When I run out of POR15, which will be a while, I'll give Master Series Silver a try. But how, or with what, do you top-coat? To me that is the big question. As for adhesion to non-rusted metal, I've used POR15 many, many times that way and it has worked quite well - as long as the metal has been media-blasted and is clean and has "tooth". I'm not saying it is as good as MS, but it works extremely well. However, once the base coat is on the trouble begins, so I'm looking for a better approach to top-coating.
Gary, AKA "Gary fellow": Profile
Dad's: '81 F150 Ranger XLT 4x4: Down for restomod: Full-roller "stroked 351M" w/Trick Flow heads & intake, EEC-V SEFI/E4OD/3.50 gears w/Kevlar clutches
|
|
Administrator
|
Talked to my brother today and we've agreed the plan to put the drivetrain in Dad's truck. Hopefully next week.
In the interim I have to get several things done: Rip 2x4's to fit between the rocker panel and the stiffening rib that's ~3" inside the rocker panel.
|
|
Administrator
|
That’s an impressive list for the week and a solid plan! Exciting stuff... I’m glad your brother is coming to help with the big stuff. Two people definitely helps 🙂
Go ahead and ask Trent about the shifter. Maybe there might be a longer linkage arm from Huck that would work with no fabricated or modified parts? That’s kind of what I was hoping you might find for Dad’s (“as Ford would have done it”).
SHORT BED 4-DOOR DIESEL: 1986 F350 4x4 under construction-- 7.3 IDIT ZF5+GVOD
STRAIGHT SIX 4X4: 1981 F150 2wd to 4x4-- 300 I6 close ratio diesel T19, hydroboost brakes, Saginaw steering BIG F: 1995 F-Superduty under construction— converting to 6.9L IDI diesel ZF5+DNE2 |
|
In reply to this post by Gary Lewis
Master Series can be top coated with anything. You can use your POR, seriously. The Master Series line included a product that is just like POR. Light sensitive etc, just like POR, but they don't recommend using it as the base. They recommend the silver. The silver primer is what the POR line does not have. Now Master Series does have a UV resistant coating as well, which is not light sensitive. So anything that was going to be exposed, your guard rails at your hose, etc . would best be coated with it . . of course on top of the Master Seriers Silver :) Note: I've seen POR peel. It's a very hard surface for sure. But I have witnessed the adhesion properties being a problem. And the fact that it can't be use don new clean metal says something right there.
Pete's Ponies
Mustang RUSToration & Performance 1982 F100 Flareside 1983 Bronco |
|
Administrator
|
Jonathan - I like lists. They motivate me. They give me something to shoot for by the end of the time period. But the biggest deal in that list is getting the engine plate and refinishing it. And I'm pretty sure I can do that in a day and refinish all the other parts the same day - with the exception of the engine mounts.
Yes, these are exciting times. However, Janey thinks that the week after next may be better for my brother to come down. That's because my SiL will come with him and take Janey somewhere fun, like shopping, and she doesn't think she will be ready for that next week. But, we shall see. Pete - Speaking of the mounts, I will POR them and topcoat them with the satin black. As said, I've used POR on lots and lots of things, most of which have been either "new" metal or media-blasted metal, meaning none of it had any rust when painted. And none of the parts has ever peeled. My shop crane was new metal and only has the base POR on it. It's been on for at least 15 years and I've used the goody out of the crane, with no chipping or peeling of the paint. Again, I'm not saying that POR is as good as Master Series. I'm just saying that it works quite well for me. And, as with everything, I think the preparation is the key. For instance, when the new engine mounts get in I'll rinse them with brake cleaner to get as much oil off as I can, and then media blast them down to bare metal with an etch. And I believe it is the etch that gives the "tooth" the paint sticks to. And once the POR has cured to the point there is "finger drag" as the instructions say, I'll top-coat it with the spray satin black. That appears to let the POR set up sufficiently to know it'll cure, but it is still soft enough for the top coat to bond.
Gary, AKA "Gary fellow": Profile
Dad's: '81 F150 Ranger XLT 4x4: Down for restomod: Full-roller "stroked 351M" w/Trick Flow heads & intake, EEC-V SEFI/E4OD/3.50 gears w/Kevlar clutches
|
|
Administrator
|
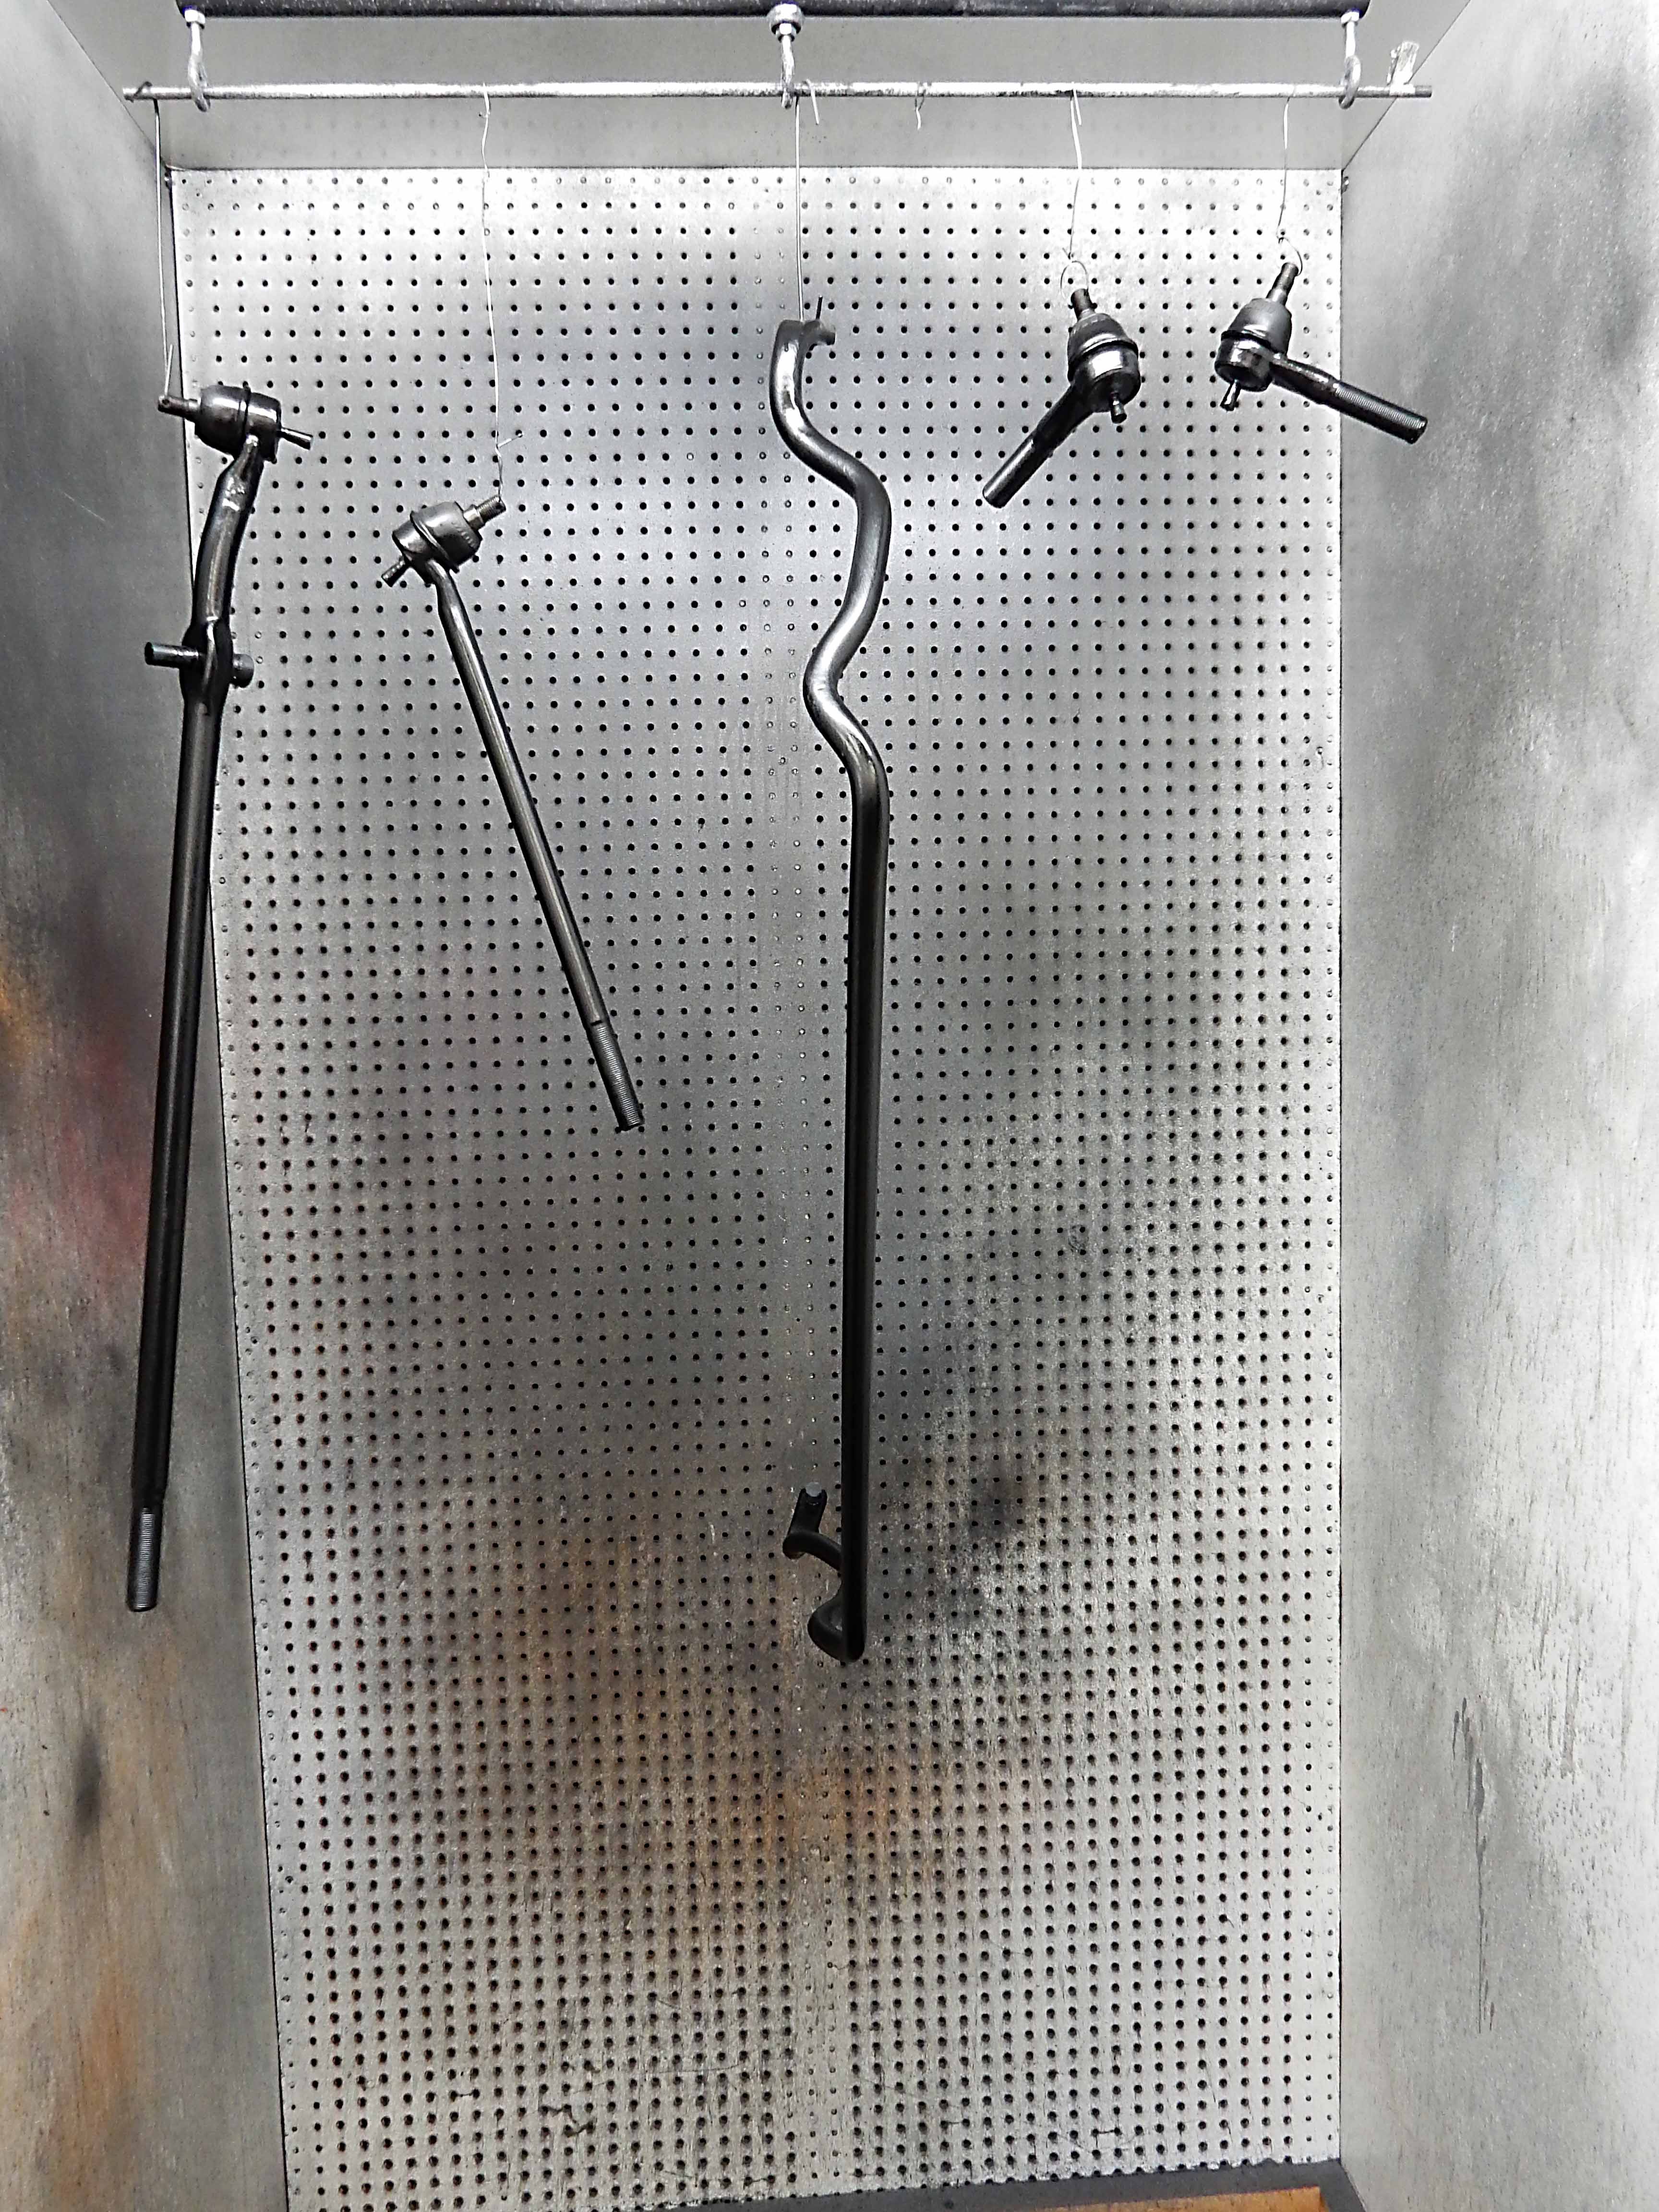
Got a little done today. First, here are the tie rods and the sway bar. (Trust me, the sway bar was swaying, but at 1/60 of a second it doesn't appear to be.
 ) )
 Then, I rounded up all the fasteners needed for the installation, I hope. Here's what I have: - Torque converter to flexplate - Flexplate through adapter to crankshaft - Engine mounts to block - Engine mounts to frame/perches - Transfer case to transmission - Transmission to engine What am I missing? Speaking of the tranny/engine bolts, here's what I found: 10 bolts 2 1/8" long, and 3 bolts 1 1/4" long. And for the E4OD/M-block combo the 1 1/4's are just right. So I suspect that some of those long bolts will shrink a bit as I want to use original-style bolts. 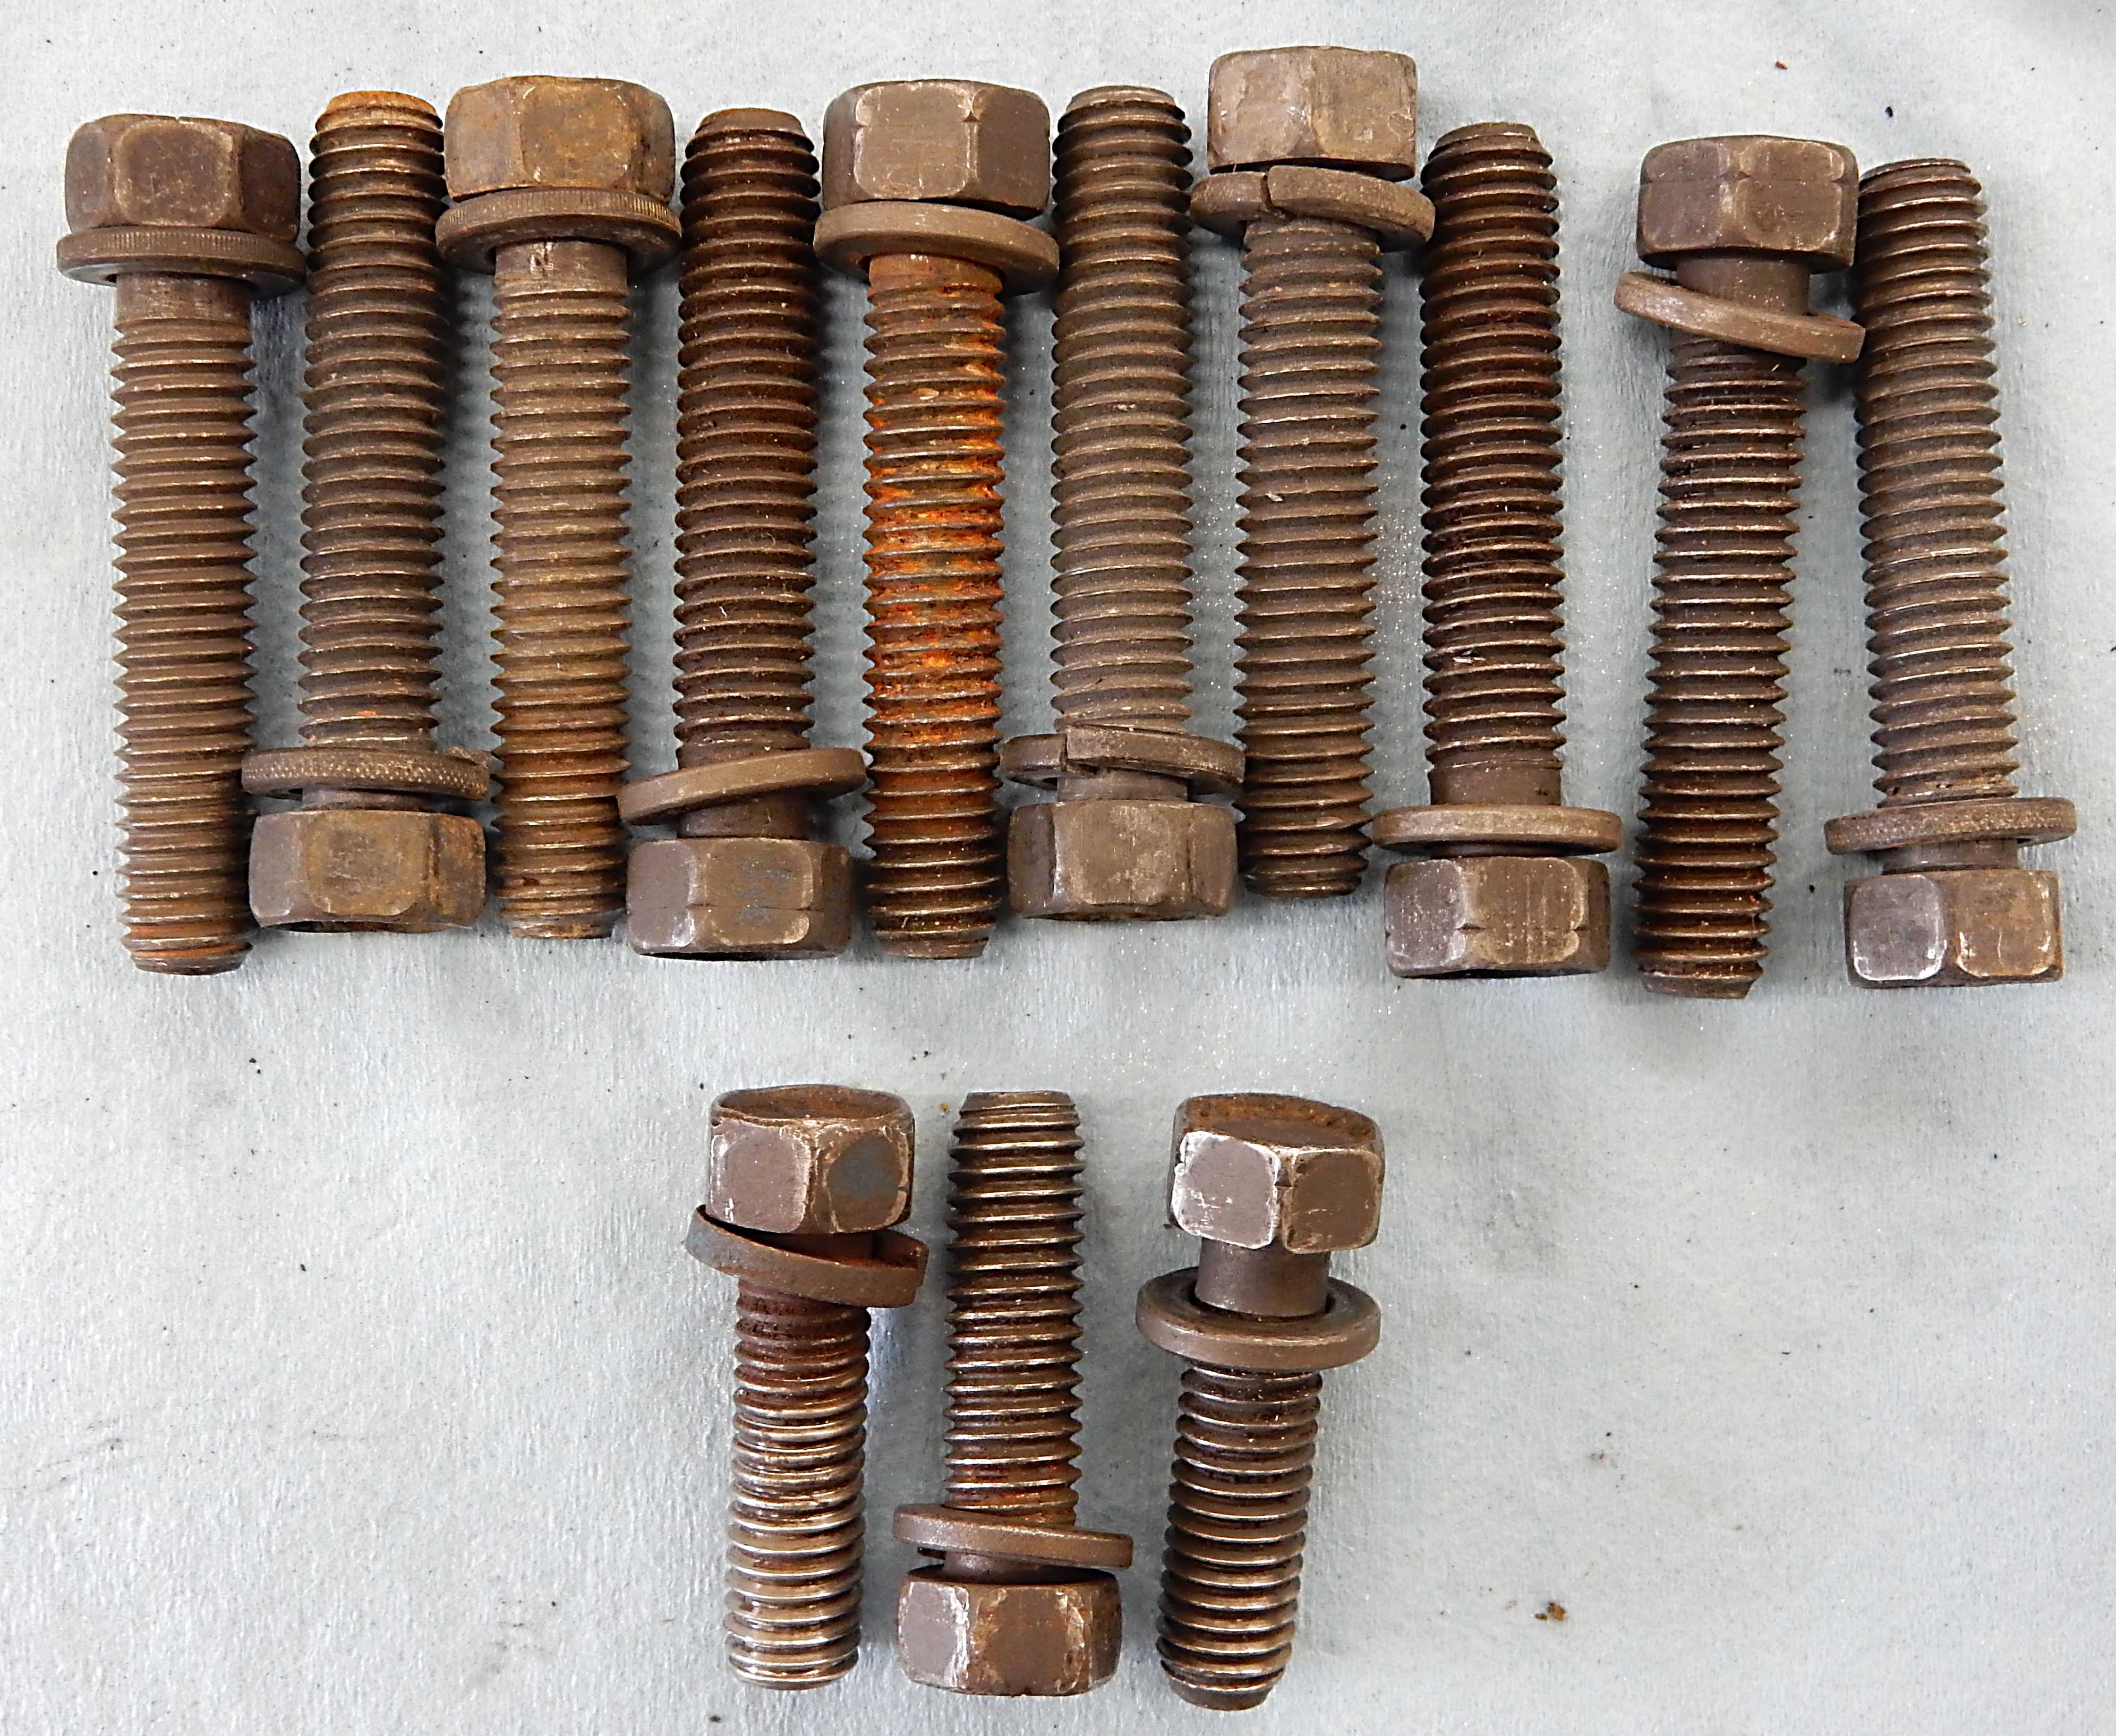 Also, I mentioned the adapter. It is shown below, but to help the reader understand, a 460's flywheel sits .300" further aft from the rear face of the block than that of the M-block's flywheel. So when you install a 460's transmission on an M-block the input shaft on the tranny doesn't fully engage the splines on the pressure plate or torque converter, whichever you have. And, the starter doesn't hit the flywheel properly as it registers on the transmission. So a few years ago, as I was installing a ZF5 in Dad's truck, I designed this spacer, which is now available from TMeyer. It moves the flywheel back the required distance and resolves the problem. It worked well on Dad's truck with the pilot bearing that's shown in the pics, but for an automatic you remove the pilot bearing. I did and test-fit the flexplate on the adapter and it fit nicely - the torque converter's pilot is 1.373" OD and the adapter is 1.375" ID, so it is a close fit. Then I test-fit the adapter, flexplate, and torque converter on the engine, and it fit perfectly. But I had to find the right place bolts to go into the crank. I had three sets: 1.750" long; 1.040" long; .693" long. The longest ones where those I bought for the ZF5 installation. The short ones are for an automatic transmission w/o an adapter. But the middle bed, I mean bolt, is just right. And all of this is just for the record if anyone is trying to follow in my footsteps.  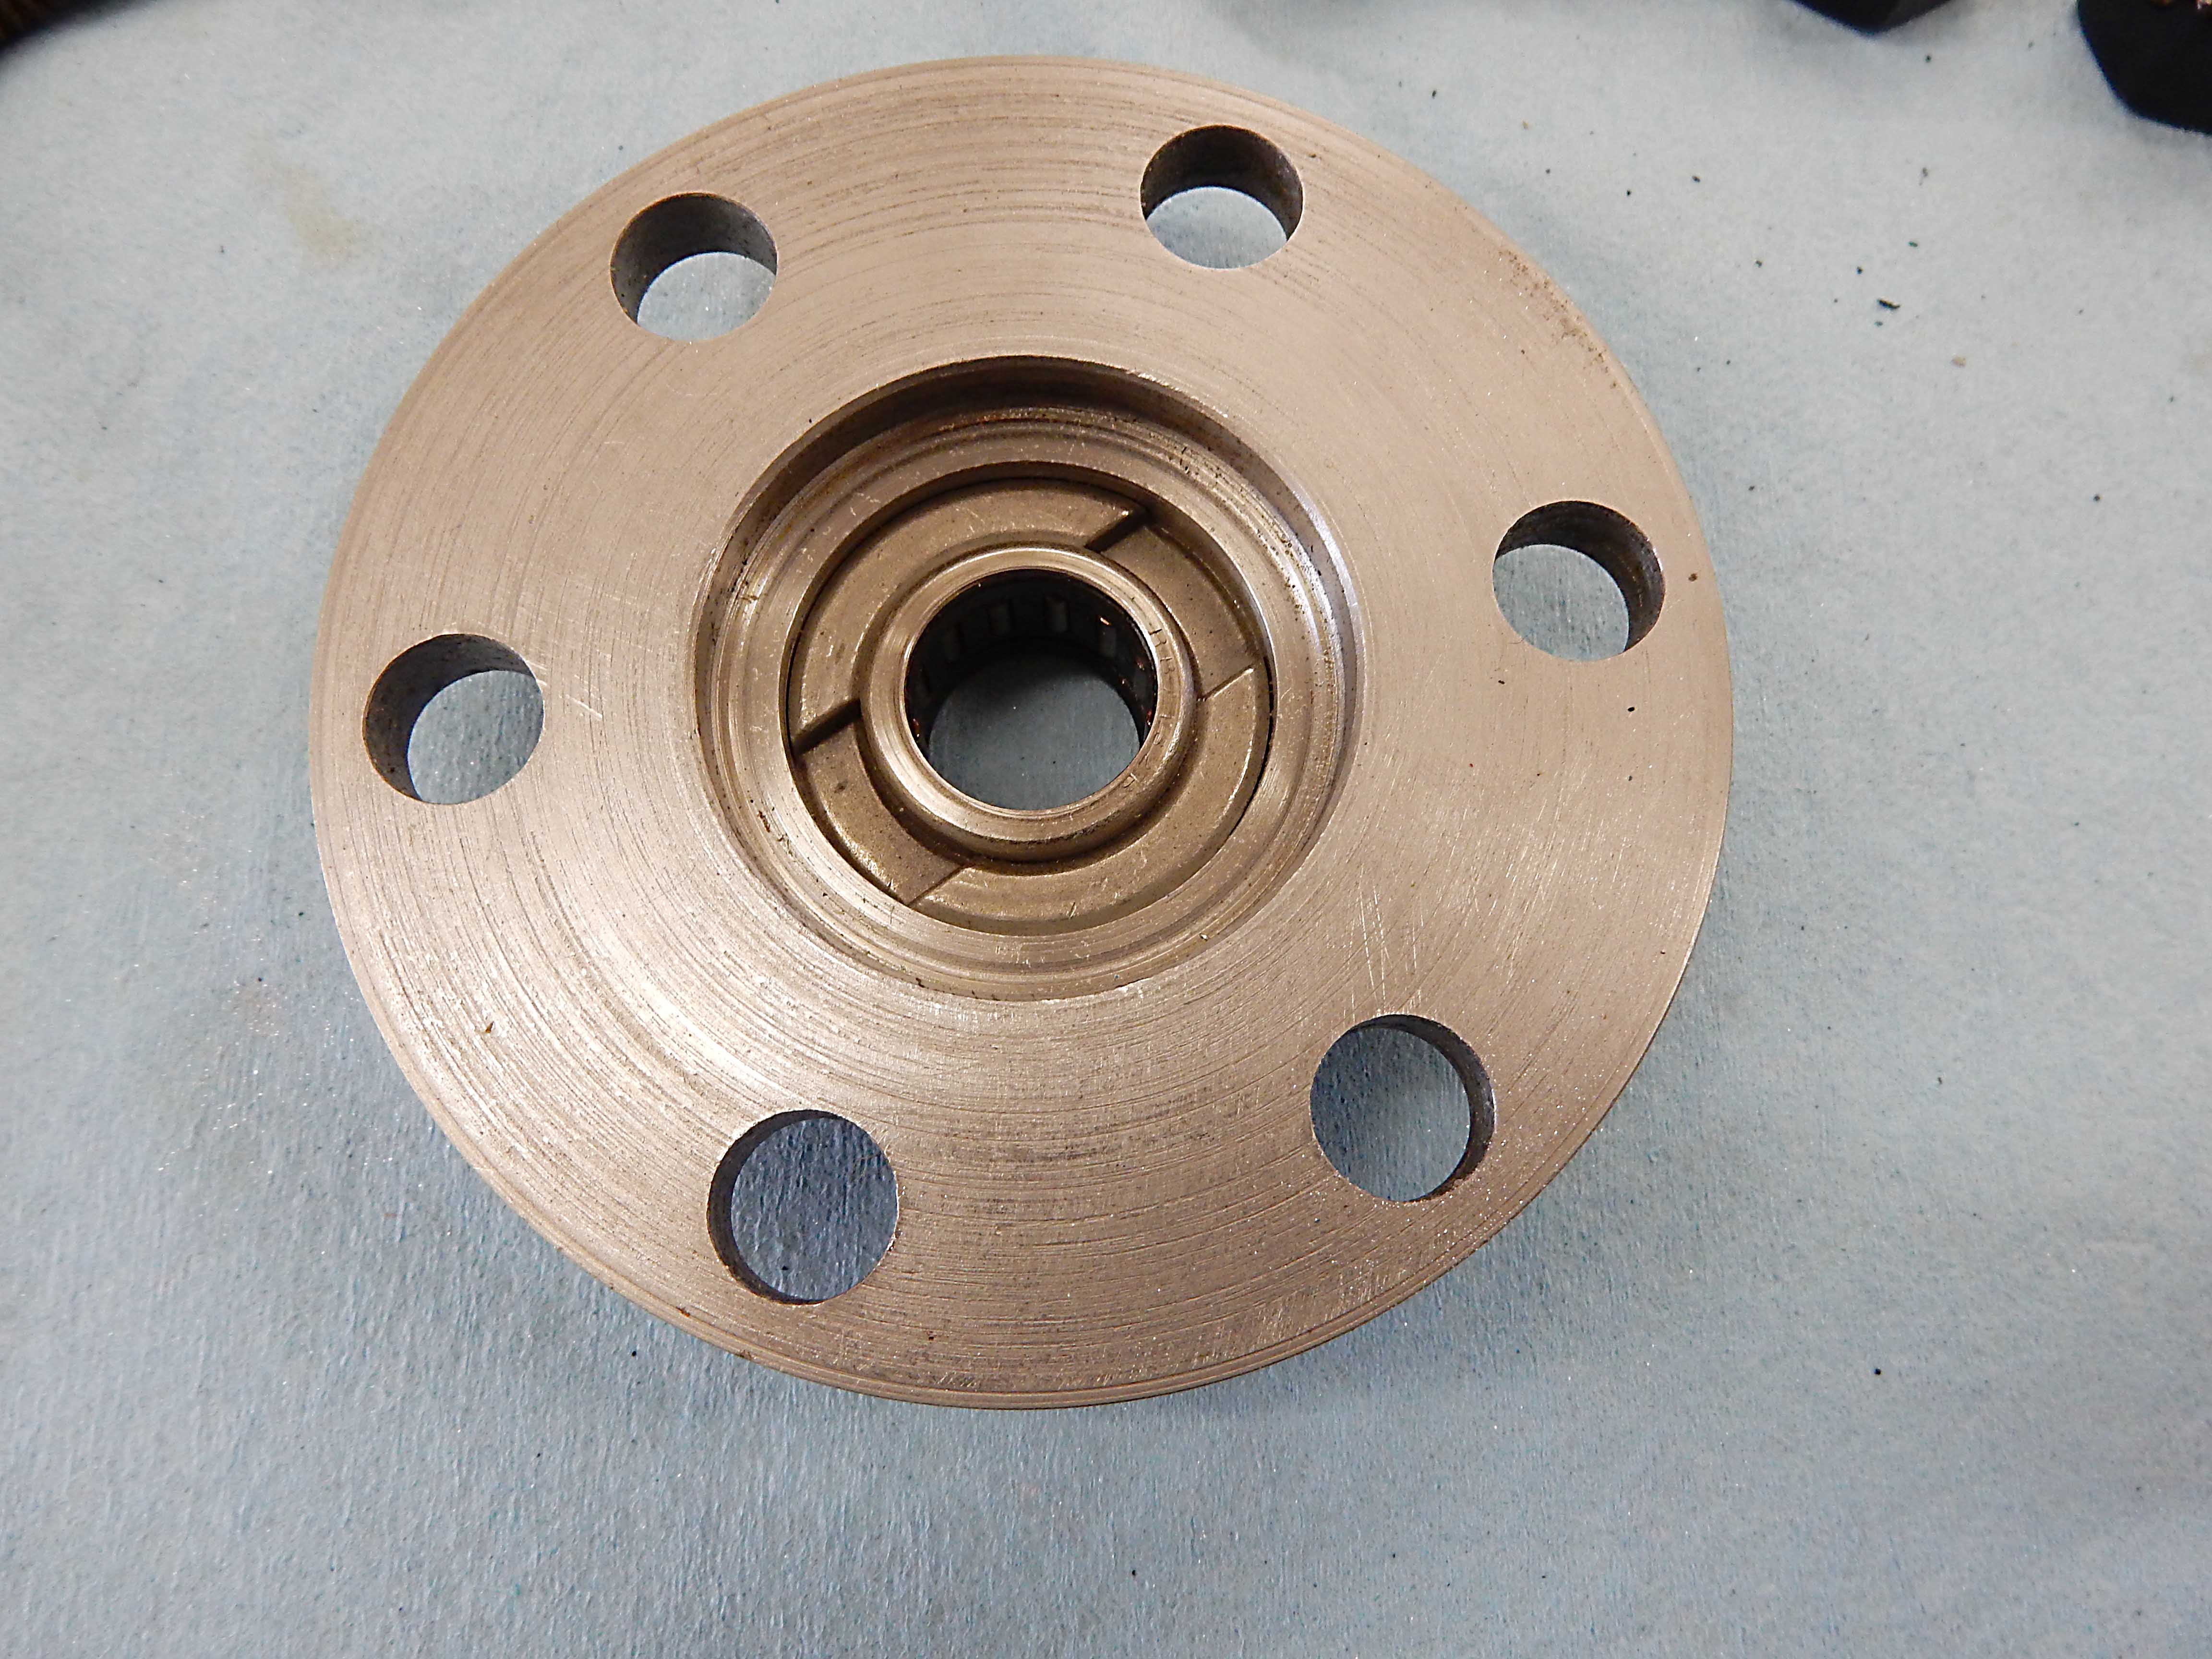
Gary, AKA "Gary fellow": Profile
Dad's: '81 F150 Ranger XLT 4x4: Down for restomod: Full-roller "stroked 351M" w/Trick Flow heads & intake, EEC-V SEFI/E4OD/3.50 gears w/Kevlar clutches
|
|
Administrator
|
So, does that mean that some of the bolts might be a "bear" to install?  |
|
Administrator
|
Lol! Yes, under normal circumstances some of those bolts are a bear to get to.
 But, fortunately, these bolts are easy to get to the way we are going to do it. All of the tranny/engine bolts will be easily accessible from above. And the torque converter nuts are a piece of cake - I have them on finger-tight right now and did it from above. So it'll be easy to do rather than a bear.  And now for a look ahead at today's activities. We just got back from Janey's 2nd checkup and she passed with flying colors. But we leave the house on these mornings a bit earlier than we normally get up and around, so we are now taking a break and drinking a cup of coffee/tea. However, I've already turned the heater in the parts washer on as I plan to pull the engine plate off Huck's 460 and de-grunge it today. And, I plan to shorten four of the tranny/engine bolts. Then I'll wash all the fasteners in the parts washer as I'm washing the plate so everything is ready to media-blast and powder coat tomorrow. But, in order to powder coat those parts the tie rods and sway bar have to come out of the paint/powder booth. So I may actually install them today instead of lay them down someplace. 
Gary, AKA "Gary fellow": Profile
Dad's: '81 F150 Ranger XLT 4x4: Down for restomod: Full-roller "stroked 351M" w/Trick Flow heads & intake, EEC-V SEFI/E4OD/3.50 gears w/Kevlar clutches
|
|
Administrator
|
Got quite a bit done today, but I also dodged a cannon ball.
You may remember a discussion about me finding two flexplates and not knowing from whence they came. And, that I counted teeth and was sure that they were 180-tooth flexplates, which means they are either for a 335 or 385-series engine. But, since a 385's flexplate won't bolt on a 335 crank and these bolted on they must be for a 335. Right? Well, today I got to thinking more about it and realized I've only had three 335 engines, and only one of those had a flexplate. Further, that flexplate had to have been on Rusty when I sold him. So, what do I have bolted onto Dad's engine? I pulled it off and counted - 164 teeth. A Windsor!  Given that, I turned to our handy dandy page on flywheels (Engines/Flywheels) and found the part number: D1AZ 6375-A. A quick search turned up several hits, but the cheapest was Rock Auto, again. So, it is on order for ~$28 + $10 shipping, and is supposed to be here on April 1st. (I wonder if that's a joke?) In addition, I pulled Huck's 460 off the engine stand and got the engine plate off the back. And I was reminded of something I need to say every time I think of it: When you are designing a shop crane and an engine stand make SURE that the legs will play nicely with each other. I didn't, and am reminded of that each and every time I try to pick and engine off the stand. The legs hit each other and won't allow the engine stand to "nest" between the shop crane's legs.  Anyway, I got the engine plate off and put it in the parts washer, gunk and all. In fact, there was so much gunk that it clogged the 2nd-stage filter in the parts washer. But with the filter cleaned the hot Simple Green did its thing and the plate came out oil-free. Then, realizing that if I had the parts media blasted today I could powder coat tomorrow and then install the sway bar and tie rods when the parts were baking, I decided to change my plans and blast today. So I took the engine plate and handful of fasteners as well as the new engine mounts to the blast cabinet. And here's what came out: 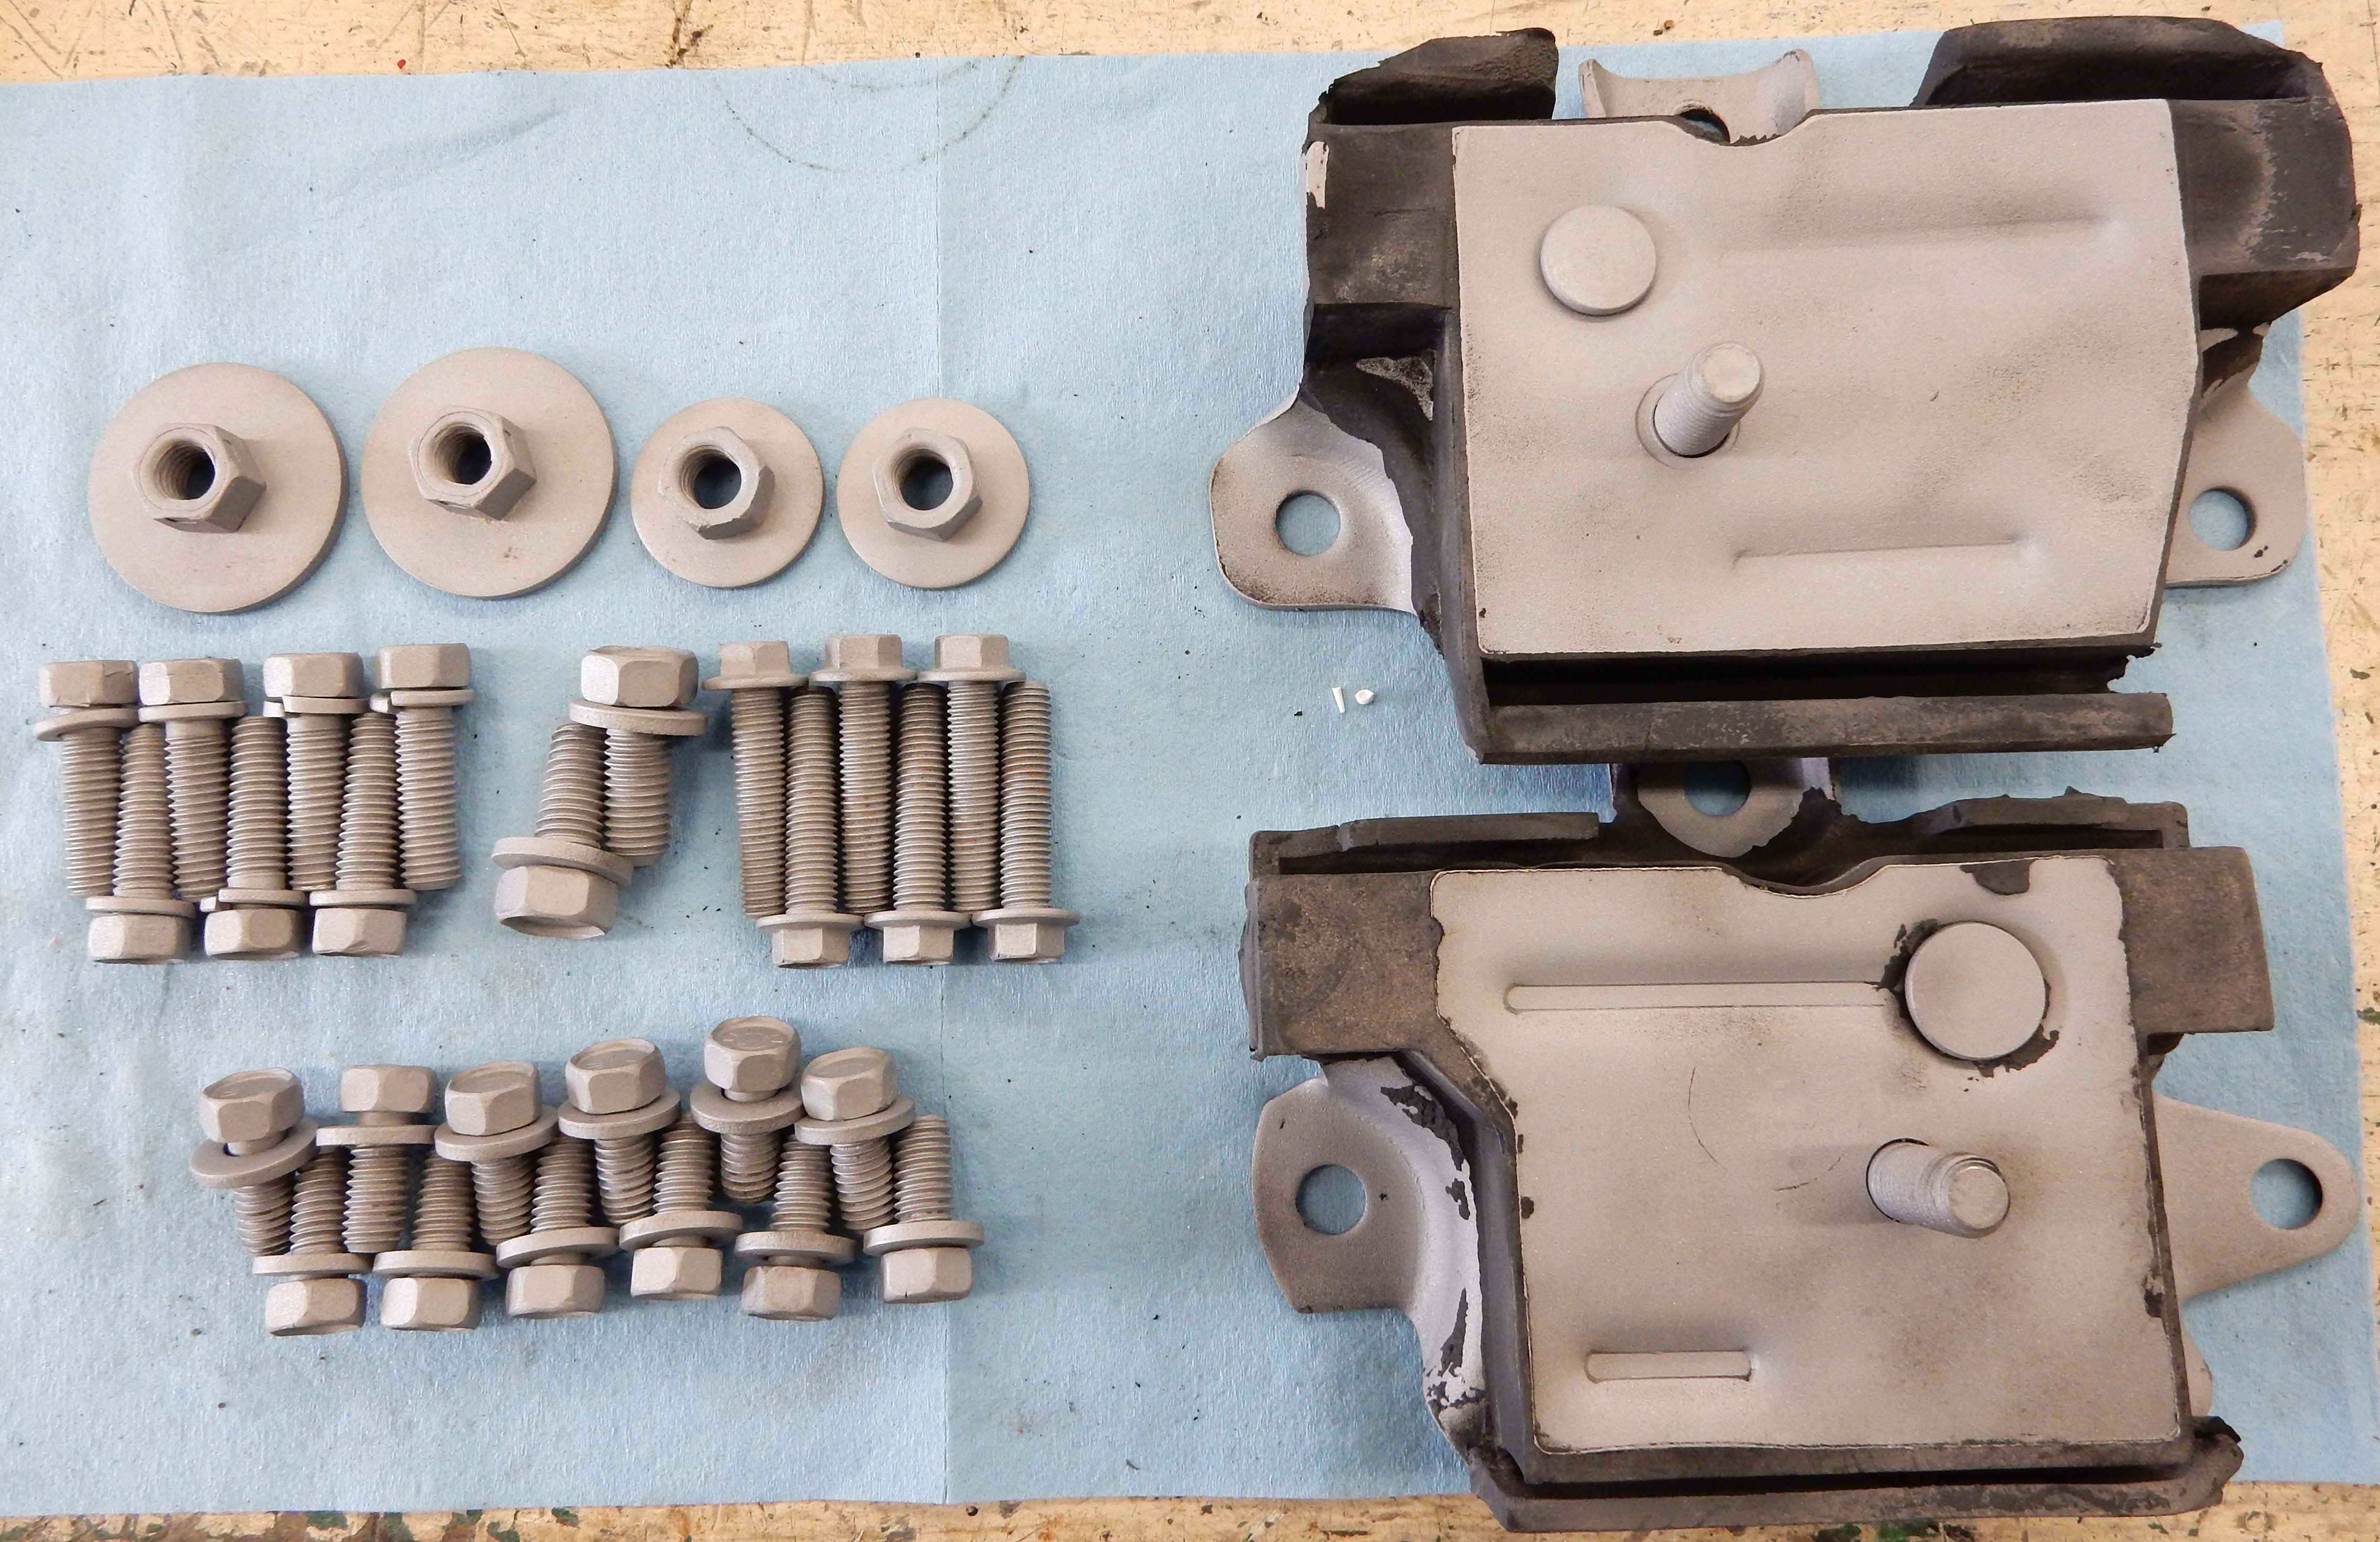 And, here's the engine plate. The one on the left is from a 335 Series engine, has a part number of D7TE 7007-A and is marked D7TE-A. That's the one that came on Dad's engine. The one on the right is from Huck and is marked E7TE 6A375-EA, which is probably part number E7TE 7007-A. However, the 1994 version of the master parts catalog only shows that as being used with a C6, not an E4OD. But, it doesn't show any engine plate for an E4OD and that is an error. So, I'm betting this is the right one. In any event, it is the one I'm going to use. 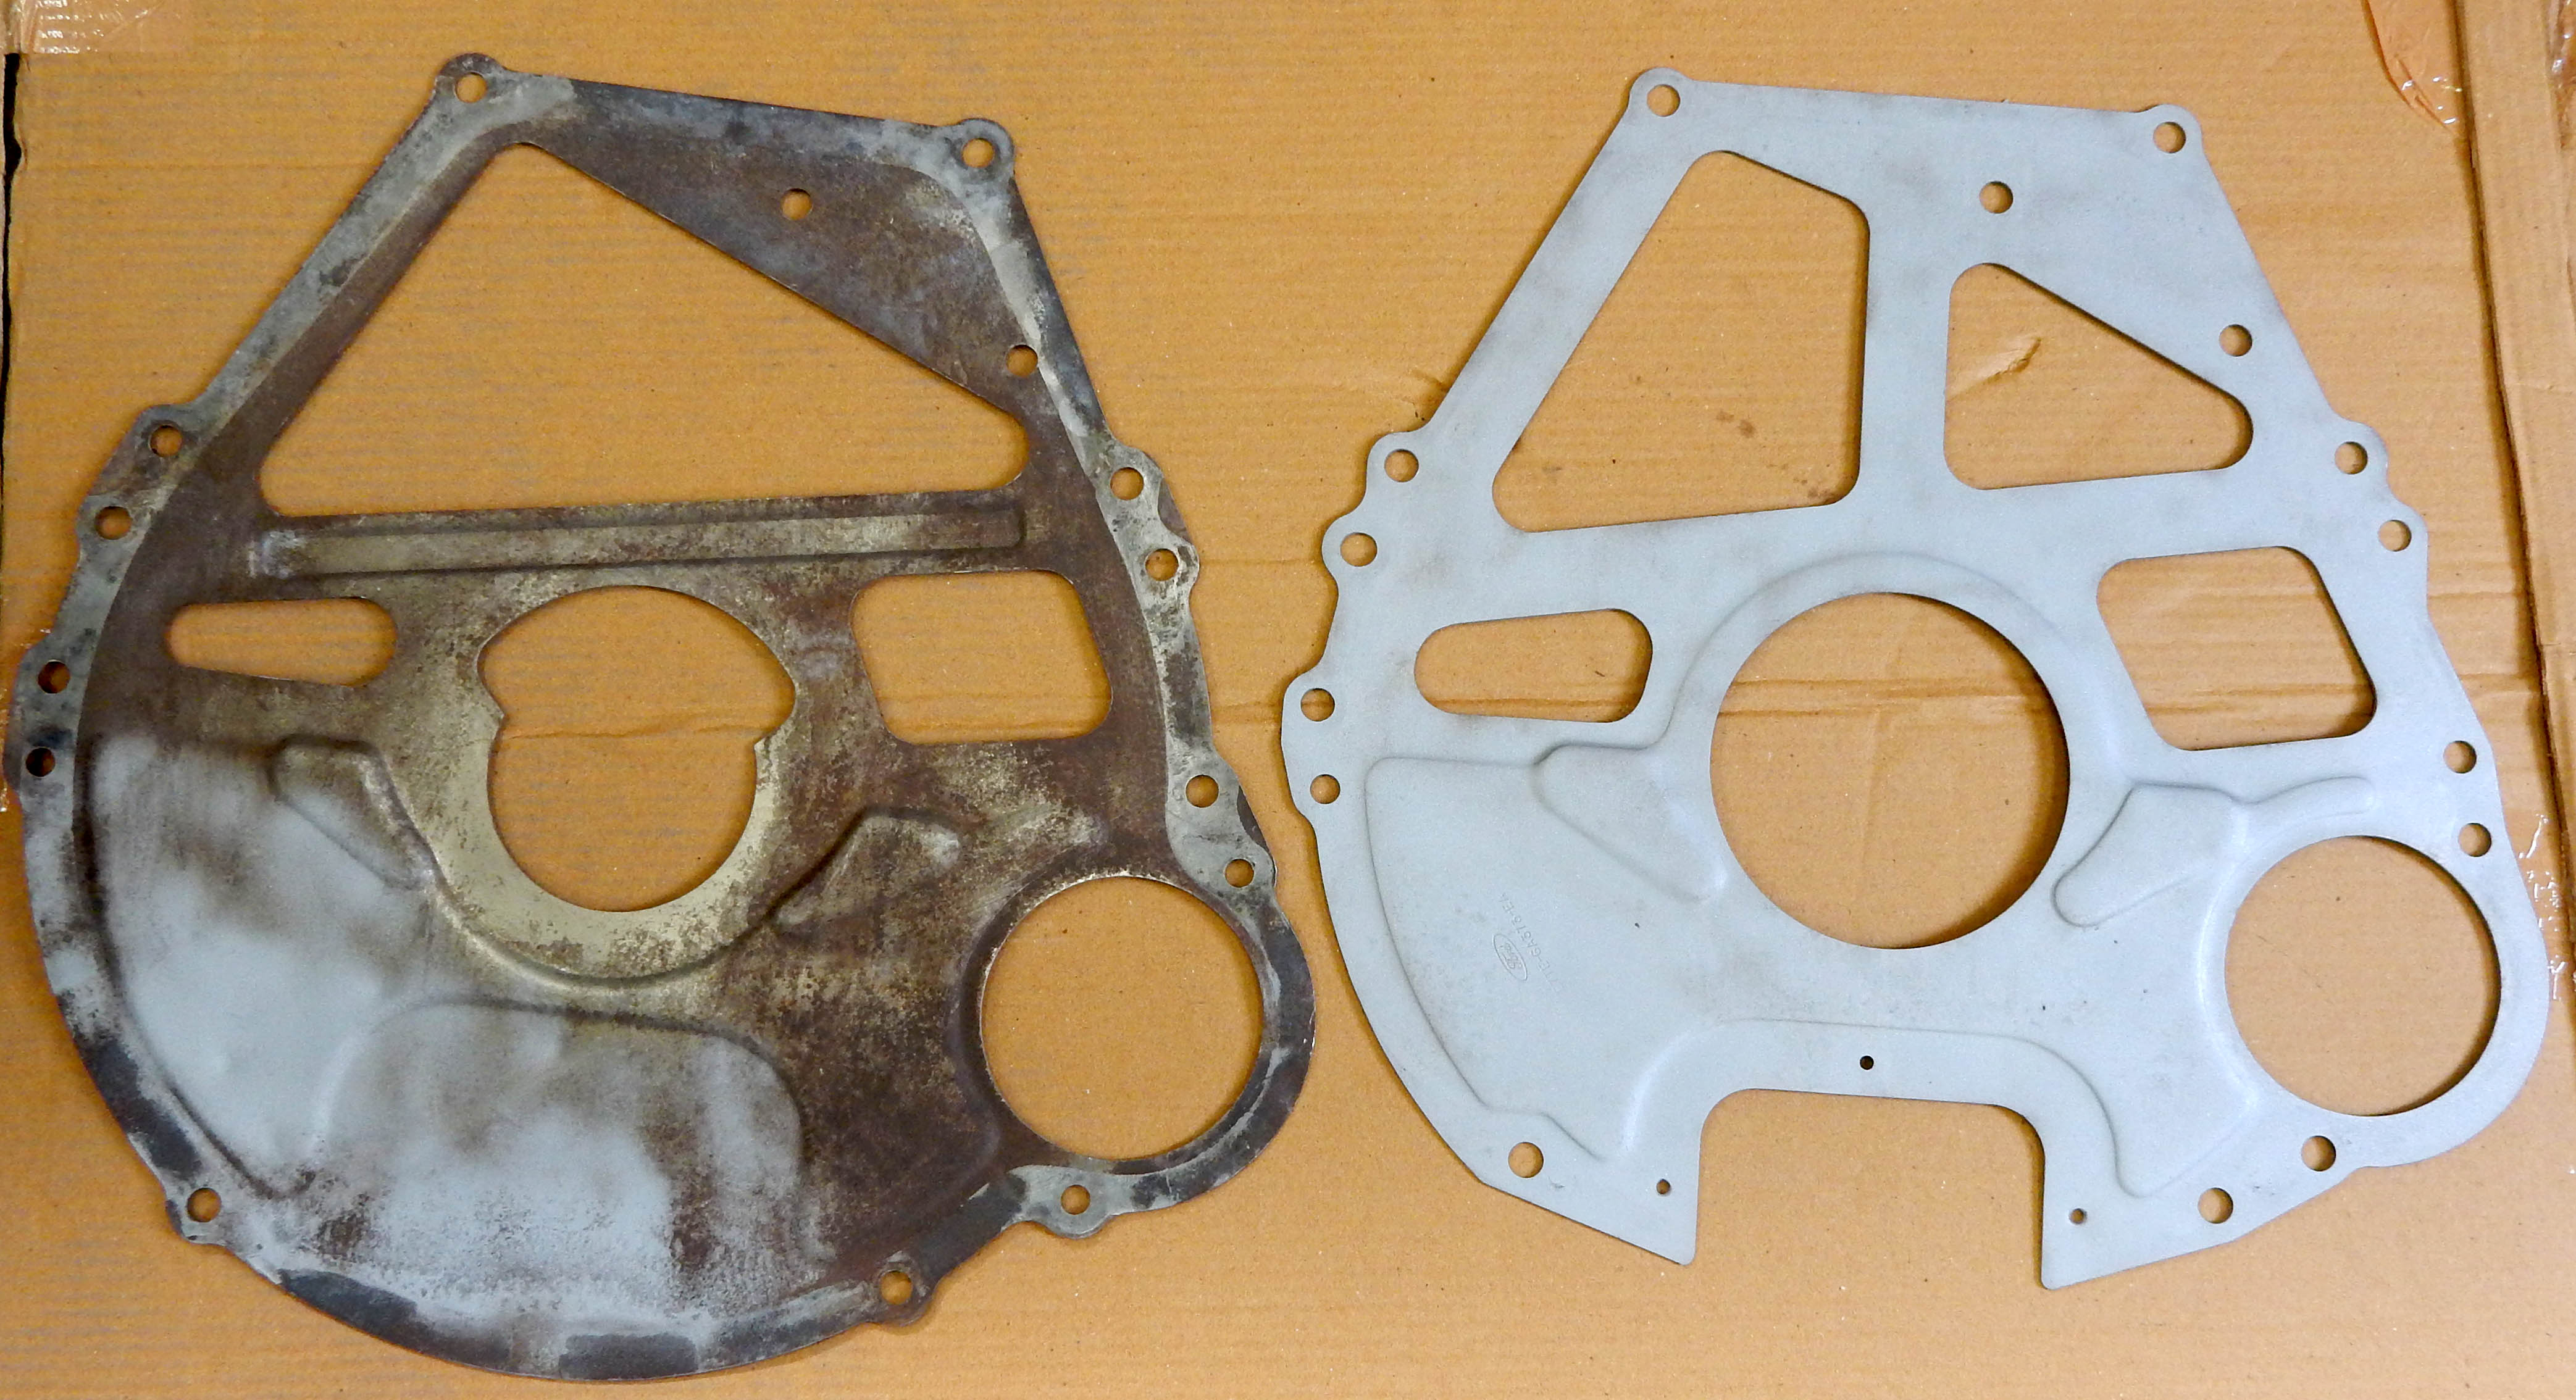
Gary, AKA "Gary fellow": Profile
Dad's: '81 F150 Ranger XLT 4x4: Down for restomod: Full-roller "stroked 351M" w/Trick Flow heads & intake, EEC-V SEFI/E4OD/3.50 gears w/Kevlar clutches
|
| Edit this page |


