Dad's Truck Build
|
Administrator
|
Thanks, guys! Yes, September would be a good time to do it. But, I have a goal of having it in the show, replete with engine, tranny, t-case, driveshafts, wheels, etc. And I doubt the night before would be enough time to lay the engine/tranny in, measure for the crossmember, spot and drill the holes, touch up the bare metal, and then bolt the crossmember in.
Plus, my bro wants to be part of it, so that we shall do! It was his dad's truck as well, so he has an interest. Speaking of the crossmember, I've been worried that it wouldn't fit right, but with some fairly-precise measuring it looks like it will fit perfectly - although I'm not about to drill holes until the engine/tranny are in and we know exactly. (Yes, I know it should fit as the later trucks had essentially the same frame and came with the E4OD, but still....) Also, I've been scoping out how to lay the engine and tranny in. Looks like I can come in from the driver's side - through the door into the other room, for those that have been in the shop. That way I don't have to worry about the legs of the shop crane hitting the front swing arms. But, I'll need to do some more measuring to ensure that will work. And, I'm thinking about installing the engine, supporting the rear of it on a jack stand, and then laying the tranny in behind it. That would mean I don't have to figure out how to marry the engine and tranny "in the air". I only have one shop crane, so would have to pick the tranny up off the engine stand it is on, lay it on something like the tool cart but with padding so it doesn't get scratched, then pick the engine up, swing it around to meet up with the tranny, bolt them together, and then use a ratchet strap around the back of the tranny to level the combo up. Thoughts? Suggestions?
Gary, AKA "Gary fellow": Profile
Dad's: '81 F150 Ranger XLT 4x4: Down for restomod: Full-roller "stroked 351M" w/Trick Flow heads & intake, EEC-V SEFI/E4OD/3.50 gears w/Kevlar clutches
|
|
Banned User
|
In reply to this post by Ford F834
Bumpers, 12K winch, other stuff stored inside the bumpers, extra battery, OBA, extra wiring, all the options I've added... I'm not sure I can buy that - the consoles I have might have been exposed to slightly less UV than at latitudes where the sun gets farther under the roof, but not by THAT much. |
|
Administrator
|
In reply to this post by Gary Lewis
Didn't get a lot done today, but some:
Prep'd the sway bar and tie rods for POR15'ing. But, since you need to top-coat POR15 w/in 6 hours of applying it I'll wait until tomorrow to do that.Checked the transmission crossmember for fitment, as previously discussed. It looks like it'll fit nicely.Ordered new engine "isolators", aka mounts. I pulled the old ones out and cleaned them up, but realized that they've seen better days. So I went to our parts list on the 351M/400 engines and found that I need E1TZ 6038-A and -B. Googled that and Amazon said they have them but they don't fit my truck. And, they want something like $50/ea for them. However, Rock Auto says they have them, they do fit, and they want $5/ea. Guess where I bought them? |
|
In reply to this post by grumpin
I answered my own question after looking further in to your post...doh!

Dane
1986 F250HD SC XLT Lariat 4x4 460 C6-Sold 1992 Bronco XLT 4x4 351W E4OD 1998 GMC Sierra SLE K1500 350 4L60E Arizona |
|
Banned User
|
In reply to this post by Gary Lewis
Why did you exclude the option of putting the trans in, then the engine? That worked very smoothly for me, but the body out of the way. Read this & the NEXT several captions: 
|
|
Administrator
|
That would work if the transmission crossmember were in place - or if I already had holes in the frame for it. But I don't exactly know where it goes since the E4OD is several inches longer. than both the C6 and Zf5, for which I already have holes. So I need the engine in place, and then the tranny, in order to know where to place the crossmember.
Gary, AKA "Gary fellow": Profile
Dad's: '81 F150 Ranger XLT 4x4: Down for restomod: Full-roller "stroked 351M" w/Trick Flow heads & intake, EEC-V SEFI/E4OD/3.50 gears w/Kevlar clutches
|
|
Administrator
|
Gary, I don’t know that there is an obviously better or worse way to do this... but my preference would be to mate them and drop it in as a single unit. The reason I would choose that is because transmissions generally don’t have many good ways to get hold of them and manipulate them to line them up. If you are really trying to mate and install them with zero finish damage I think you would have the best luck putting the transmission in some kind of a padded cradle, and manipulating the engine on the hoist to line them up and bolt them together. If the engine is mounted, and you are raising the transmission on a jack, you are pretty much limited to up and down, and maybe some for and aft tilt by lifting the engine. Side to side tilt or rotation is always the difficult part with the transmission on a jack. This will be all that much more difficult if you are worried about scratching things. A dedicated true transmission jack would help, but nothing beats the control you have with the hoist. Granted the two together will be heavier and more awkward, but with two of you it should be a gentle and exact operation. Like I said I don’t think there is a wrong way, but that’s what I would lean towards if it were me.
SHORT BED 4-DOOR DIESEL: 1986 F350 4x4 under construction-- 7.3 IDIT ZF5+GVOD
STRAIGHT SIX 4X4: 1981 F150 2wd to 4x4-- 300 I6 close ratio diesel T19, hydroboost brakes, Saginaw steering BIG F: 1995 F-Superduty under construction— converting to 6.9L IDI diesel ZF5+DNE2 |
|
Administrator
|
In reply to this post by Gary Lewis
Only got a little bit done today:
Found two flywheels/flexplates. Not sure why I have two, but they appear to be the right ones for a 335 Series engine as they bolt up to the crank on Dad's engine. So far I've not found any #'s on them, but I can confirm they are the right ones as they have a 180-tooth ring gear just like the 460, but have a smaller hub, so can't be interchanged. Anyway, one of them has really good teeth on the ring gear, so that's the one I'll use. And, I pulled out one "Plate Assy. (Engine Rear)", and I'm sure it is for the 335 Series engines. I compared it to the one on the 460 out of Huck, which had an E4OD behind it, and it looks identical with the exception of 3 small screw holes to attach an inspection cover - the 335 one has them and the 385 one doesn't. I guess I'll pull Huck's engine off the stand and get that plate off, just to make sure. Bill - do you have an inspection cover for the torque converter on Darth? I also pulled the adapter I made to space the flywheel on a 335 back to where it should be on a 385. I'll use it and be able to use a 460's starter as it registers on the transmission, which is a 460's transmission. And, I found the place bolts for the flywheel, the mount/isolator bolts, the tranny/engine bolts, and the t-case/tranny bolts. I'll have to blast and PC those to be ready to install the engine, tranny, and t-case. But, now for the lament. Did I ever tell you that I don't like to paint? Well, I put on two coats of POR15 Rust Preventive Coating in gray on the tie rods and front sway bar. Heretofore I've used their gloss black, and have always complained that it is hard to tell where the quasi-cured base coat is when you put their chassis back top coat on as it goes on shiny and you can't tell the difference. So, I thought gray would be just the ticket as you can easily tell what's what. Yep, sure can. But, covering the gray isn't all that easy. I got two coats of chassis black on and will have to hit it again tomorrow.  In future I might go to a chassis black spray paint to cover the POR15. Apparently if you put it on while the POR is still sticky it'll bond, and it sure would be easier and smoother.
Gary, AKA "Gary fellow": Profile
Dad's: '81 F150 Ranger XLT 4x4: Down for restomod: Full-roller "stroked 351M" w/Trick Flow heads & intake, EEC-V SEFI/E4OD/3.50 gears w/Kevlar clutches
|
|
Administrator
|
Yes, there is a two bolt "inspection" plate on Darth, that's how you access the torque converter nuts, E4OD converter drain is on the outer diameter of the converter and is accessed through the round hole with plastic plug on the bottom of the converter housing.
Bill AKA "LOBO" Profile
"Getting old is inevitable, growing up is optional" Darth Vader 1986 F350 460 converted to MAF/SEFI, E4OD 12X3 1/2 rear brakes, traction loc 3:55 gear, 160 amp 3G alternator Wife's 2011 Flex Limited Daily Driver 2009 Flex Limited with factory tow package Project car 1986 Chrysler LeBaron convertible 2.2L Turbo II, modified A413 |
|
Administrator
|
In reply to this post by Ford F834
Bill - Thanks. Yes, I have the plastic plug. But I wonder if under all the crud on the 460's engine plate there are holes. I'll pull that thing off and clean it up to find out. It is gross!
Jonathan - I'll have to look at the tranny tomorrow, but I can come under the front and the rear with large ratchet straps, as shown below when I took that monster out of Huck, thereby missing the pan. The straps won't hurt the paint, although I might pad them. And, I have a load balancer like the one below that will let me tilt the tranny to line up with the engine. Plus, I don't have to use the tranny jack as I can lay the tranny in from the top with the shop crane. So if I can place the engine and prop the rear of it up with a jack stand or floor jack (remember, the truck will be down at almost ground level) then I can add the torque converter afterwards. The TQ is HEAVY on an E4OD, and especially so since I went with one that is extra stout. And then add the transmission. 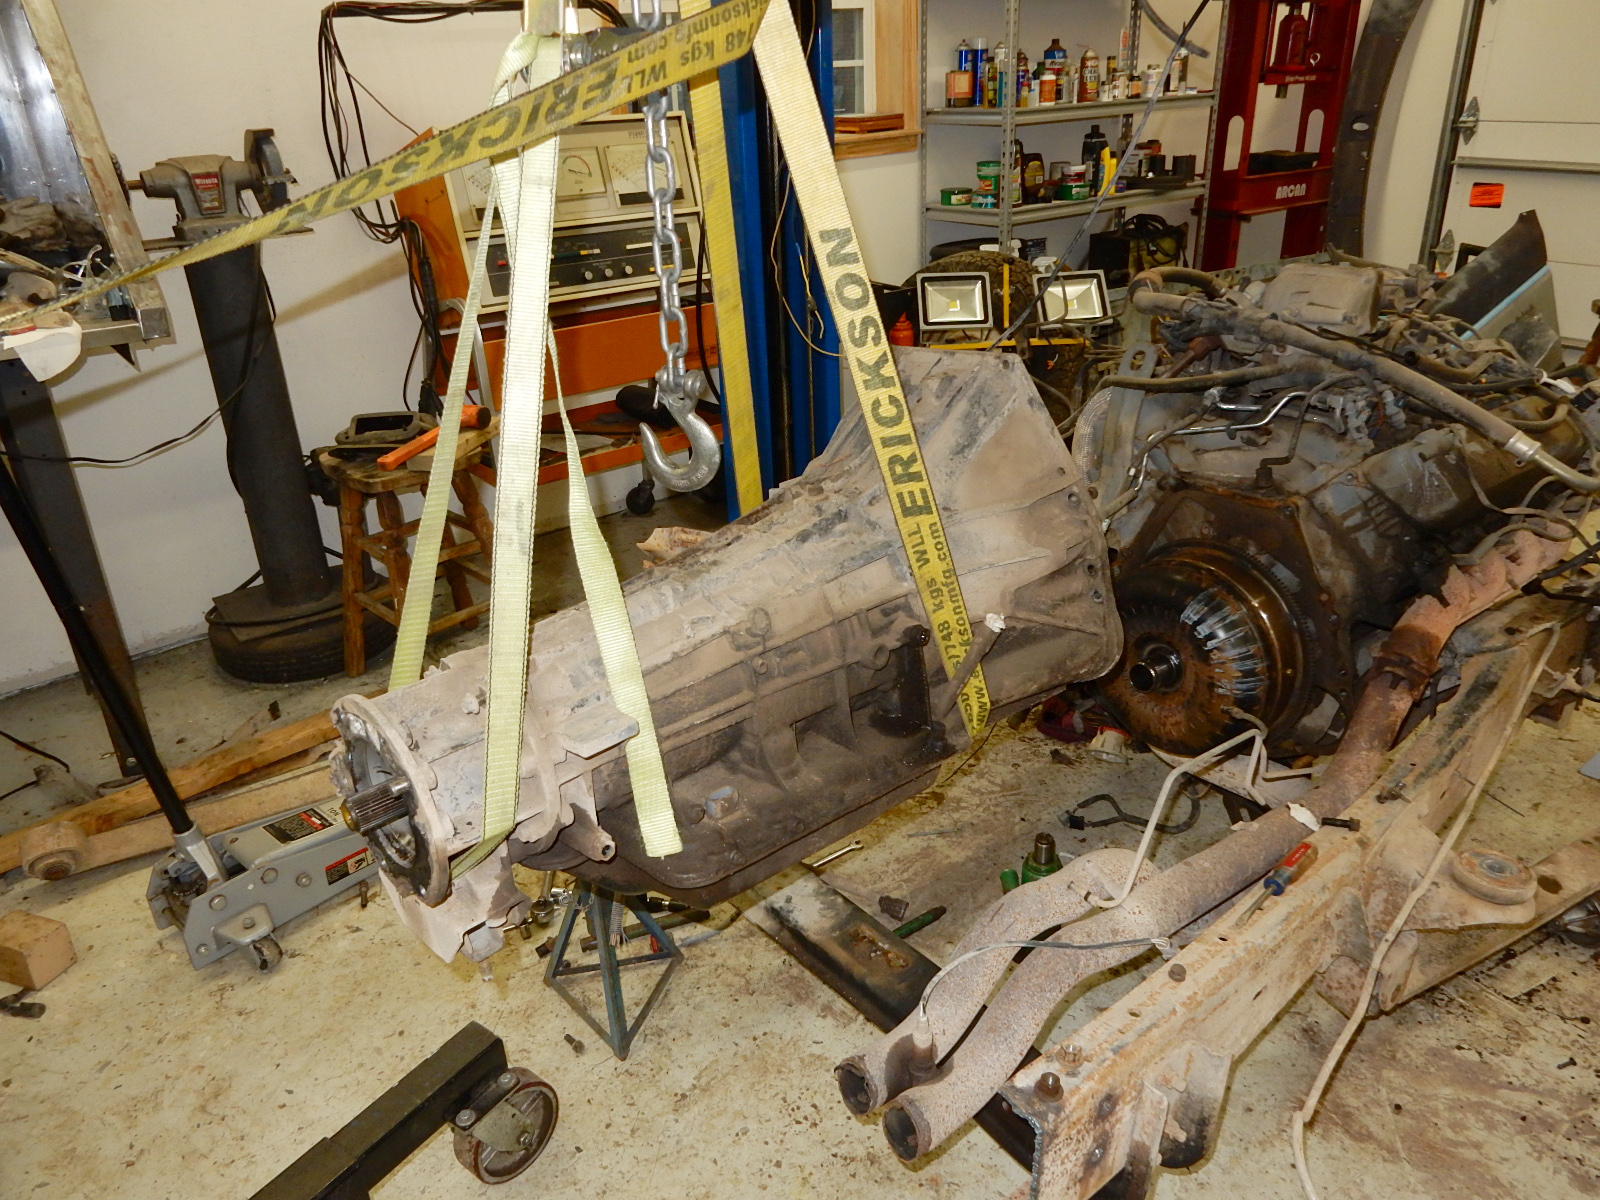 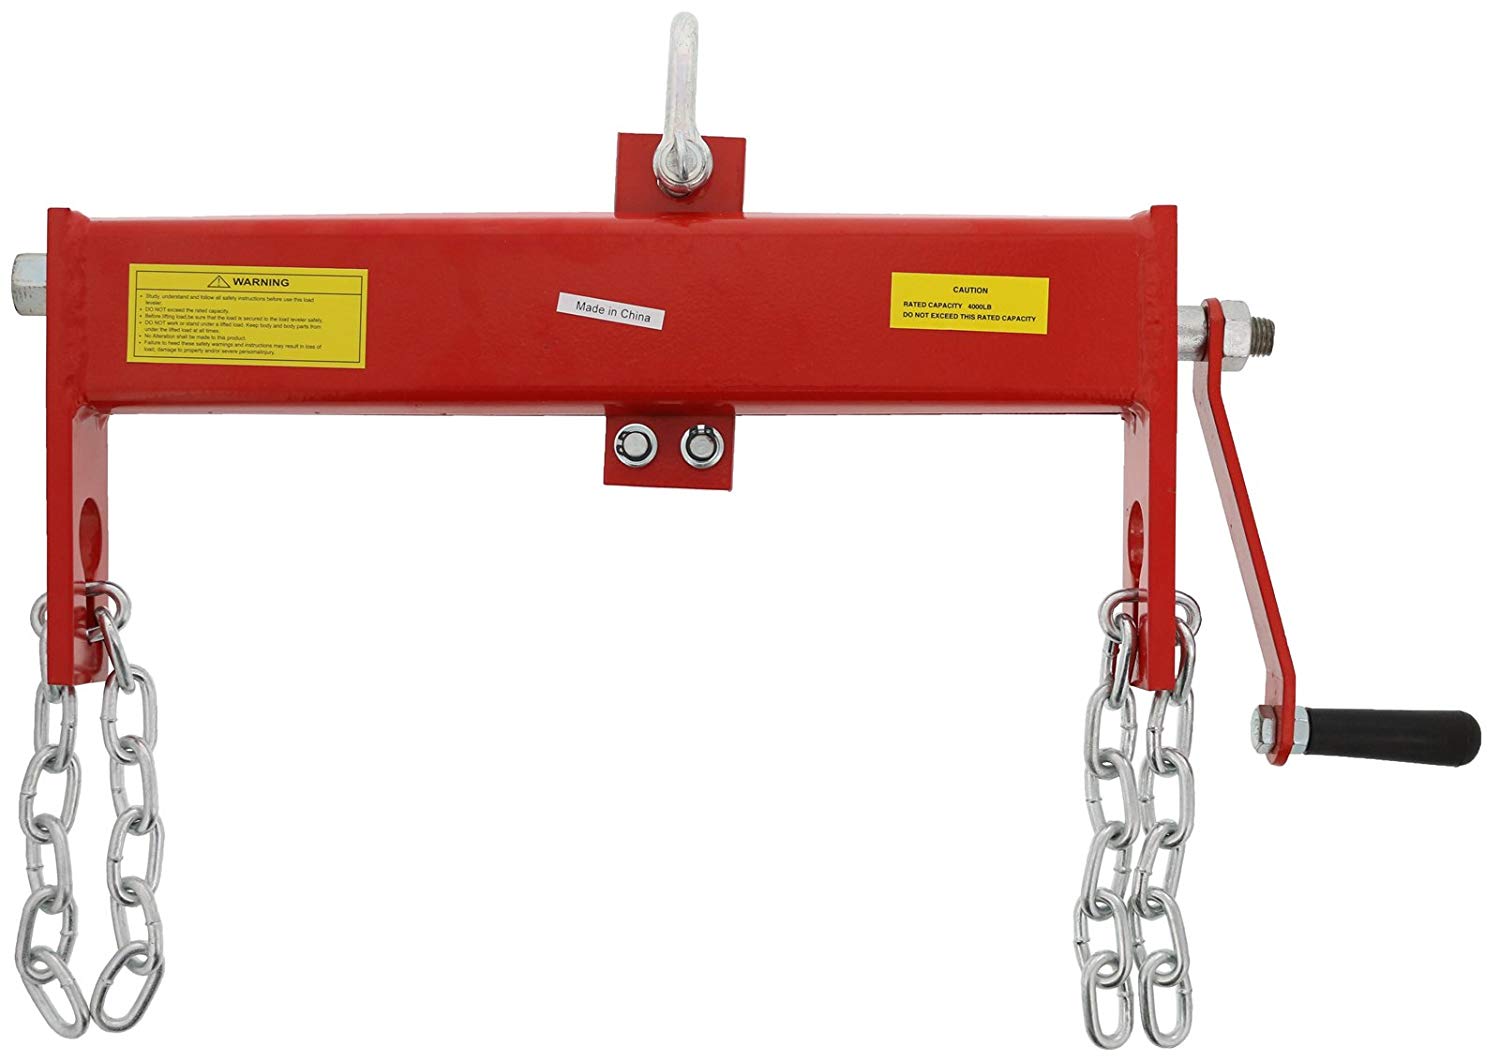
Gary, AKA "Gary fellow": Profile
Dad's: '81 F150 Ranger XLT 4x4: Down for restomod: Full-roller "stroked 351M" w/Trick Flow heads & intake, EEC-V SEFI/E4OD/3.50 gears w/Kevlar clutches
|
|
Banned User
|
In reply to this post by Gary Lewis
I'm not saying this is the only or best way to do it; only that it's an option for you to consider. But you COULD set the trans in the frame (on a 2x4 at the front) bolted to the crossmember, whose ends are padded with cardboard. Then bring the engine in, bolt it to the bellhousing, then set it onto the frame perches, sliding the crossmember as needed. Then remove the pads, drill the holes (if necessary), and bolt the Xmbr in. |
|
Administrator
|
Steve & Jonathan - You both seem to think that I either need the tranny attached to the engine or need to get it in the truck first, before the engine. That seems to be telling me that you think I'll have problems getting the tranny in after the engine is in place. Right?
If so, then I need to do some serious measuring. Perhaps I can this afternoon after/before church and after getting another coat on the parts being painted. For this exercise the cab will be way up on the lift, so we will have access from the front and the driver's side. But the crane has a limit of how far it can go towards the rear with the boom fully extended, so I'd better check that out to ensure I can get the tranny over the engine and then behind it. Steve - I'd rather not slide the crossmember on the frame as it'll scratch both of them. But I could remove the mount and put a 2x4 at both the front and the rear, sufficiently padded, and that might not scratch things. But, if I can lay the engine in and come over it with the tranny and have plenty of clearance, then I won't have to slide anything. Jonathan - One worry I have is that Tim has a lift plate screwed into the carb mount. It is obviously adequate for the engine as he's already lifted it that way. But I am leery of adding the weight of the transmission, flex plate, and torque converter to that. I could use chains to the front and rear of the engine, but that risks scratching something. Or, I could use ratchet straps, both front and rear, to take the load of the tranny up to the load equalizer and keep the weight off the four little 1/4" bolts that go into an aluminum intake. Guys - Thanks for helping me think through this. I really do appreciate it. Please keep those ideas coming. 
Gary, AKA "Gary fellow": Profile
Dad's: '81 F150 Ranger XLT 4x4: Down for restomod: Full-roller "stroked 351M" w/Trick Flow heads & intake, EEC-V SEFI/E4OD/3.50 gears w/Kevlar clutches
|
|
Administrator
|
I have this old Mac Tools relic.
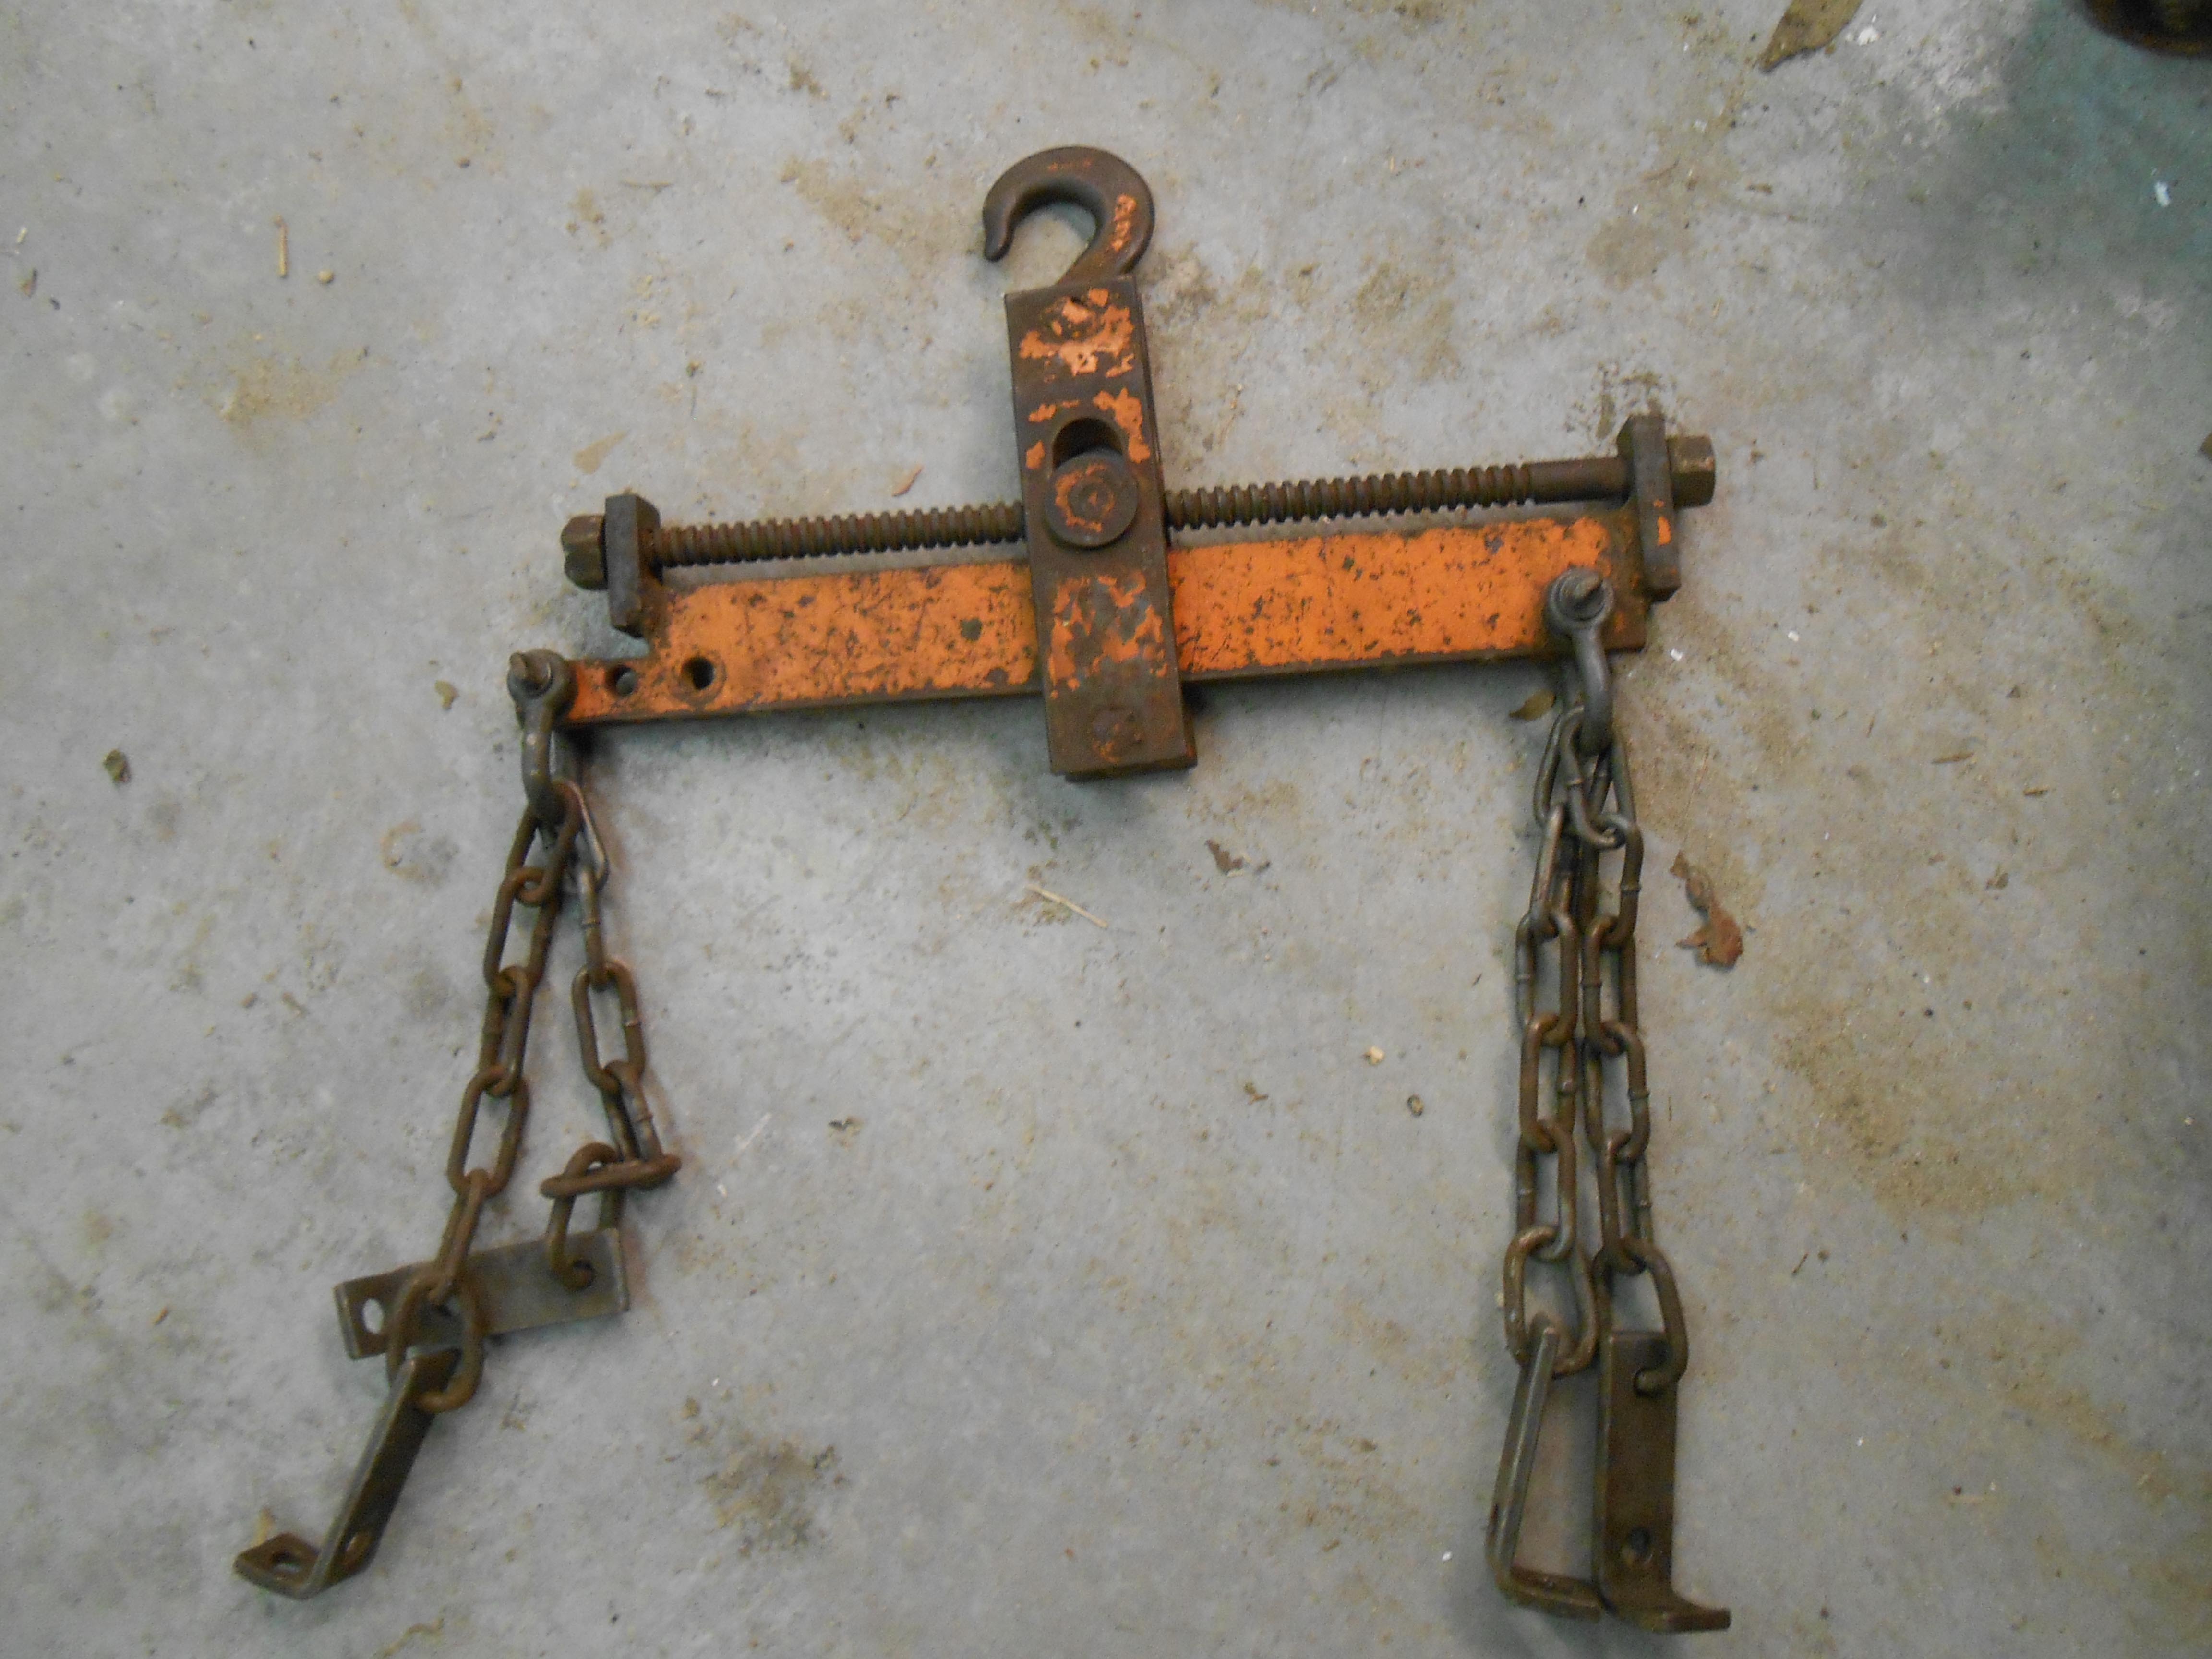 It can be attached to intake manifold bolts, accessory bracket holes in the heads for lifting points, I can use the Acme thread leveling screw and set pretty much any angle I need.
Bill AKA "LOBO" Profile
"Getting old is inevitable, growing up is optional" Darth Vader 1986 F350 460 converted to MAF/SEFI, E4OD 12X3 1/2 rear brakes, traction loc 3:55 gear, 160 amp 3G alternator Wife's 2011 Flex Limited Daily Driver 2009 Flex Limited with factory tow package Project car 1986 Chrysler LeBaron convertible 2.2L Turbo II, modified A413 |
|
Administrator
|
Bill - That looks longer than my HF one, which is only 22" long and has a off-set of 9". And, at first blush, I don't think that's enough to compensate for a 22" long engine and a 30" long tranny - from the front face to the rear mount.
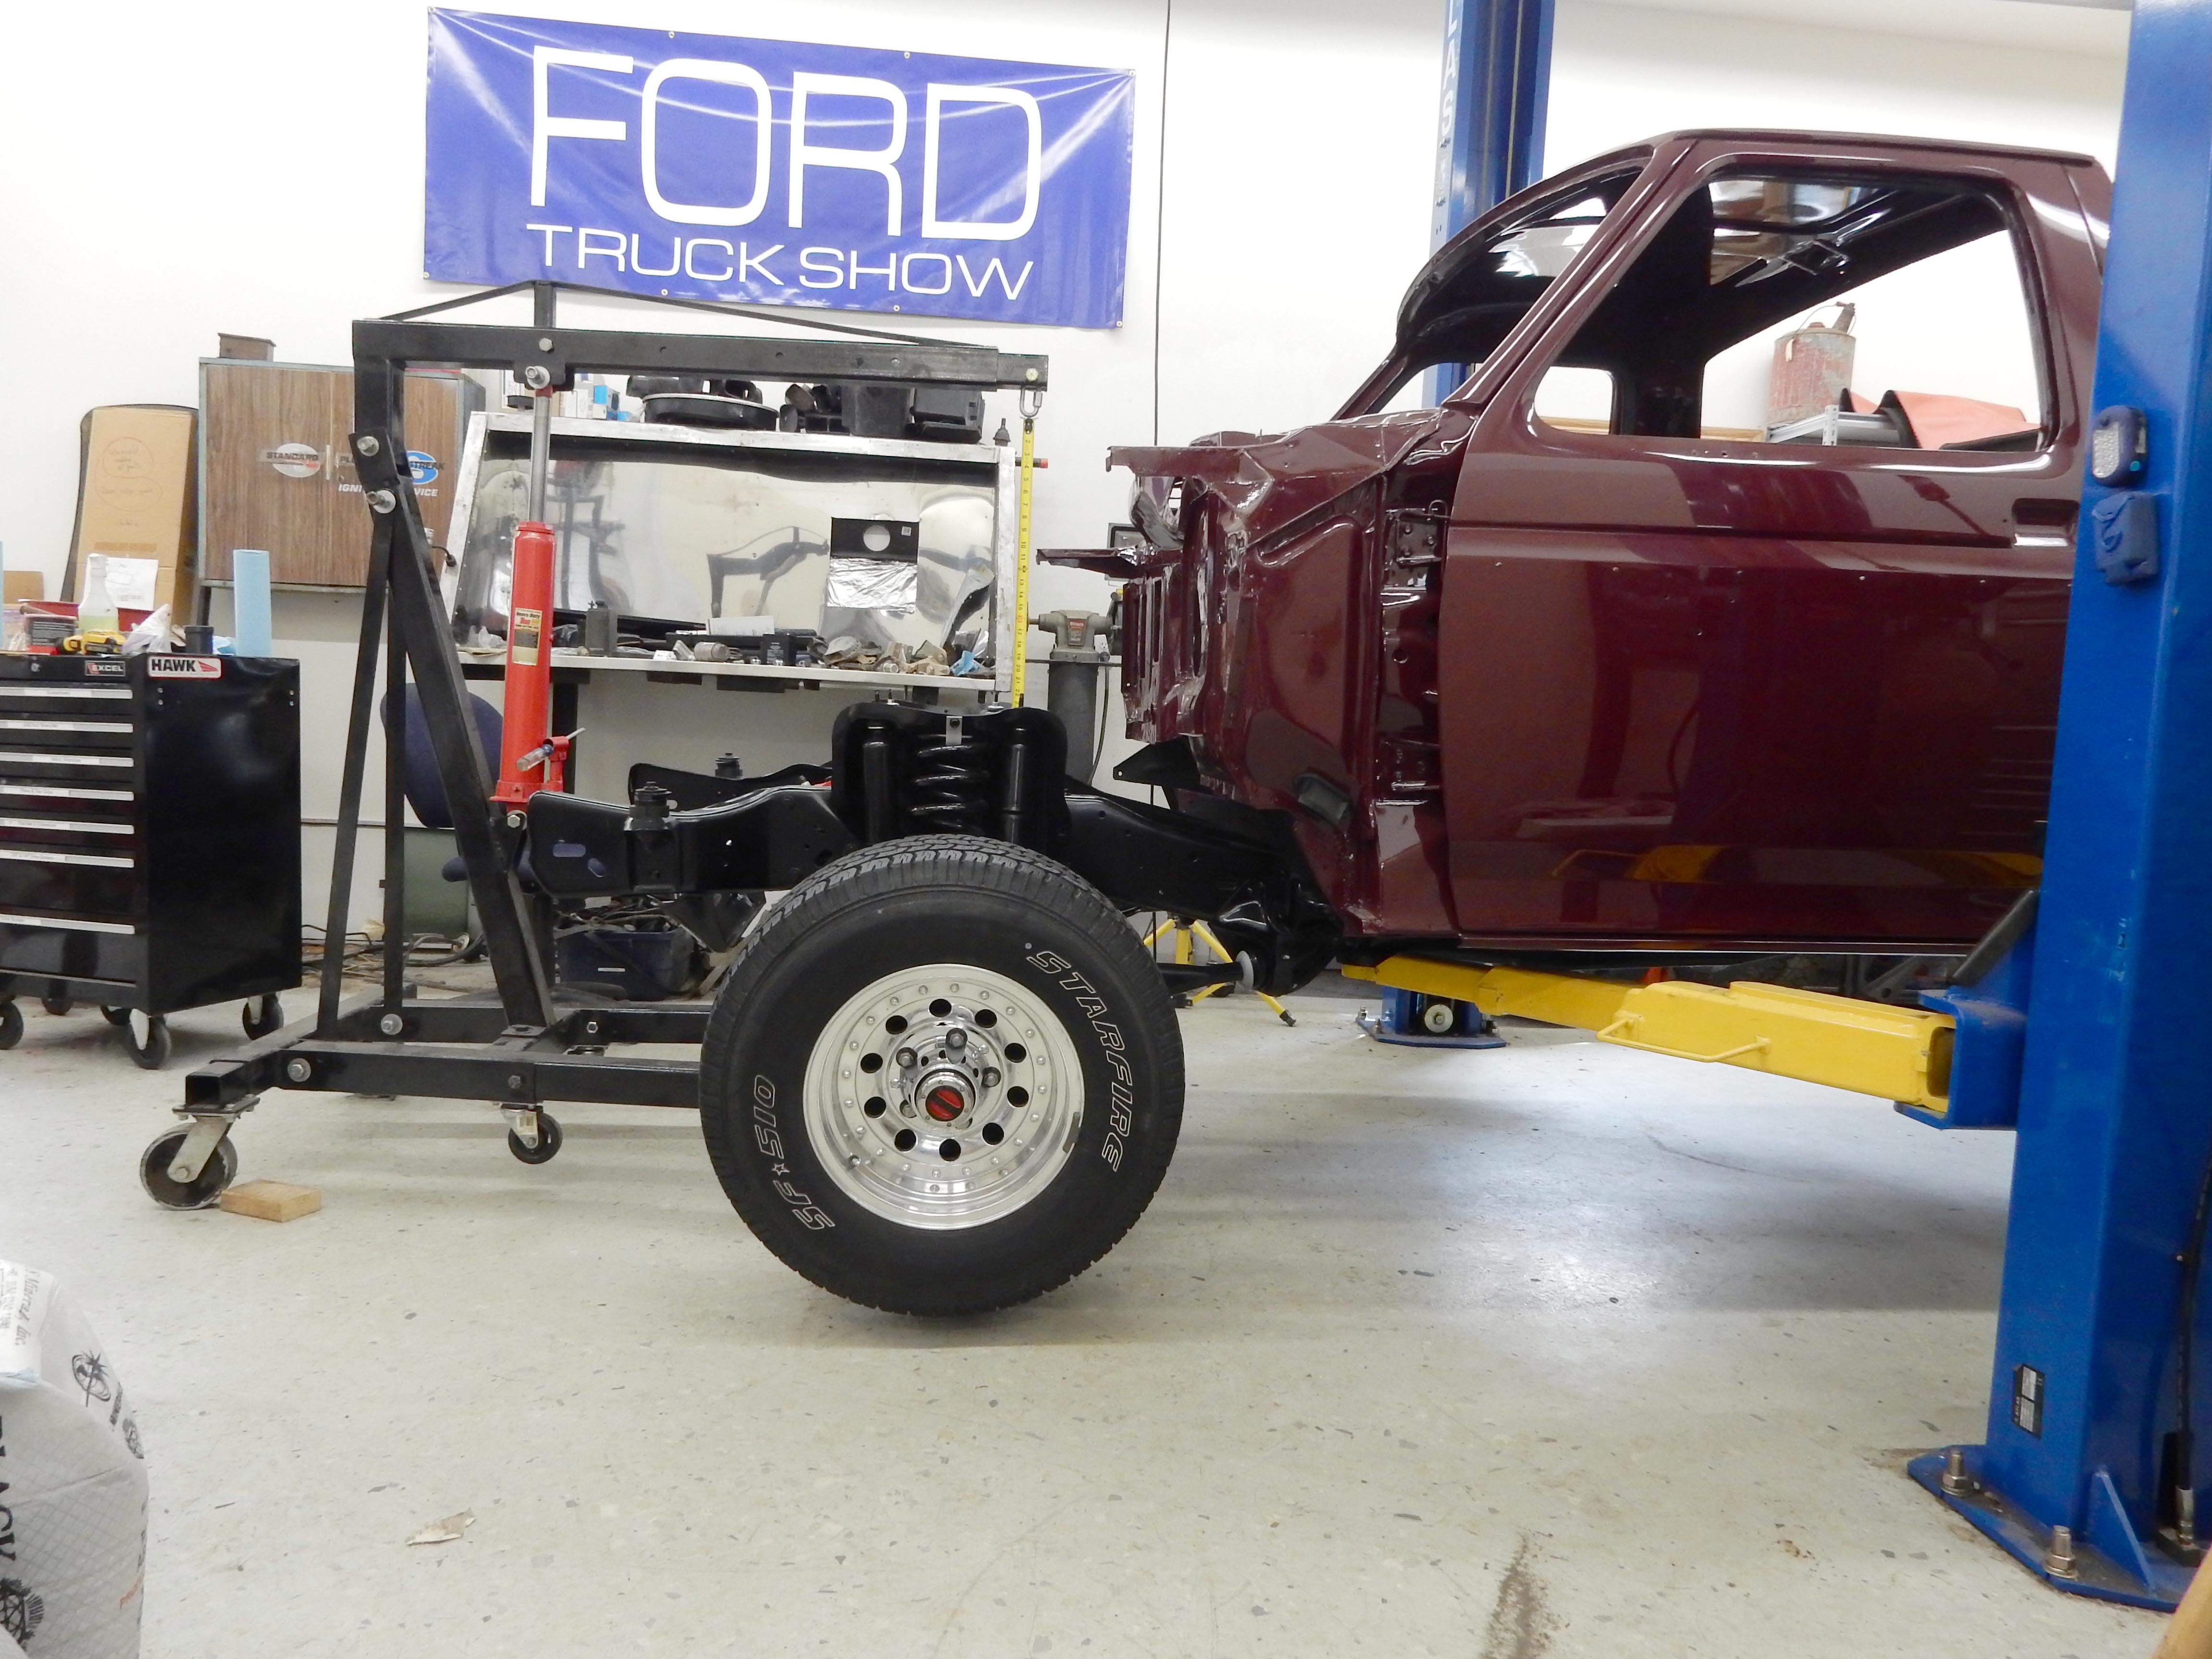
But, I have worked out that I could pick the tranny up with the crane and suspend it from the powder coating cart using ratchet straps. Then pick up the engine/flywheel/torque converter combo, maybe using 7/16" bolts into the heads f/r and balance that with the load balancer. Then mate it to the tranny and use a couple of ratchet straps for safety to hook into the rear of the tranny where the t-case mounts and balance things using the straps and the load balancer. Having said that, I've also worked out that I can lay the parts in piecemeal. In the pic below the crane's boom is all the way in, meaning to the left, and the hook is directly above the engine mounts, which are essentially at the mid-point of the engine. So I could lay the engine in easily with the crane in that position, prop it up, and then add the flywheel and torque converter. And, I can extend the boom and/or roll the crane forward and the end of the boom could be up to 42" further to the rear - which puts it directly over where I think the transmission mount will go. And that's clearly well past the center of gravity for the transmission. In other words, there's plenty of "reach" to allow lowering the tranny behind the engine and then bringing it forward to mate with the engine.
I know some of you think I need to put the engine/flywheel/torque converter/tranny combo in as a unit. And while it looks like I can do that, I don't see the advantage of that versus placing things in a piece at a time. In fact, I see disadvantages as the heavier the load is the harder it is to precisely locate the crane. But I'm very willing to listen if you see something I don't see. What am I missing?
Gary, AKA "Gary fellow": Profile
Dad's: '81 F150 Ranger XLT 4x4: Down for restomod: Full-roller "stroked 351M" w/Trick Flow heads & intake, EEC-V SEFI/E4OD/3.50 gears w/Kevlar clutches
|
You might already see this, but if you extend the boom on that engine hoist far enough to reach the transmission past the engine you are likely to have the cg of the whole shootin' match past the wheels on the hoist, which would not be good for the finish! You can still do it, but you might want to pile some bags of sandblasting media on the other end.
Bob
Sorry, no '80 - '86 Ford trucks "Oswald": 1997 F-250HD crew cab short box, 460, E4OD, 4.10 gears "Pluto": 1971 Bronco, 302, NV3550 5 speed, Atlas 4.3:1 transfer case, 33" tires "the motorhome": 2015 E-450-based 28' class C motorhome, 6.8L V-10 "the Dodge": 2007 Dodge 2500, 6.7L Cummins |
|
Administrator
|
This post was updated on .
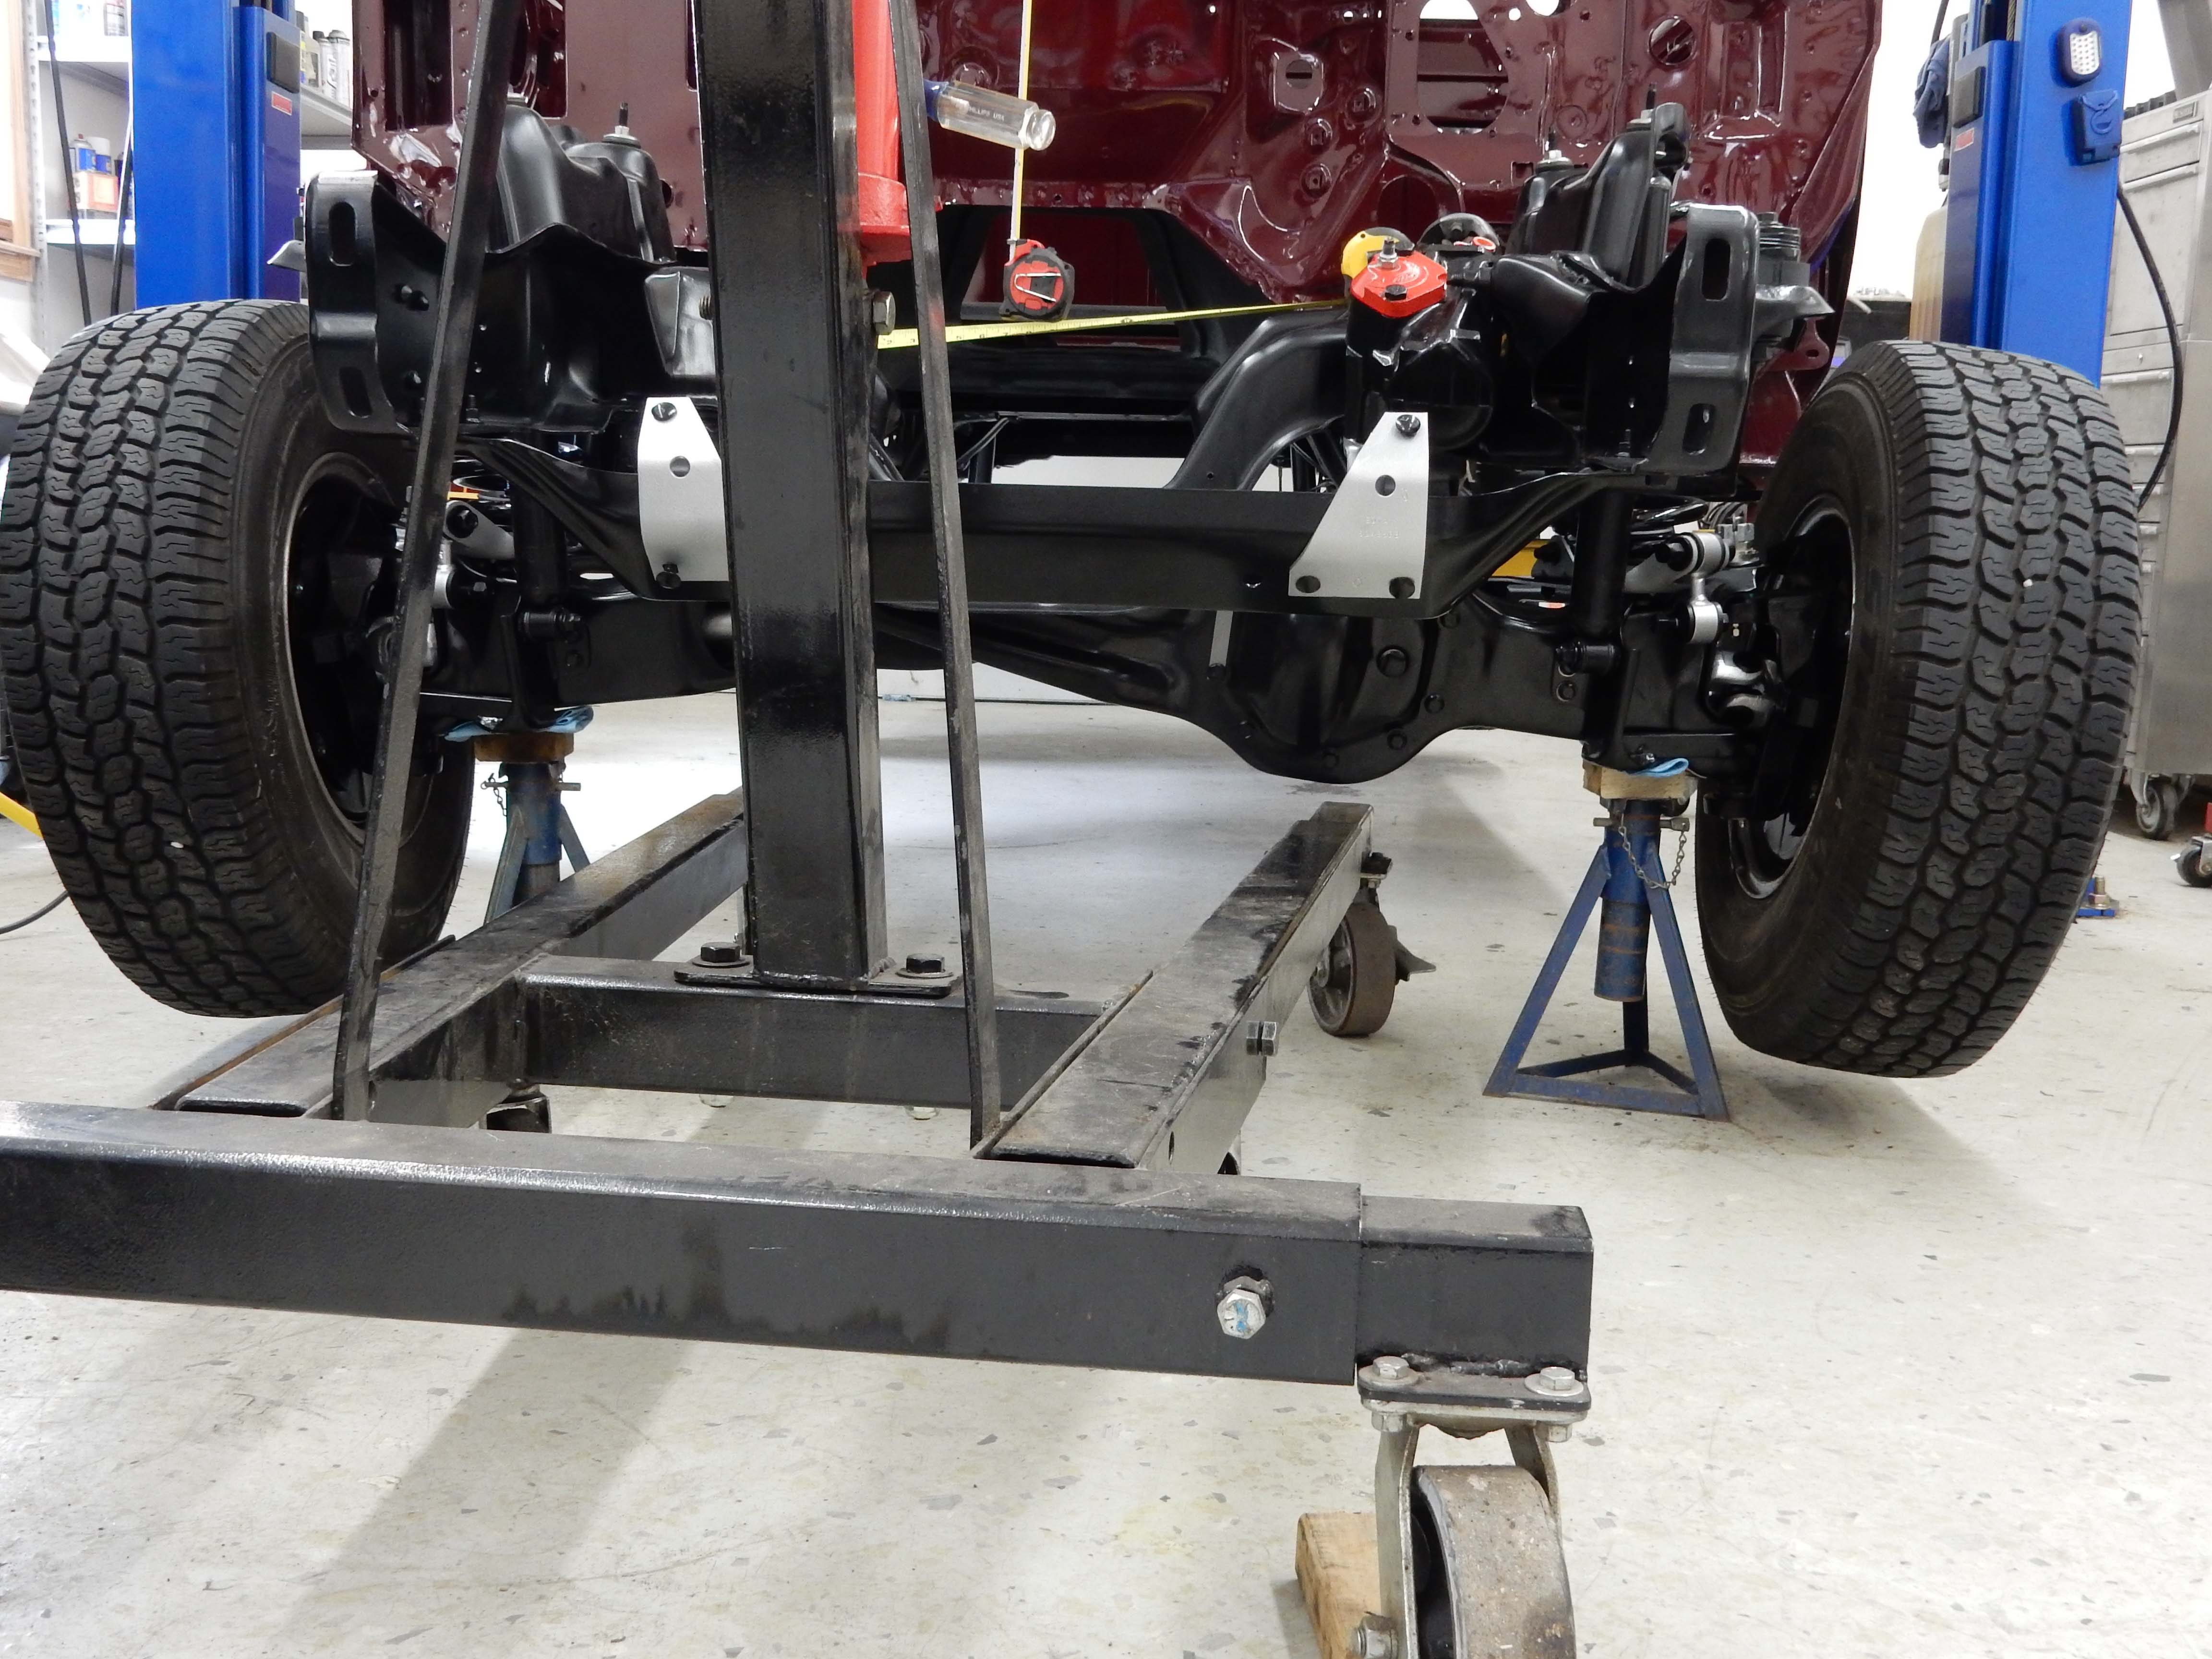
Bob - Good point. I've been known to use blast media as ballast. However, in this case it won't be needed. As you can see below, I have the front of the truck on jack stands, which gives ~2" of clearance between the bottom of the diff and the legs of the crane. So I can pull the legs out the whole way, which puts the front wheels past the hook on the boom.
And, on other aspects of this quest, I pulled the driveshafts out that came on Huck. Unfortunately the rear shaft uses a slip yoke and I had the BW1356 set up with a yoke for a u-joint, which is what Dad's NP208 has.
So, do I have the original NP208 rebuilt, which will require having the small crack welded up, convert the 1356 to slip yoke, or find another driveshaft that is the right length? And, to finish the saga on painting the tie rods and front sway bar, I gave them another coat of the chassis black top coat today, which was well within the 72-hour window. But there were still lots of streaks, brush marks, etc. So I grabbed a can of Rustoleum Satin Black and sprayed them while the top coat was still tacky. Fixed the streak problem and appears to have helped with the brush marks. We shall see. But, I think that will be my approach in the future when using POR15 - use the base coat and then spray it while the base coat is tacky. Far, far easier.
Gary, AKA "Gary fellow": Profile
Dad's: '81 F150 Ranger XLT 4x4: Down for restomod: Full-roller "stroked 351M" w/Trick Flow heads & intake, EEC-V SEFI/E4OD/3.50 gears w/Kevlar clutches
|
|
Administrator
|
Another thought - I gave a guy from church the 1356 that was on Huck. It obviously has the right outputs for the front and rear to take these driveshafts. I'm thinking about seeing if I can buy it back. Would want to have it gone through like the last one, but it sure simplifies the driveshaft situation.
Thoughts? (Btw, what do you think of the color?
Gary, AKA "Gary fellow": Profile
Dad's: '81 F150 Ranger XLT 4x4: Down for restomod: Full-roller "stroked 351M" w/Trick Flow heads & intake, EEC-V SEFI/E4OD/3.50 gears w/Kevlar clutches
|
|
Banned User
|
I don't like the idea of trying to stab the trans over the engine under the body into place. And I've pulled & stabbed a couple of engine/trans combos - it's not fun. I prefer setting the trans onto the chassis, and then mating the engine to it. If you don't want to slide the trans on the frame, you can reach over the engine & lift it again - the engine should balance easily on its mounts. So my vote is: put the trans (w/torque converter) on pads on the frame (~3" too far back - no measuring); bolt the engine (w/flexplate) down; mate the bellhousing to the block; bolt the crossmember down; hang the transfer case.
I'd use a 1356 before any other. It's easy to mod the pump stay arm yourself - no need to pay someone to go through it. |
|
Administrator
|
In reply to this post by Gary Lewis
Gary, regarding the engine & transmission install, I think your plan to install them separately makes good sense. Your situation of having the body off makes any route you choose pretty easy, and having the E4OD in a sling like that is probably as easy as it is going to get as far as joining them.
As far as the transfer cases I’m not quite following. You have the original NP208 but it needs rebuilt and a crack welded... check. I take it Dad’s driveshafts won’t work anyway because of the E4OD length. That route sounds like you don’t have anything going for it. You have a rebuilt BW1356 but the yokes are wrong for the Huck driveshafts? That’s where I get lost. What yoke(s) does it have? They are different than the ones from what were on Huck’s 1356? Won’t you need a new rear shaft anyway because of the length difference between the 10.25” and 9” snout lengths? Or are they close? I guess if it were me I would lean toward running the rebuilt 1356 or buy back Huck’s 1356 just because at least the front shaft would be the right length, and yoke I assume. Then you only need the rear shaft, and the yoke if it needs changed just slides off in your hand. Regarding the 1345 vs 1356 discussion, was that entering Big Blue’s transfer case into the list of possibilities?
SHORT BED 4-DOOR DIESEL: 1986 F350 4x4 under construction-- 7.3 IDIT ZF5+GVOD
STRAIGHT SIX 4X4: 1981 F150 2wd to 4x4-- 300 I6 close ratio diesel T19, hydroboost brakes, Saginaw steering BIG F: 1995 F-Superduty under construction— converting to 6.9L IDI diesel ZF5+DNE2 |
|
Administrator
|
Steve - The cab is going to be so far up it won't be an issue, so I'm not worried about that aspect of it. (And believe me, I'm very careful around the cab.)
But, your idea of laying the tranny in ahead of the engine has merit. It is one more step, but wouldn't be that much more work. I'll cogitate on that. Thanks. Jonathan - I hadn't thought about the different snout lengths for the 10.25 vs 9". Yipes! So it isn't likely that I'll find a driveshaft with the right configuration and length to fit. Which means I may have to have a driveshaft made. Perhaps they can cut down the essentially new one I have for Dad's C6/208/9" combo. Now for the other bits. The rebuilt 1356 was reconfigured to have the right yokes to match Dad's truck, which means the small cup yoke front and rear. The thought was that I could then re-use the original driveshaft. But the rear driveshaft off Huck uses a a slip yoke, so that's not going to work. Are you saying that I can easily un-bolt the cup yoke from the re-built 1356 and bolt on a slip yoke from Huck's 1356? As for the front shaft, is the 1356's yoke in a different spot than where a 208's yoke would have been, assuming the same transmission? If so, then Huck's front driveshaft should work, assuming that the u-joints are the right size. And yes, at one point I was considering installing the rebuilt 1356 in Big Blue when I put the EFI on and the ZF5 in, and then having his 1345 rebuilt to use in Dad's truck. And, as I think about it, that may still be an option. If Huck's rear shaft would, by some miracle, work if the 1345 had a slip yoke, then I could go that way and find the slip yoke. Bottom Line: I think the decision on what t-case and driveshaft to use needs to wait until I can do some measuring. I remember seeing that someone makes custom driveshafts for $300. But I can probably get Dad's "new" one cut down for that price. Or, I can get a t-case rebuilt for that. So, I need to wait until I get the engine and tranny in, steering in, and drop the truck down on the ground for some measurements. Thoughts?
Gary, AKA "Gary fellow": Profile
Dad's: '81 F150 Ranger XLT 4x4: Down for restomod: Full-roller "stroked 351M" w/Trick Flow heads & intake, EEC-V SEFI/E4OD/3.50 gears w/Kevlar clutches
|
| Edit this page |



 )
)