Fuel Injection upgrade


Administrator
|
Why not go with the later master? Much better. Aluminum and plastic won't rust.
As for the rest of that stuff, you are like me - once you get started you don't know when to stop! 
Gary, AKA "Gary fellow": Profile
Dad's: '81 F150 Ranger XLT 4x4: Down for restomod: Full-roller "stroked 351M" w/Trick Flow heads & intake, EEC-V SEFI/E4OD/3.50 gears w/Kevlar clutches
|
|
|
I might do that. I dont even know if I will stick with vacuum brakes. I wont know what kind of vacuum I will have till I get this engine running. I very well may be going with late model hydraboost brakes. Aside from that I assembled the front accessory brackets to mock up the fuel line. I blew through 20 feet of 3/8 stainless line due to wrong bends or collapsed lines or just not liking the routing I completed. Right now I am waiting on a new 25ft roll of 3/8 stainless line and trying to figure out how I can do it. I ended up flipping the Tee upside down but screwing the pressure gauge in another half turn is making it block off the tee passage more and I dont like it so I am going to have to get another tee as its ruined now being aluminum but its good enough for mocking the line up. What has me unsure about the routing I have now in these photos is I think its going to be in the way of the ignition coil. I also think the forward line will be as well but I hope not as the forward line I cant bend any shorter and if I tried I wouldnt have enough material to flare it with the AN sleeve and tube nut installed first. First photo is of the aluminum powersteering pump bracket that I cleaned up and sprayed with Krylon high temp engine primer and top coated with eastwood aluma blast. 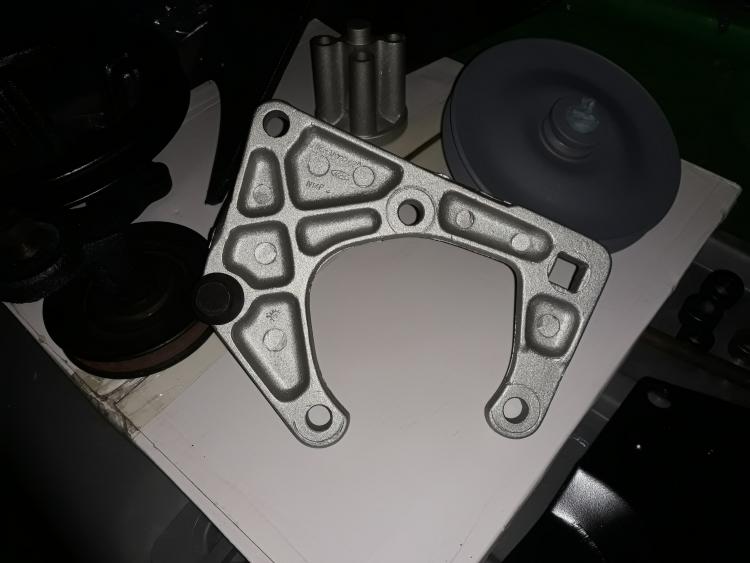 Second photo is of the mock up with the accessory drive brackets including water pump pulley, fan spacer and my OE dimension 7 bladed flex fan which is a quarter inch smaller diameter than the factory offered AC equipped flex fan that had 7 blades. 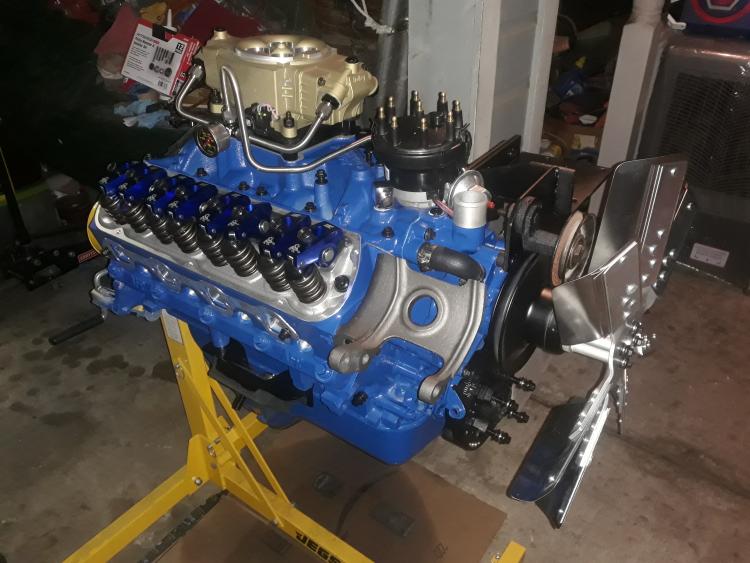 This is the fuel line routing I currently have. I tried to put the 180 loop on the bottom but I cant get it bent tight enough so any 180 I do will not fit as the loop is smashed into the intake/head before I can even attempt to get the line in place on the tee. I believe the loop is close enough that it should clear the OE aircleaner. Before I go making another line up I will try mocking up my OE air cleaner to verify the clearance then I will remove my coil and coil mount to see if I can maybe slide the coil a little forward in the bracket to clear the fuel lines.  Close up of the 7 blade flex fan, I bought it in Ford blue with polished stainless steel blades but Flex A Lite discontinued that color so I had to get the silver with polished stainless steel blades. Listed as being good to 8,000 rpm which is more than this engine will ever see and it has off set blades like the OE so it should operate quietly. 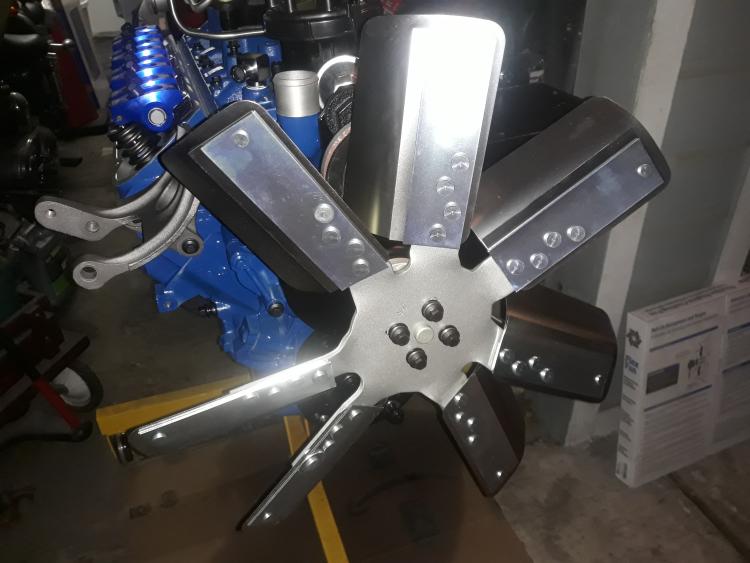 I also decided to use ARP hardware for everything except for the pivot bolt for the power steering pump, alternator and the tension bolt for the power steering pump. Many of the bracket bolts were miss matched due to being a dealer installed A/C unit and the flex fan bolts had flattened lock washers that couldnt do their job and they werent able to be removed as they are captured behind the threads.
"Old Blue" - '56 Fairlane Town Sedan - 292-4V, Ford-O-Matic transmission, 3.22:1
'63 Belair 2dr sdn - 283-4V, Powerglide transmission, 4.56:1 '78 Cougar XR7 - 351-2V, FMX transmission, 2.75:1 9inch "Bruno" - '82 F150 Flareside - 302-2V, C6 transmission, 2.75:1 9inch, 31x10.50-15 BFG KO2 |
|
Administrator
|
Looks great, Rusty! And I think you'll like the later master. Far fewer, if any, leaks from the cap and no cast iron to rust.
Love the attention to detail. I know you are anxious to get this done, but the extra time forced on you is paying off in getting things "right".
Gary, AKA "Gary fellow": Profile
Dad's: '81 F150 Ranger XLT 4x4: Down for restomod: Full-roller "stroked 351M" w/Trick Flow heads & intake, EEC-V SEFI/E4OD/3.50 gears w/Kevlar clutches
|
|
|
It is also letting me rethink some things such as my fuel line routing. I had one bend I tossed cause it would require the fuel line to be removed to get the distributor cap off as it was too close to the clip that holds the large cap to the cap adapter. The current iteration I like but not sure how to get the bends just right in the stiff stainless steel line to clamp it with the fuel pump block off plate bolt to hold the line. Then there is the air cleaner and coil issue I have to check this week and see if the same layout is viable or if I want to bring it around behind the sniper and down the driver side which I really dont want to do as thats a lot of excessive line.
"Old Blue" - '56 Fairlane Town Sedan - 292-4V, Ford-O-Matic transmission, 3.22:1
'63 Belair 2dr sdn - 283-4V, Powerglide transmission, 4.56:1 '78 Cougar XR7 - 351-2V, FMX transmission, 2.75:1 9inch "Bruno" - '82 F150 Flareside - 302-2V, C6 transmission, 2.75:1 9inch, 31x10.50-15 BFG KO2 |
|
Administrator
|
And getting all of those things "right" is what makes for joy down the road. Sometimes there's goodness in having to slow down.

Gary, AKA "Gary fellow": Profile
Dad's: '81 F150 Ranger XLT 4x4: Down for restomod: Full-roller "stroked 351M" w/Trick Flow heads & intake, EEC-V SEFI/E4OD/3.50 gears w/Kevlar clutches
|
|
|
In reply to this post by Rusty_S85
Still no real progress, No pushrods and I called up Manley last week since Jegs just cant seem to get me a straight answer. Manley told me they wont be getting materials in to start making pushrods till April at the earliest. They also informed me they only had 7 of the pushrods that I ordered in stock so there isnt stock to even send out.
Aside from that I havent done anything to the engine but I did find the following aircleaner housings how ever used and cant decide what way to go. First off aircleaner was taken off a 5.8L HO engine in a 1985 bronco 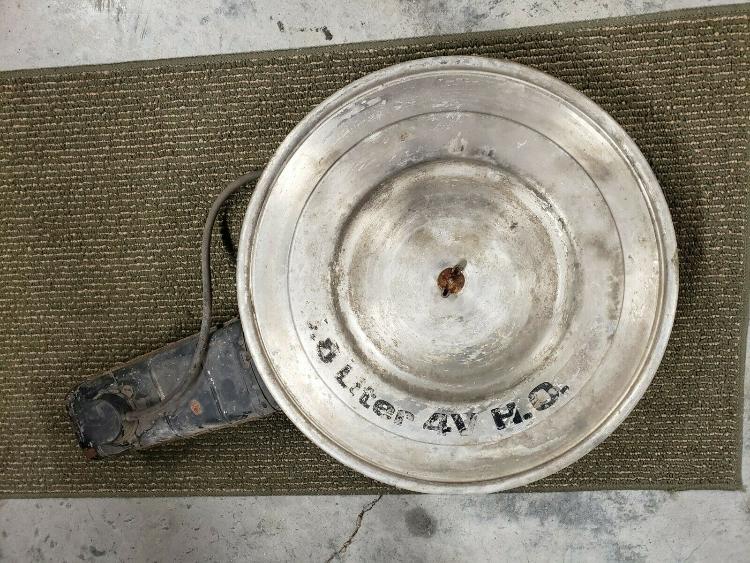 Then I found this aircleaner taken off a 80s truck with no mention of engine size but it is a steel base 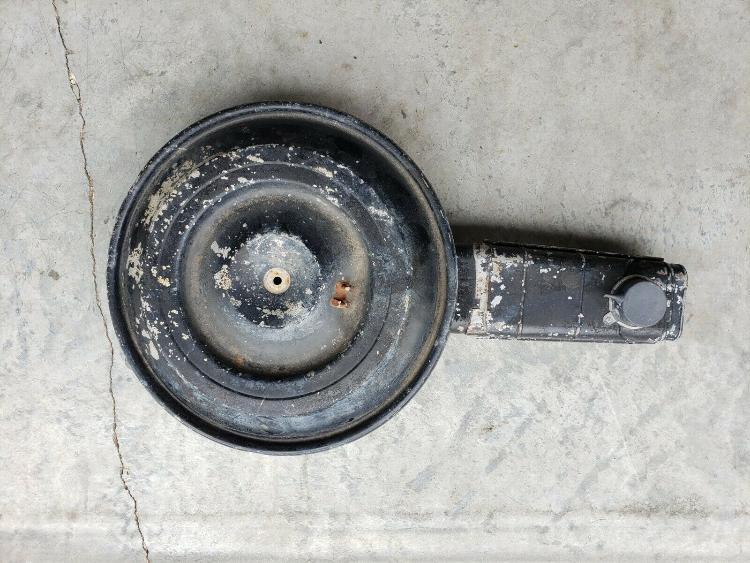 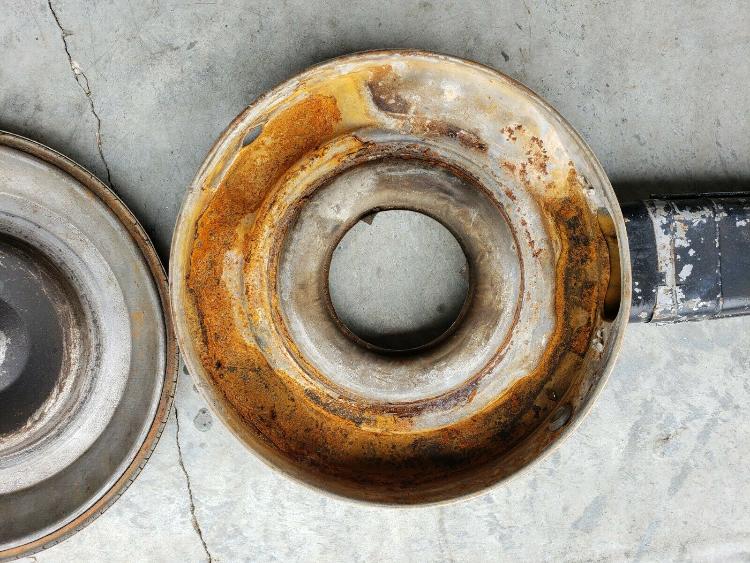 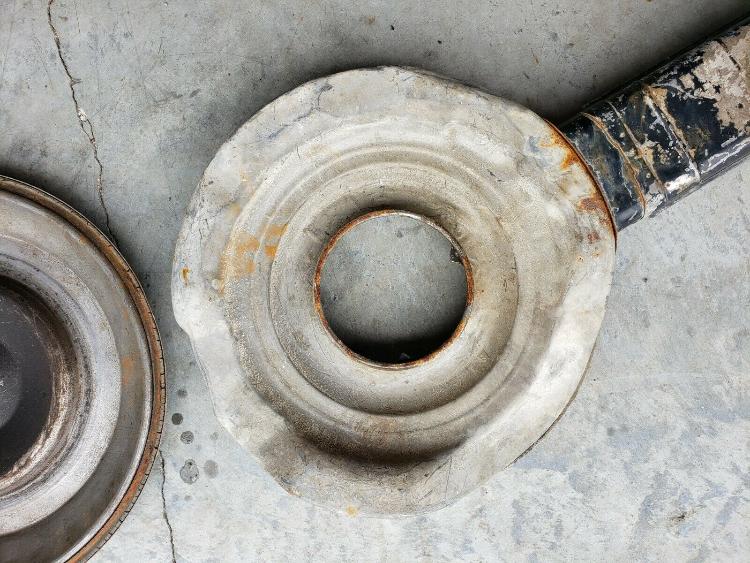 Then I found this one that came off a 1984 F150 with a 302 and a 4V carb 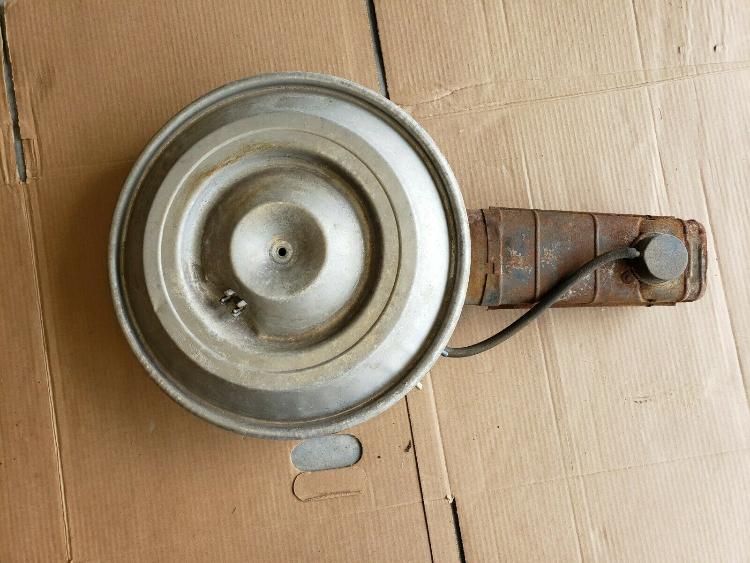 Part of me would like to get the first one for the bronco but not sure if the snorkel off my current aluminum aircleaner could be swapped over. My next choice is the third one I found which is basically the same aluminum aircleaner I currently have just without any cracks. Down side is I know my OE aircleaner wont fit the 4150 sniper as the simulated float adjustments on the front and rear simulated bowls are hitting the aircleaner preventing it from sitting flush. I believe I could simply throw on a 1/4" carb spacer to elevate the aircleaner enough to fit flush if I have to. I feel the 5.8L HO one might would be clearanced for the 4150 style carb but for $120 I am unsure about all the fitment and it appears that one may have a larger diameter cleaner which means I couldnt use my original lid as my seal is in perfect condition.
"Old Blue" - '56 Fairlane Town Sedan - 292-4V, Ford-O-Matic transmission, 3.22:1
'63 Belair 2dr sdn - 283-4V, Powerglide transmission, 4.56:1 '78 Cougar XR7 - 351-2V, FMX transmission, 2.75:1 9inch "Bruno" - '82 F150 Flareside - 302-2V, C6 transmission, 2.75:1 9inch, 31x10.50-15 BFG KO2 |
|
Administrator
|
That's a bummer on the push rods!
 On the air cleaner, my experience is that all the snorkels interchange. And the HO air cleaner is bigger in diameter. Hope that helps.
Gary, AKA "Gary fellow": Profile
Dad's: '81 F150 Ranger XLT 4x4: Down for restomod: Full-roller "stroked 351M" w/Trick Flow heads & intake, EEC-V SEFI/E4OD/3.50 gears w/Kevlar clutches
|
|
|
Thats what I was afraid of, the lid on the HO air cleaner has damaged gasket so I couldnt simply throw my lid on that housing. I would have to get the smaller aluminum one which doesnt currently have cracks but may form over time. Then there is the thought that if the HO is a larger diameter it may actually clear my 4150 style system and not need a spacer for the aircleaner.
"Old Blue" - '56 Fairlane Town Sedan - 292-4V, Ford-O-Matic transmission, 3.22:1
'63 Belair 2dr sdn - 283-4V, Powerglide transmission, 4.56:1 '78 Cougar XR7 - 351-2V, FMX transmission, 2.75:1 9inch "Bruno" - '82 F150 Flareside - 302-2V, C6 transmission, 2.75:1 9inch, 31x10.50-15 BFG KO2 |
|
|
Might be getting my pushrods sooner than I thought. I just checked jegs website and my order which under status was previously blank now says "In process". Might have gotten enough made and when I called and checked with Manley directly they wouldnt know the order and I was simply seeking for current production which may take till April.
"Old Blue" - '56 Fairlane Town Sedan - 292-4V, Ford-O-Matic transmission, 3.22:1
'63 Belair 2dr sdn - 283-4V, Powerglide transmission, 4.56:1 '78 Cougar XR7 - 351-2V, FMX transmission, 2.75:1 9inch "Bruno" - '82 F150 Flareside - 302-2V, C6 transmission, 2.75:1 9inch, 31x10.50-15 BFG KO2 |
|
|
Had to make some changes to my routing of my hardlines to clear the OE coil mount.
What I ended up doing is using the sniper 4150 stealth supplied tee that has one female -6 and two male -6 to make the connection by the coil as I just could not make a tight enough bend to fit around the coil. I like how it came out but a new problem arose for the rear, I just can't get the fit right so I have two choices. One choice is to attempt to bend a solid hardline from the forward tee to the rear tee without the inline fuel pressure port. If I go this route I will mount the fuel pressure port on the hardline on the frame after the fuel filter/regulator assembly. The other route is to use a male -6 elbow to connect at the fuel pressure port and either try to tweak a hardline to fit or use a -6 male to -6 female fitting at 45* to allow for a straight hook up. I will be buying those fittings and trying out what my choices are but I will also be purchasing -6 male to 3/8" hose barb to make my rubber flex connection from the engine to the frame. I also need to find and purchase some 3/8" hardline clamps that has a 3/8" bolt hole as I thought what I had from my stash from left over parts at work would work but the hole wasn't large enough and attempting to drill the hole out twisted and destroyed the clamp. I also am looking at one of two things either a air filter adapter to fit the larger CFI air cleaner base to a standard 4V carb or a simple 1/8" (or smallest size available) spacer to just raise the OE air cleaner up. Looking at how high the air cleaner is in the photos below above stock without this spacer/adapter I don't know if I could run the larger bronco air cleaner without hitting the firewall. I thought about just running like the sniper air filter that has the notches to fit the 4150 stealth which would allow the filter to fit lower but I don't like the thought of the open element getting blasted with hot air from the cooling fan when it could be pulling air from in front of the core support like OE. Photo of the tee I ended up using to clear the OE coil and coil mount. 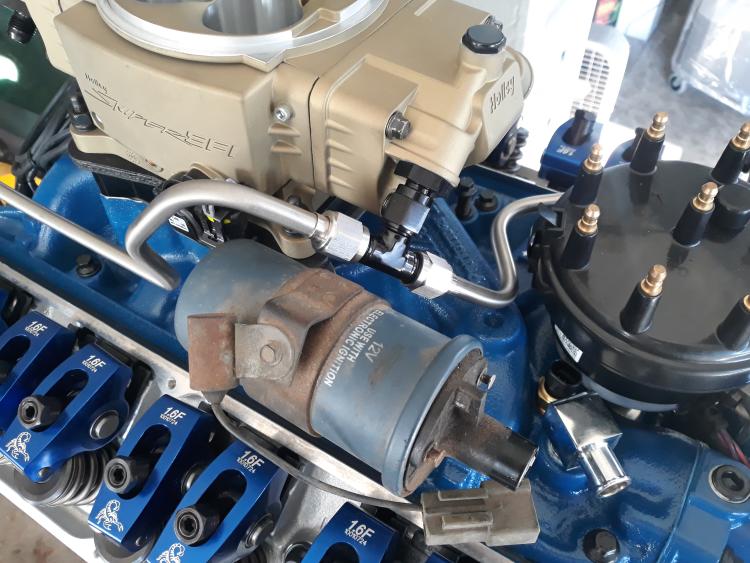 Photo of the driver side showing the routing of the hardline and the AN flared end where the rubber hose flex joint will attach. 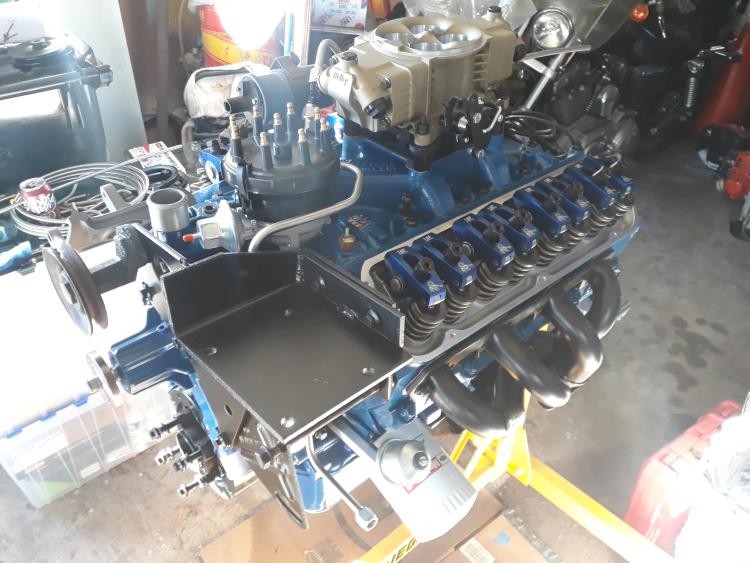 Photo of the attachment at the tee by the distributor. 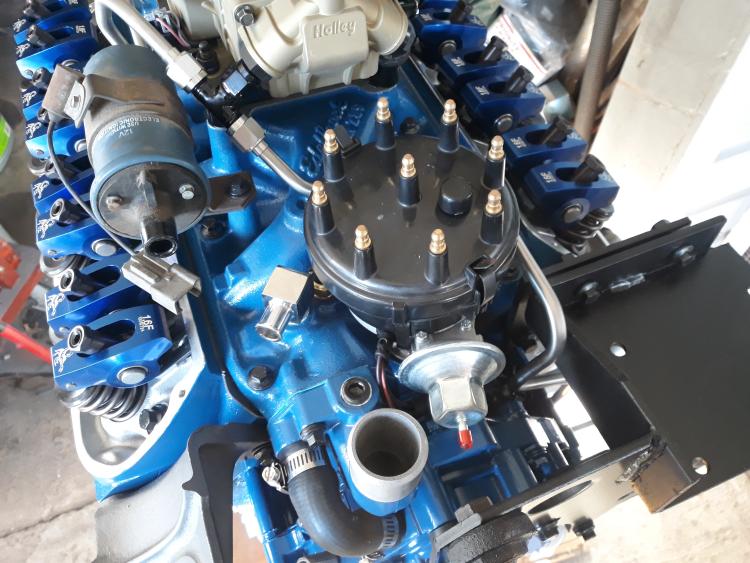 Photo of the fuel line around the back of the distributor, I gave it enough room to allow the clip for the cap to easily be accessed to not just remove the cap but to clip the cap back down in place. 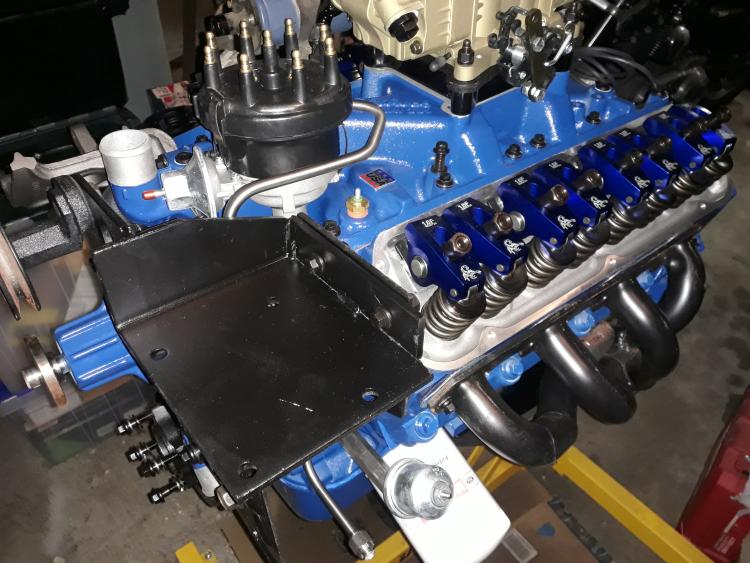 Next two photos show the close up with the pressure port tee installed but I have a -6 AN male to female pressure port that I didnt switch to yet but will be the fitting I use. These photos show just how hard it is for me to make a 3/8" hardline as I cant bend the lines tight enough or I cant move the pressure port more forward as I cant flare the hardline with the sleeve installed due to the 90* bend. Only way I could attempt to get around that is to bend a new hardline and measure cut and flare before I do the bend and then make the bend but that may pose a problem with making a 90* bend with the sleeve. 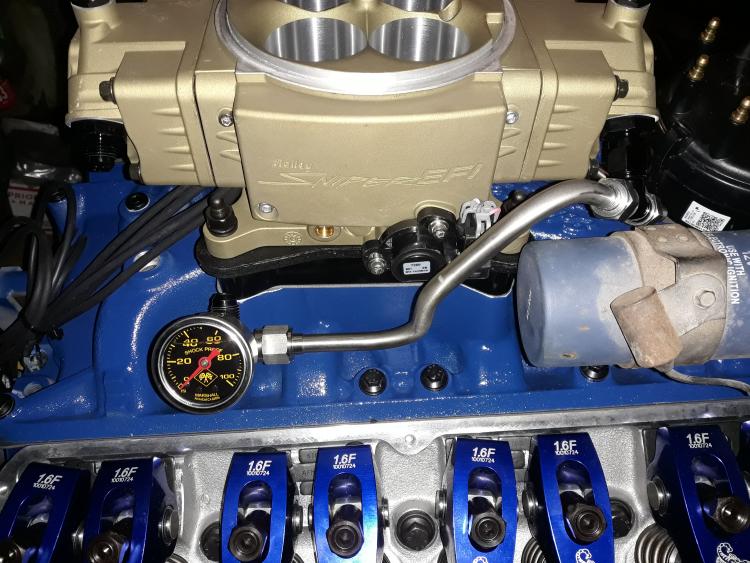 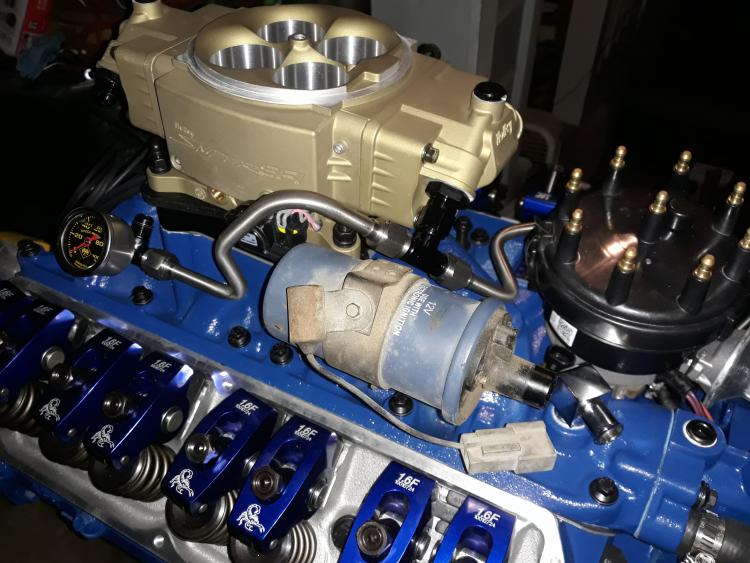 And a photo of my OE air cleaner sitting atop the 4150 stealth. Can see just how high the air cleaner sits compared to OE and I still need to raise it up a bit for clearance unless I can find an adapter that will allow me to fit the CFI air cleaner I have that is NOS in the box. Still this extra height has me concerned about fitment on the truck as the truck does have this over hang for the cowl and if too high the air cleaner will hit. If this ends up happening I will just have to get a generic open element air cleaner or spend big money for a drop base snorkel aftermarket assembly and try to fit it to the truck. 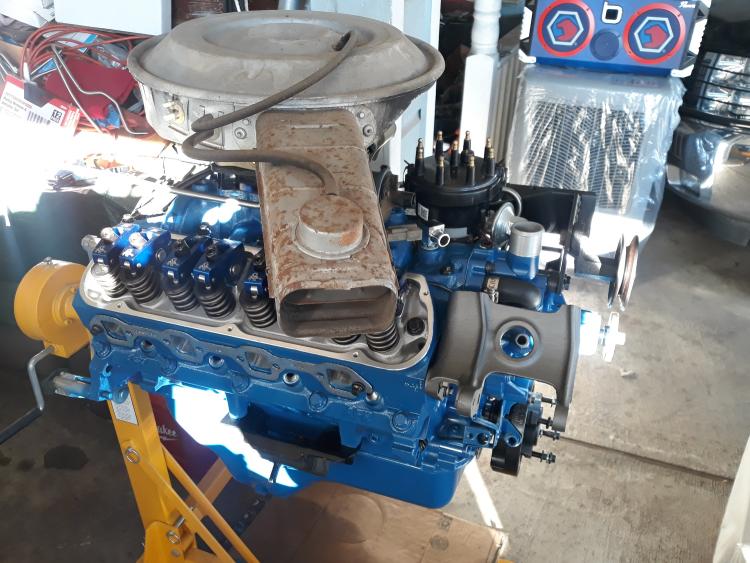
"Old Blue" - '56 Fairlane Town Sedan - 292-4V, Ford-O-Matic transmission, 3.22:1
'63 Belair 2dr sdn - 283-4V, Powerglide transmission, 4.56:1 '78 Cougar XR7 - 351-2V, FMX transmission, 2.75:1 9inch "Bruno" - '82 F150 Flareside - 302-2V, C6 transmission, 2.75:1 9inch, 31x10.50-15 BFG KO2 |
|
Administrator
|
It is looking very good, but I see your dilemma on the fuel line routing. I think I'd put the gauge down on the frame to make it easy, or put it in the run ahead of the distributor. But given the options you mentioned I'll bet you will get it worked out to put it up above.
As for the air cleaner, the larger HO unit is thinner than the smaller aluminum unit. On Big Blue even with a 1" spacer between the carb and that cleaner, and on top of the tall 460, it still fits under the overhang on the cowl. You do have to snake it in there, but it fits.
Gary, AKA "Gary fellow": Profile
Dad's: '81 F150 Ranger XLT 4x4: Down for restomod: Full-roller "stroked 351M" w/Trick Flow heads & intake, EEC-V SEFI/E4OD/3.50 gears w/Kevlar clutches
|
|
Administrator
|
In reply to this post by Rusty_S85
A suggestion on the air cleaner that may sound like sacrilege, when I had my Shelby, I was trying to find an air cleaner that would allow me to use the hood scoop as the inlet source. I found a GM one, I believe it was from a Holley equipt 396 or 427 Chevy. The bottom dropped down below the carburetor top, but was sculpted so it had clearance for the cathedral bowls. It used a 14" element, had a lower bowl that was probably 16 - 18" OD so the ram air adapter to seal against the hood slipped over it. I made a new seal for it (it was just a foam strip high enough to reach) and ran it until I put the dual Holley system on.
Bill AKA "LOBO" Profile
"Getting old is inevitable, growing up is optional" Darth Vader 1986 F350 460 converted to MAF/SEFI, E4OD 12X3 1/2 rear brakes, traction loc 3:55 gear, 160 amp 3G alternator Wife's 2011 Flex Limited Daily Driver 2009 Flex Limited with factory tow package Project car 1986 Chrysler LeBaron convertible 2.2L Turbo II, modified A413 |
|
|
Thanks, I might end up putting it on the frame in the end I am not messing with it today but I am going to order the following. x1 PICO Wiring 7515PT Rubber Insulated Clamps zinc plated steel 3/8" line with a 3/8" mounting hole set of 12 x1 Summit Racing 220635B -6 AN male 90* union x1 Vibrant Performance 10772 -6 AN male to female 45* Union x2 Vibrant Performance 11207 -6 AN Male to 3/8" Hose barb The 11207 will be used at the hardline under (at least I hope its under) the power steering pump to make a flex joint via EFI rated hose to the frame 3/8" -6 AN flared line. The 220635B is what I am thinking of using to make the connection at the fuel gauge port fitting to make a short turn. The 10772 I am thinking of attaching to the -10 AN straight cut O ring to -6 AN fitting in the throttle body so I dont have to put a slight jog in the hardline but I fear it might make the line so short it cant be flared on both ends. Honestly I am seriously contemplating next weekend just doing the hardline again but start at the throttle body end first then make the jog around the coil as I the two attempts I made without the gauge port was from the jog around the coil back. I ran into a problem of not getting the hardline square to the AN fitting in the throttle body which with AN it needs to be square. My end game was always to get Dakota Digital to make the RTX Retro look cluster for our trucks and I wanted to replace the mechanical fuel pressure gauge with a fuel pressure sensor so I can use a add on module to the Dakota Digital RTX cluster so I can input a warning to flash on the information center when fuel pressure drops below 50-55 psi or goes above 65-70 psi. I can also get my transmission temperature read out as well without having to mount a under dash gauge and can set a warning for it as well. I also would have to get the compass and ambient air temp module as well. Ive posted the photos before some where but this is the 73-79 truck cluster that Dakota Digital offers in the RTX Retro just to show how OE stock they appear. Key off with door open, the mechanical look digital odometer turns on when door opens 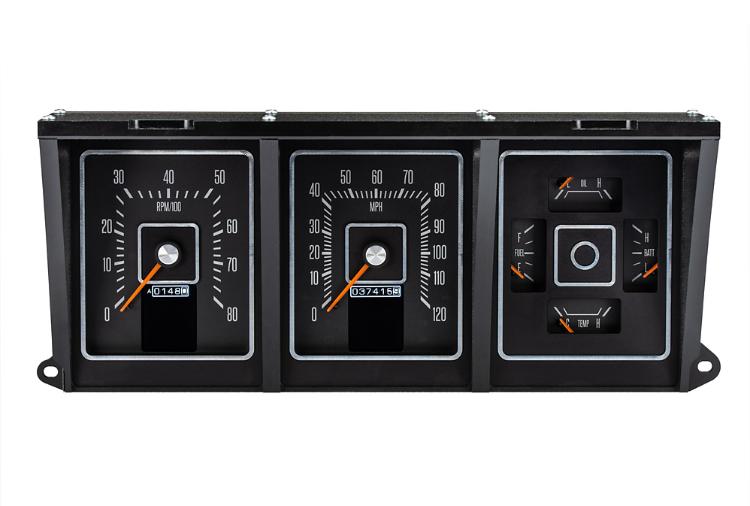 Key on the cluster can light up in day light or remain dark till you turn the headlights on and you have multiple colors avaliable on each unit. Also the normal range box lights up with hash marks with actual read out for the gauges. 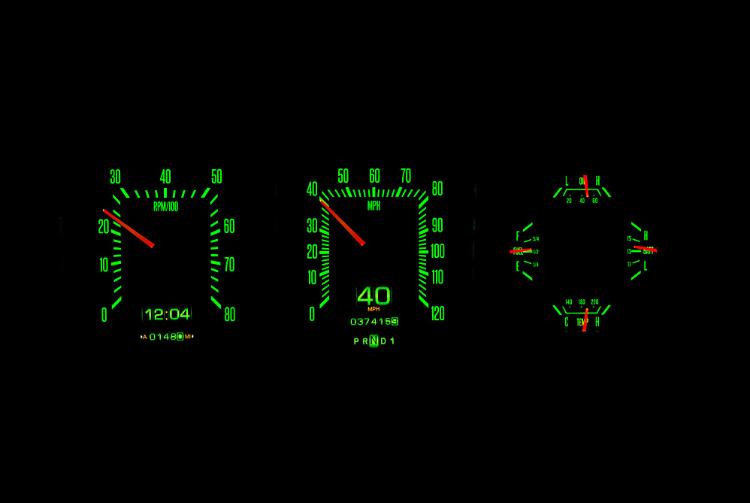 So in this case the mount being on the frame is no major loss for me as it will eventually be replaced with an electronic pressure sensor that wont require me to crawl under the truck to check the pressure. Interesting, I was looking at the Goodmark GM air cleaners. I know the snorkel wont be right to fit the OE duct work but I was thinking if the diameter was the same I could in theory cut the snorkel off and graft the Ford one on. I could even turn the assembly around to put the distributor indentation to the front plate in the original opening and put the snorkel in the proper passenger side location. These were the Goodmark ones I was looking at but they are listed as for cowl induction hoods. Goodmark 4021230704S dual snorkel, pricy at $309.99 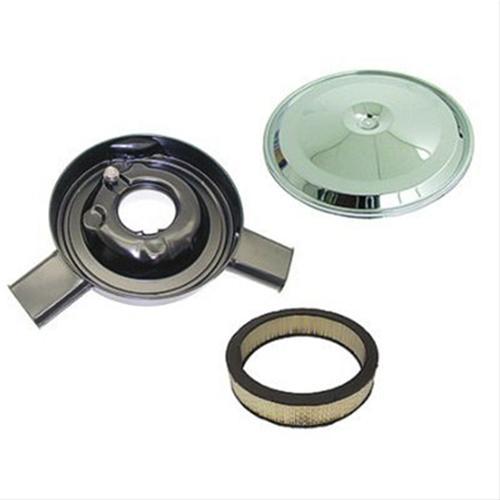 Goodmark 4020230694SX single snorkel, still kind of pricy at $232.99 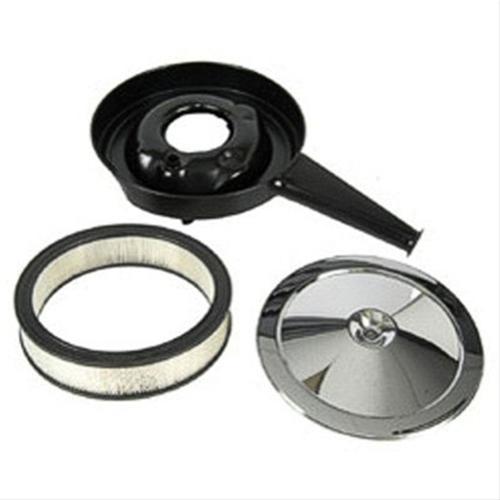 I also looked at the Spectre Performance aftermarket air box but its 14" od with a 3" tall filter and a 4" round snorkel which I dont know if could be made to work with the OE plastic duct. Its also priced a bit higher than the single snorkel GM one at $264.99 but lots of people gave it one star review that the filter is so close to the housing that it leaves 90% of the filter unused. 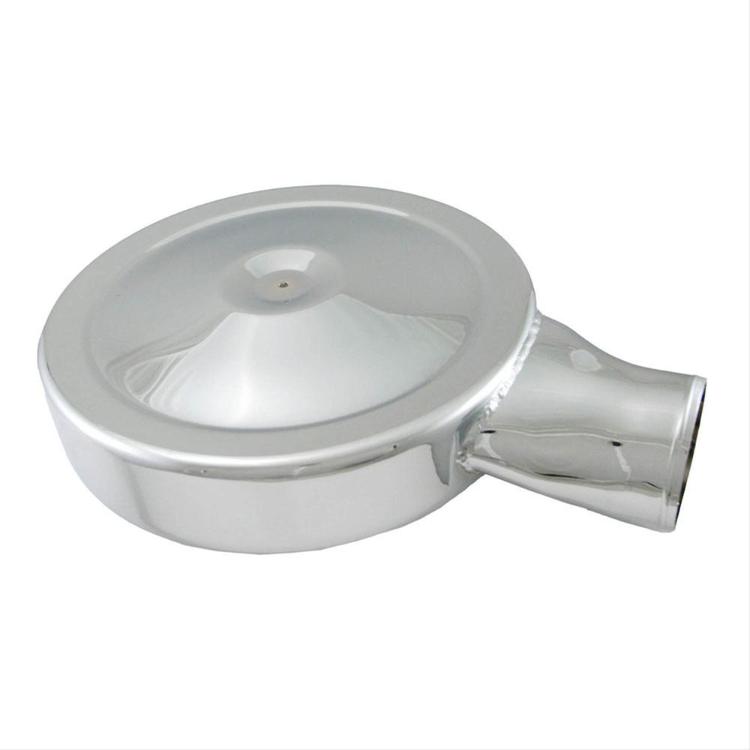 As far as modifying goes I seriously thought about seeing if I could cut up a used air cleaner and graft another bottom into the center to get more of a drop on the air cleaner housing but I have no idea where to start. If the Bronco 5.8 HO filter will fit I may consider just sourcing one of those and run that till I figure out how to get it to sit lower. If I use the air filter for a 302 how ever like what I have I will have to run a spacer and the smallest spacer is 1/2". The simulated float adjustment nuts on the 4150 is hitting mine right where the filter sits and I really cant ding it without it resulting in distorting the filter.
"Old Blue" - '56 Fairlane Town Sedan - 292-4V, Ford-O-Matic transmission, 3.22:1
'63 Belair 2dr sdn - 283-4V, Powerglide transmission, 4.56:1 '78 Cougar XR7 - 351-2V, FMX transmission, 2.75:1 9inch "Bruno" - '82 F150 Flareside - 302-2V, C6 transmission, 2.75:1 9inch, 31x10.50-15 BFG KO2 |
|
|
Still no word on my pushrods, no email from jegs when I inquire about how much longer since it now says "in process" under status.
I finally got my hardline made up and I am happy with how it came out. The fuel pressure gauge how ever will be mounted under the truck. I looked at how much of the line I would have to cut at the tbi as well as next to the distributor and it would leave too little material to fit the AN sleeve in place and get it in my AN flare tool. The 3/8" zinc plated steel clamps with rubber insulator still hasnt been delivered, its been in town since Wed and was slated to be delivered yesterday but update to the USPS tracking number at 3pm yesterday put it leaving the city and going halfways across the state for some unknown reason. Hopefully they dont arrive by the 11th so I can request a refund on it. The -6AN to 3/8" barb fittings did come in how ever and I am looking at running Earls Vapor Guard 3/8 hose with the vapor barrier. One thing that has me thinking since I saw how much higher the OE aircleaner sits and realized that the Edelbrock Performer intake is actually taller than the emission intake then I have a 1" four hole spacer on top I am not contemplating if I could just simply raise my throttle cable bracket up 1" - 2" to get a square pull and still have enough cable length to obtain full travel. If not I am contemplating going with a lokar cable and just chop the OE cable and retain the OE housing but slide the lokar cable in and make my own end up and figure out how to attach the cruise control. This gave way to the C6 kick down rod, I have the Holley 2V to 4V extension but considering how the intake is so much taller than stock now without realizing it I dont know if I can make that work or if I will have to go to a aftermarket cable setup which I dont want to do. Besides that, just paying off bills, harassing Dakota Digital to try and get the RetroTech cluster made for our trucks and waiting on parts to further my build. Photo of the -6 AN male to 3/8" hose barb fitting 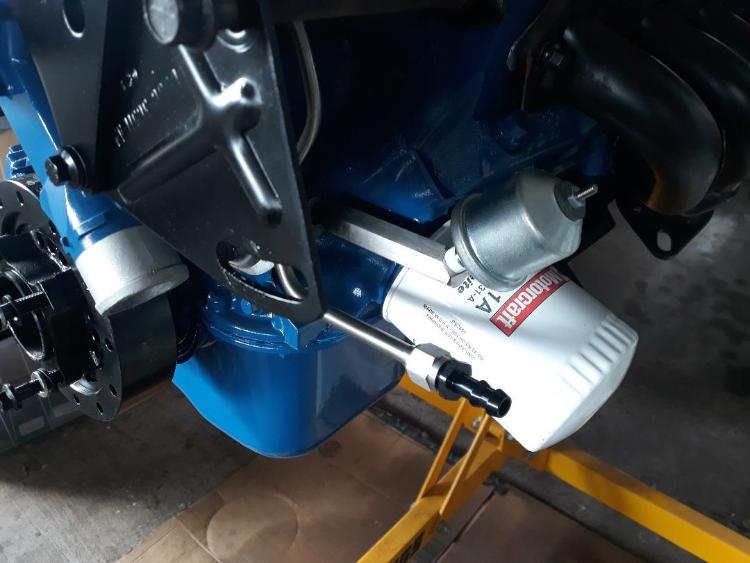 Close up of the hardline without fuel pressure port 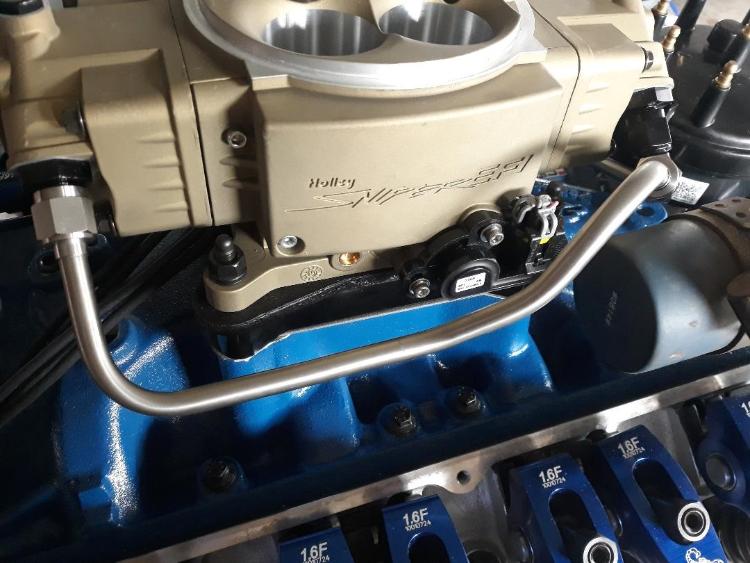 Another close up of the hardline 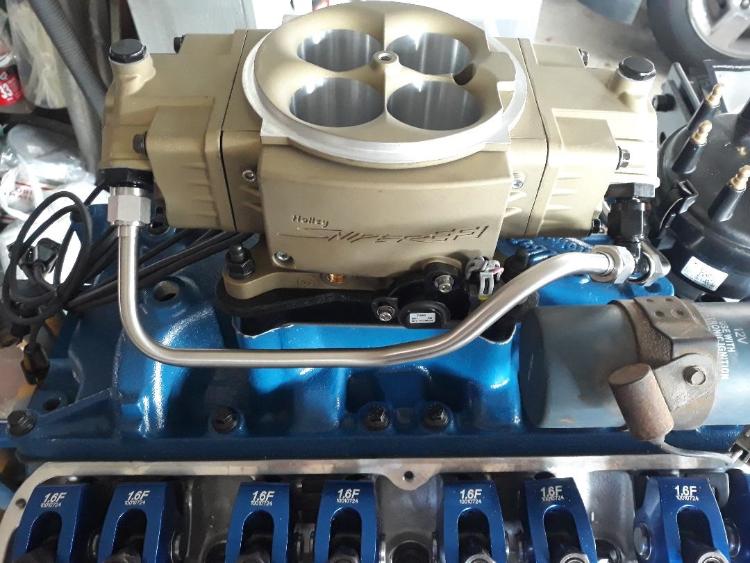
"Old Blue" - '56 Fairlane Town Sedan - 292-4V, Ford-O-Matic transmission, 3.22:1
'63 Belair 2dr sdn - 283-4V, Powerglide transmission, 4.56:1 '78 Cougar XR7 - 351-2V, FMX transmission, 2.75:1 9inch "Bruno" - '82 F150 Flareside - 302-2V, C6 transmission, 2.75:1 9inch, 31x10.50-15 BFG KO2 |
|
|
Have a bit of a issue right now. Earlier today through fb I was in contact with Ed on one of the Ford V8 groups I am on, he informed me that he had or had the ability to get me the 5/16" x 6.40" length pushrods that I've been waiting half a year for through jegs made by Manley. This company that makes them for Ed is Manton Pushrods and I can get a set of 3 piece pushrods for $216.84 which would save me $27.79 on the Manley 6.400" x 5/16" x 0.120" wall thickness. Only thing is these pushrods are a thinner wall thickness but it sounds like the 3 piece design allows for hardening to be done differently for different parts resulting in a pushrod that is stouter than a traditional 1 or 2 piece.
I am seriously thinking about canceling my jegs order and place my order with him. Only thing is I never bought from him before and to get the custom length it says to just simply order the length you want but I dont know exactly how that is to be done. I have sent an email and will see what is said as I am torn between the 0.083" wall thickness 3 piece pushrod set for $192.00 or the 0.116" wall thickness 3 piece pushrod set for $248.00.
"Old Blue" - '56 Fairlane Town Sedan - 292-4V, Ford-O-Matic transmission, 3.22:1
'63 Belair 2dr sdn - 283-4V, Powerglide transmission, 4.56:1 '78 Cougar XR7 - 351-2V, FMX transmission, 2.75:1 9inch "Bruno" - '82 F150 Flareside - 302-2V, C6 transmission, 2.75:1 9inch, 31x10.50-15 BFG KO2 |
|
Administrator
|
First, I missed the previous post, but your fuel line looks great. Well done.
On the push rods, do you have to cancel the first order? The odds of you getting both aren't high, but that could happen I guess. But I don't have any suggestions for you on the wall thickness. I'm not up to speed with push rods. Sorry.
Gary, AKA "Gary fellow": Profile
Dad's: '81 F150 Ranger XLT 4x4: Down for restomod: Full-roller "stroked 351M" w/Trick Flow heads & intake, EEC-V SEFI/E4OD/3.50 gears w/Kevlar clutches
|
|
|
Thanks, I dont have to cancel the order from Jegs but what I may do is put the pushrods on my paypal credit and once they ship I can then cancel my jegs order and put the refunded money onto my paypal credit as a payment. On the wall thickness I couldnt say either. AFR states to run 0.120" wall thickness pushrods since there are guide plates but yet you can buy 0.080-0.083" wall thickness pushrods that are hardened for use with guide plates. I know the mass of the pushrod doesnt matter from a performance stand point but with the price difference I dont see the point in spending the extra money if the 0.083" wall thickness is already overkill for my application.
"Old Blue" - '56 Fairlane Town Sedan - 292-4V, Ford-O-Matic transmission, 3.22:1
'63 Belair 2dr sdn - 283-4V, Powerglide transmission, 4.56:1 '78 Cougar XR7 - 351-2V, FMX transmission, 2.75:1 9inch "Bruno" - '82 F150 Flareside - 302-2V, C6 transmission, 2.75:1 9inch, 31x10.50-15 BFG KO2 |
|
Administrator
|
I think you have a good plan.

Gary, AKA "Gary fellow": Profile
Dad's: '81 F150 Ranger XLT 4x4: Down for restomod: Full-roller "stroked 351M" w/Trick Flow heads & intake, EEC-V SEFI/E4OD/3.50 gears w/Kevlar clutches
|
|
|
Yep, I got a email reply from Ed, he informed me that I am doing nothing special just a street performance engine and thus a standard 4150 chromoly one piece pushrod in 0.083" wall thickness will be well over enough. He informed me that the chromemoly is a considerable amount stronger than the standard steel tube that your average pushrods are so I shouldnt have any issues with the 0.083" wall thickness.
So I placed my order today for the 6.400" length chromemoly 1 piece push rods in 5/16" size and 0.083" wall thickness where one end is 210* spherical end and the other is a standard 180* spherical end on order. Hopefully the pushrods should ship out in 24 - 48 hours as per Manton`s website that states when they receive an order the order will ship with in 24 - 48 hours. I will keep the Jegs order on hand even though I cant cancel the order I placed now as its a custom part but I think it will ship before Jegs ships since the last I heard is Manley wont be getting material in to make pushrods till April.
"Old Blue" - '56 Fairlane Town Sedan - 292-4V, Ford-O-Matic transmission, 3.22:1
'63 Belair 2dr sdn - 283-4V, Powerglide transmission, 4.56:1 '78 Cougar XR7 - 351-2V, FMX transmission, 2.75:1 9inch "Bruno" - '82 F150 Flareside - 302-2V, C6 transmission, 2.75:1 9inch, 31x10.50-15 BFG KO2 |
|
Administrator
|
This should speed things up dramatically!

Gary, AKA "Gary fellow": Profile
Dad's: '81 F150 Ranger XLT 4x4: Down for restomod: Full-roller "stroked 351M" w/Trick Flow heads & intake, EEC-V SEFI/E4OD/3.50 gears w/Kevlar clutches
|
| Edit this page |