Fuel Injection upgrade
|
Administrator
|
I like the look, but I'm not sure how I'd like it with a grille guard. And I'm pretty sure I wouldn't add the bug shield. I think it would be getting too busy. But that's just me.
On double terminals, I've see ones that take two wires but the wires come in from the opposite ends. That seems like it would make it awkward to use. I think I'd put two wires into one hole in the terminal and crimp it.
Gary, AKA "Gary fellow": Profile
Dad's: '81 F150 Ranger XLT 4x4: Down for restomod: Full-roller "stroked 351M" w/Trick Flow heads & intake, EEC-V SEFI/E4OD/3.50 gears w/Kevlar clutches
|
Big reason why I am trying to figure out what to do with the grill. I wanted to get the chrome grill but the grill guard is chrome so that has me thinking do I go back argent silver on the grill like OE, do I go with a black out grill, or do I go with the chrome grill and just have the grill guard powder coated a gloss black which I dont know how that will look bolted to a chrome bumper On the double terminals I have seen those at the opposite ends or even as a Y, the ones I am looking at getting are like the ones included with the American Auto Wire harness kits, where your wire crimps at it is double width so you lay two wires side by side and crimp them together.
"Old Blue" - '56 Fairlane Town Sedan - 292-4V, Ford-O-Matic transmission, 3.22:1
'63 Belair 2dr sdn - 283-4V, Powerglide transmission, 4.56:1 '78 Cougar XR7 - 351-2V, FMX transmission, 2.75:1 9inch "Bruno" - '82 F150 Flareside - 302-2V, C6 transmission, 2.75:1 9inch, 31x10.50-15 BFG KO2 |
|
Some updates, I got back onto the engine for a bit. To start off I put another two quarts of the Driven 10w40 break in oil bringing the total to 5 quarts and primed the system again. It took about four tries at spinning the oil pump at 10 second intervals before the snap and pop of air went away from inside the engine. After the fourth try every time I spun and built up full oil pressure and held it (I dont know if pressure was dropping as I didnt hook the oil pressure gauge up again) there was no noises coming from inside the engine when stopping so the whole system has to be fully primed.
I also went back to my parts and illustration guide to source some more parts that I am looking for the engine. The following is the parts I added to my list last night. E0TZ-2B257-A : Brake valve - Under 8500 GVW D9ZZ-6A666-A : PCV Valve (*EV-98-B) E1TZ-6853-A : PCV Hose (r/b E5TZ-6853-C) E2TZ-6754-A : Oil Dipstick Tube E3TZ-6750-L : Oil Dipstick Indicator (E3TE-CA) E1TZ-9A474-D : 6-way Intake Manifold Vacuum fitting E0TZ-18832-A : Radio Capacitor at Ignition Coil C9PZ-6A664-A : PCV Hose 15/32" ID cut to fit C9PZ-6A664-B : PCV Hose 5/8" ID cut to fit D3PZ-6A664-A : PCV Hose 3/8" ID cut to fit C9PZ-8620-GT : A/C Belt (1/2" width x 60 1/2" length) C9PZ-8620-CM : P/S Belt (1/2" width x 52 1/2" length) C9PZ-8620-GF : Alt Belt (15/32" width x 38 5/8" length) I was able to locate and purchase a couple of the items last night. I purchased the PCV valve under EV-98-B part number and I am leaning towards running the OE style PCV valve over the fixed orifice tube that everyone with snipers keep saying to run over the OE variable but every thing I keep reading on the fixed orifice has people citing they have saw a increased in oil consumption to the point of a quart in 1,500 - 2,000 miles being consumed and I do not want that. The second item I purchsaed was the Radio Capacitor that bolts to the coil. I could not find the E0TZ-18832-A but when googling the number I found that the number was replaced with F6UZ-18832-AA which strangely enough is not listed in the parts and illustration guide which typically lists the replacement part number. The connector how ever looks the same as the cylinder capacitor so at the very least I can depin the connector from the housing and use the housing on my OE cylinder capacitor as the connector on my old one has the latch broken. Right now I am currently looking at the C9PZ-6A664-B which is a 25ft roll of 5/8" PCV hose, I dont want to spend big bucks as this will be the hose that goes from my breather cap to the air cleaner pcv filter. I found some Gates brand hose for PCV that is 25ft length for $41 but I do not need 25ft length and the PCV itself is not 5/8" I believe it is 3/8" and I know I will need to get a 3/8" tee as I will be connecting the PCV to the 3/8" pcv/brake booster port on the back of the sniper. The other leg of the 3/8" tee will be connected to my charcoal canister purge which I will be confirming with my tuner if I will be fine to use it as I do not want to just leave it unconnected and then have to deal with raw fuel vapors. I am also looking for a vacuum tree as I do not need all the ports that the OE one has, plus the port I will be using is vertical not at an angle so I will need something low profile to clear the sniper. Since it is going into cylinder 4 intake runner I do not want to run anything to the port that will lean cylinder 4 out. So with that known I know I need a 3/8" port for the brake booster which will not lean out cylinder 4. I also know I need 5/16" which will run to the vacuum tree on the firewall which then runs down to my vacuum modulator on my C6 transmission which also will not lean out cylinder 4, worse case it will suck in transmission fluid into cylinder 4 if the modulator fails. I know I do not want to add the purge for my charcoal canister to this port as it will make cylinder 4 rich so that 3/8" hose will need to be teed into the manifold port on the sniper to ensure it can enrich all cylinders. The sniper has a 3/8" manifold vacuum port and a 3/16" manifold vacuum port on the back side and only one 3/16" ported vacuum port on the front. The 3/16" ported vacuum port on the front will go to my distributor advance but I will also have to put a 3/16" tee in line as the purge solenoid on the charcoal canister is activated by a ported vacuum source to allow manifold vacuum to purge the canister. The only real question is do I source a vacuum temp switch and thread it into my thermostat housing so the charcoal canister only purges when the engine is hot. I hate to do that cause I might not use the charcoal canister if my tuner advises against it for causing a economy issue. Im also looking at belts, trying to find some belts made by Goodyear that are like the old gatorbacks that Goodyear discontinued in V-belt form. I found some belts that I will have to look into such as they have a 17600 V-belt for my Dealer A/C but I am really trying to find a super grippy belt in 15/32" width that is around 38 5/8" length for my alternator which should fit the 3G alternator I eventually will be adding to this build since I will be using a OE sized pulley. Wiring wise I have put that on the back burner for the time being but I do need to get back to my wiring and I do need to start assembling my fuse/relay box to get it ready for installation into the truck.
"Old Blue" - '56 Fairlane Town Sedan - 292-4V, Ford-O-Matic transmission, 3.22:1
'63 Belair 2dr sdn - 283-4V, Powerglide transmission, 4.56:1 '78 Cougar XR7 - 351-2V, FMX transmission, 2.75:1 9inch "Bruno" - '82 F150 Flareside - 302-2V, C6 transmission, 2.75:1 9inch, 31x10.50-15 BFG KO2 |
|
Looks like finding vacuum hoses is going to be a chore.
I been looking for 3/16" hose for about 7 hours now and I just cant find anything made out of rubber that is specifically for vacuum hose and is automotive rated. I found a Pico brand I was going to get but its only good to 180* F which is totally useless in automotive use especially considering with the 195*F thermostat I have installed will result in 200 - 212* F temperatures in the summer time. Only thing I been able to find that could be used is silicone and I really dont want to run silicone as I cant run silicone hose for the PCV system as its not oil rated. Guess I will be checking at work tomorrow to see if we have any 3/16" vacuum hose that I can get a part number off the spool. Other sizes is 3/8" for the PCV line and 5/8" for the breather to air cleaner which I have found Gate`s brand hose in those sizes rated for emission use.
"Old Blue" - '56 Fairlane Town Sedan - 292-4V, Ford-O-Matic transmission, 3.22:1
'63 Belair 2dr sdn - 283-4V, Powerglide transmission, 4.56:1 '78 Cougar XR7 - 351-2V, FMX transmission, 2.75:1 9inch "Bruno" - '82 F150 Flareside - 302-2V, C6 transmission, 2.75:1 9inch, 31x10.50-15 BFG KO2 |
|
This post was updated on .
Talking with Jet-Hot now to see what I am looking at cost wise for ceramic coating my headers. Im looking at their Offroad 2000 coating which has a textured surface once applied, I have to see if the inside of the header would be coated as well. Cradin Industries informed me you dont want the inside ceramic coating but in reading other publications online everyone states you want ceramic coating on the inside as well otherwise the steel tubing can get heated up and cant shed the heat so the headers will fail from the heat no different than using header wrap.
This is a stock photo from Jet-Hot of their Off-Road 2000 showing the texture of the coating. 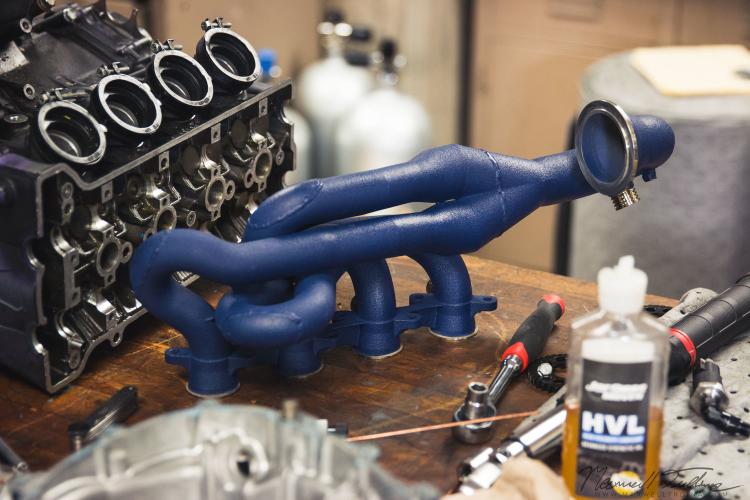 These are the colors I am looking at if I can get a color top coat on their smooth polished ceramic coating as I really dont want silver. 2057 Titanium  2069 Platinum 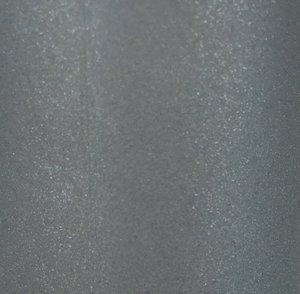 Satin Black 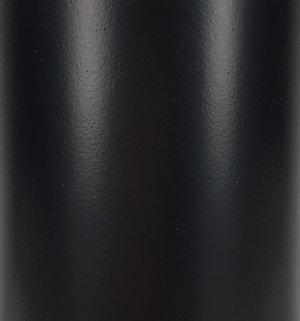 The satin black would be my last choice, after looking at the engine more today while routing vacuum lines and installing the PCV valve and cleaning up the coil bracket I realized while the black headers wont look bad I just cant get over all the black there is on the engine between the accessory brackets, the drive pullies and the ARP fasteners that arent painted over. Photo with the NOS pcv valve installed as well as the chinese made silicone vacuum hoses in 3/8" and 3/16" sizes. 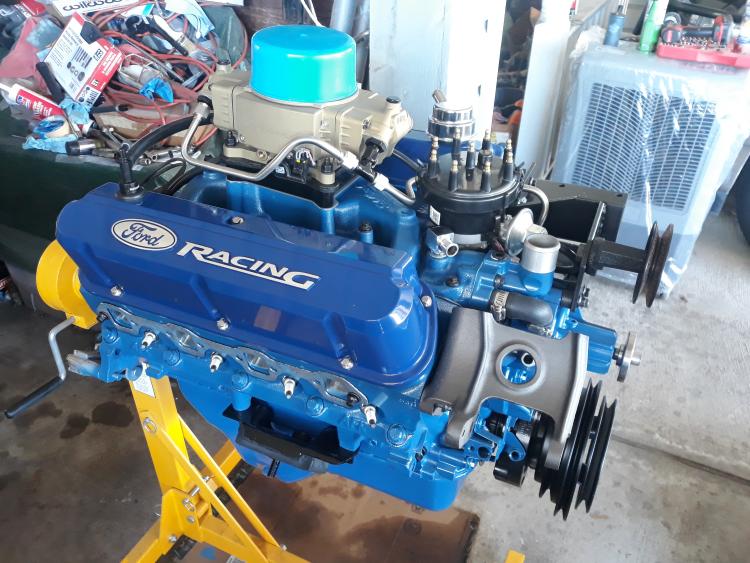 I also went back and emailed Davis Unified Ignition about their Ford Duraspark distributor just to make a comparison of what they are doing tune wise vs Parkland. One thing about the DUI unit is they are a OE distributor housing which means my NOS blue adapter will fit which it currently does not fit on the Cardone housing. The other thing is the DUI unit has a full length bronze bushing to stabilize it to 10,000 rpm which I dont need but hey a full length bronze bushing is better even if I never need it. Im looking at $110 plus cost of return shipping not including cost to ship my Cardone unit to Parkland so I figure around $150 - $175 with shipping both ways. The DUI unit is priced at $289 and is tuned not just mechanically but their description states they tune the vacuum advance as well using the specs of the engine and vehicle you provide.
"Old Blue" - '56 Fairlane Town Sedan - 292-4V, Ford-O-Matic transmission, 3.22:1
'63 Belair 2dr sdn - 283-4V, Powerglide transmission, 4.56:1 '78 Cougar XR7 - 351-2V, FMX transmission, 2.75:1 9inch "Bruno" - '82 F150 Flareside - 302-2V, C6 transmission, 2.75:1 9inch, 31x10.50-15 BFG KO2 |
|
Administrator
|
Jet Hot is what I have on Bug Blue’s headers, Off-road 2000 IIRC. And they do coat the inside.
Gary, AKA "Gary fellow": Profile
Dad's: '81 F150 Ranger XLT 4x4: Down for restomod: Full-roller "stroked 351M" w/Trick Flow heads & intake, EEC-V SEFI/E4OD/3.50 gears w/Kevlar clutches
|
So the Off-Road 2000 has a coating on the inside as well? I figured with the rough texture of the Off-Road 2000 that they wouldnt coat the inside with it as it will disrupt exhaust flow and helping carbon to build up. Thats interesting. I am also talking with Davis Unified Ignition right now about their Distributors, I was in the process of updating my previous post when your post was made. I am curious how the DUI distributor tuning stands up to Parkland`s tuning. The pricing is not that much different once I figure in the round shipping cost, the recurve cost and the cost of my dorman distributor.
"Old Blue" - '56 Fairlane Town Sedan - 292-4V, Ford-O-Matic transmission, 3.22:1
'63 Belair 2dr sdn - 283-4V, Powerglide transmission, 4.56:1 '78 Cougar XR7 - 351-2V, FMX transmission, 2.75:1 9inch "Bruno" - '82 F150 Flareside - 302-2V, C6 transmission, 2.75:1 9inch, 31x10.50-15 BFG KO2 |
|
Havent gotten a price quote yet from Jethot. I was informed by Lance from JetHot that the polished silver 1300 is their biggest heat reducer that will see a 55% - 65% reduction in heat and is ceramic coated inside and out. The 2000 and 2500 series Ceramic Coating is outside only with no interior ceramic coating so from this I am being told the Off Road 2000 is exterior only which I am not too crazy about. I can do a top coat color for the 1300 but I wont have any heat reduction cause apparently they do not use the polished silver/matte silver as a base for the top color coat.
So with this all taken into consideration to obtain the heat reduction that I am wanting it looks like I am forced to go with the polished silver which I really am not a fan of. No email as of today from Davis Unified Ignition for clarification on how they do their calibration so I can compare to Parkland.
"Old Blue" - '56 Fairlane Town Sedan - 292-4V, Ford-O-Matic transmission, 3.22:1
'63 Belair 2dr sdn - 283-4V, Powerglide transmission, 4.56:1 '78 Cougar XR7 - 351-2V, FMX transmission, 2.75:1 9inch "Bruno" - '82 F150 Flareside - 302-2V, C6 transmission, 2.75:1 9inch, 31x10.50-15 BFG KO2 |
|
Administrator
|
I guess I was wrong. Perhaps I didn't get mine coated inside?
Went back to my To Jet Hot Or Not thread and found this: HPC (Jet-Hot): So I called HPC and Roger answered "HPC Jet-Hot." Turns out they merged a few years ago. As previously reported I talked with Debi at their CA facility and got quotes from her. But today Roger, the plant manager, talked with me for 30 minutes. I explained my application and he told me about their products: 1300; 2000; & 2500, with those being the names as well as the temps they can withstand. Roger agreed with Debi that in my application the 1300 might melt. And while the 2500 has the best of the properties it is also essentially porcelain and can chip. So Roger said he thinks the 2000 is the one for me. And, if I come down to pick them up the price for coating them both inside and out is $450. Plus, he'll give me a tour.
Gary, AKA "Gary fellow": Profile
Dad's: '81 F150 Ranger XLT 4x4: Down for restomod: Full-roller "stroked 351M" w/Trick Flow heads & intake, EEC-V SEFI/E4OD/3.50 gears w/Kevlar clutches
|
Interesting, I wonder if HPC is actually Jet-Hot and not just using the name cause on Jet-Hots website they only have two locations, one in Oklahoma and one in North Carolina. I know I was reading lots of places talk about using Jet-Hot and even on Jet-Hot`s FAQ they state no one but them uses Jet-Hot. Still there is conflicting information on their website. Lance told me they do not apply the color coat over the silver ceramic coating but yet on Jet-Hot`s website under coatings it states the following under color coat. "The most popular choices are Satin Black and Classic Polish, but there are more than 65 other color options to choose from. Color topcoats are applied over a ceramic-metallic base-coat to protect against corrosion" The whole metallic base coat makes it sounds like it is a color coat applied atop the silver ceramic coat. Then there is the whole heat reduction, Lance is making it sound like the 2000 series Off road ceramic coating does not offer any heat reduction but yet their website under coatings states this about the 2000 series Off-Road coating "this coating is ideal for off-road cars, trucks, dune buggies, motorbikes, and Jeeps. Like Classic Polish, Jet-Hot’s Off-Road Polish lowers parts’ surrounding temperatures and prevents galvanic thermal oxidation, improving the performance of the entire exhaust system. This unparalleled coating is rated for severe conditions surviving conditions up to 2000°F" which clearly states it lowers parts surrounding temperatures but only the silver/polish ceramic coating the 1300 series has a FLIR showing the heat reduction and nothing on the 2000 series. It really is making me wonder and I still have yet to get a price quote from them I said the only thing I need is a price quote for a pair of shorty headers with the longest tube being 19" from head flange to ball and socket flange. Three email replies and still no price quote. I am thinking about just going with the local guy at Cradin industries at least his website lists a break down of ceramic coating. Only thing is he doesnt do inside the tubes.
"Old Blue" - '56 Fairlane Town Sedan - 292-4V, Ford-O-Matic transmission, 3.22:1
'63 Belair 2dr sdn - 283-4V, Powerglide transmission, 4.56:1 '78 Cougar XR7 - 351-2V, FMX transmission, 2.75:1 9inch "Bruno" - '82 F150 Flareside - 302-2V, C6 transmission, 2.75:1 9inch, 31x10.50-15 BFG KO2 |
|
Did lots of reading and lots of thinking and I pulled the trigger on purchasing a D.U.I. Duraspark II distributor.
Stock photo below, says I should have it in 6 to 8 weeks 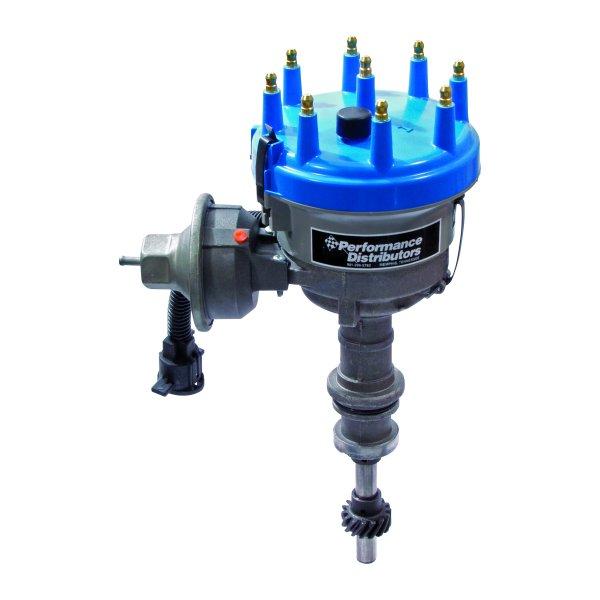 and the description "The Ford Duraspark we offer is a high performance unit for those who want a completely stock appearing or factory style electronic distributor. Each Duraspark Electronic Distributor is custom calibrated on a distributor machine and blueprinted for your Ford engine to provide maximum power, torque and instant throttle response. We tune the centrifugal advance using information about the vehicle and engine such as cam duration & lift, carburetor size, compression ratio, vehicle weight and octane of fuel. A super smooth advance curve assures excellent performance and mileage. The vacuum advance is calibrated for maximum fuel economy and light throttle ping is eliminated. The factory center bushing on our Duraspark Distributors is replaced with a full length bronze oil impregnated bushing to provide increased durability and cure top end timing fluctuation, which is a common problem in these distributors due to the weaker stock bushing. Our Duraspark Distributor can be used for a number of applications from everyday street use to all out racing. The distributor is capable of 10,000 rpms with our ED Dyna-Module and Inferno Coil kit. It will work with other modules and coils, but rpm ability is not guaranteed." I started thinking with all the money I have in this engine do I really want to ship out to have recurved a cardone new duraspark distributor that was purchased for $40 or do I want to get one custom built for my truck and engine out of a OE distributor housing. I tried to put the NOS blue cap adapter on my cardone unit and it wouldnt fit as the distributor housing was different. I ordered the one with the blue cap so I can have a all blue cap/adapter assembly once I get it in 6 to 8 weeks. I also did some asking around and everyone swears up and down that D.U.I. are the people if you want a quality distributor. The ceramic coating has been put on the back burner for now because Jet-Hot still hasnt answered me how much am I looking at for three different ceramic coatings I was looking at and I am done asking. I am being pushed back towards Cradin Industries for ceramic coatings since I know his pricing.
"Old Blue" - '56 Fairlane Town Sedan - 292-4V, Ford-O-Matic transmission, 3.22:1
'63 Belair 2dr sdn - 283-4V, Powerglide transmission, 4.56:1 '78 Cougar XR7 - 351-2V, FMX transmission, 2.75:1 9inch "Bruno" - '82 F150 Flareside - 302-2V, C6 transmission, 2.75:1 9inch, 31x10.50-15 BFG KO2 |
|
Administrator
|
At one point Tim Meyer was trying to work up a deal with Davis to have them make distributors for him as he was impressed with their quality. It didn't happen, although I have one of the prototypes, but I still remember that Tim was impressed with them.
On the Jet Hot issue, I sure understand. But my guess is that you called at the height of their season. IIRC they told me that this time of year the racers were hitting them heavy to get their headers coated. I still think they should have returned your call, and I'd move on if it was me.
Gary, AKA "Gary fellow": Profile
Dad's: '81 F150 Ranger XLT 4x4: Down for restomod: Full-roller "stroked 351M" w/Trick Flow heads & intake, EEC-V SEFI/E4OD/3.50 gears w/Kevlar clutches
|
Thats what I keep seeing from every source I keep looking at, everyone says they are high quality. It could be, or it could be the guy I was dealing with just didnt understand and thought I was still questioning the products when I was in fact interested in the cost of the three different options I was looking at. I may revisit it later this year after my D.U.I. distributor comes in.
"Old Blue" - '56 Fairlane Town Sedan - 292-4V, Ford-O-Matic transmission, 3.22:1
'63 Belair 2dr sdn - 283-4V, Powerglide transmission, 4.56:1 '78 Cougar XR7 - 351-2V, FMX transmission, 2.75:1 9inch "Bruno" - '82 F150 Flareside - 302-2V, C6 transmission, 2.75:1 9inch, 31x10.50-15 BFG KO2 |
|
Got the coil bracket painted today, going to let it dry a week before I mount it. Now I am trying to find a coil to put in its place as the one that I have been using which does run the truck, I noticed rust on the terminals that the horse shoe connector connects to. Since I am going all new I really want to put a nice clean new coil as well.
So I looked at RockAuto first as my go to and found the following United Motor Products part# C314 (no markings on coil) NGK oil filled canister part# 48773 (Marked 12V for breakerless Ignition with external resistor 016 NGK) If I go with the standard replacement grade I probably will go with the NGK just cause its NGK. There is one heavy duty grade and its below Standard Motor Products part# FD476 (Blue Streak) This coil is all Ford Blue in color and I heard in the past Blue Streak were great coils but it seems now they are not the same as the ones of the past, Plus I am wary of using Standard brand parts for electronics I have seen them fail way too often prematurely. Over on Summit I found more coils below Taylor Cable part# 718205 (High Performance oil filed Duraspark states to use a ballast resistor with stock Duraspark ignition which negates the whole Duraspark style coil) Standard Motors Products part# FD476T So it appears outside of getting the Echlin brand coil from Napa for $37 my only choices are the standard replacement NGK coil for $18.57 or take a chance on the HD Standard brand coil in Ford Blue for $16.48. The other thing I am dealing with right now is the C4/C6 kick down adjustment screw, I forgot I purchased the Holley kit for use with my Holley made Summit 600cfm 4V carb I wont be using so I am going to try that but Sniper instructions has no mention of the adjustment screw for the C4/C6 kick down that the Stealth 4150 has and no one can tell me what Holley wants you to do. The kit I bought has a spring and spring perch to attach to the kick down lever to hold it in the full up position but Ford never had a spring on the kick down so I will be omitting it if I can get the Holley screw, jam nut, and capture nut to work. Only question is do I install it like Holley says in the instructions for the kick down kit by placing the head of the screw against the throttle lever or do I do it like Ford did and have the screw head accessible easily for adjustment and let the blunt threaded end contact the throttle. The other thing I am messing with is related to coolant. I know I wont be using Conventional Green with this new engine, I was planning on using Global Gold which is compatible with Conventional Green unlike long life orange ie dex-cool that will sludge up. But I am wondering if there might be another coolant out there I could use that would be even more aluminum/copper safe than Global Gold and Conventional Green.
"Old Blue" - '56 Fairlane Town Sedan - 292-4V, Ford-O-Matic transmission, 3.22:1
'63 Belair 2dr sdn - 283-4V, Powerglide transmission, 4.56:1 '78 Cougar XR7 - 351-2V, FMX transmission, 2.75:1 9inch "Bruno" - '82 F150 Flareside - 302-2V, C6 transmission, 2.75:1 9inch, 31x10.50-15 BFG KO2 |
|
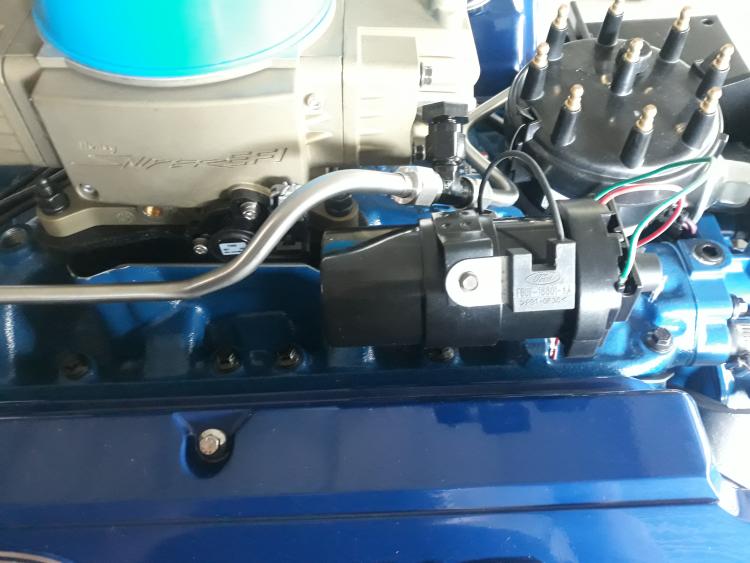
Late update, bout two weeks ago I installed the NGK ignition coil and snapped the standard brand horse shoe connector. Both are currently mounted on the engine. I also installed the NOS replacement capacitor to the ignition coil bracket which has the correct plug for the OE harness.
 I also installed the adjustment screw for the transmission kick down linkage. This is how Holley shows their kit is installed. I might try to make some tweaks to it once I get it installed as I dont know where it needs to be set and the way I have it set currently smashes it against the secondary linkage. I much rather have the head of the screw on the opposite end I cant run it there as the head of the screw hits the secondary linkage. 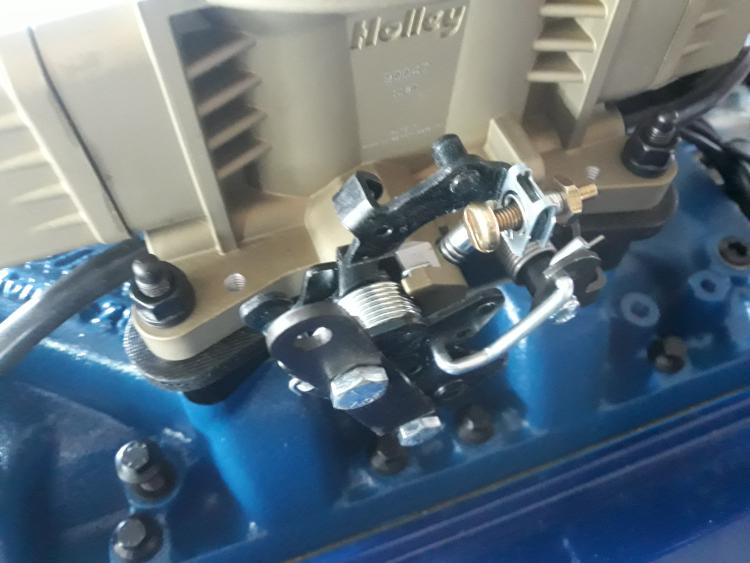 Still a few things to do while I wait for my distributor from D.U.I. which hopefully ships by May 20, I am still on the hunt for a NOS oil dipstick and dipstick tube. I am also still hunting for a NOS vacuum tree that screws into the intake manifold, I have a take off on a '84 F150 with a I6 with feedback carb which has one extra port than mine that I may use if its not too tall. The other aspect I am looking at is the temperature switch for the charcoal canister. I thought it was the one that screws into the thermostat housing but the Ford Parts and Illustration guide calls this part the EGR Control. I did some searching online and it sounds like the temperature switch is the one in the air cleaner but that cant be right as I know for a fact this temperature switch goes to the vacuum motor on the snorkel. I guess I will be looking at my truck this weekend if the weather is nice and I have time to see what I am looking at. I want to try hooking up the charcoal canister to retain that functionality but I hate to buy a vacuum switch that isnt the right one.
"Old Blue" - '56 Fairlane Town Sedan - 292-4V, Ford-O-Matic transmission, 3.22:1
'63 Belair 2dr sdn - 283-4V, Powerglide transmission, 4.56:1 '78 Cougar XR7 - 351-2V, FMX transmission, 2.75:1 9inch "Bruno" - '82 F150 Flareside - 302-2V, C6 transmission, 2.75:1 9inch, 31x10.50-15 BFG KO2 |
|
Administrator
|
Coil and capacitor look good.
But that kickdown screw looks odd. Does the head hit the lever at the rear to kick the tranny down? If so, could you turn the whole thing around and Loctite a nut on the very end of the screw to hit the linkage? On the canister purge system and the temp switch, have you looked at our manual called Understanding Emissions Control Systems? Starting on Page 3-13, which is the 50th page, there is a 25 page detailed description of how the systems work. And on Page 1-9, which is the 14th page in the document, there are descriptions of when the various valves and switches open. Maybe that will help?
Gary, AKA "Gary fellow": Profile
Dad's: '81 F150 Ranger XLT 4x4: Down for restomod: Full-roller "stroked 351M" w/Trick Flow heads & intake, EEC-V SEFI/E4OD/3.50 gears w/Kevlar clutches
|
|
This post was updated on .
It does, thats why I have been contemplating of just tapping the arm but the head of the screw is how holley wants it to be in contact with the throttle lever. The jam nut holley from what I can tell is supposed to be on the otherside from where I have it as well as the clip. But when the throttle is moved open to full throttle as the secondary linkage rotates just shy of full throttle the adjustment screw comes into contact with the linkage. Its quite possible once installed on the truck and properly adjusted to bottom the kick down linkage at full throttle might prevent it from contacting. I have been looking at those pages and taking notes. My biggest thing was trying to find the proper one for my truck and go from there. I am not sure what temp I should look for, I assume I should shoot for at least 100*F temp which would give me Green/Blue, Yellow, or Gray as choices for a 2-port switch. The Sniper I dont think hits closed loop till 160* coolant temp as you have to wait till 160*F to make your adjustment but it shouldnt matter how ever because this vacuum switch would after all be in the thermostat housing itself mounted after the 195*F thermostat so either way it wouldnt start purging the canister till the thermostat opens up anyways. In looking at the diagrams it does show the purge valve goes through a vacuum restrictor and then plugs into the top port on the PCV. I saw many state to make the hook up there for the purge, but I was thinking of connecting it via a tee to the 3/8" line from the PCV to the TBI. Think I will do this cause finding a tee is a pita. Only tee I would need is inline of the 3/16" line from the timed port to the vacuum advance so I can run another 3/16" line from there to the ported vacuum switch then from the switch to the canister purge. Looks to be very straight forward then with me capping the large fuel bowl vent port at the purge valve. I just have to wait to hear back from the guy I will be paying to create a tune for my system, I asked him if he could get a tune squared away while retaining the evap functionality. I do not know enough about the system if there would be a way where he could get me a base line tune but then set it up where the canister purging while going down the road doesnt force a change in the fuel map. If he says no I might just end up leaving this plugged off which I hate to do as my goal is as much fuel efficiency as possible and we all know those vapors over time will add up. I tried the '84 I6 7 port vacuum tree and I can use it on my intake manifold and clear the back of the Sniper Stealth. Problem is its tall, most of the ports I wont be using and the fitting was designed to be at an angle not vertical. Ive been looking online for an aftermarket 3/8" npt vacuum port fitting and I found a few but nothing that really jumps out at me. All three ports are for Corvettes from the late 60s and thus they are supposed to have a metal line to connect with a rubber hose slipping over the joint. I found some that have 1/8" npt ports where I could thread my own 1/8" npt to hose barb but the best I found was a 2 port and havent been able to find a 3 port which I think I need. It appears I have a vacuum line from my cruise control to this port, a vacuum line to the plastic tree on the firewall for the transmission modulator and a 3/8" line to the brake booster. I tried looking on summit for a 1/8" npt Y fitting so I could use one of the 1/8" ports to make two probably the two smaller lines from the cruise control and to the transmission modulator leaving the other port for a 3/8" line. But every Y I found is 1/8" npt on one side and AN on the other. ~Update~ Well I think I have a plan of attack, just have to go out and measure the barb on the plastic vacuum manifold on the firewall I suspect that is 1/4" and I need to crawl up under the hood and pull the cruise control hose off and measure the barb there. Hopefully its a 1/4" as well if it is then my plan of attack is to buy a aftermarket fitting that has two 1/8" npt ports and install a single 3/8" barb and a single 1/4" barb and then just install a 1/4" tee between the plastic vacuum manifold and intake fitting for the cruise or I could use the spare slot on the manifold on the fire wall since I dont have factory A/C and just hook the cruise control there. I dont think there would be a performance problem doing this since it all is getting vacuum from the same source, intake runner #4.
"Old Blue" - '56 Fairlane Town Sedan - 292-4V, Ford-O-Matic transmission, 3.22:1
'63 Belair 2dr sdn - 283-4V, Powerglide transmission, 4.56:1 '78 Cougar XR7 - 351-2V, FMX transmission, 2.75:1 9inch "Bruno" - '82 F150 Flareside - 302-2V, C6 transmission, 2.75:1 9inch, 31x10.50-15 BFG KO2 |
|
No real progress to speak of. First off the alternator arm I found NOS from a dealership online that I bought for $26 on May 21 still hasnt shipped. I sent them an email earlier last month and then sent yet another email yesterday first asking for an update and now demanding an update under the threat of disputing the charge as fraud since they are violating the US consumer laws that state they are obligated to ship my order out with in 30 days of taking my money, informing me of a delay to see if I am ok with it, or refunding my money which they did none of and refuse to email me back.
Second my DUI distributor still hasnt shipped, should have shipped May 20th, I finally was able to get an email reply today from DUI, they informed me that they are still waiting on parts and that they hope to have the parts and get it shipped out in 3 weeks. Besides that I have bought a vacuum fitting thats aftermarket and pieced together three barbs for supplying vacuum for my brake booster, my cruise control, and the vacuum manifold on the firewall for my vacuum modulator for my transmission. I am using a 3/8" brass barb for brake booster, 5/16" brass barb for cruise control, and 1/4" brass barb for the vacuum manifold on the firewall. 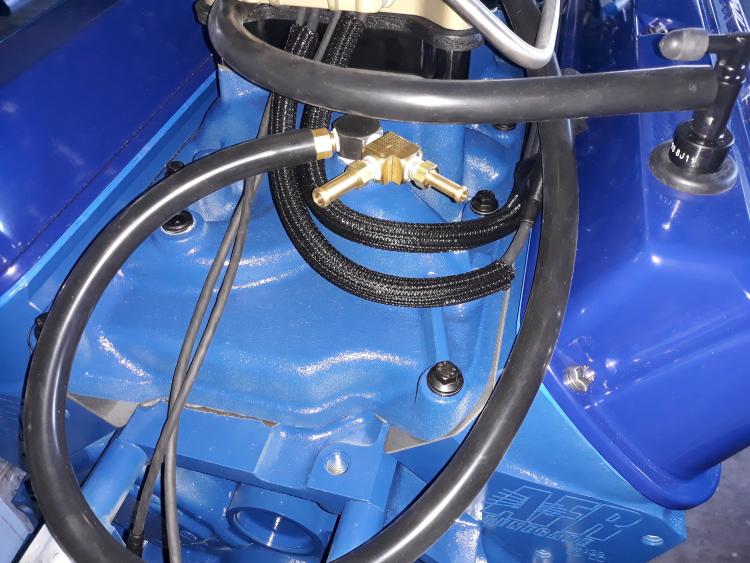 I also applied woven loom material on the wiring for the sniper and routed some of the wiring for the sniper. I hope having the wires run under the coil doesnt introduce RFI. 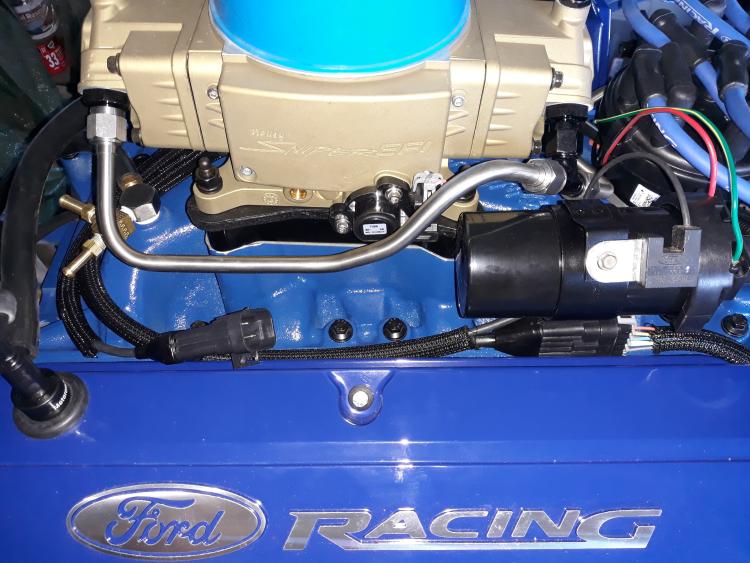 Last I have done I attempted to work on routing the spark plug wires which I just cant get happy with the routing at the distributor. I also am not sure if I still want to buy the Ford oval reproduction distributor cap cover that was used on the Mustangs. I did order the blue version of the DUI Distributor so I can use my NOS blue cap adapter with their blue cap. 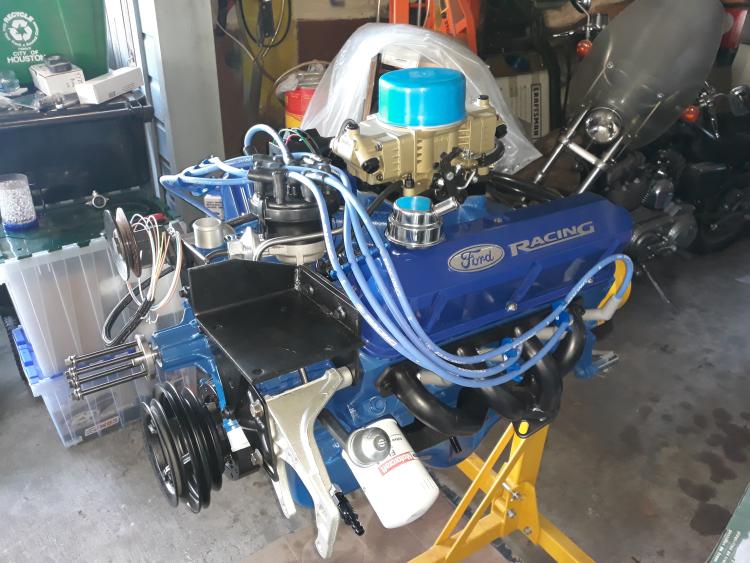 Still havent decided on color for the ceramic coating on the headers, I have never been able to get a price quote from JetHot, they constantly correct me in what I am saying when I am asking about pricing to the point that I think they have wrote themselves out of who I will be using. Crading Industries I havent heard form him in a year now so I dont know if I want to try emailing them again or just simply call up when I have free time. I would like to move on to the alternator but without the alternator adjustment arm that I ordered I think I want to wait a bit before I go deciding which 3G to pick up.
"Old Blue" - '56 Fairlane Town Sedan - 292-4V, Ford-O-Matic transmission, 3.22:1
'63 Belair 2dr sdn - 283-4V, Powerglide transmission, 4.56:1 '78 Cougar XR7 - 351-2V, FMX transmission, 2.75:1 9inch "Bruno" - '82 F150 Flareside - 302-2V, C6 transmission, 2.75:1 9inch, 31x10.50-15 BFG KO2 |
|
Administrator
|
My father would have said "Without bad luck you'd have no luck at all!" Man, every time you turn around you are having problems.
 But I don't think you'll have RFI as the shell/cover of the coil should stop any radiation. And the vacuum connections look good, as does the wiring. So you are making progress, albeit somewhat slowly.
Gary, AKA "Gary fellow": Profile
Dad's: '81 F150 Ranger XLT 4x4: Down for restomod: Full-roller "stroked 351M" w/Trick Flow heads & intake, EEC-V SEFI/E4OD/3.50 gears w/Kevlar clutches
|
I think it's the economy, the shut down and everything that has happened the last couple of years that has these businesses taking the lazy route and using it as excuses for why. Like this dealership with the D7 alternator arm I ordered so I could modify it to work with the 3G alternator upgrade then I can put my original alternator arm up in the off chance I ever decide to do a factory stock restoration down the road. But right now, I can't get word out of them to find out what is going on and they were the only ones that had the 40 - 60A adjustment arm for a 302 but its listed as for a '86 Bronco, but the D9UZ-10145-A part number they have is showing up as fitting 80/85 F-U100/250 with a 40/60A alternator or an 86 E150/250 with all alternator outputs. So, I am hopeful this should fit with my OE brackets and then leave me with just hammering the curve out of it and then figuring out what 3G alternator to go with and mocking it up. On the ceramic coating I have to admit I haven't really been aggressive on it because I am still waiting on my tax refund which they told me last month was going to be yet another 90 days and that is what I been waiting on to fund the ceramic coating of the headers. Plus, I really haven't made a decision on what color to go with so I might just say screw it and go with standard black especially if I finally get a pricing out of Jet Hot and I go with them seeing as only black or silver is the only colors for thermal barrier ceramic coating and the other colors are just a topcoat with no thermal barrier capability. I also need to figure out on the air cleaner as well. I'm thinking about using some silver solder and just fixing my split and broken aluminum one because I just can't justify the price these fools on Ebay is wanting for OE air cleaners. Cheapest one I found was listed for a 460 big block truck and has that scoop on the back side for extra air when you nail the throttle from what I understand but they want over $200. If I am going to pay that much, I would just invest in one of those ducted air cleaners sold on the aftermarket in the $500 - $1000 price range. I already tossed out the 5.0 dual snorkel idea a while back since I would have to run the PCV valve on the driver side and I really didn't want to switch all that around as its already a pain when I go to add oil due to the height of my truck with the 31x10.50-15 tires which will only get higher when I replace the worn out leaf springs in the back and replace the coil springs in the front with a oe spec set with a 1.5" increase in height to level the truck out with the new leaf springs. But I am making some progress, I did purchase the plastic chinese made fuse/relay box and I did undo the Sniper harness to see how they had it all wired up and modified my wiring schematic to plan out my wiring of the box. I just need to get the connectors, the bulk wiring and start making the harnesses up and I dont know if I ever posted the new schematic but below is the new schematic and I also isolated the EFI circuits onto its own ANL fused circuit, isolated from the other ANL fused circuit that provides power to Fuses 1 through 8 that covers headlights, driving lights, AC compressor, and future upgrade with roll bar lights if I decide to do that. I might have to toss out my idea of using the 100w Halogen daylighters and go with their LED Daylighters cause I can only run one V belt and even with a soft start regulator I dont believe I would be able to keep my amperage under 100A with two 100W driving lights, four 100W roll bar lights, and everything else on the truck from the EFI, to the Radio, to the CB, to the AC powered up. Only draw back is I cant omit my driving lights cause they are 100W driving lights wired into my highbeam circuit and KC doesnt offer a LED driving light that looks vintage looking, unless I go with the 6" Daylighter which can only be had in black but the base makes it stand so tall I dont know if it will clear my grill guard top bar. Plus those LED Daylighters are $250 a piece and I would need six total if I do four on the roll bar and two on the grill guard. 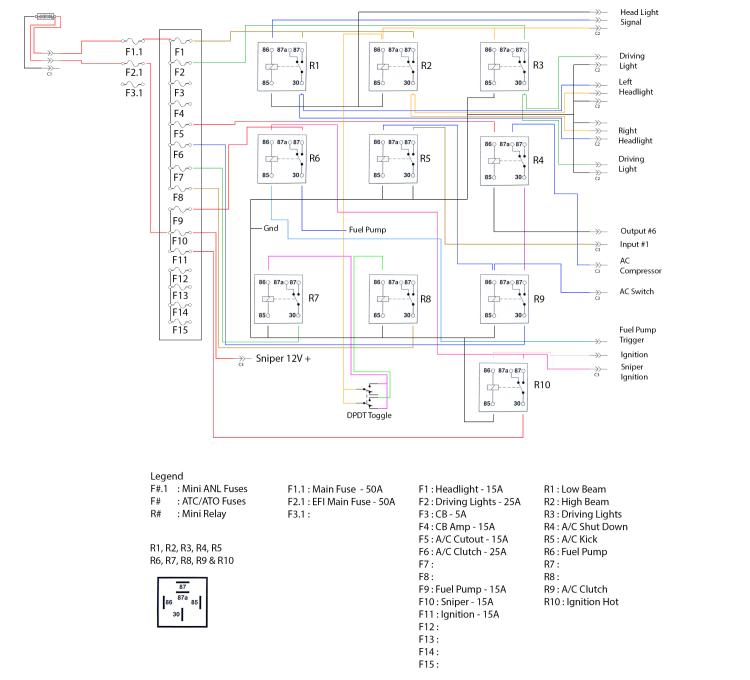
"Old Blue" - '56 Fairlane Town Sedan - 292-4V, Ford-O-Matic transmission, 3.22:1
'63 Belair 2dr sdn - 283-4V, Powerglide transmission, 4.56:1 '78 Cougar XR7 - 351-2V, FMX transmission, 2.75:1 9inch "Bruno" - '82 F150 Flareside - 302-2V, C6 transmission, 2.75:1 9inch, 31x10.50-15 BFG KO2 |
| Edit this page |

