Big Blue's Transformation


Administrator
|
I'd completely missed that you run your California Air Tools 4610AC on your 2000 watt inverter. That's a game-changer as I've been very afraid of buying an inverter and compressor only to find one won't run the other.
And, I wasn't sure you were offering me the 3000 watt inverter, so I didn't want to ask as it might put you in a bind. Thank you for being persistent. I've sent you an email so we can talk privately, and it includes questions about dimensions on it, which actually would be better answered on here so all can see. But let me ask some questions about your compressor. Looking at the pictures it appears that: The motor/compressor is just sitting on rubber isolators on the frame, so could easily be unbolted and supported elsewhere. But can you get some rough measurements?The tanks are just held to the frame with tabs and through-bolts, but appear to be welded together to make one unit. You said they are 7" diameter, but could you give me some measurements on them as a unit?The filter for the compressor is a screw-in unit, so could be remoted for easy replacement?I'm thinking that the motor needs protection from rain, etc, but it also needs ventilation. So I'm wondering if it would go ahead of the wheelwell and to the right of the toolbox in the bed. Any reason you see why it couldn't be mounted with its feet to the side of the toolbox?
Gary, AKA "Gary fellow": Profile
Dad's: '81 F150 Ranger XLT 4x4: Down for restomod: Full-roller "stroked 351M" w/Trick Flow heads & intake, EEC-V SEFI/E4OD/3.50 gears w/Kevlar clutches
|
|
Administrator
|
The California Air compressor is pretty much modular.
Yes, the two tanks are bridged with two tubes that join them. My compressor is at the job (buried in snow) and I don't plan to go in today.  But I did measure the individual tanks at 6 5/8 x 18 1/2" I think you'd be fine with the single tank model I linked. It has the same pump and motor for only $169. Again... I don't think you can push too much air through a Schrader valve. The pump should easily keep up. Mounting the pump/motor assembly anywhere you want would be a simple job of using a longer braided hose and wires from the pressure limit/unloader switch. The regulator/coupler could also be remoted with any 1/4 NPT male-male line. Probably best another braided stainless over rubber hose from a plumbing supply. Definitely NO need for anything like hydraulic pressure line.
Jim,
Lil'Red is a '87 F250 HD, 4.10's, 1356 4x4, Zf-5, 3G, PMGR, Saginaw PS, desmogged with a Holley 80508 and Performer intake. Too much other stuff to mention. |
|
Administrator
|
I'd forgotten that y'all are getting hit with the storm.
 So, if the individual tanks are 6 5/8 x 18 1/2" then I'm going to guess the motor/compressor to be 6" x 14" based on the pics below. And I agree that splitting the parts up would be easy. I'll check later, but I'm thinking the motor/compressor can go as said beside the tool box and ahead of the wheel well. Possibly turned on its side with the bolts going into the tool box so it can't be easily removed w/o getting into the box. And the regulator/switch/coupler could be mounted right there as well. As for the tank(s), I think our measurements of the space under the fender and ahead of the tire say that a max height of 8" and a max width of 16" will fit nicely. So the twin tanks would appear to fit, but there are questions in my mind about connections. The inlet to the tanks is on the backside of the top tank, so that would point up when then are laid down. But the drain is on the bottom of the bottom tank, so it would point essentially sideways, and therefore wouldn't drain the tank properly. However, the single tank unit looks like it might work nicely. The whole unit is said to be L (18.7") x W/D (14.2") x H (14.75"). But the motor/pump sits beside the tank, so if that is 6" then the tank is less than 8". And, the inlet is on top with the drain on the bottom. So perhaps the inlet can go through the bed floor and simplify the connections? And the drain could have a 90 on it to minimize its vulnerability? 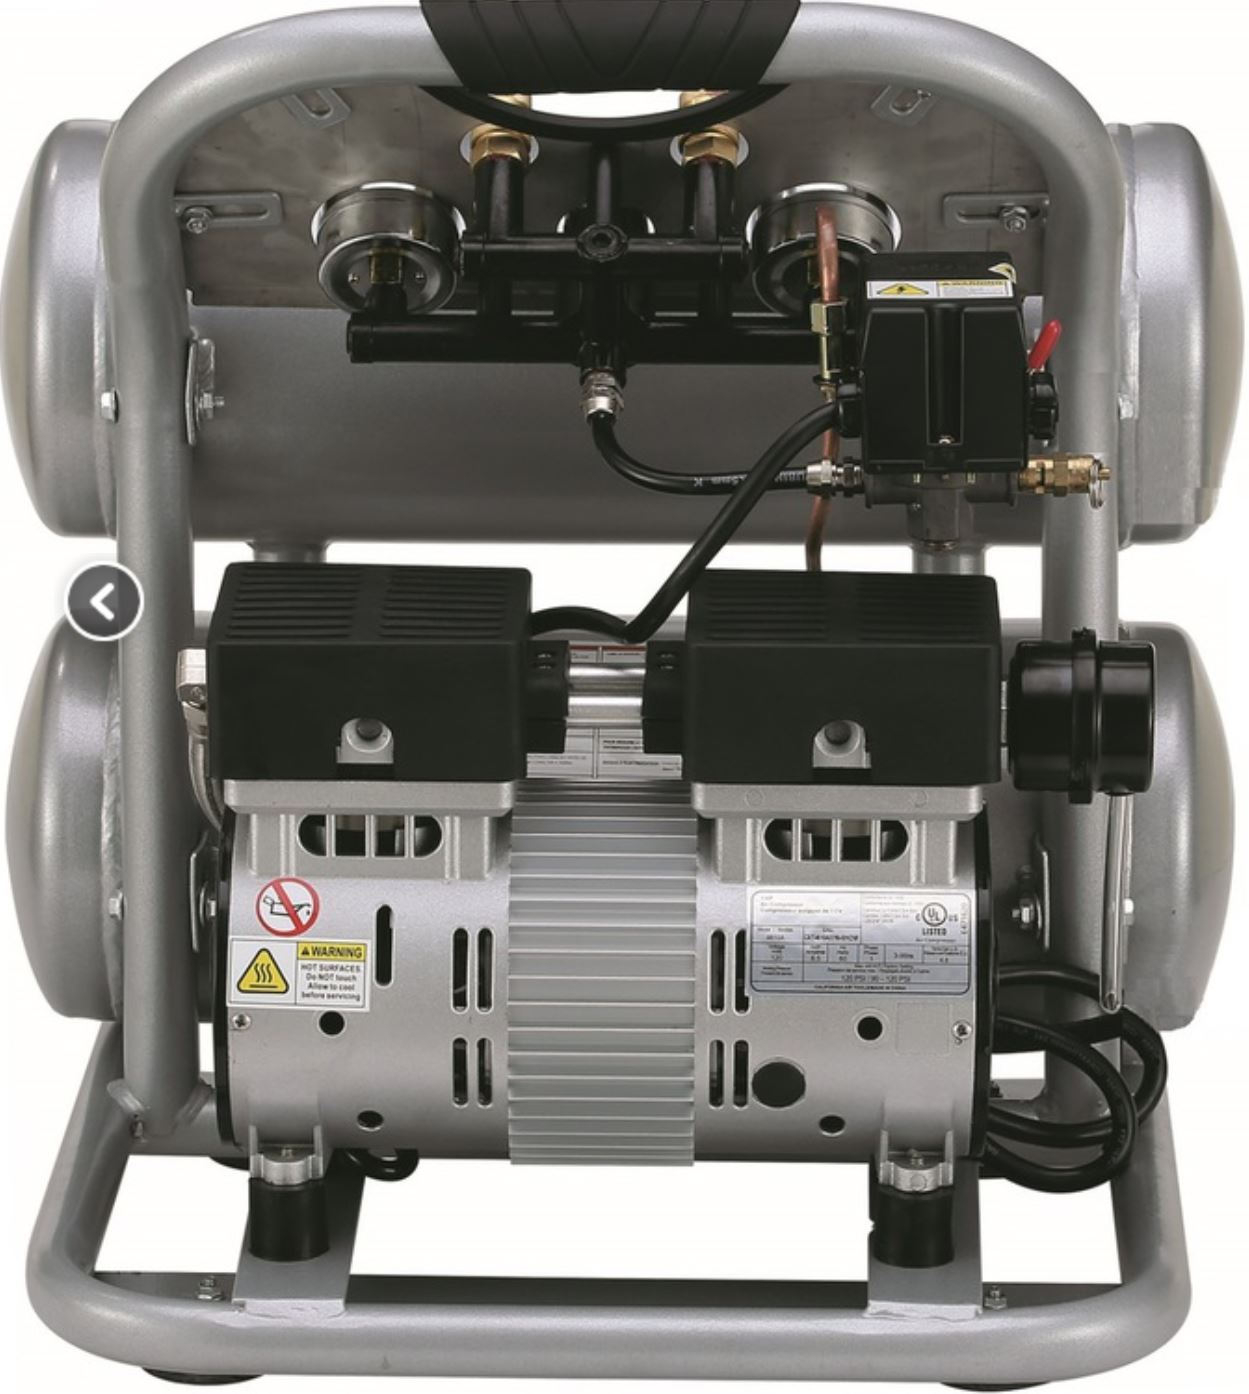 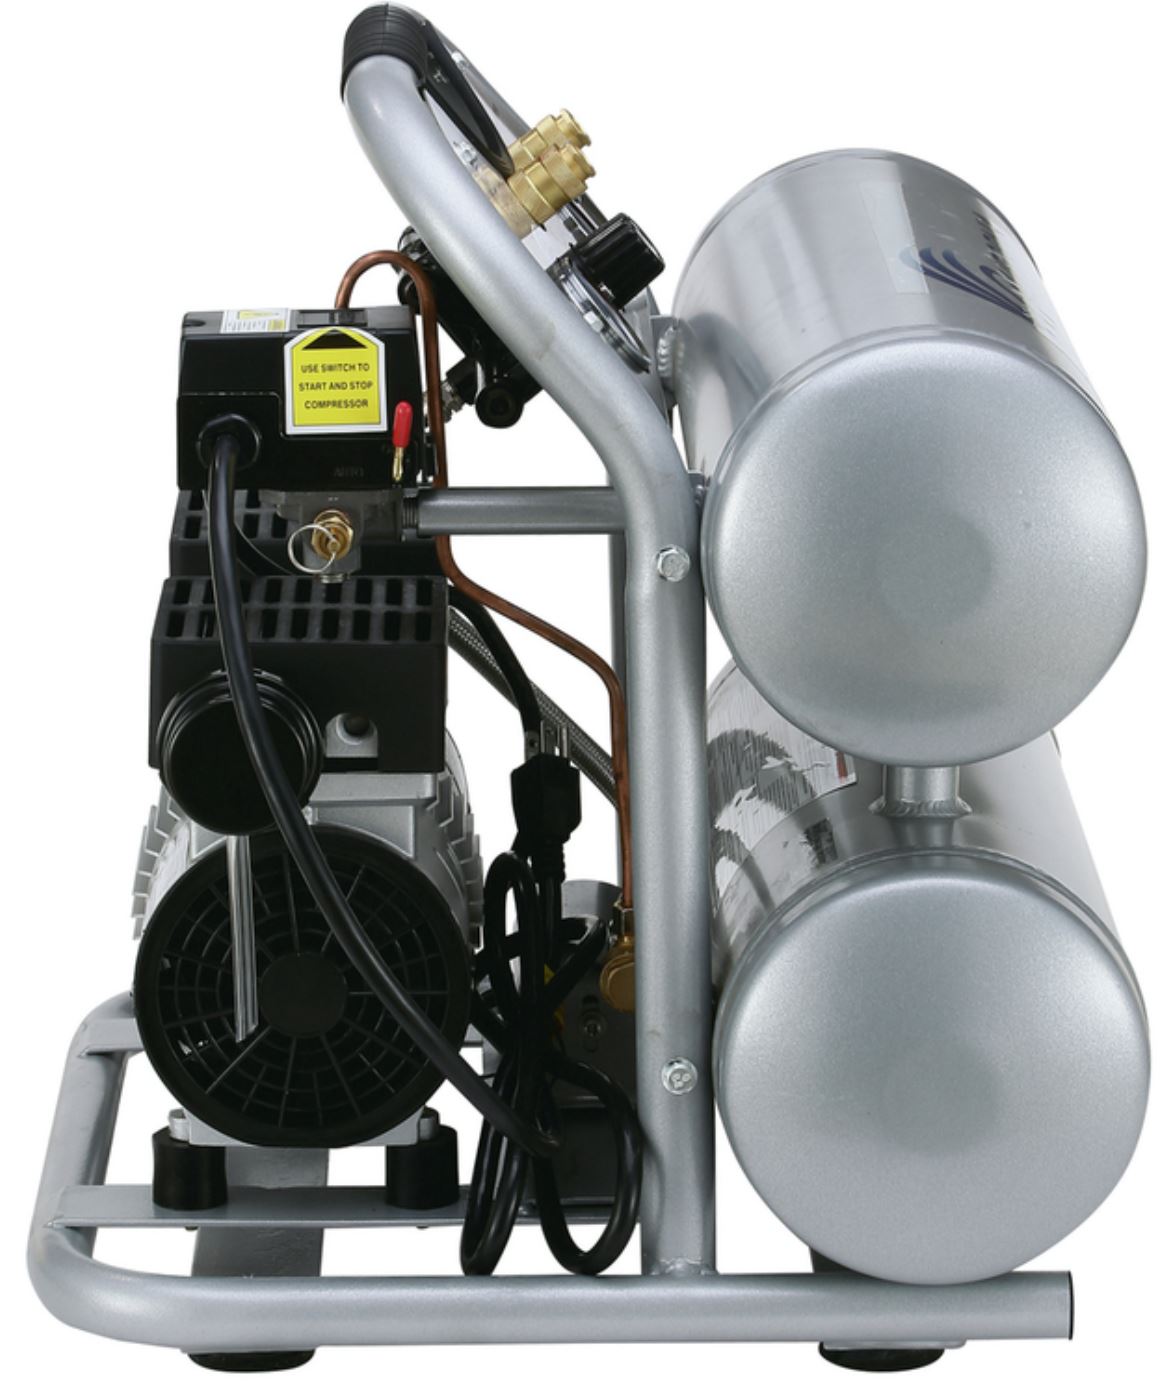
Gary, AKA "Gary fellow": Profile
Dad's: '81 F150 Ranger XLT 4x4: Down for restomod: Full-roller "stroked 351M" w/Trick Flow heads & intake, EEC-V SEFI/E4OD/3.50 gears w/Kevlar clutches
|
|
Administrator
|
Well, the best-laid plans of mice and men. There's essentially no room beside the tool box as I'd envisioned. And only 4 1/2" below it.
 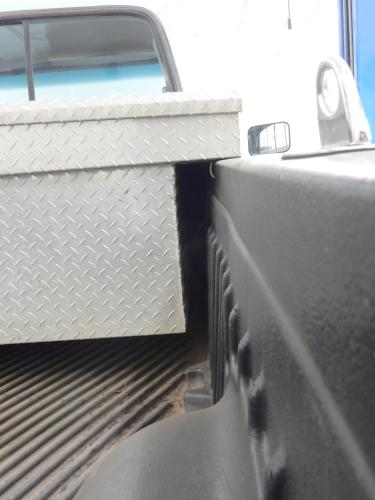 So, some other place will be needed for the compressor. I thought about IN the tool box with the intake being run through the tool box, like maybe under it. But the motor/compressor surely needs cooling air and with the tool box crammed as it would be on a trip I doubt there'd be much air in there to cool it. I thought about placing it below the bed with the tank, but that's a very dusty, wet, yukky area that wouldn't be conducive to the life of the unit. Thoughts?
Gary, AKA "Gary fellow": Profile
Dad's: '81 F150 Ranger XLT 4x4: Down for restomod: Full-roller "stroked 351M" w/Trick Flow heads & intake, EEC-V SEFI/E4OD/3.50 gears w/Kevlar clutches
|
Re: Big Blue's Transformation
|
|
My thoughts... In the tool box could still work if you discipline yourself to always open the cover when you are running the compressor. You'd probably be opening it to get out the hose anyway. Might be a bit of a drag if it was raining... And on my old CJ5 I didn't have much room so I ended up putting it off the frame behind the right front tire. It was enough behind / above the inner fender to avoid getting directly hit by junk off the tire, but not a clean environment. Was it ideal? No, but it held up for the time I had that setup with no issues (~8 years). So maybe underneath but with some splash guards wouldn't be terrible?
Bob
Sorry, no '80 - '86 Ford trucks "Oswald": 1997 F-250HD crew cab short box, 460, E4OD, 4.10 gears "Pluto": 1971 Bronco, 302, NV3550 5 speed, Atlas 4.3:1 transfer case, 33" tires "the motorhome": 2015 E-450-based 28' class C motorhome, 6.8L V-10 "the Dodge": 2007 Dodge 2500, 6.7L Cummins |
|
Administrator
|
Bob - I like the idea of just opening the covers, both sides, when running the compressor.
 I could put a partition in the box to keep things from being stacked on the compressor, thereby giving it the best chance of keeping cool. And, I wouldn't have to take the intake filter off as it could just pull air from in the box. However, my plan was to turn the compressor on before getting to the end of the trail so the tank would be full. But I'm not sure that having it running in the closed tool box would be a good idea. However, it only takes that compressor 50 seconds to fill the 2 gallon tank and 130 seconds to fill the 4.5 gallon dual tanks. I guess that it would take me at least that long to get the hose out and get ready to fill up a tire, so there's probably no need to fill the tank early. Or, perhaps in that short of time the motor and compressor would be happy with the covers closed?
Gary, AKA "Gary fellow": Profile
Dad's: '81 F150 Ranger XLT 4x4: Down for restomod: Full-roller "stroked 351M" w/Trick Flow heads & intake, EEC-V SEFI/E4OD/3.50 gears w/Kevlar clutches
|
|
Administrator
|
In reply to this post by Gary Lewis
The drains are not directly on the bottom, but a bit of an angle towards the front.
It you mounted the twin tanks at a bit of an angle the rear fender would still protect the ball valve supplied as a drain. And remember, these are coated aluminum tanks. Neither of mine has any evidence of rust or corrosion inside (obviously)
Jim,
Lil'Red is a '87 F250 HD, 4.10's, 1356 4x4, Zf-5, 3G, PMGR, Saginaw PS, desmogged with a Holley 80508 and Performer intake. Too much other stuff to mention. |
|
Administrator
|
In reply to this post by Gary Lewis
I don't really think you need the twin tank for filling tires.
By the time you checked the pressure, replaced the cap, moved to the next tire and removed the cap, the compressor will have refilled and shut off. With gas law and a tank pressure of (say 125) a 17 psig rise in the tire is not a big task. Does anyone know what the internal volume of Gary's tires is? It would be easy to calculate how much is needed of the compressor.
Jim,
Lil'Red is a '87 F250 HD, 4.10's, 1356 4x4, Zf-5, 3G, PMGR, Saginaw PS, desmogged with a Holley 80508 and Performer intake. Too much other stuff to mention. |
|
Administrator
|
In reply to this post by ArdWrknTrk
Jim - I hope this doesn't make you mad, but we are thinking alike.
 Here's a pic I took a bit ago. And that was because I wondered if the tanks could be angled and the drain be roughly straight down. But, before making that decision I need to figure out where the inlet tube would go. Maybe when the snow melts you can measure yours? Just called California Air. Didn't have the drawings nor the twin-tank to measure, but did measure the single tank 2010A: 6 1/2" x 18 1/2". I'd rather have the 4.5 gallons than 2 gallons, but the smaller tank would be easier to mount. 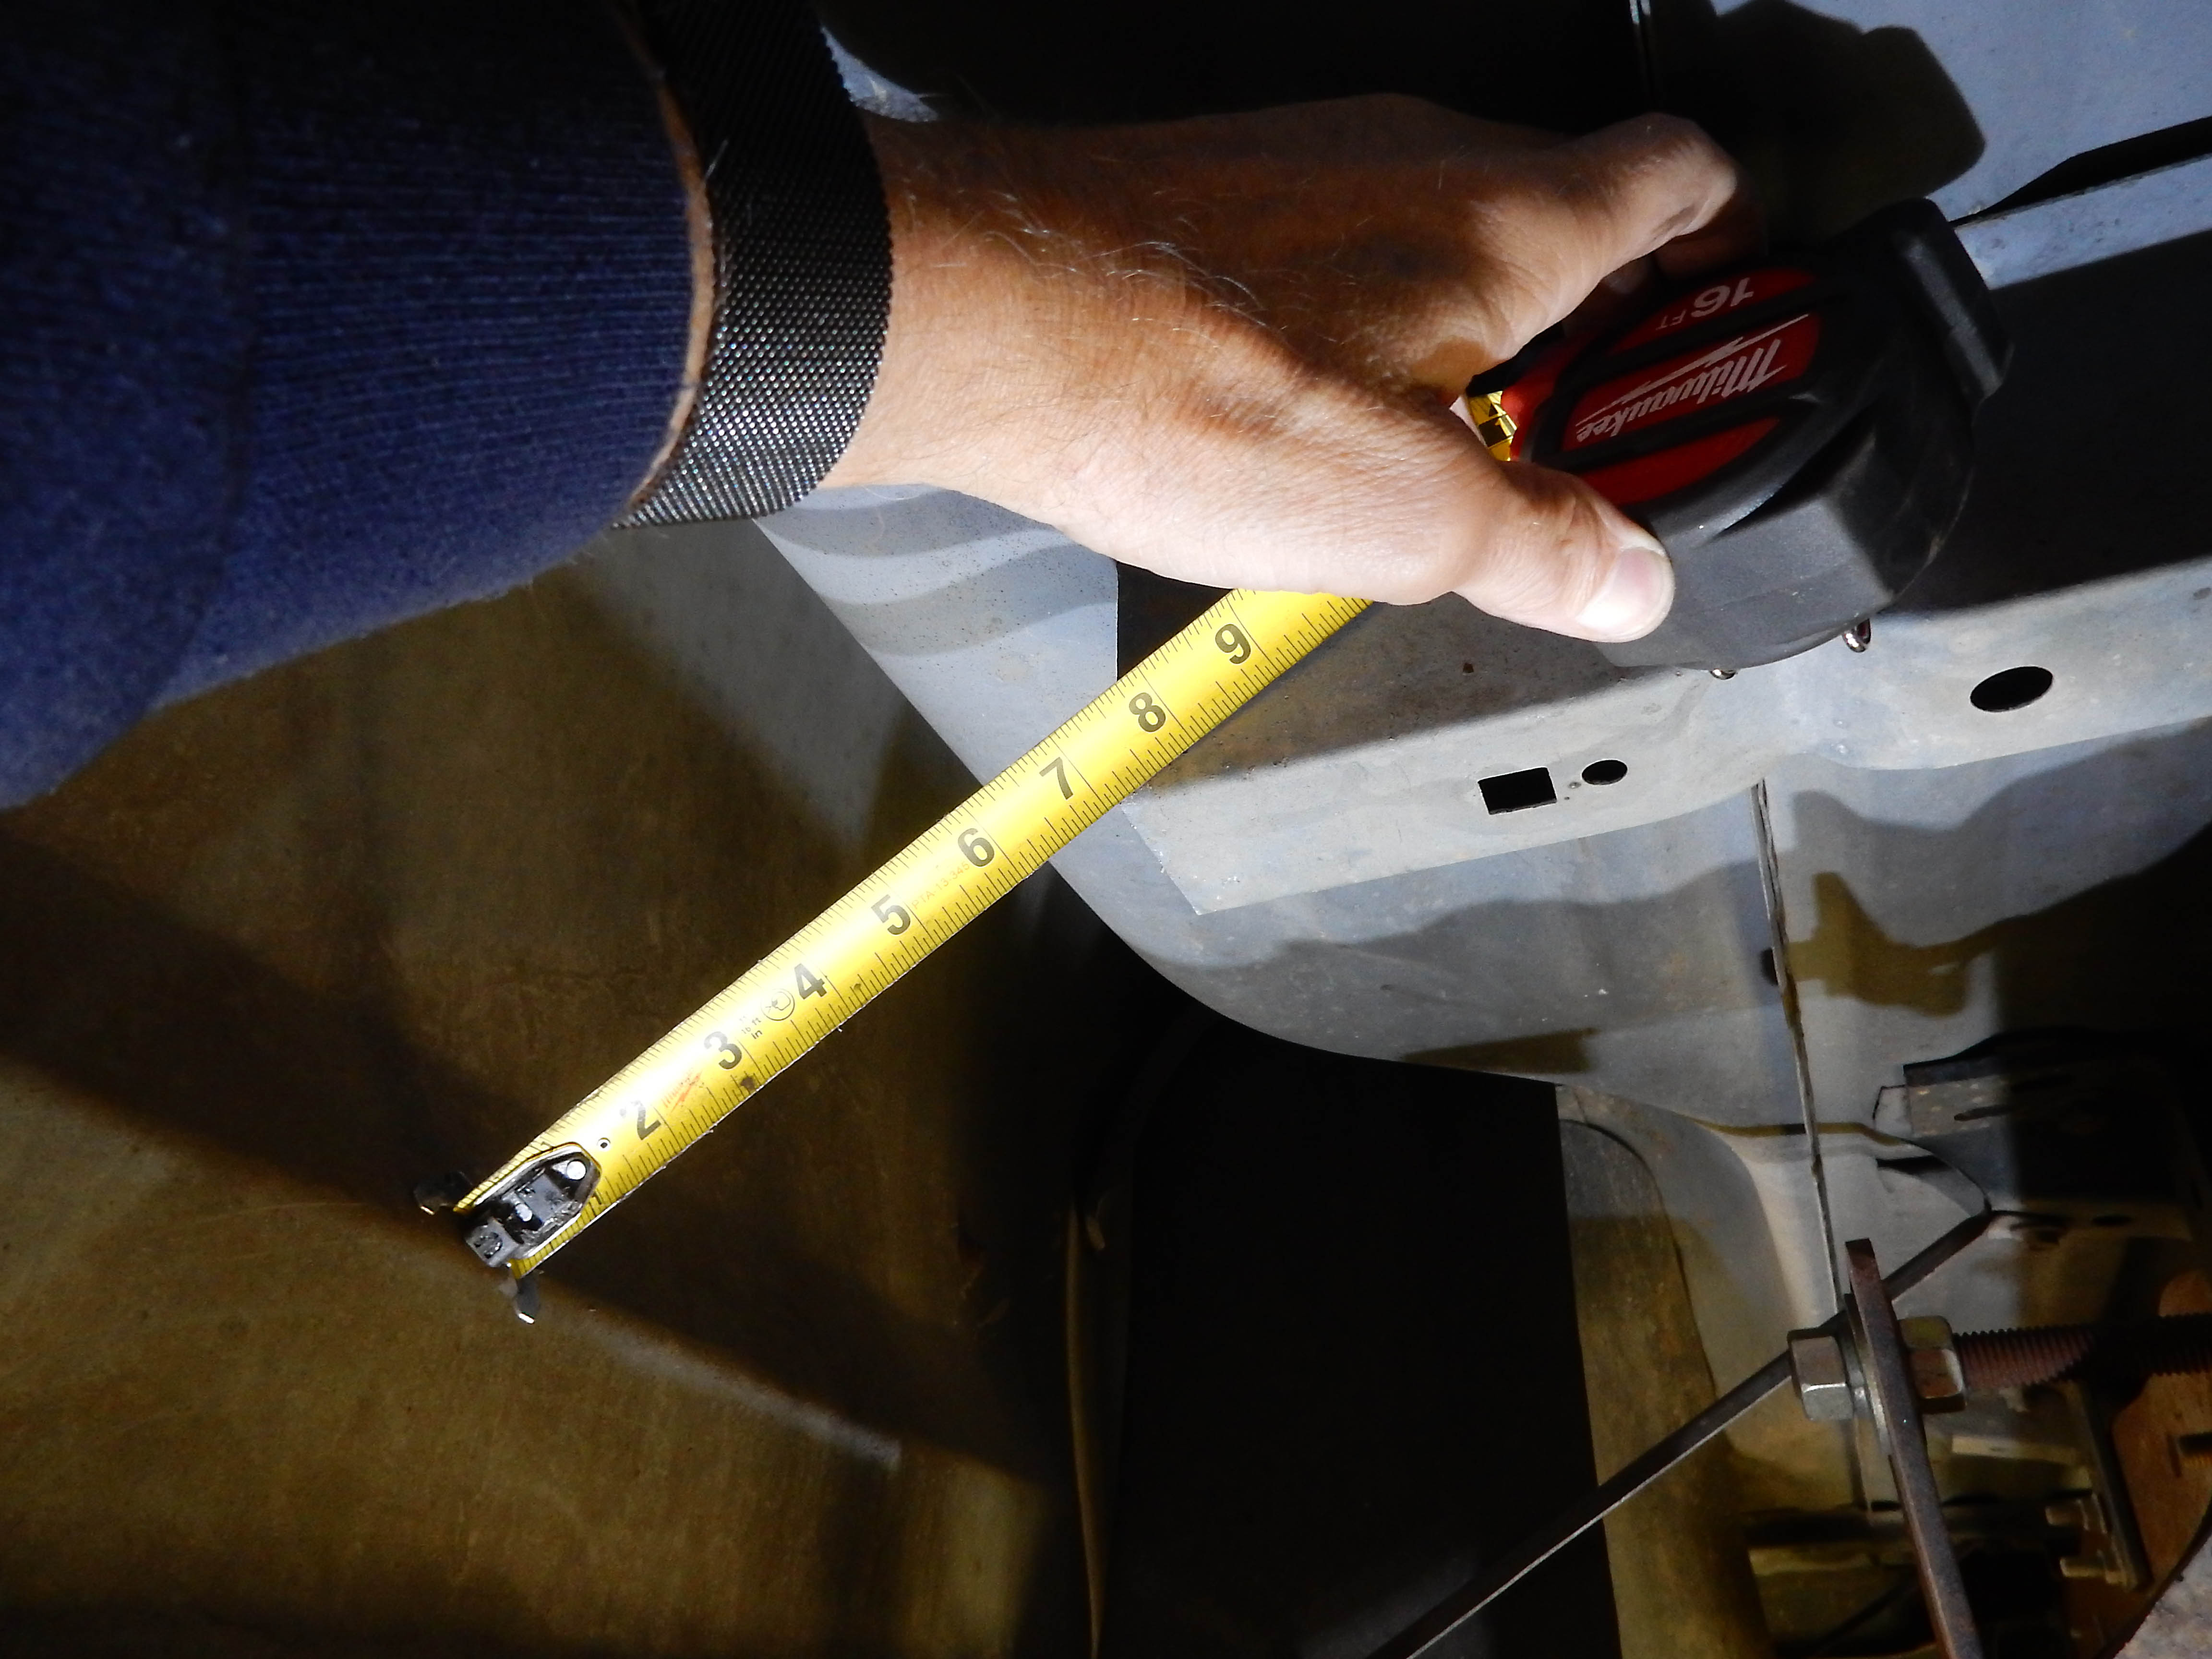
Gary, AKA "Gary fellow": Profile
Dad's: '81 F150 Ranger XLT 4x4: Down for restomod: Full-roller "stroked 351M" w/Trick Flow heads & intake, EEC-V SEFI/E4OD/3.50 gears w/Kevlar clutches
|
|
Administrator
|
I guess my measurements were a tad optimistic?
 At any rate I think the dual tank would fit. I will note the angle of the bleeder when I get back up to that job. Do note that not having them vertical will mean the top tank won't drain all the way. But given the neglect I've offered mine I don't see a problem in your use case.
Jim,
Lil'Red is a '87 F250 HD, 4.10's, 1356 4x4, Zf-5, 3G, PMGR, Saginaw PS, desmogged with a Holley 80508 and Performer intake. Too much other stuff to mention. |
|
Administrator
|
I, too, think the dual tank will fit. And while the top tank won't drain when sitting still it should drain when driving. But if you can get more measurements LATER it would help. LATER!
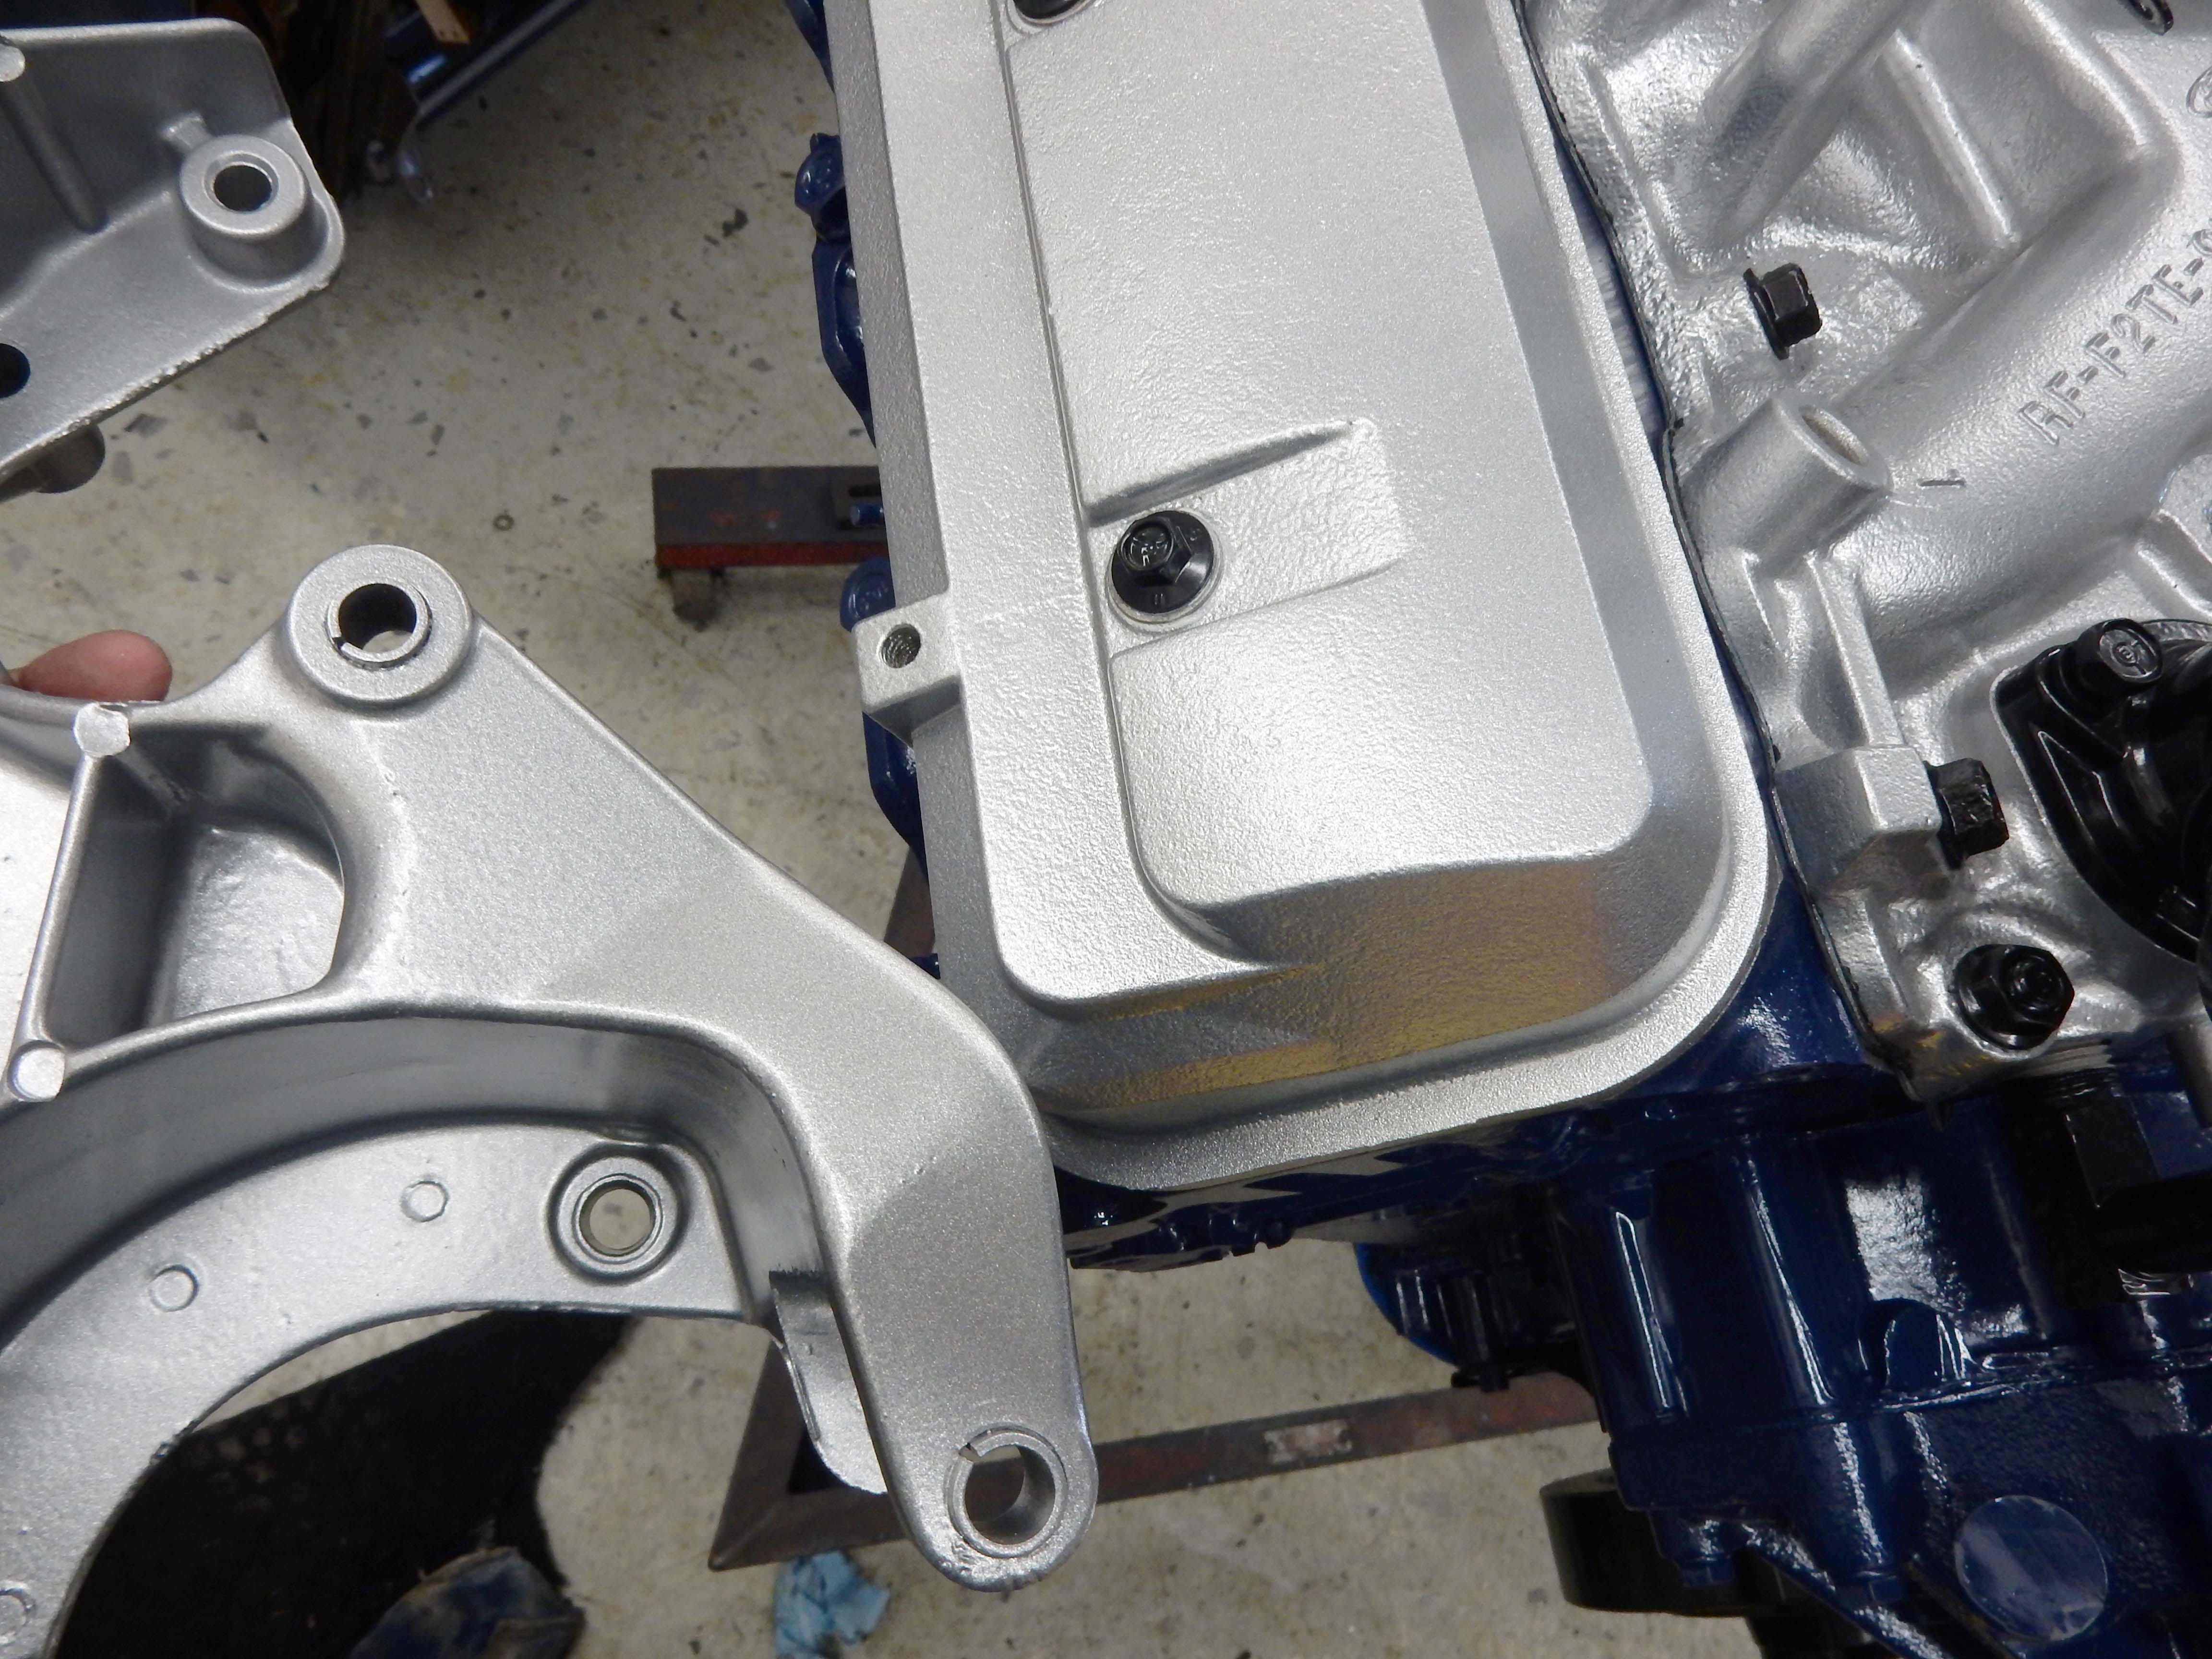
As for what I did today, I got the bracketry installed on the front of the engine. But, the installation of the alternator brackets wasn't w/o a bit of a problem. When I put the curved bracket on I noticed that it didn't sit down flush with the water pump. And when I swung the alternator into place it hit the bracket because the bracket was angling toward the rear of the engine. A bit of sleuthing determined why - the water pump hadn't been machined far enough for the bracket to go flush against it. You can see the issue here: 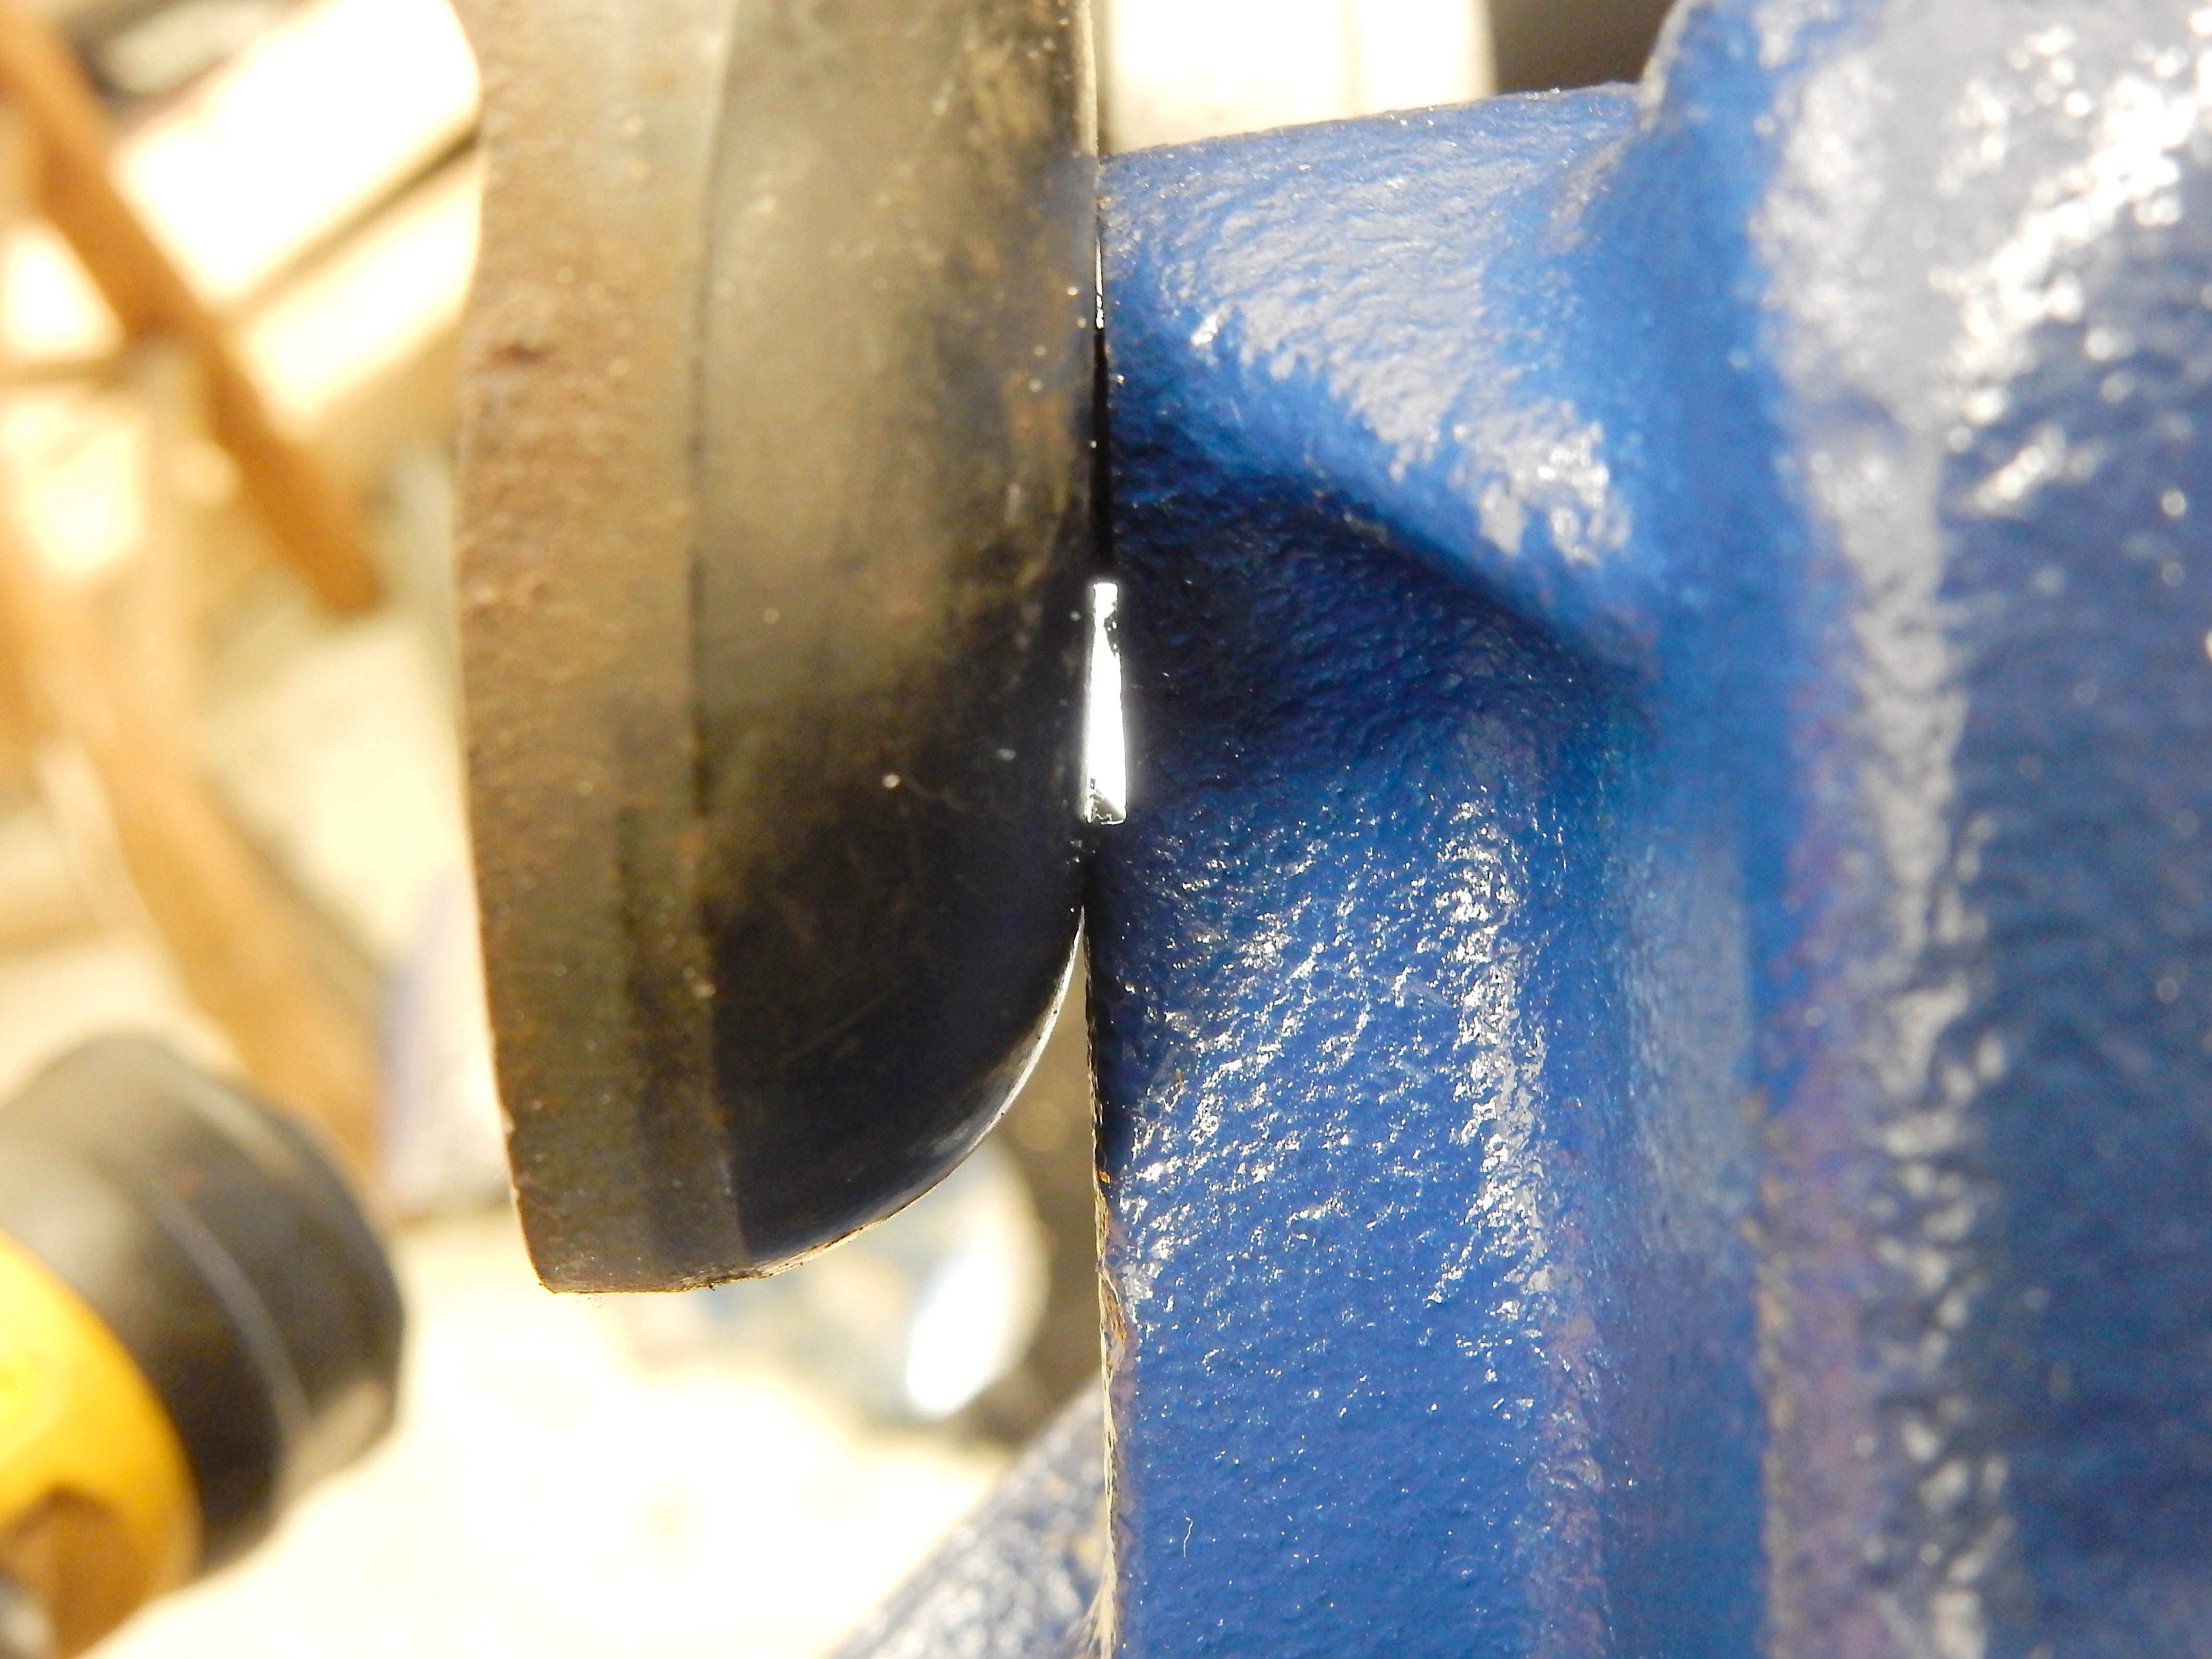 In this pic you can see my pencil mark where the red arrow is pointing, and that's what I trimmed that boss back to, and then the bracket fit perfectly. And here's what it looks like. Jim, do you recognize the alternator? Thanks again.  Hopefully tomorrow I'll get the brackets and fasteners blasted and powder coated. We shall see. 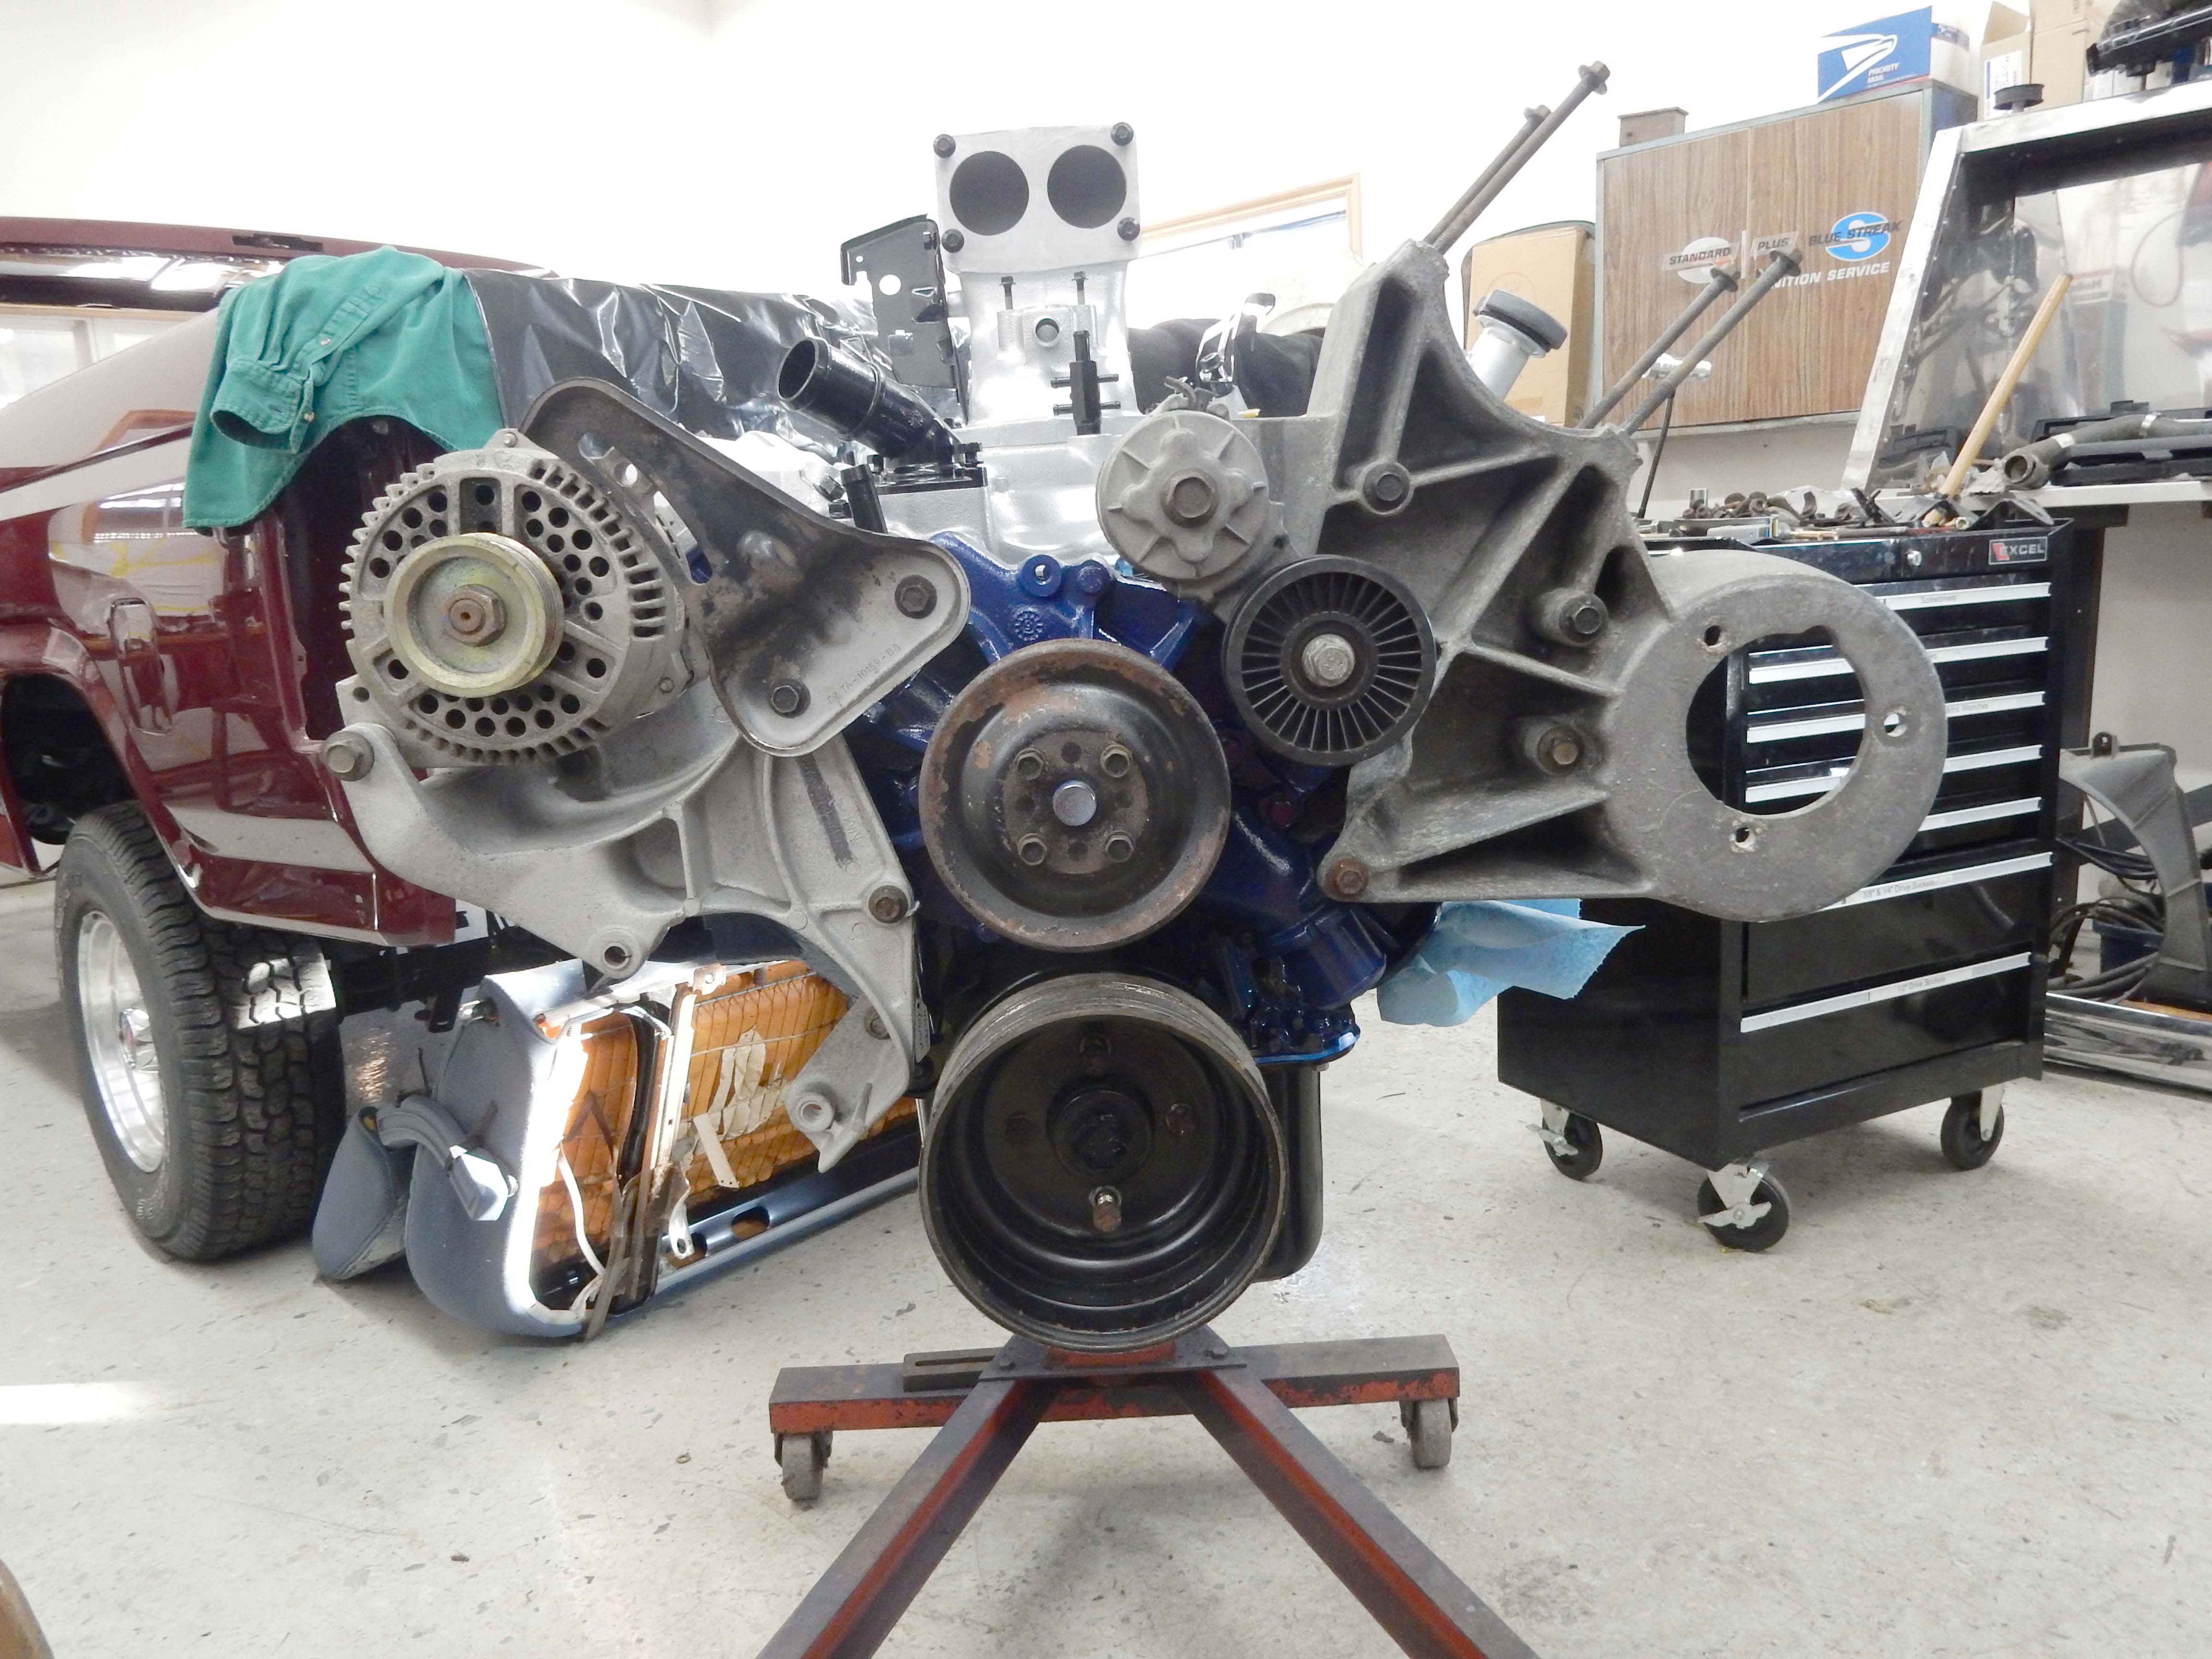
Gary, AKA "Gary fellow": Profile
Dad's: '81 F150 Ranger XLT 4x4: Down for restomod: Full-roller "stroked 351M" w/Trick Flow heads & intake, EEC-V SEFI/E4OD/3.50 gears w/Kevlar clutches
|
Re: Big Blue's Transformation
|
|
This is sort of peripherally related to on-board air, because the main reason to have the compressor is so you can air up after you air down. But that means that at some point you need to air down. So get some of these! If that link works it's to an Amazon ad for tire deflators. Staun is the first brand I'd heard of and I've only heard good things. I got Coyote because they were less expensive and I'd heard good reports on them. And there are other lower priced options in this ad, but I don't know anything about them.
It's a little bit putzy to set deflators originally, and the different brands have different ranges (I like the 4 - 56 psi range of the Coyotes). But once they are set you just put them on in place of the valve cap. For me, about the time I finish putting the 4th one on the 1st is done and I can start putting the caps back on. It's a lot faster than letting the air out one by one, and as I've gotten older I was "enjoying" squatting down by each tire less and less. I aired down each tire one at a time for about 20 years. After one trip with the deflators I can't believe I didn't get them earlier. So maybe you shouldn't get them until you've made at least one trip without them. That way you can more properly appreciate them when you get them! By the way, it's so nice not needing to keep stopping to check the pressure that I bought another set for the garage. I've got one at 35 psi for Lesley's Renegade, one at 30 for my Bronco, one at 50 for the pickups front tires and one at 40 for the rears. So I can just overshoot a little and put the deflator on to get each tire set correctly.
Bob
Sorry, no '80 - '86 Ford trucks "Oswald": 1997 F-250HD crew cab short box, 460, E4OD, 4.10 gears "Pluto": 1971 Bronco, 302, NV3550 5 speed, Atlas 4.3:1 transfer case, 33" tires "the motorhome": 2015 E-450-based 28' class C motorhome, 6.8L V-10 "the Dodge": 2007 Dodge 2500, 6.7L Cummins |
|
Administrator
|
Cool! I'd never heard of those, but at 72 my knees sure don't need to be down letting air out of tires. So I'll pass on trying it the first time.
 I've passed the link on to Janey in case someone is looking for a Christmas gift for me. Thanks!
Gary, AKA "Gary fellow": Profile
Dad's: '81 F150 Ranger XLT 4x4: Down for restomod: Full-roller "stroked 351M" w/Trick Flow heads & intake, EEC-V SEFI/E4OD/3.50 gears w/Kevlar clutches
|
|
Administrator
|
Today I got a bit of media blasting done, but not w/o difficulties. I got the brackets blasted and baked in the oven for an hour or more at 400 degrees, as shown below:
 But they took a long to blast and I realized that the amount of media coming out varied with the position of the gun. So I took a look at the hose and found this. And then when I checked farther down on the hose and found another worn out spot. Off to the hardware store we went and I got a new hose. 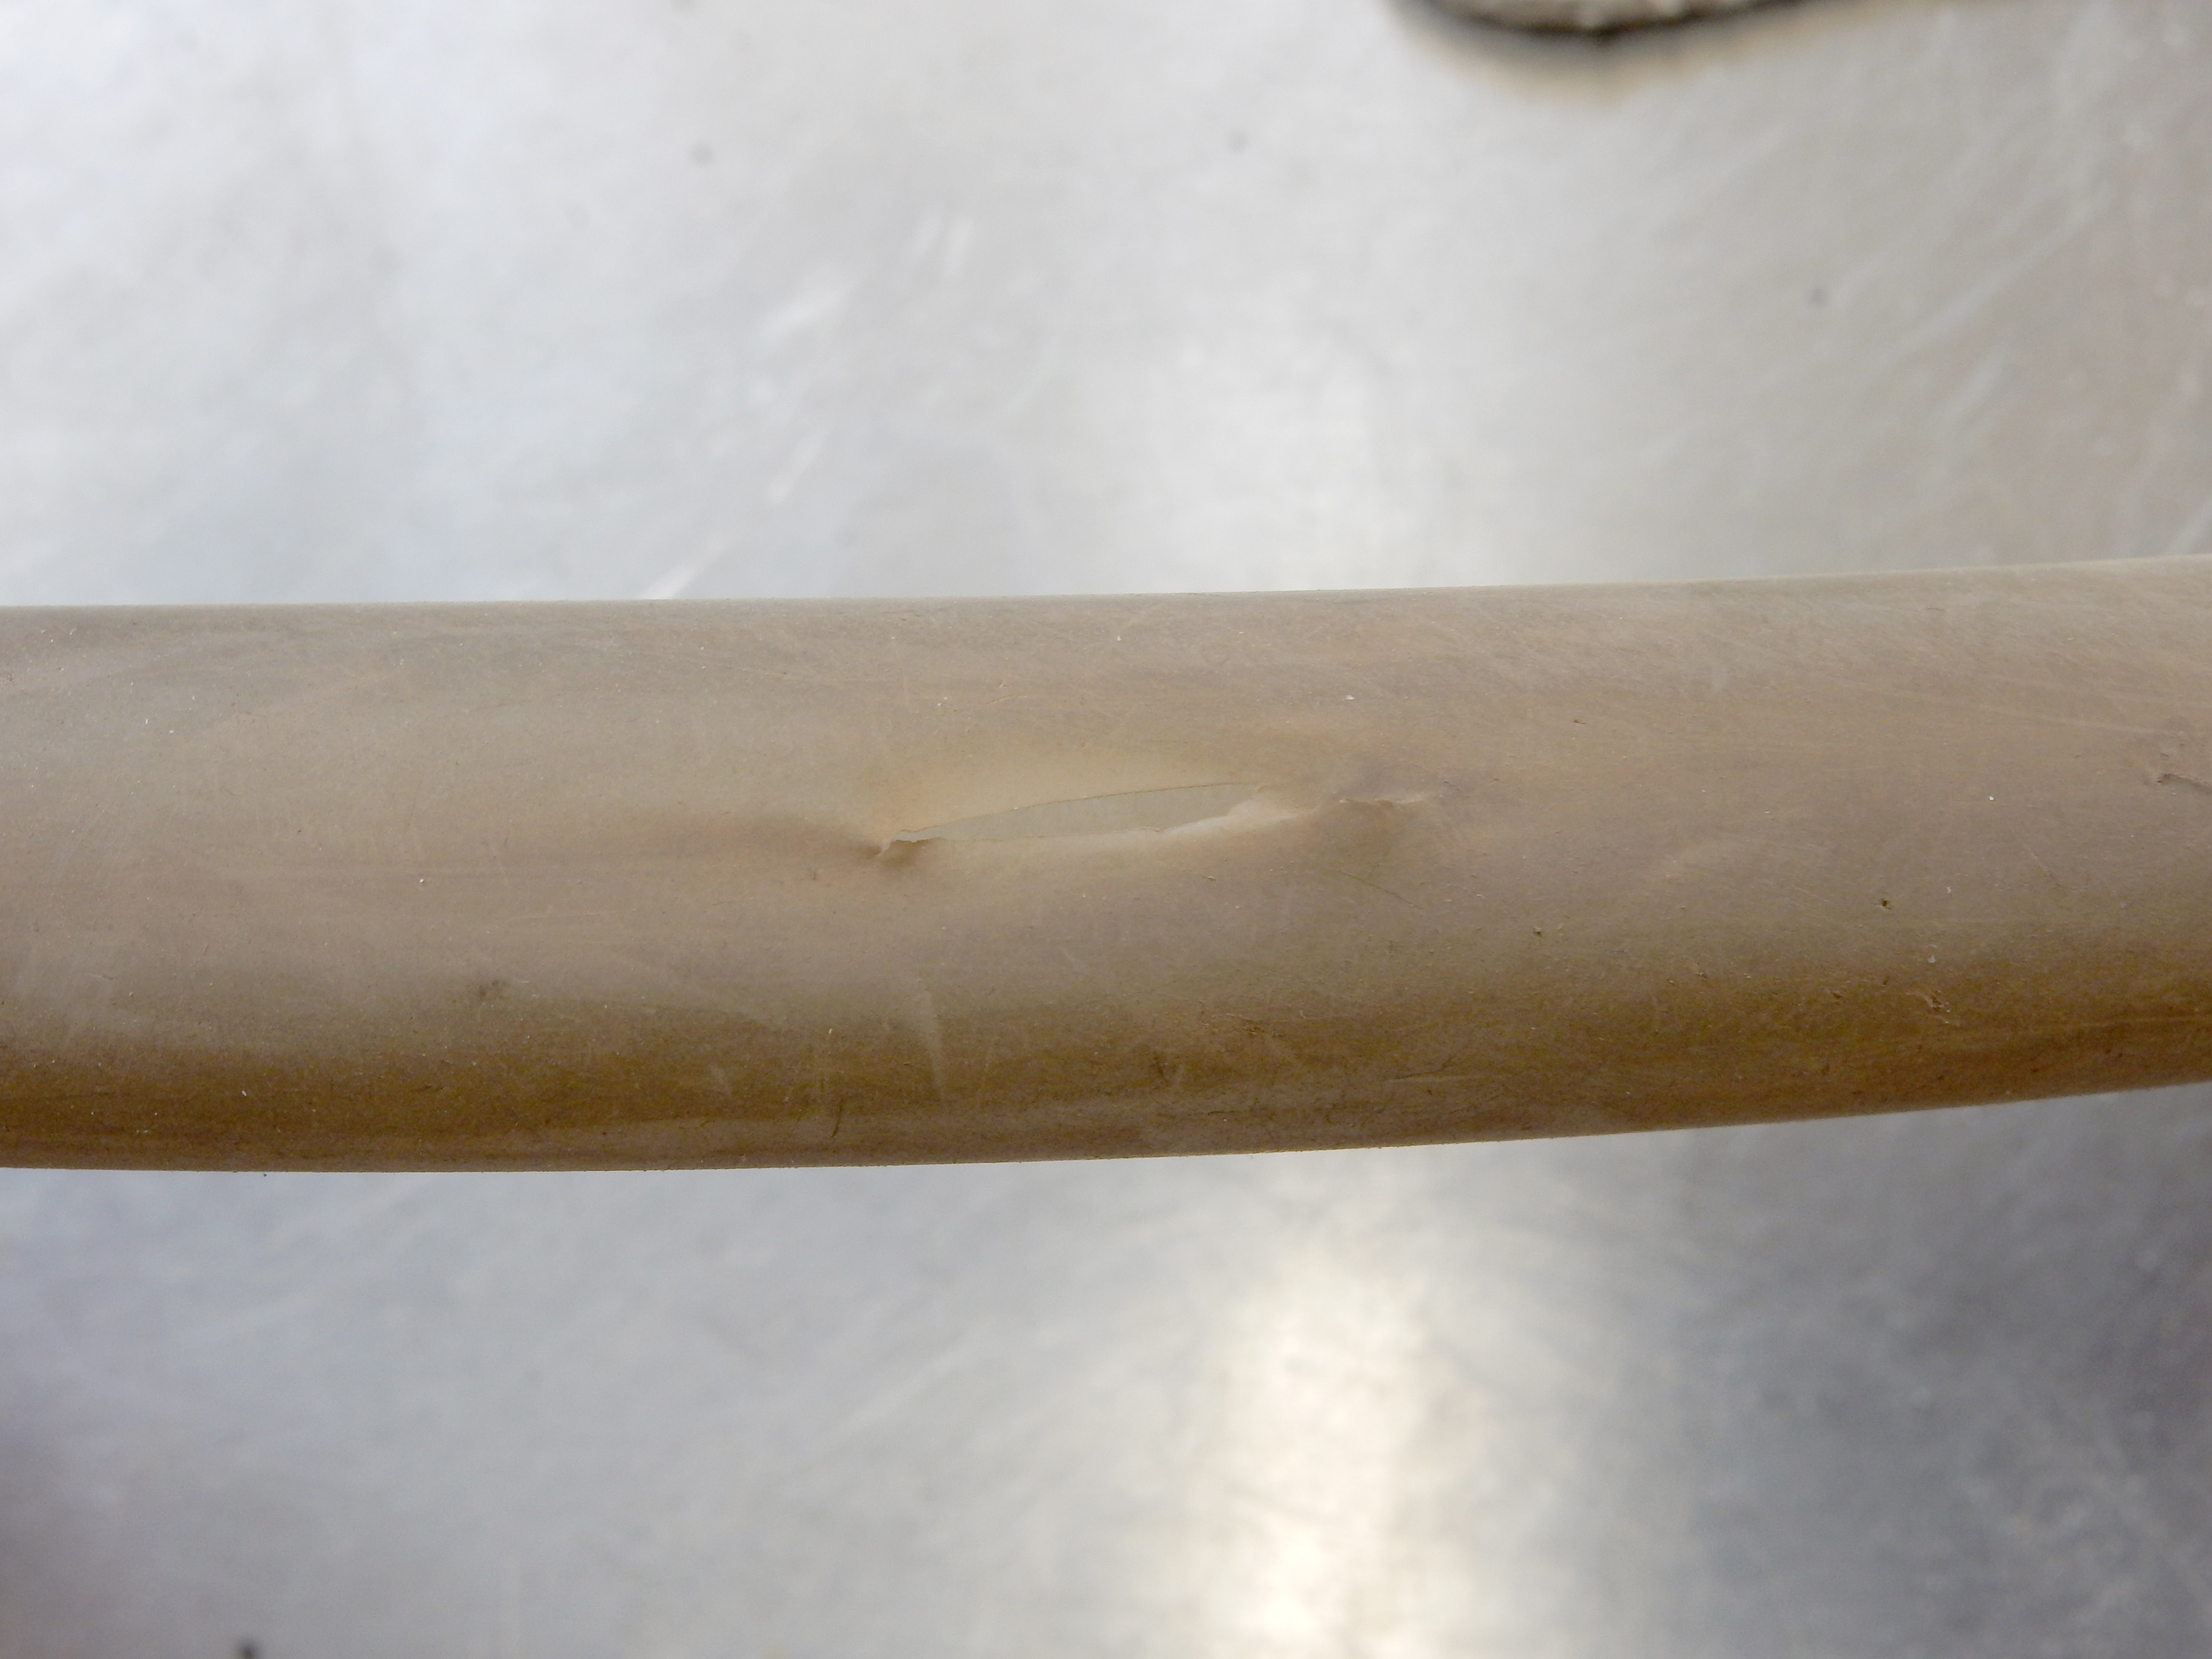 Then when I got home and took the hose off the gun I found this: 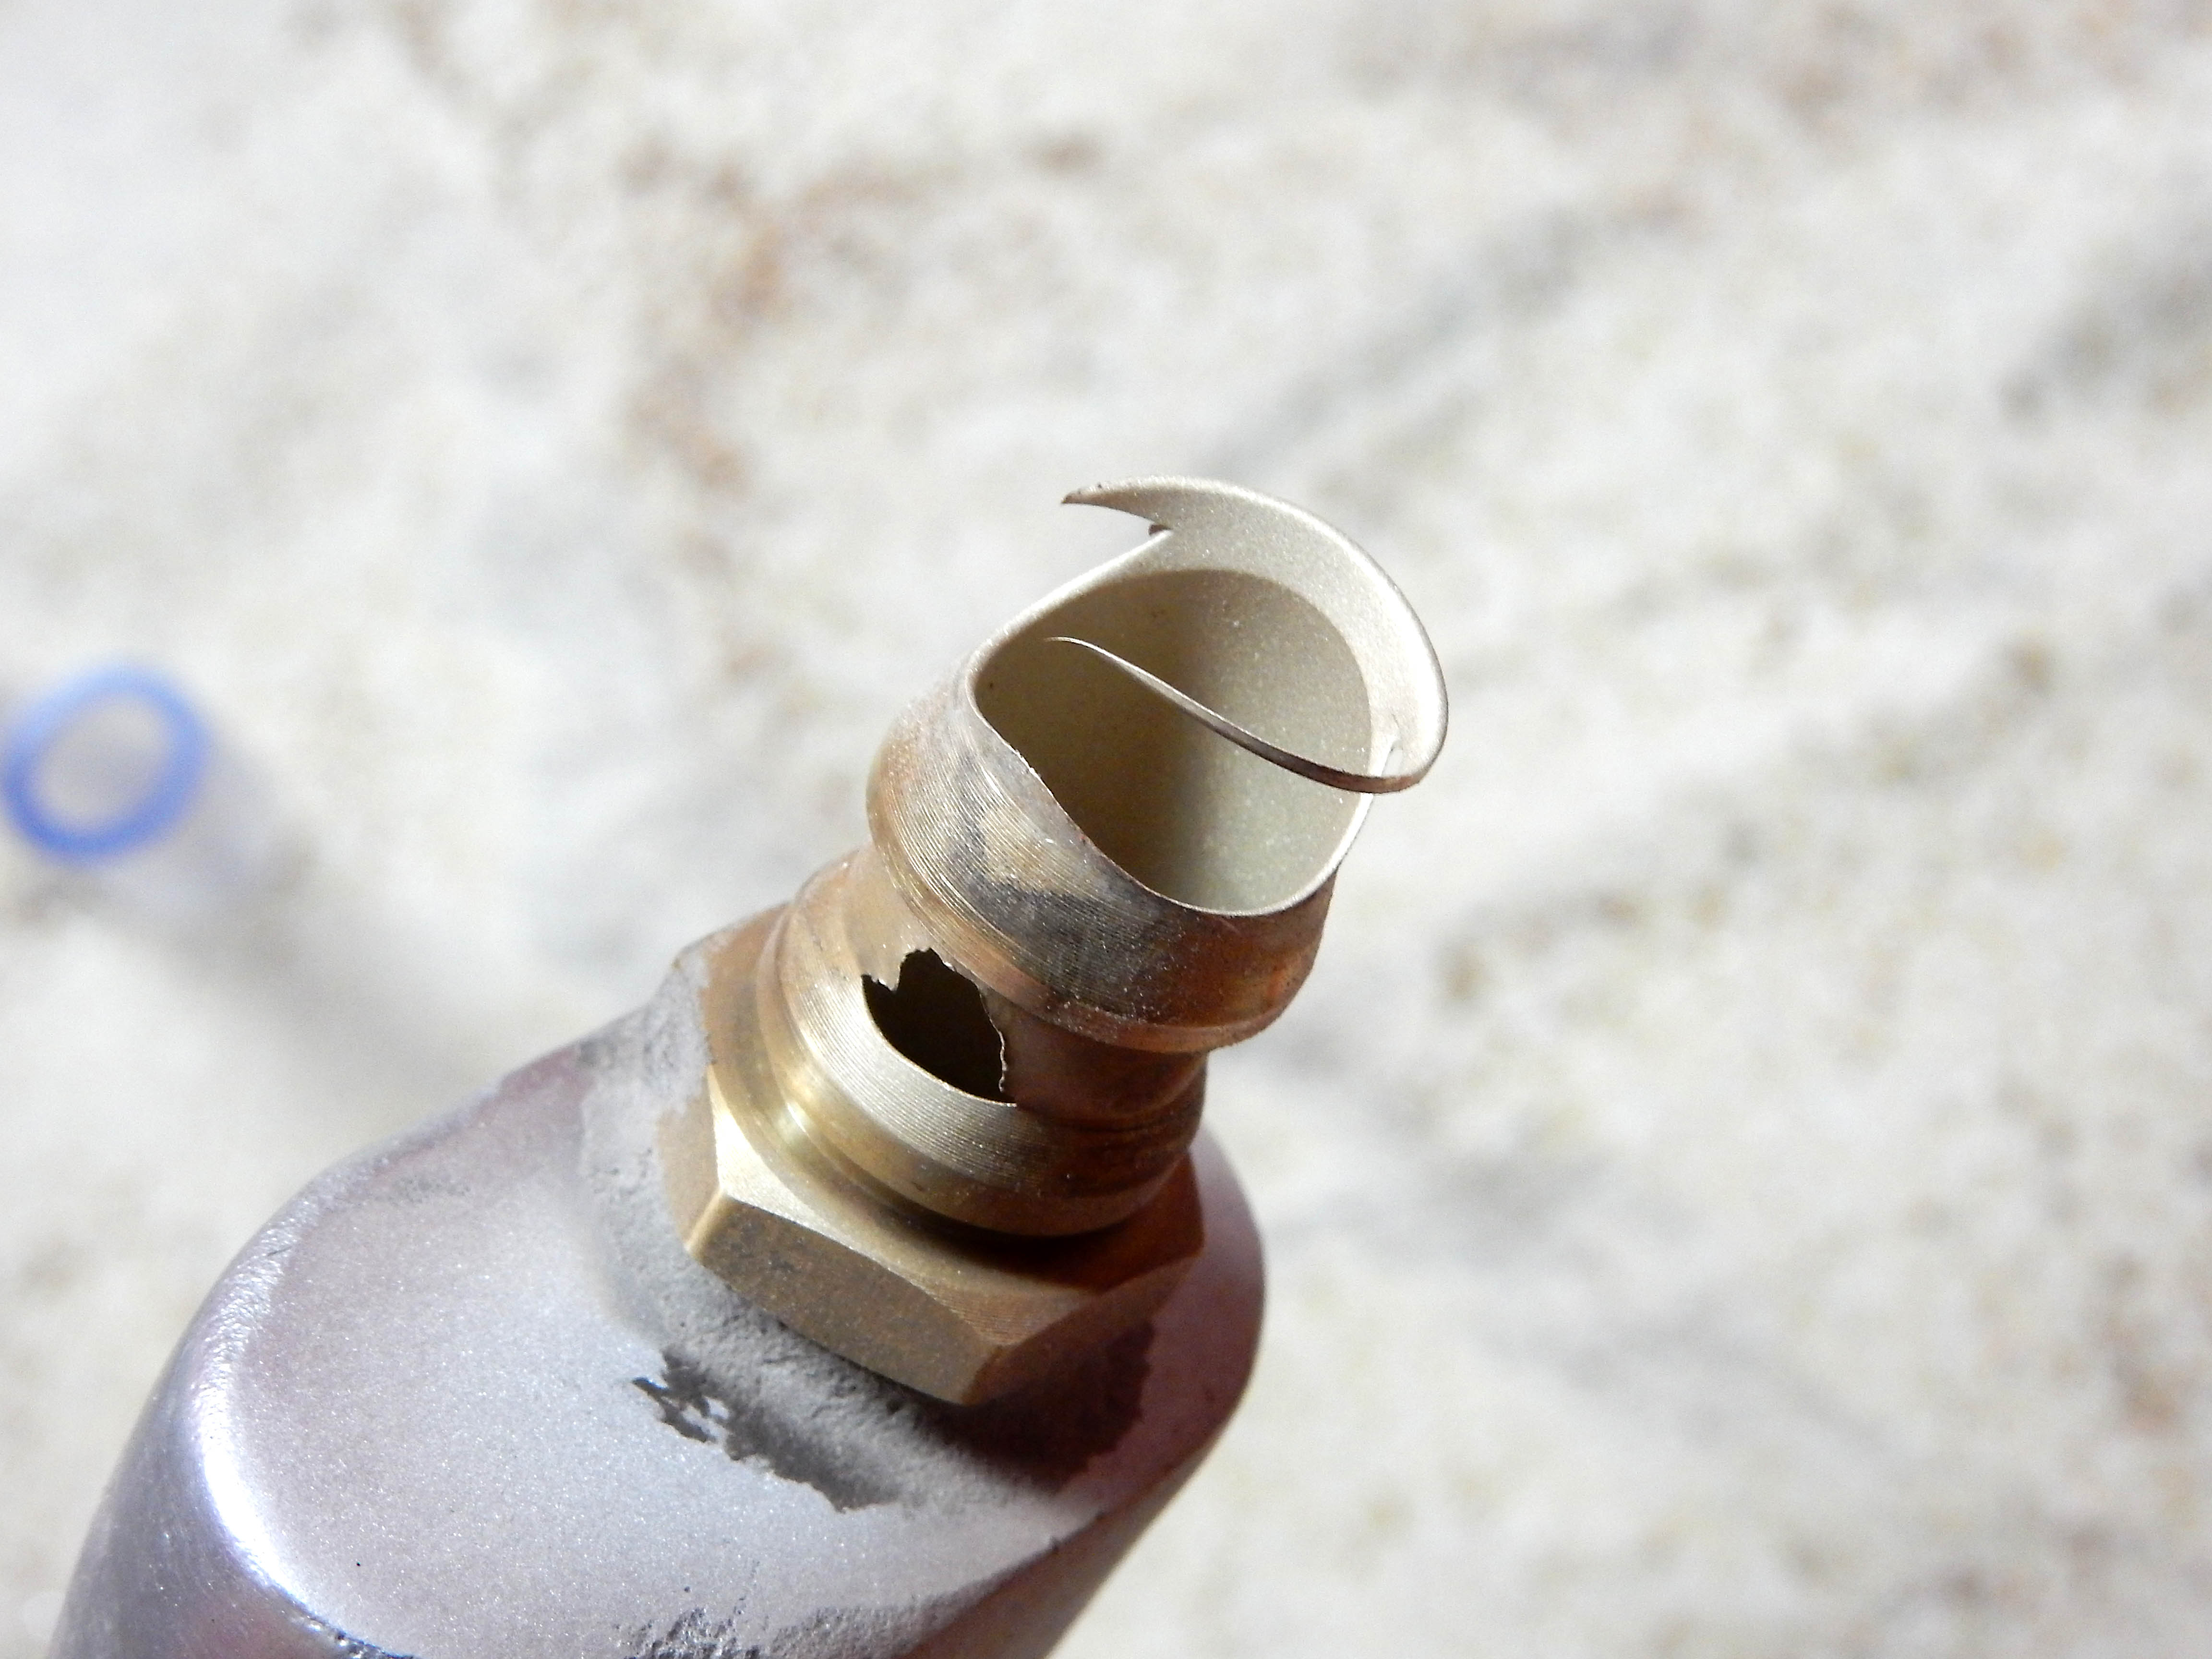 With that done I started blasting the other parts. BOY, did the new hose make a huge difference! Maybe 10 times the amount of media. So much that the dust collector couldn't keep up 'cause it was almost plugged. Took the filter out and cleaned it and then the going was much, much faster. Got this stuff done: 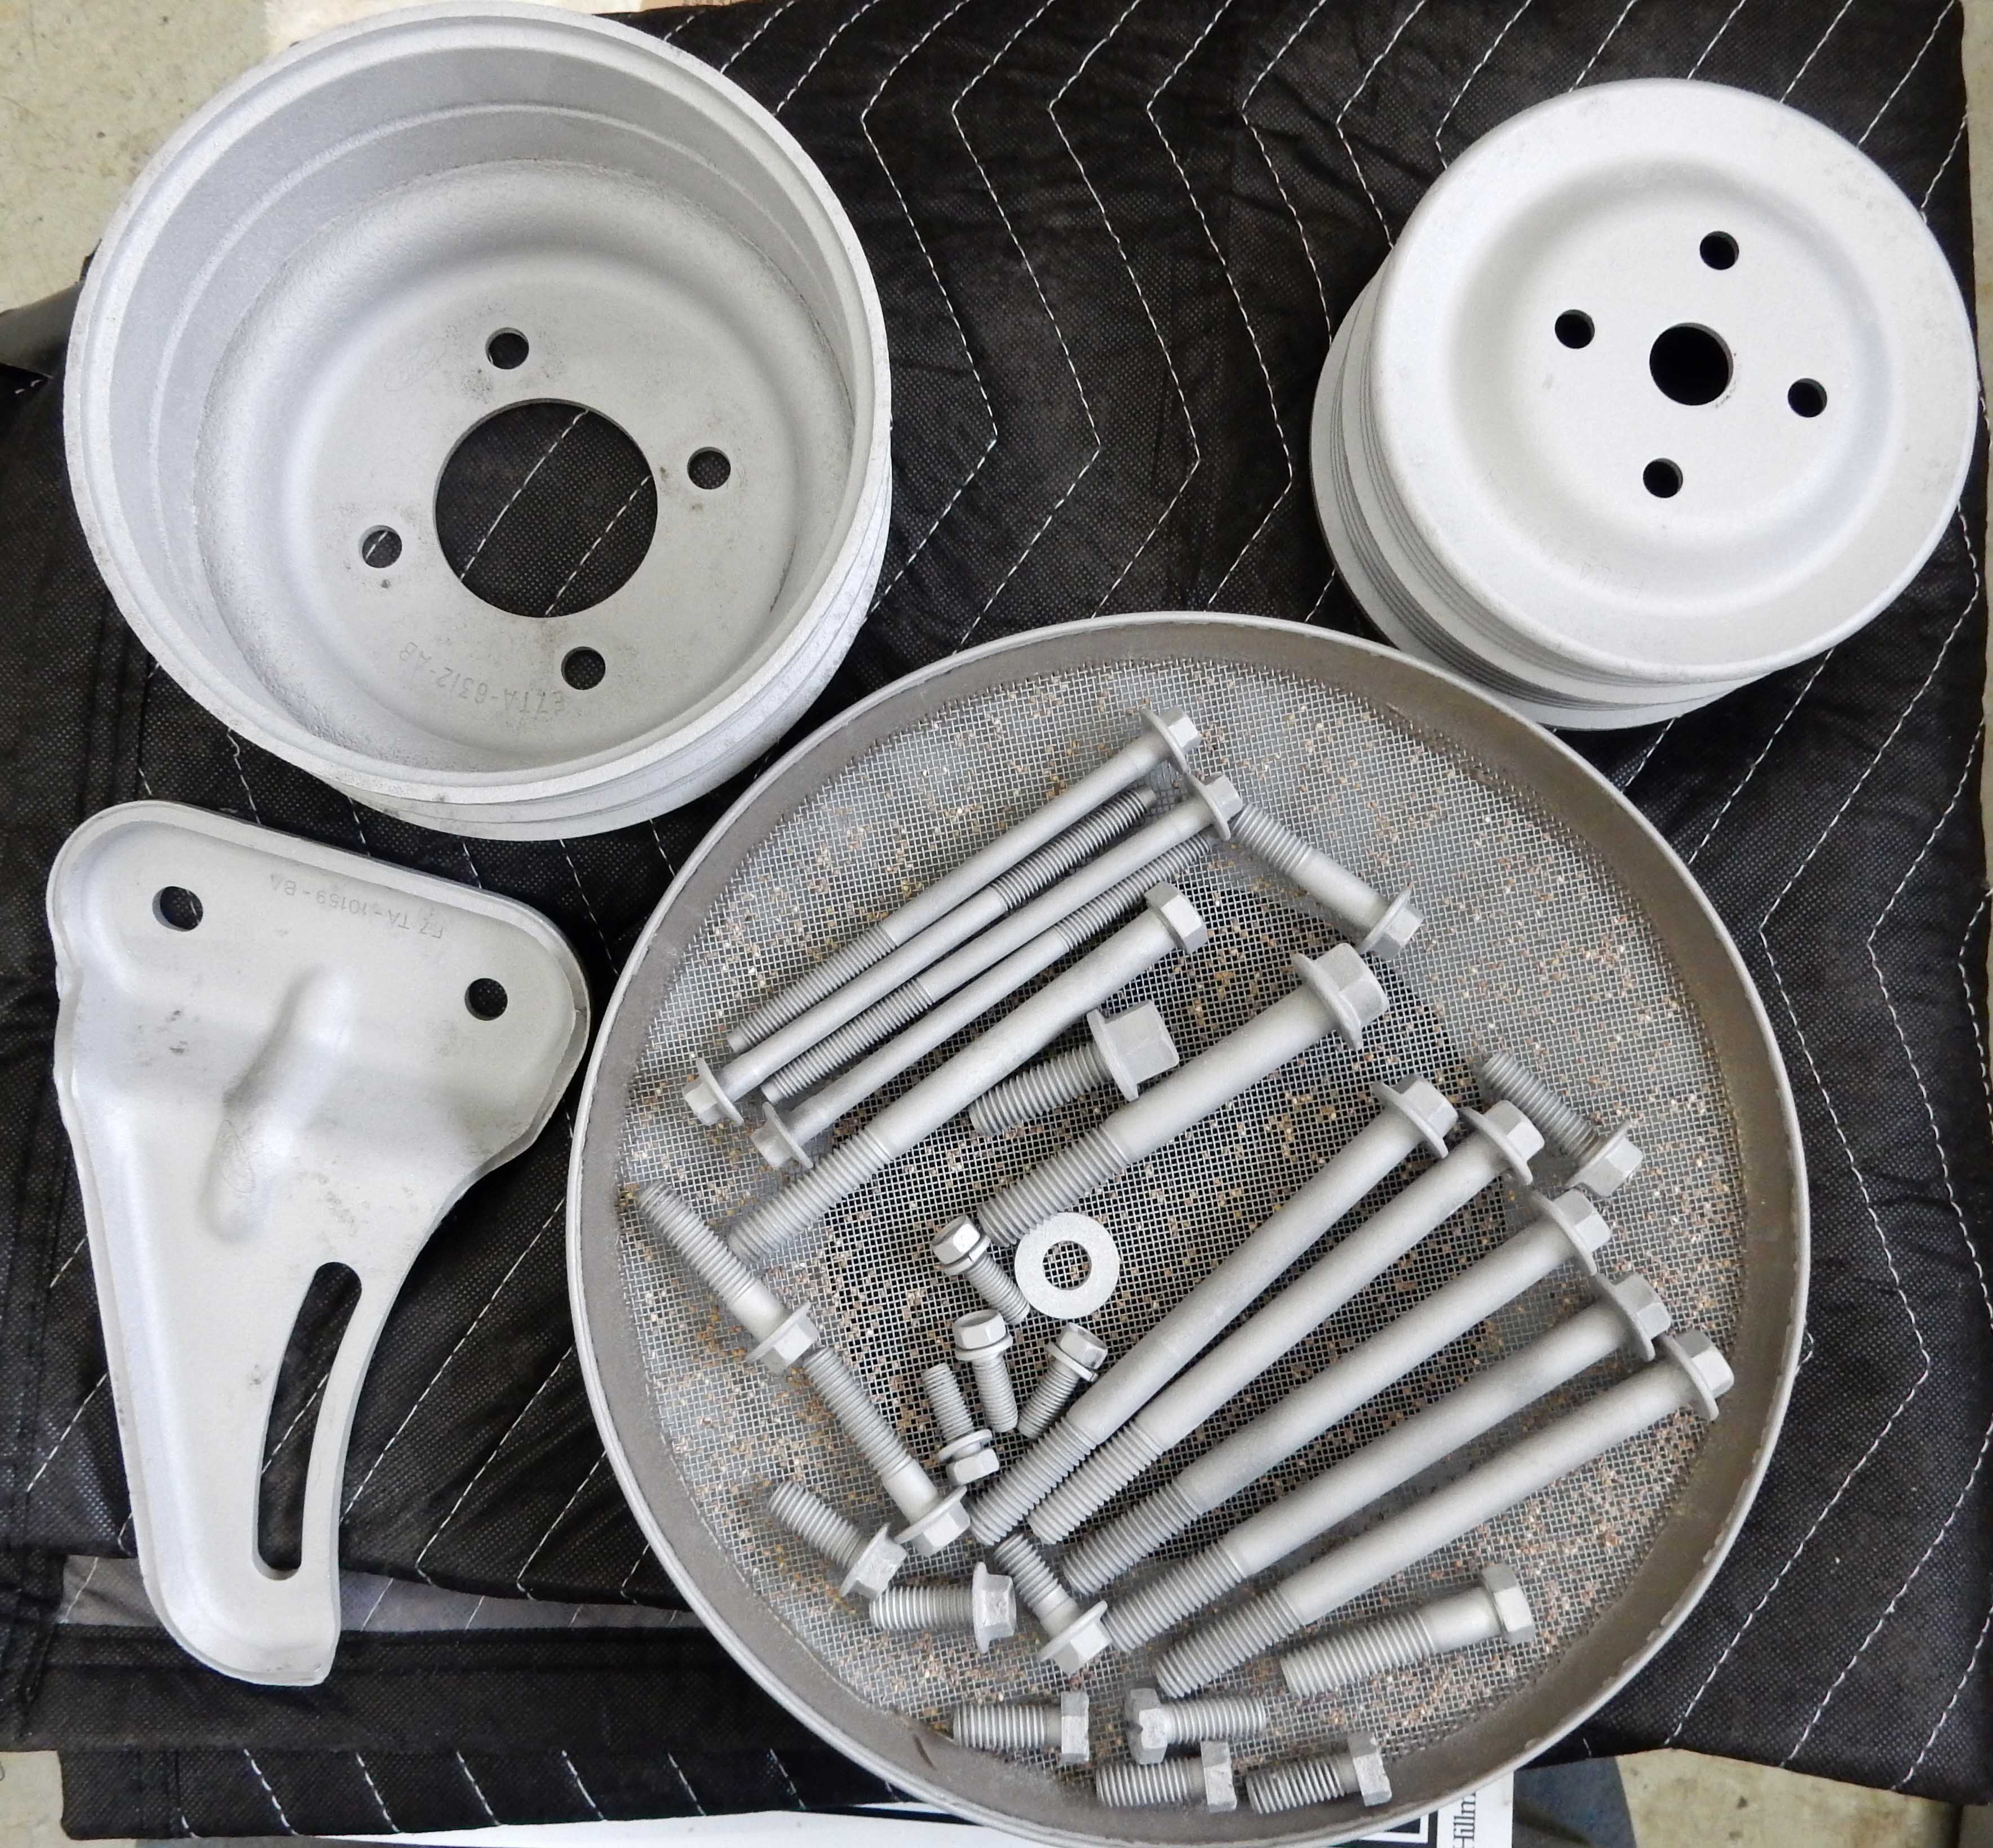 Hopefully I'll get the things PC'd tomorrow. But the neighbor wants help installing a "bed bar" and some KC lights on his Jimmy. So we will see how much I can get done before his parts come in.
Gary, AKA "Gary fellow": Profile
Dad's: '81 F150 Ranger XLT 4x4: Down for restomod: Full-roller "stroked 351M" w/Trick Flow heads & intake, EEC-V SEFI/E4OD/3.50 gears w/Kevlar clutches
|
|
Administrator
|
Well, this is going to be interesting. All of those parts are in the oven. But, there was a bit of a mistake along the way.
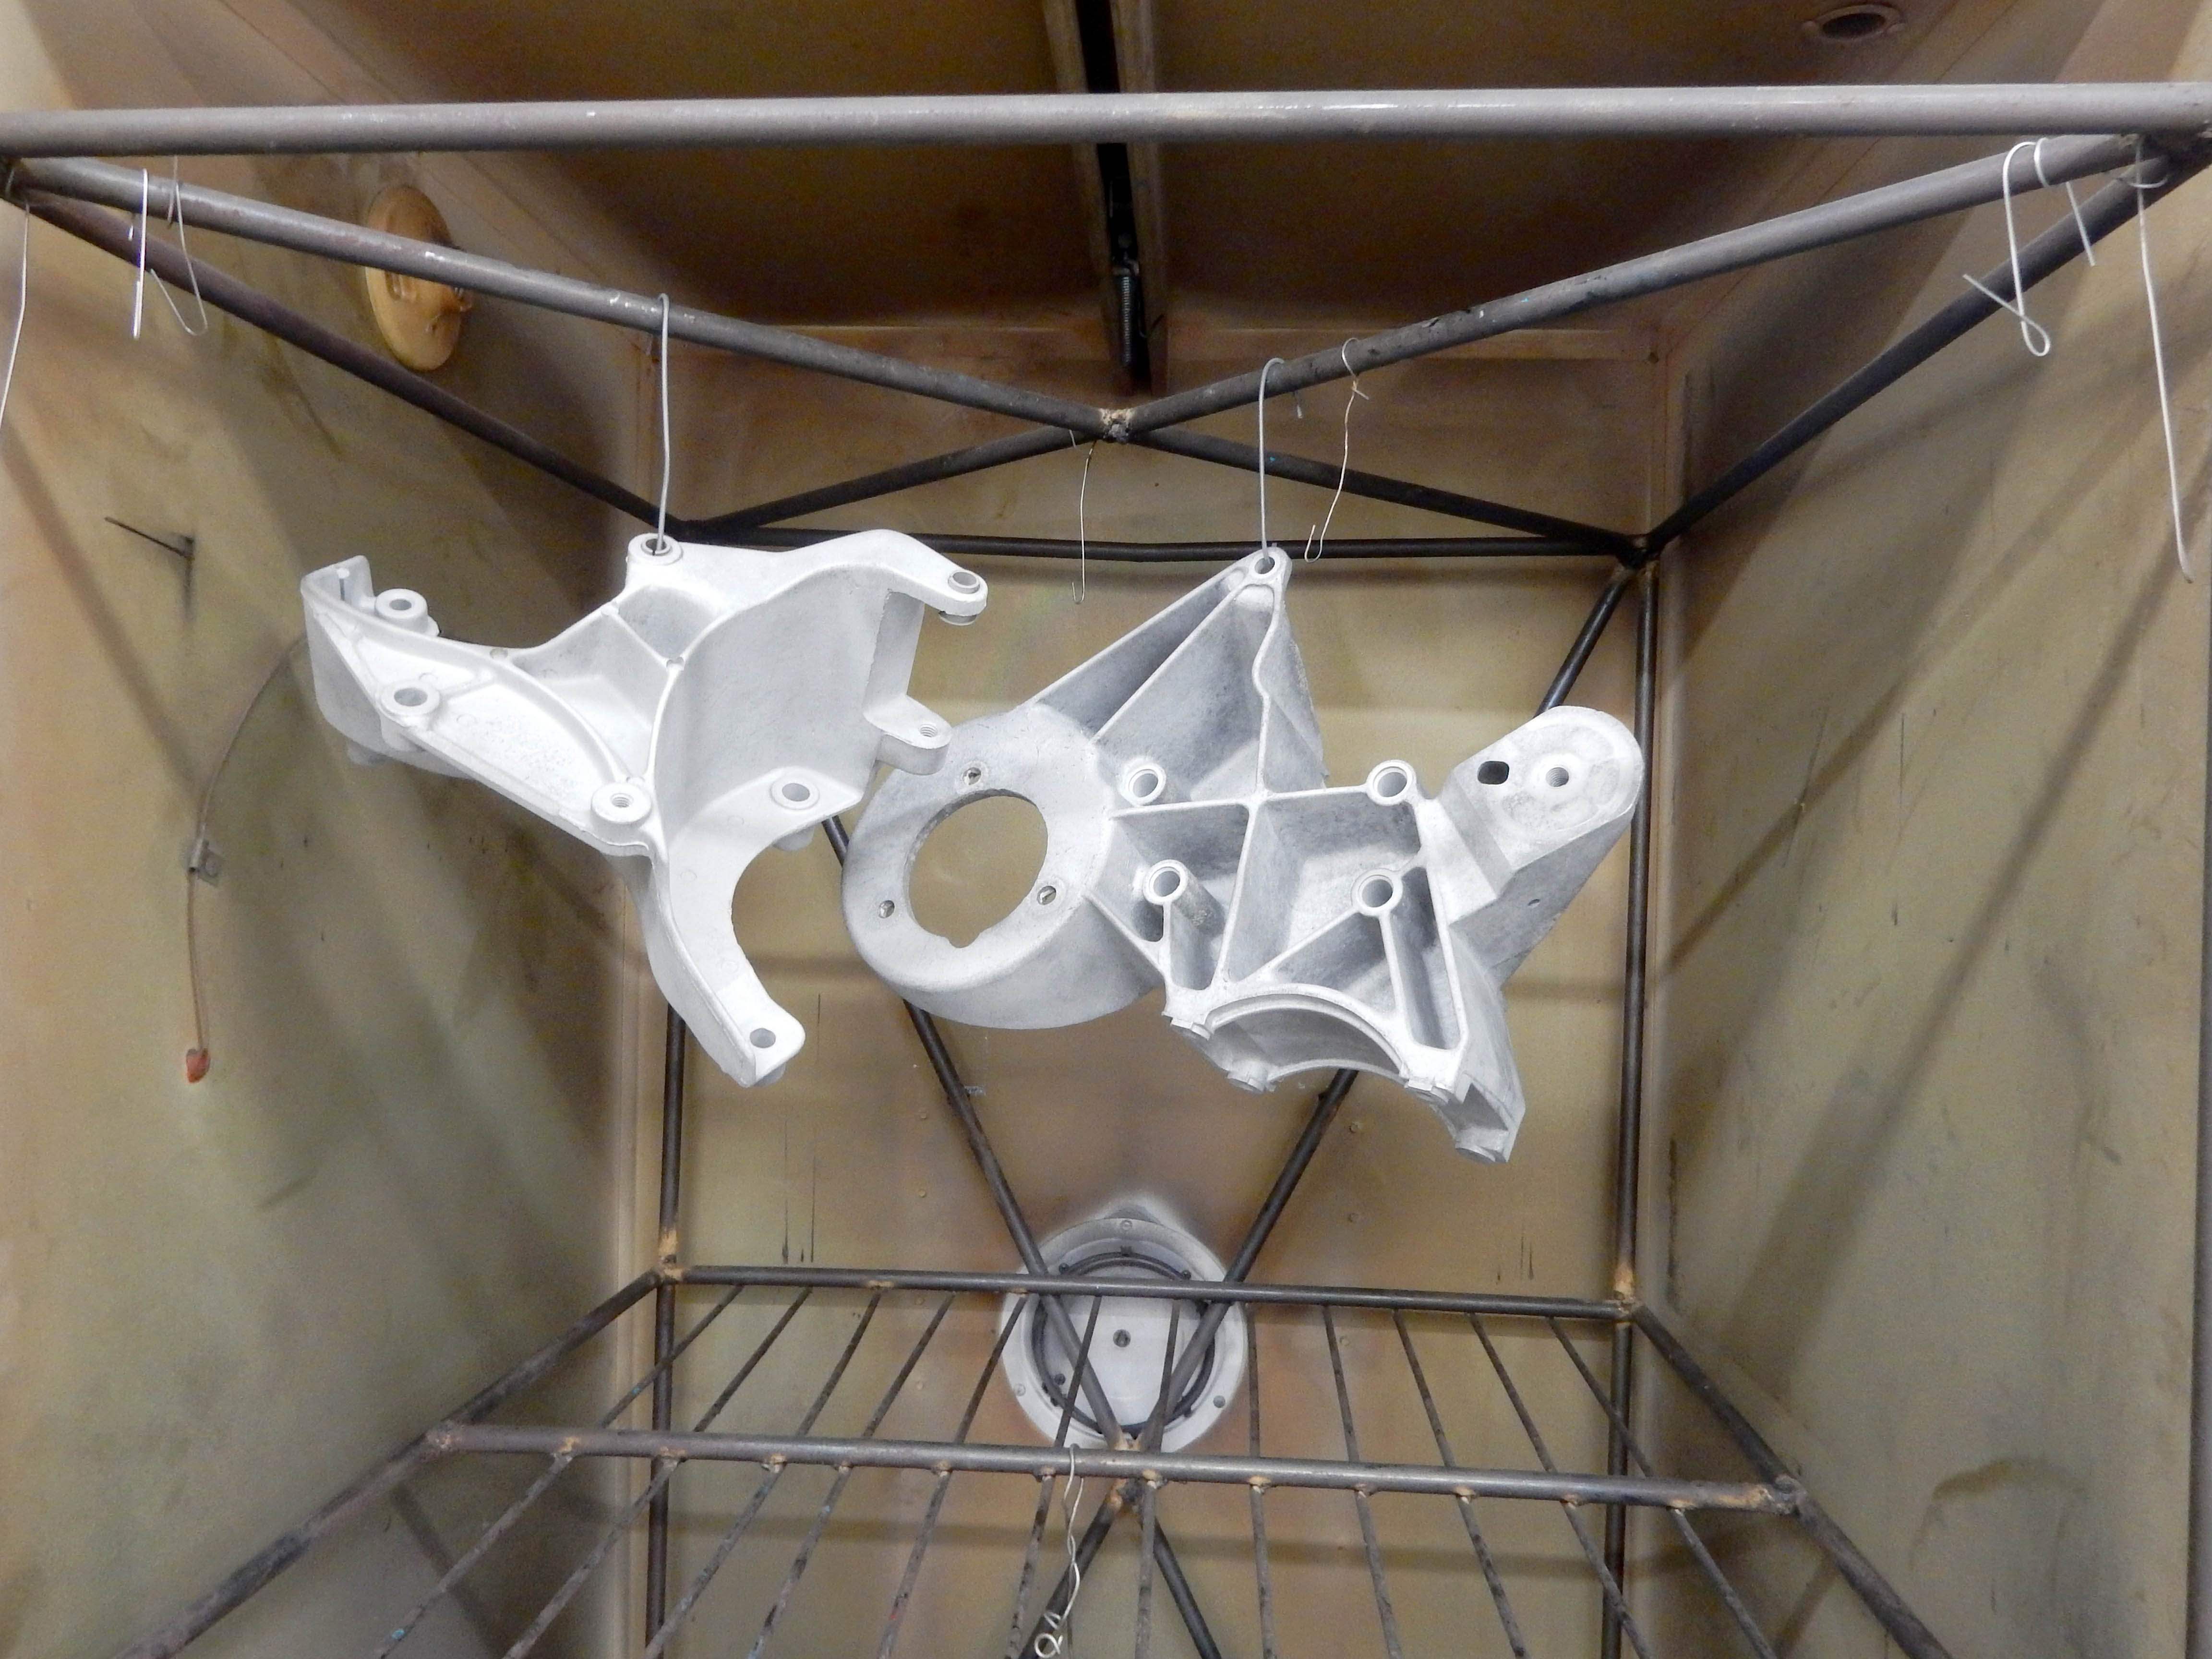
I checked the powder I had in the gun and said "Oh good, it is the Silver Lining so I can do the brackets first." But, I also noted that the amount of powder might not be enough for both brackets, so I might have to stop and add more. So I hung the brackets, washed them with brake cleaner and dried them with the heat gun, and started applying the powder. But it sure seemed to be going on thinly and it was hard to get a good layer of it on the parts. I had a thin layer on both of them and finally decided that I needed more in the gun so stopped and added more. However, as I pulled the trigger and a whole lot more powder came out and coated the parts I realized the error of my ways - the first coat was epoxy primer, and the second coat was Silver Lining! I went ahead and gave them a heavy coat of Silver Lining, which will hopefully overlay the epoxy when the baking is done. Here's what they looked like before baking. We shall see if this is a good idea or a disaster. 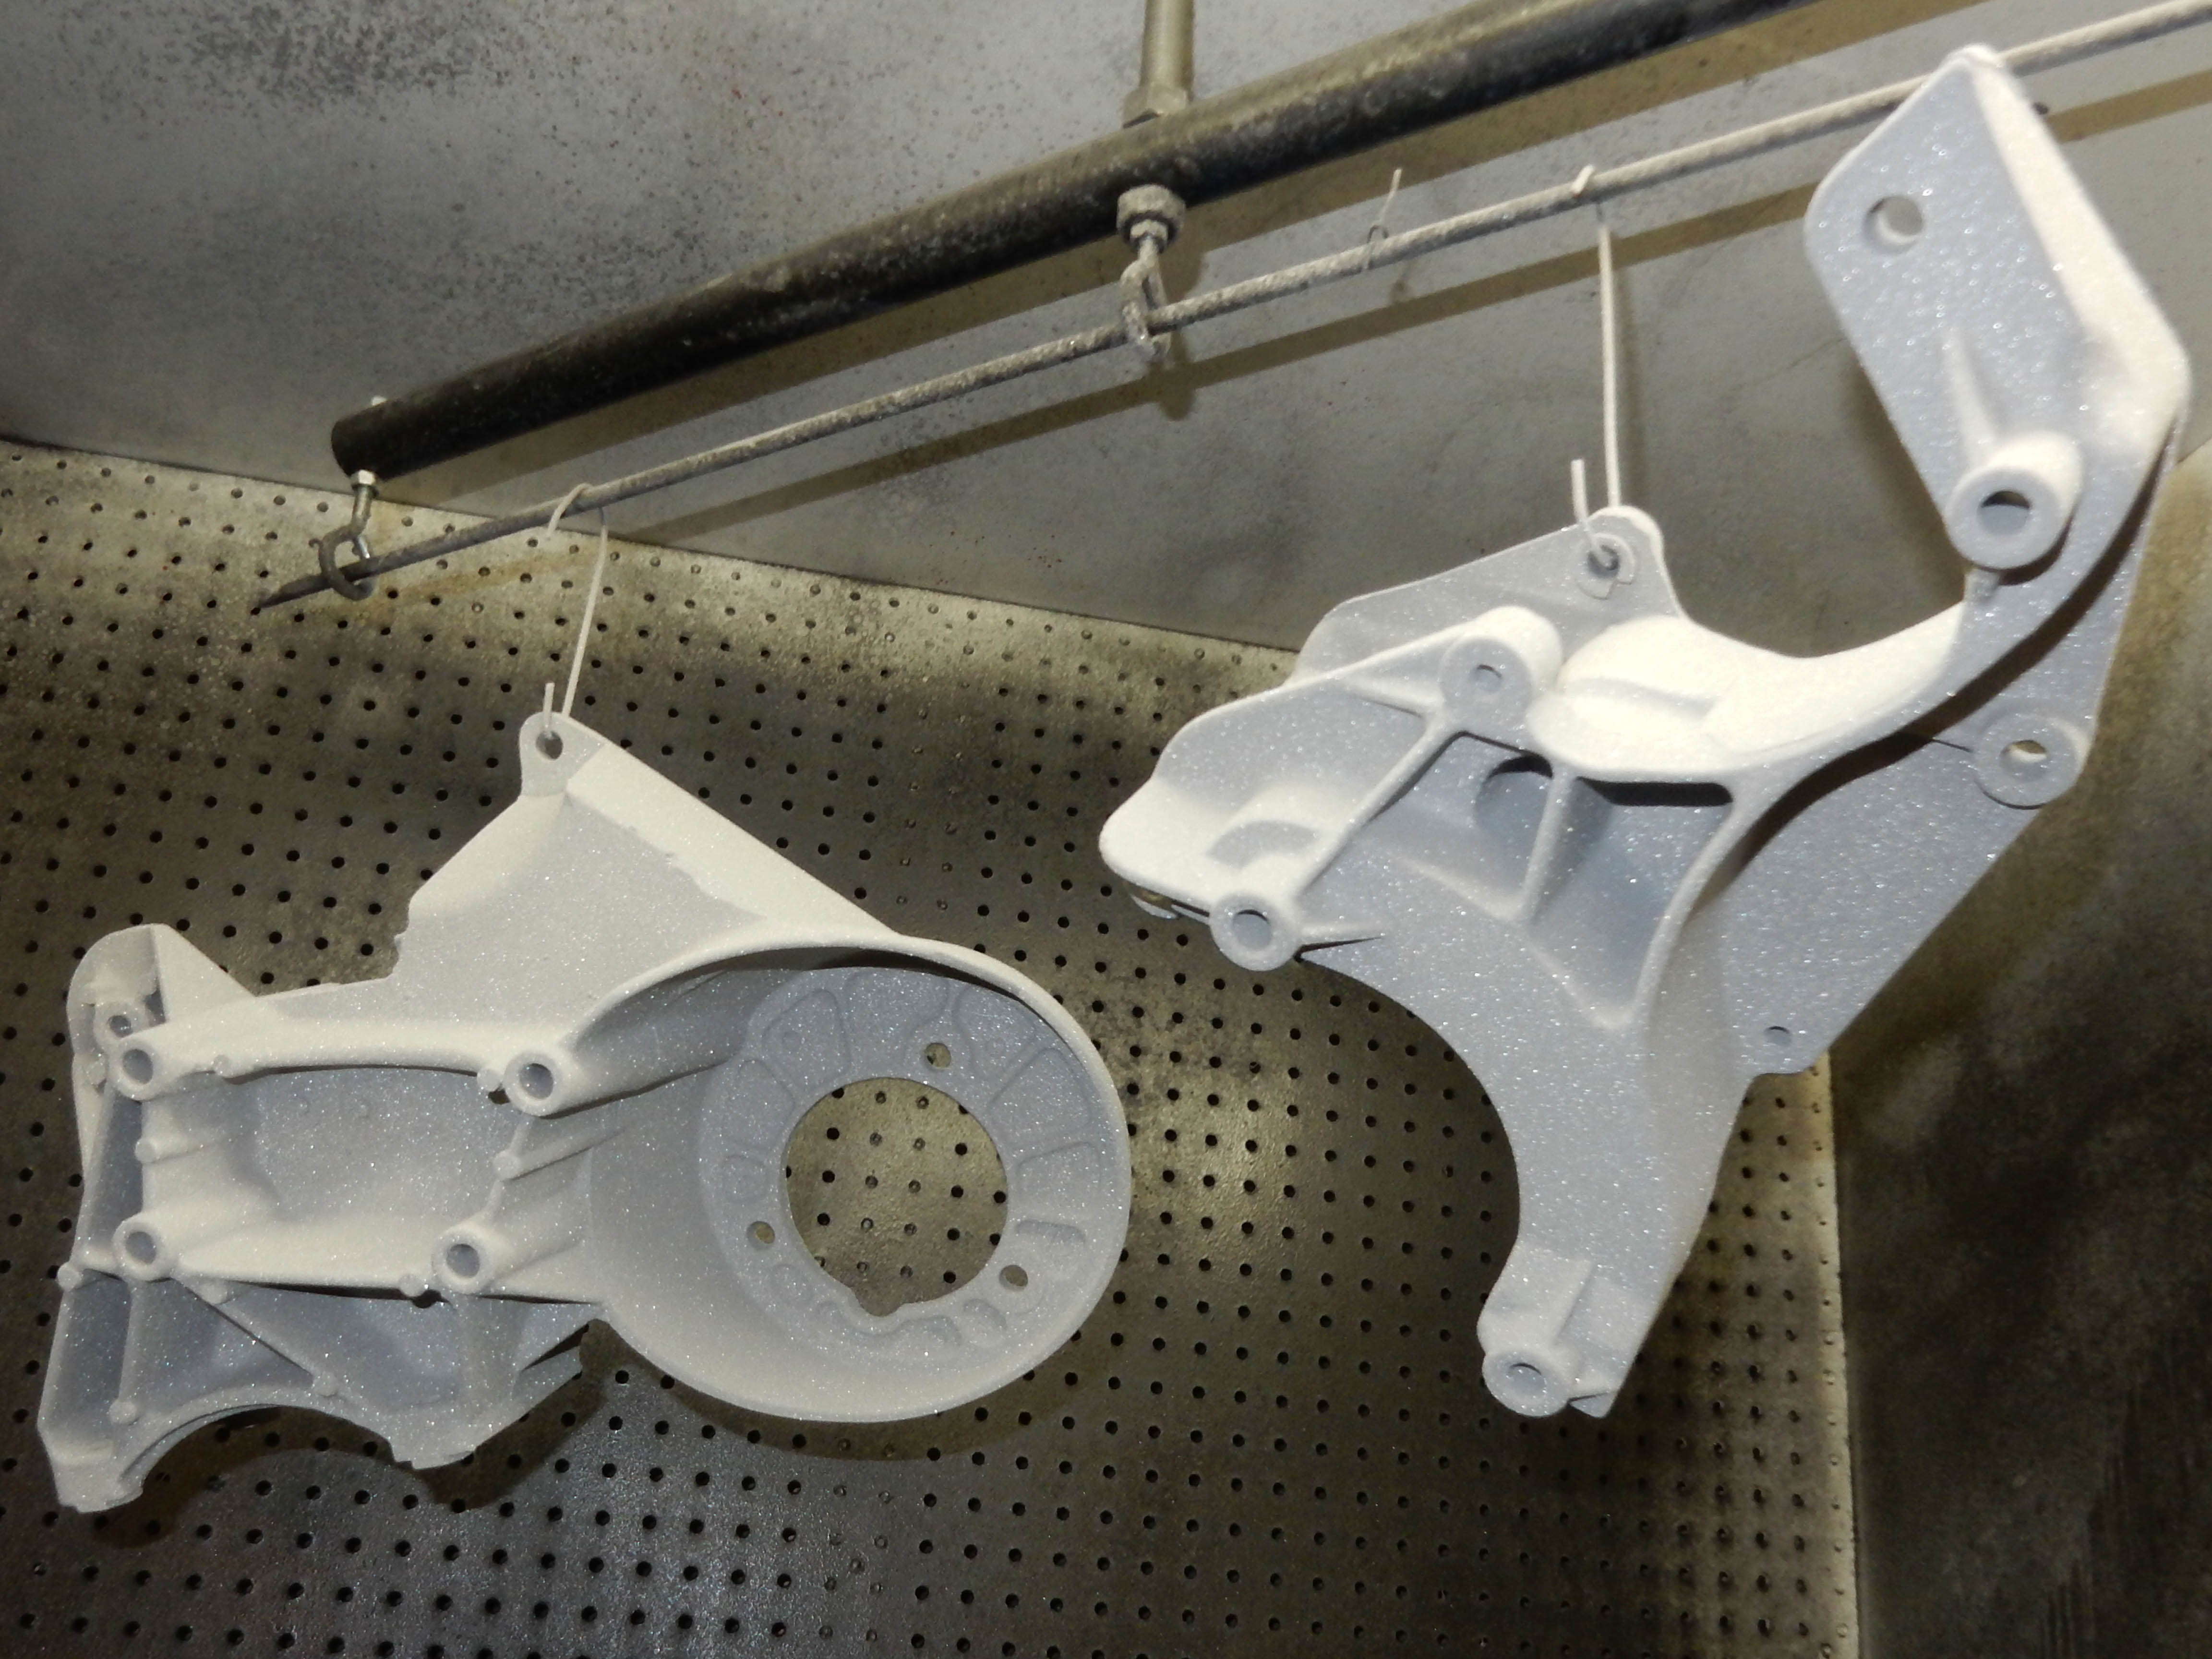
Gary, AKA "Gary fellow": Profile
Dad's: '81 F150 Ranger XLT 4x4: Down for restomod: Full-roller "stroked 351M" w/Trick Flow heads & intake, EEC-V SEFI/E4OD/3.50 gears w/Kevlar clutches
|
|
Administrator
|
Success!!!! The brackets came out looking just like all of the other Silver Lining'd parts. Here's a comparison of the alternator bracket and the valve cover:
 And here's the alternator bracket by itself: 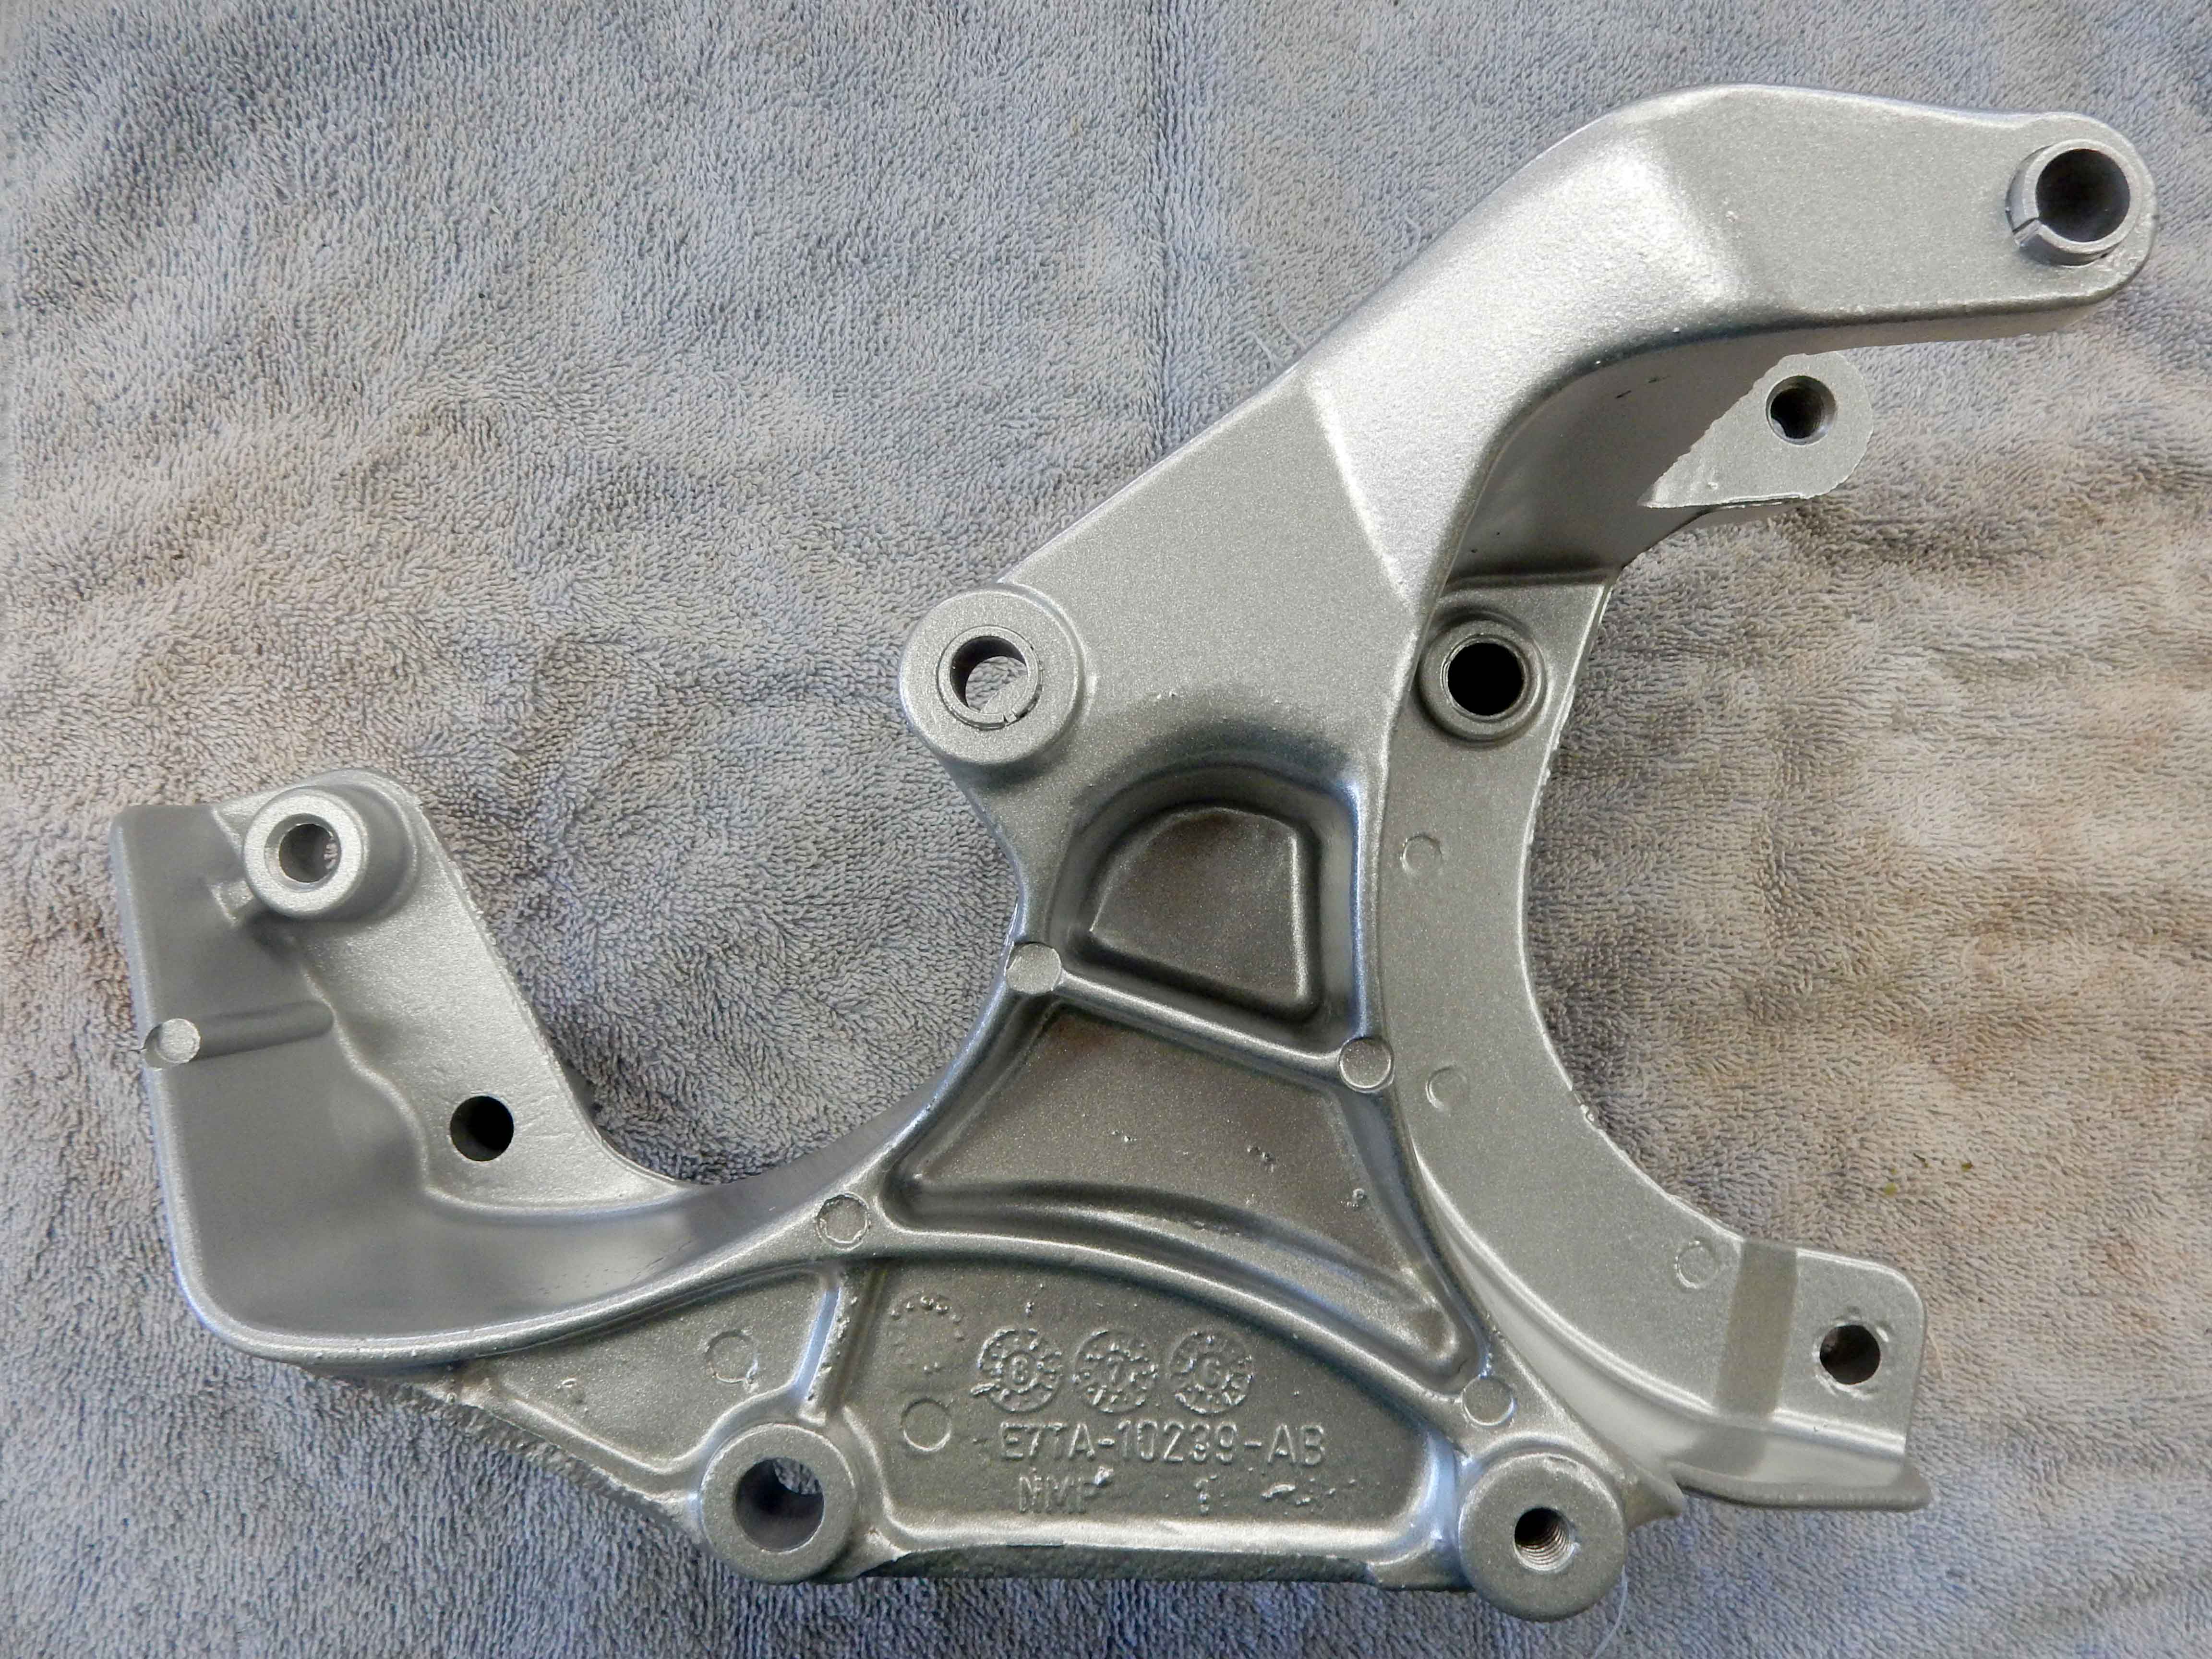 Here's the AC/PS bracket: 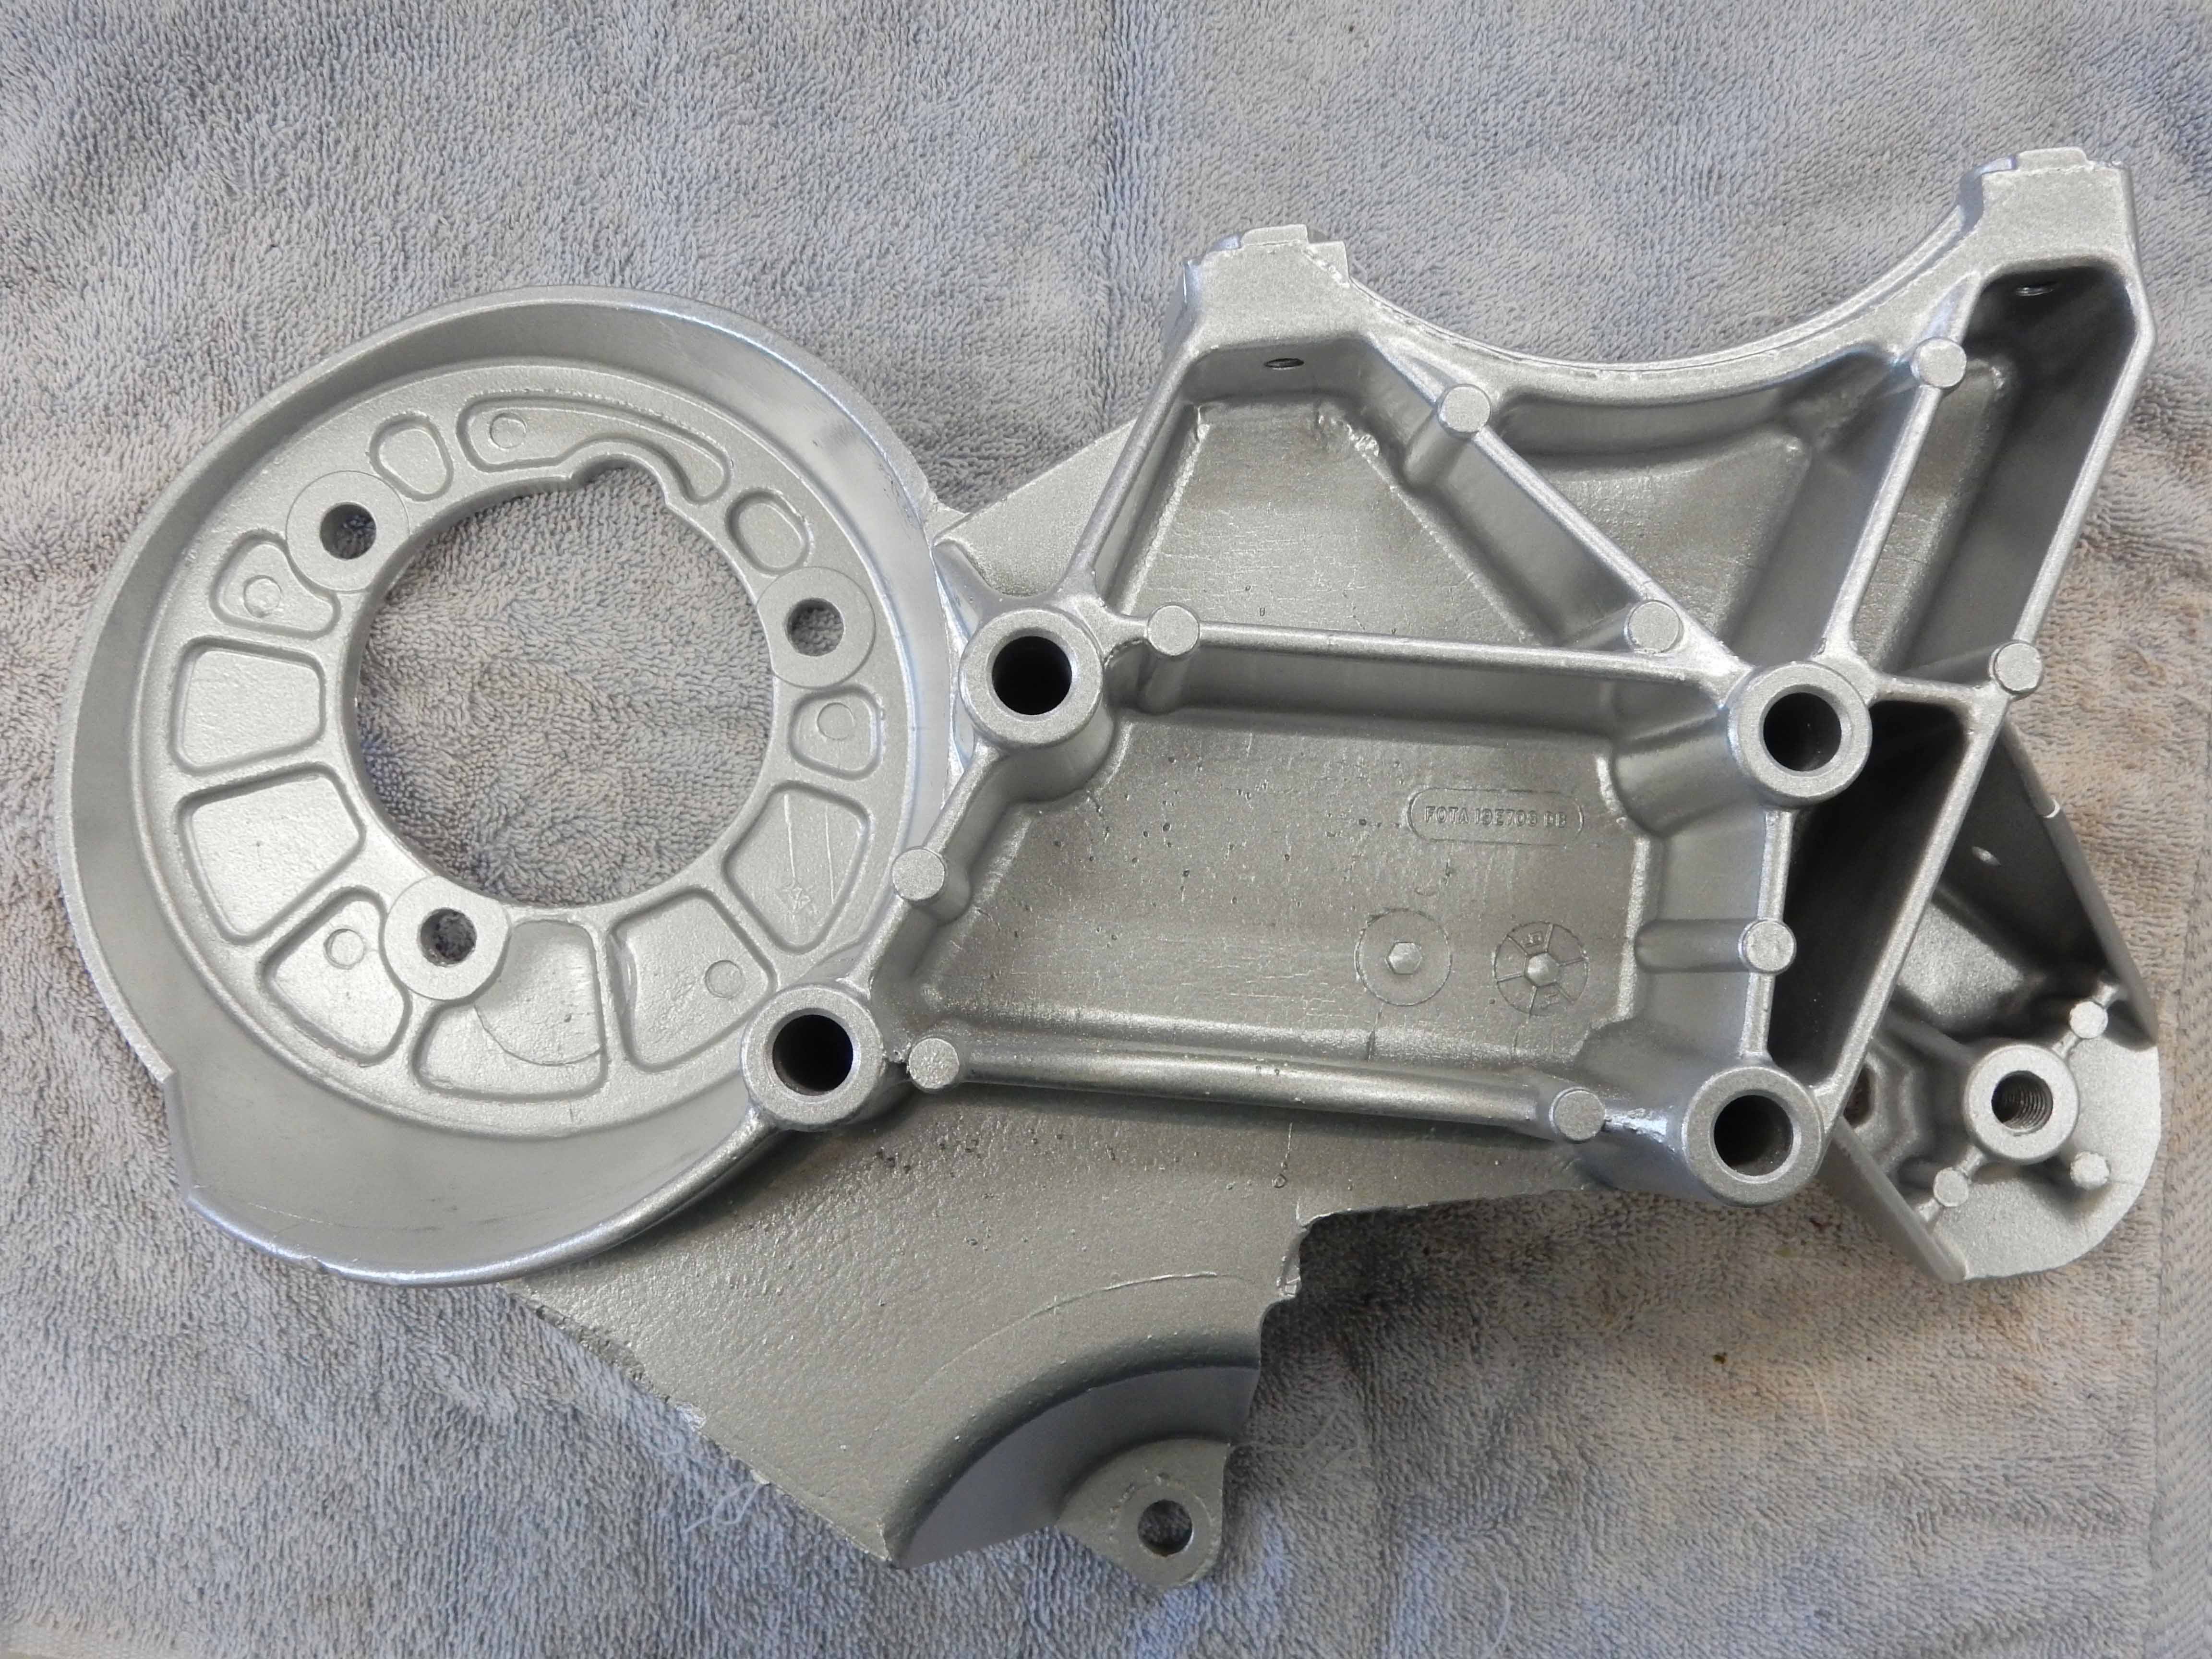 A couple of pulleys and the other alternator bracket: 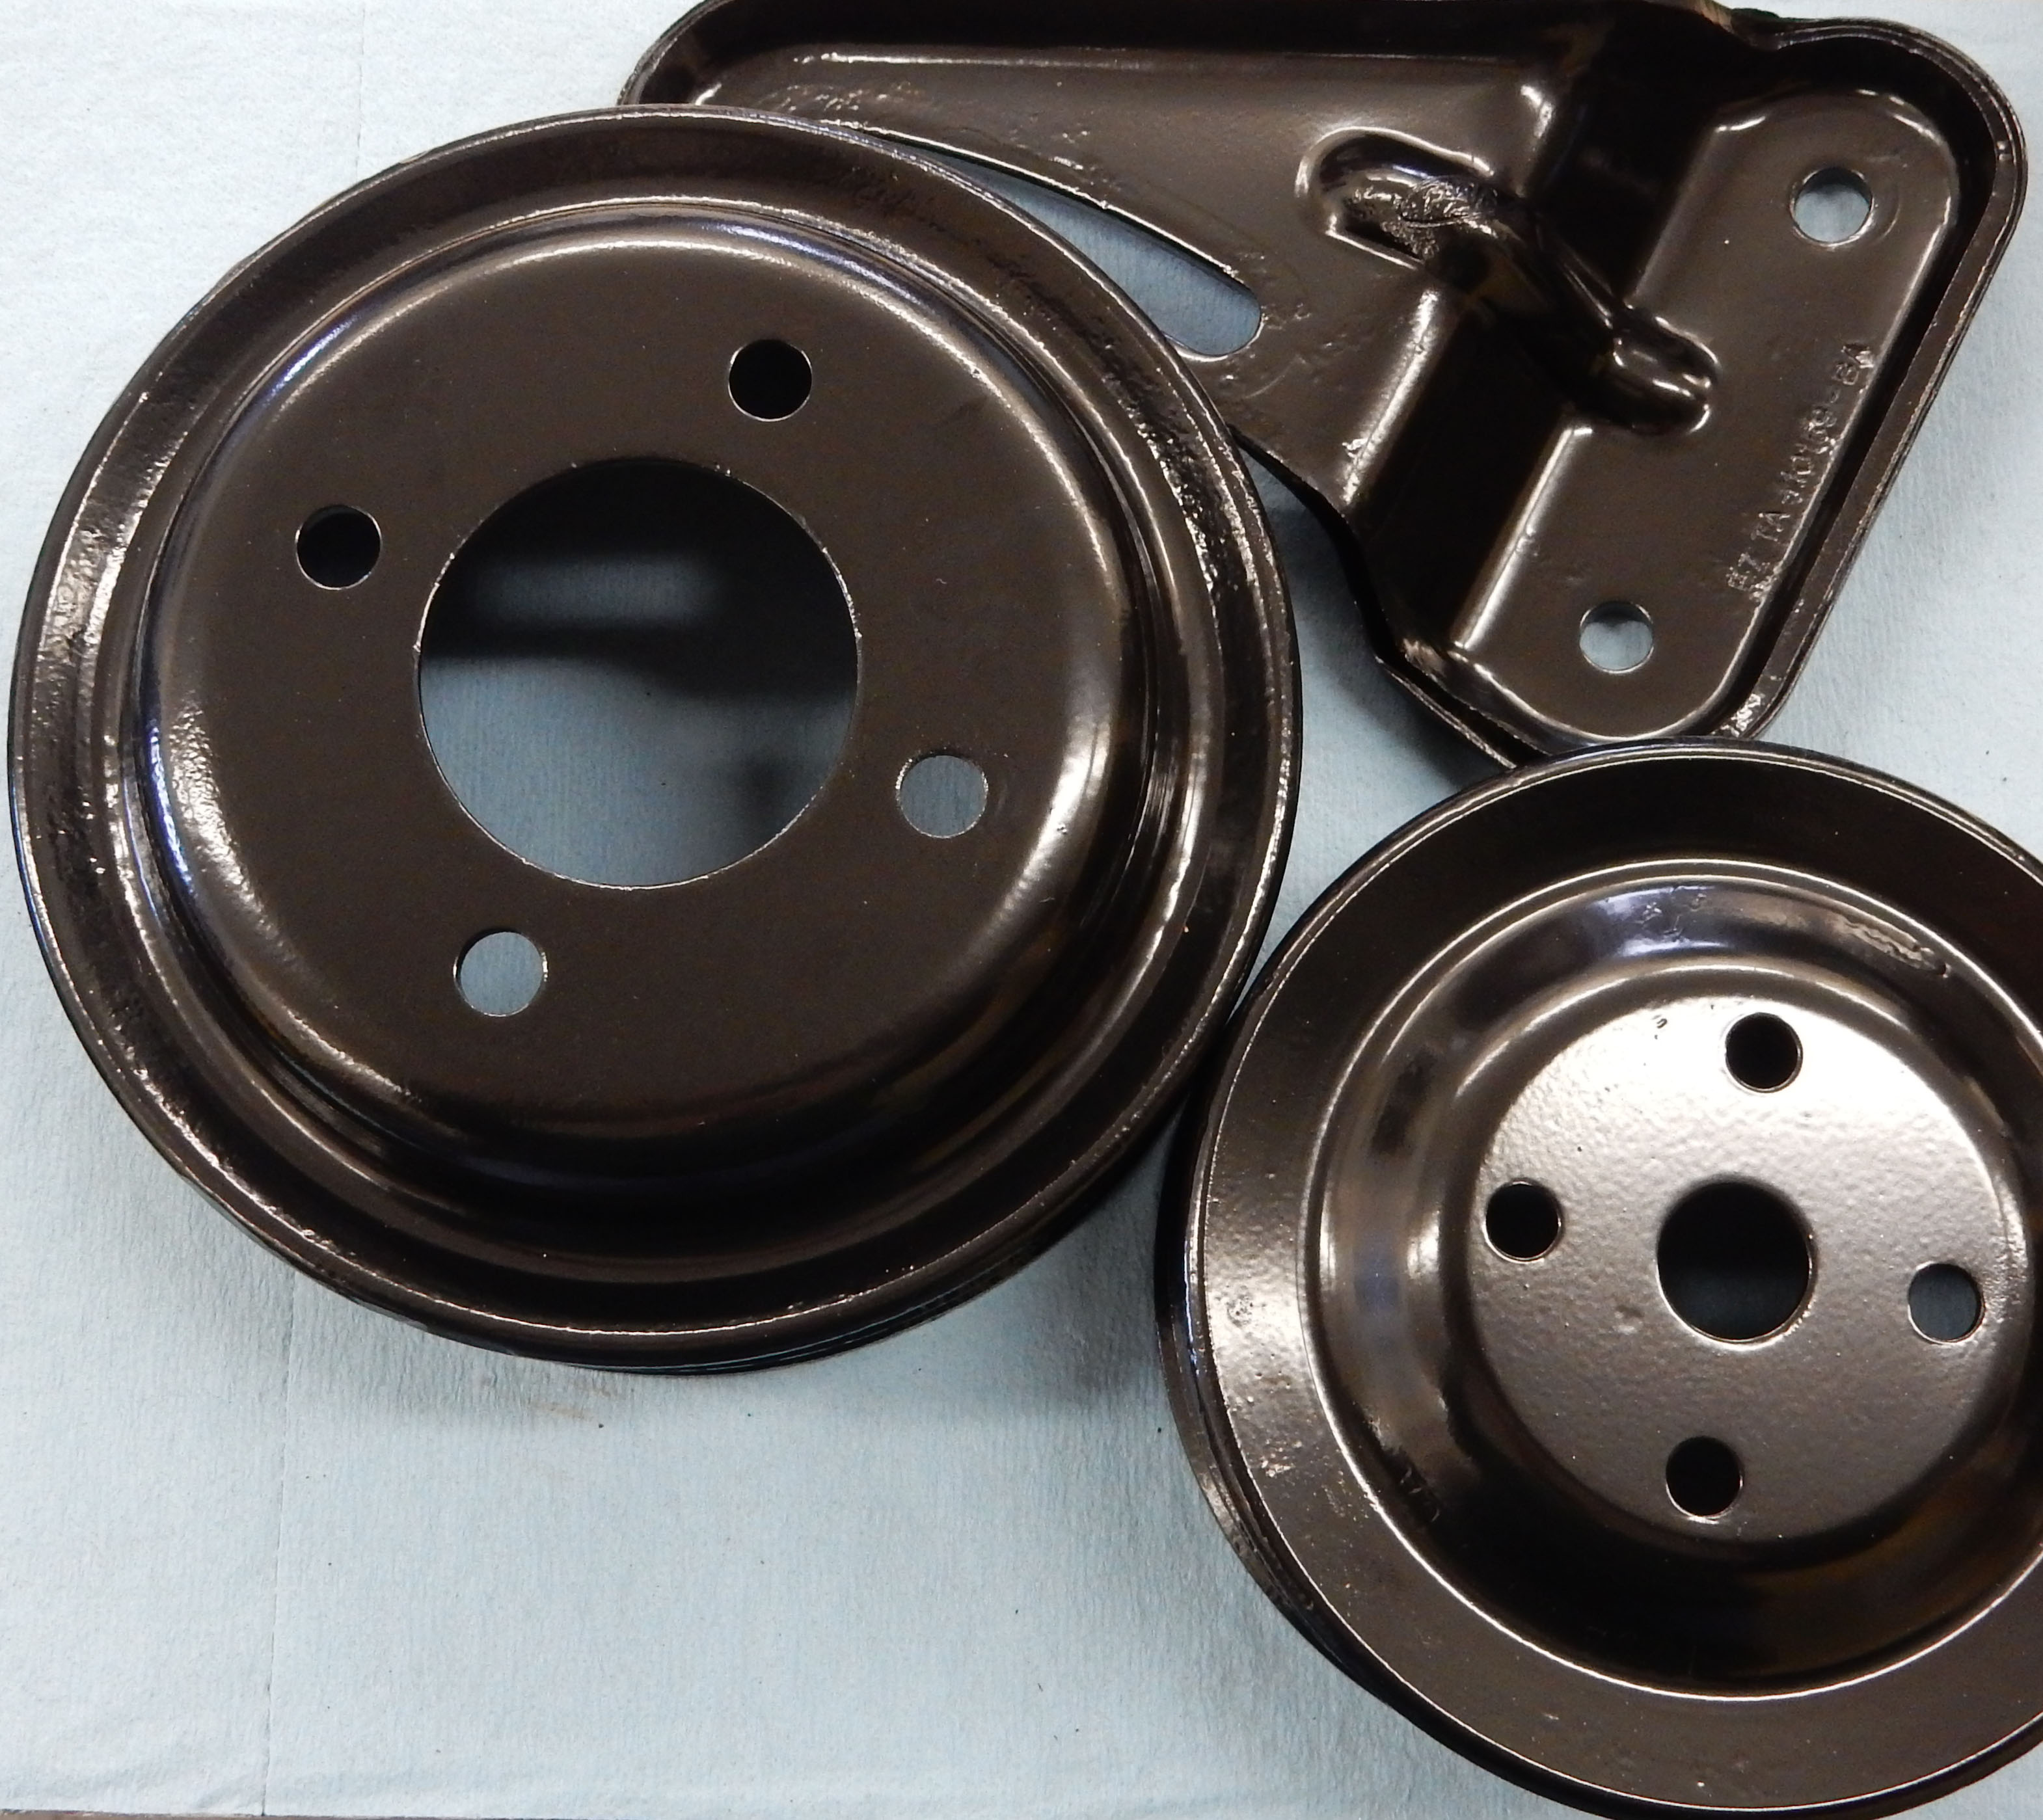 And last, the various fasteners to hold all those pieces, as well as some others, on: 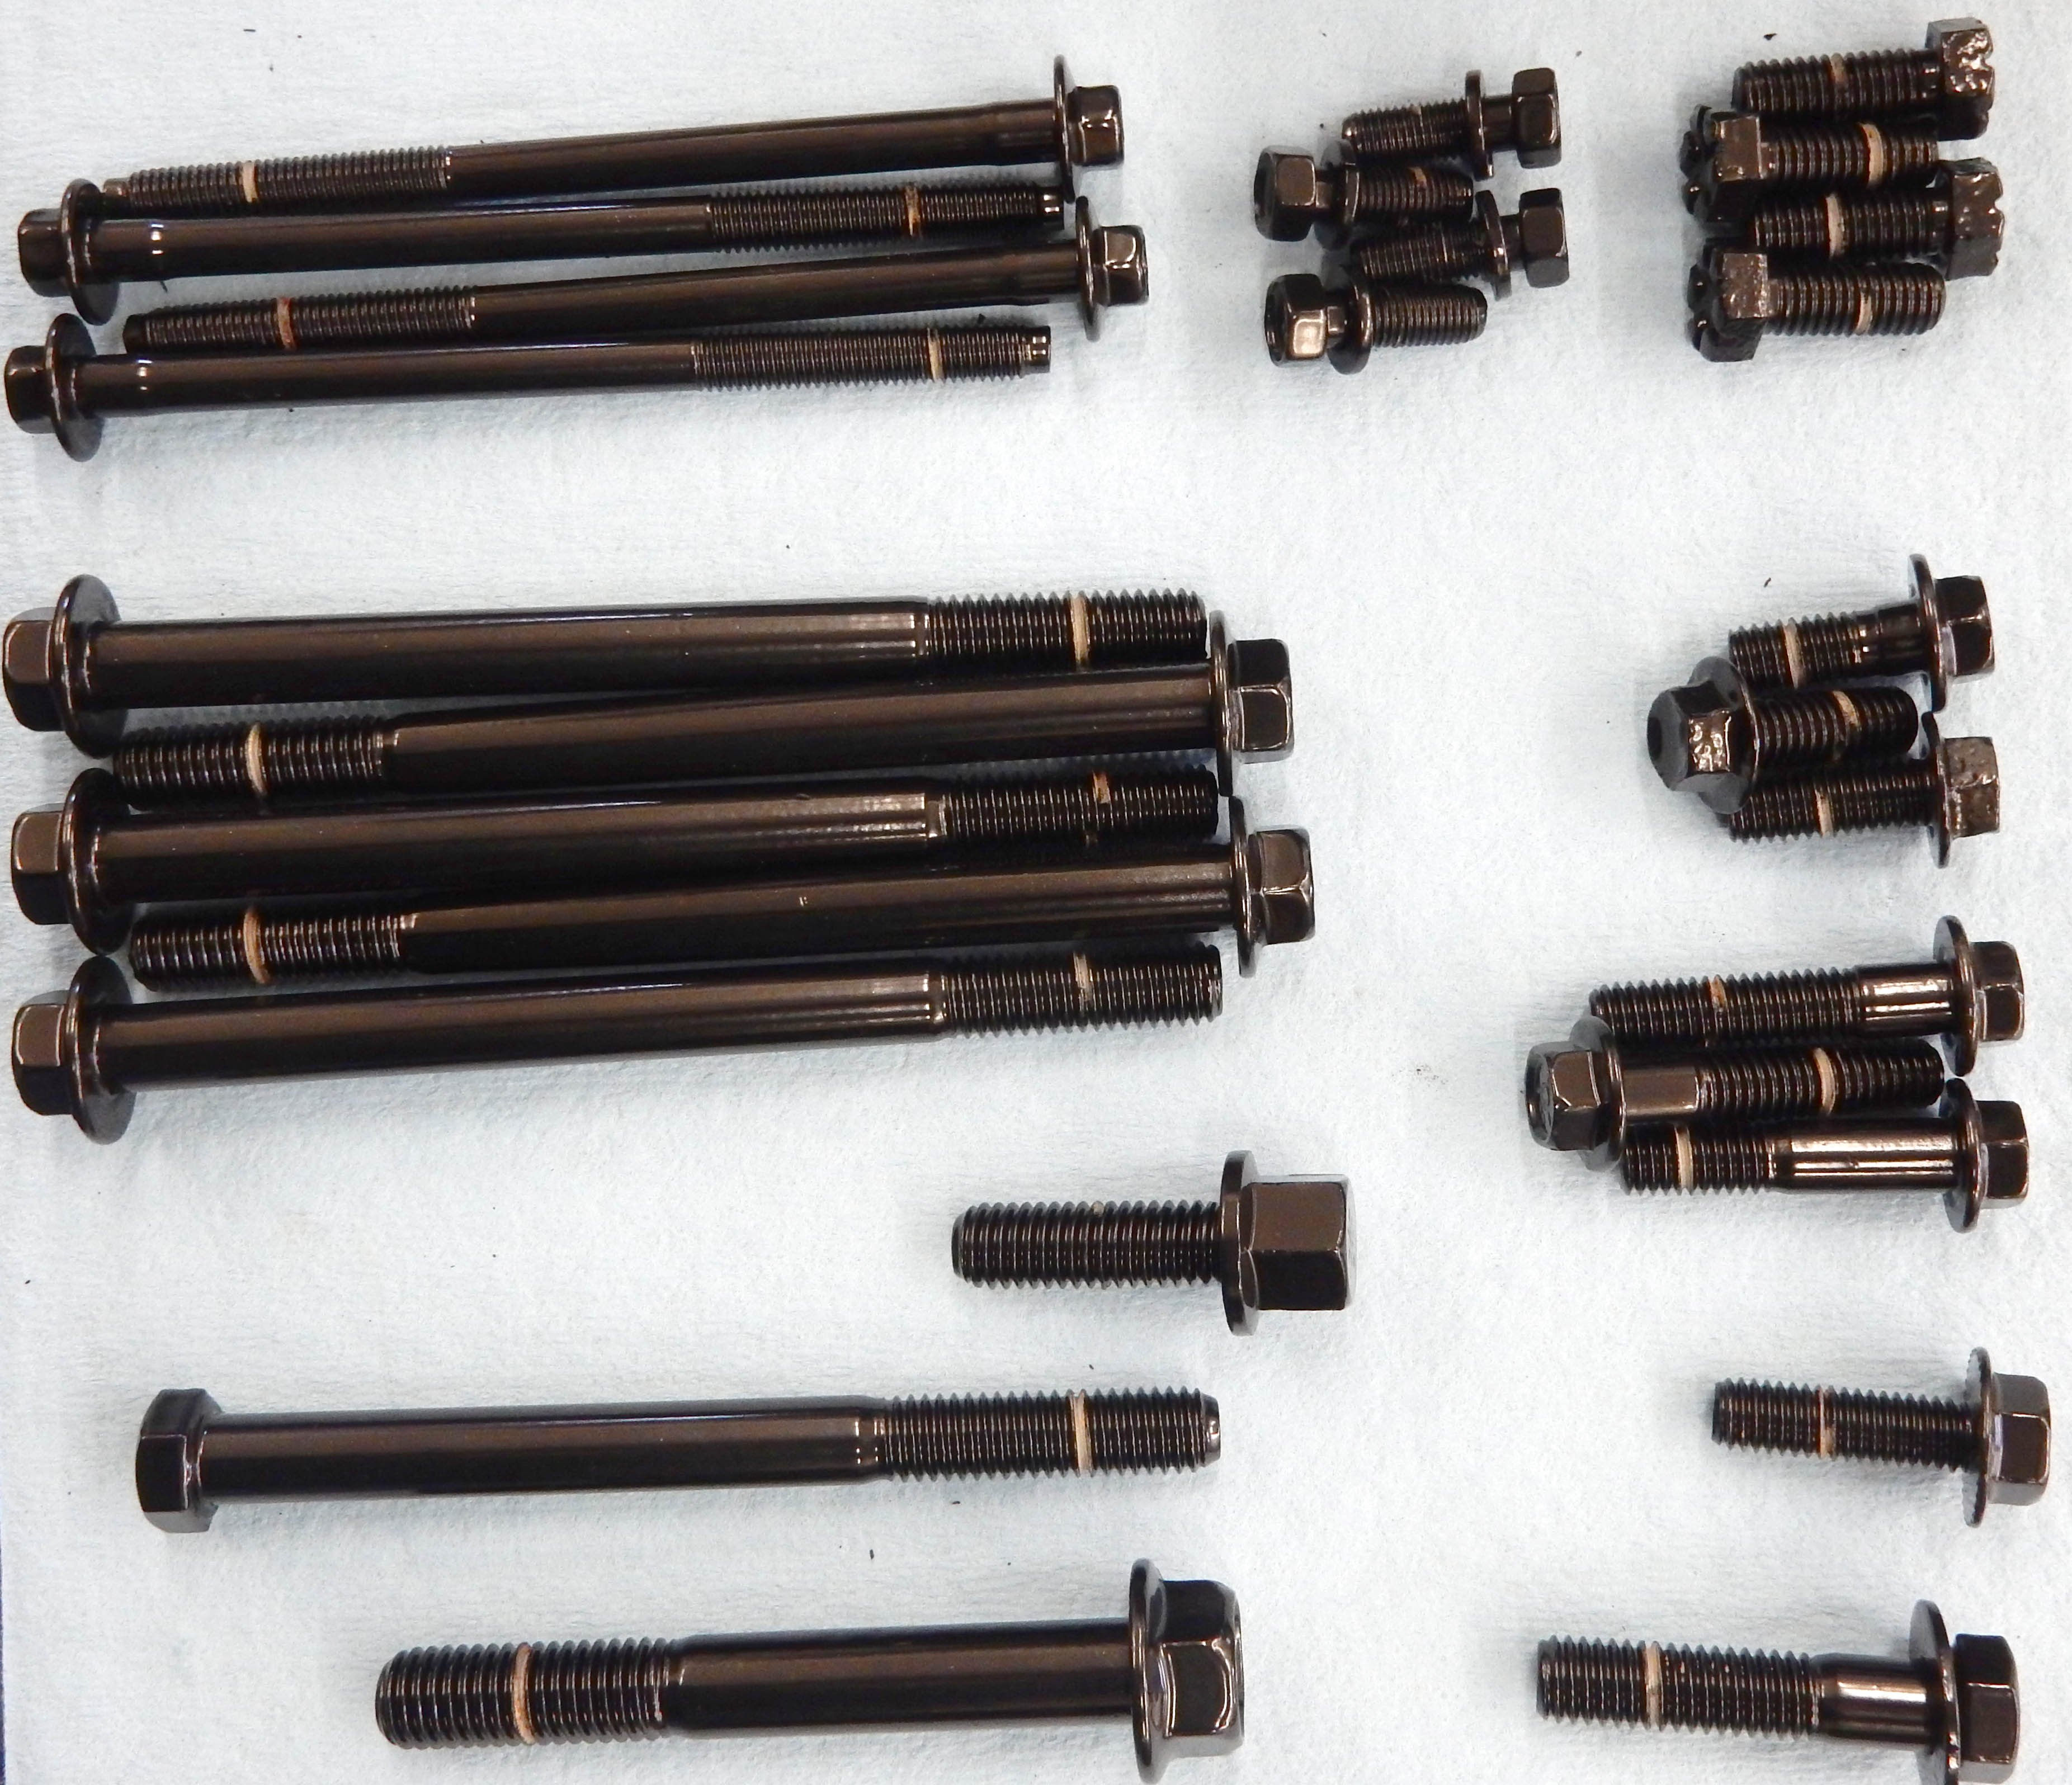
Gary, AKA "Gary fellow": Profile
Dad's: '81 F150 Ranger XLT 4x4: Down for restomod: Full-roller "stroked 351M" w/Trick Flow heads & intake, EEC-V SEFI/E4OD/3.50 gears w/Kevlar clutches
|
|
Administrator
|
And here's what the engine looks like with the PC'd parts gently installed:
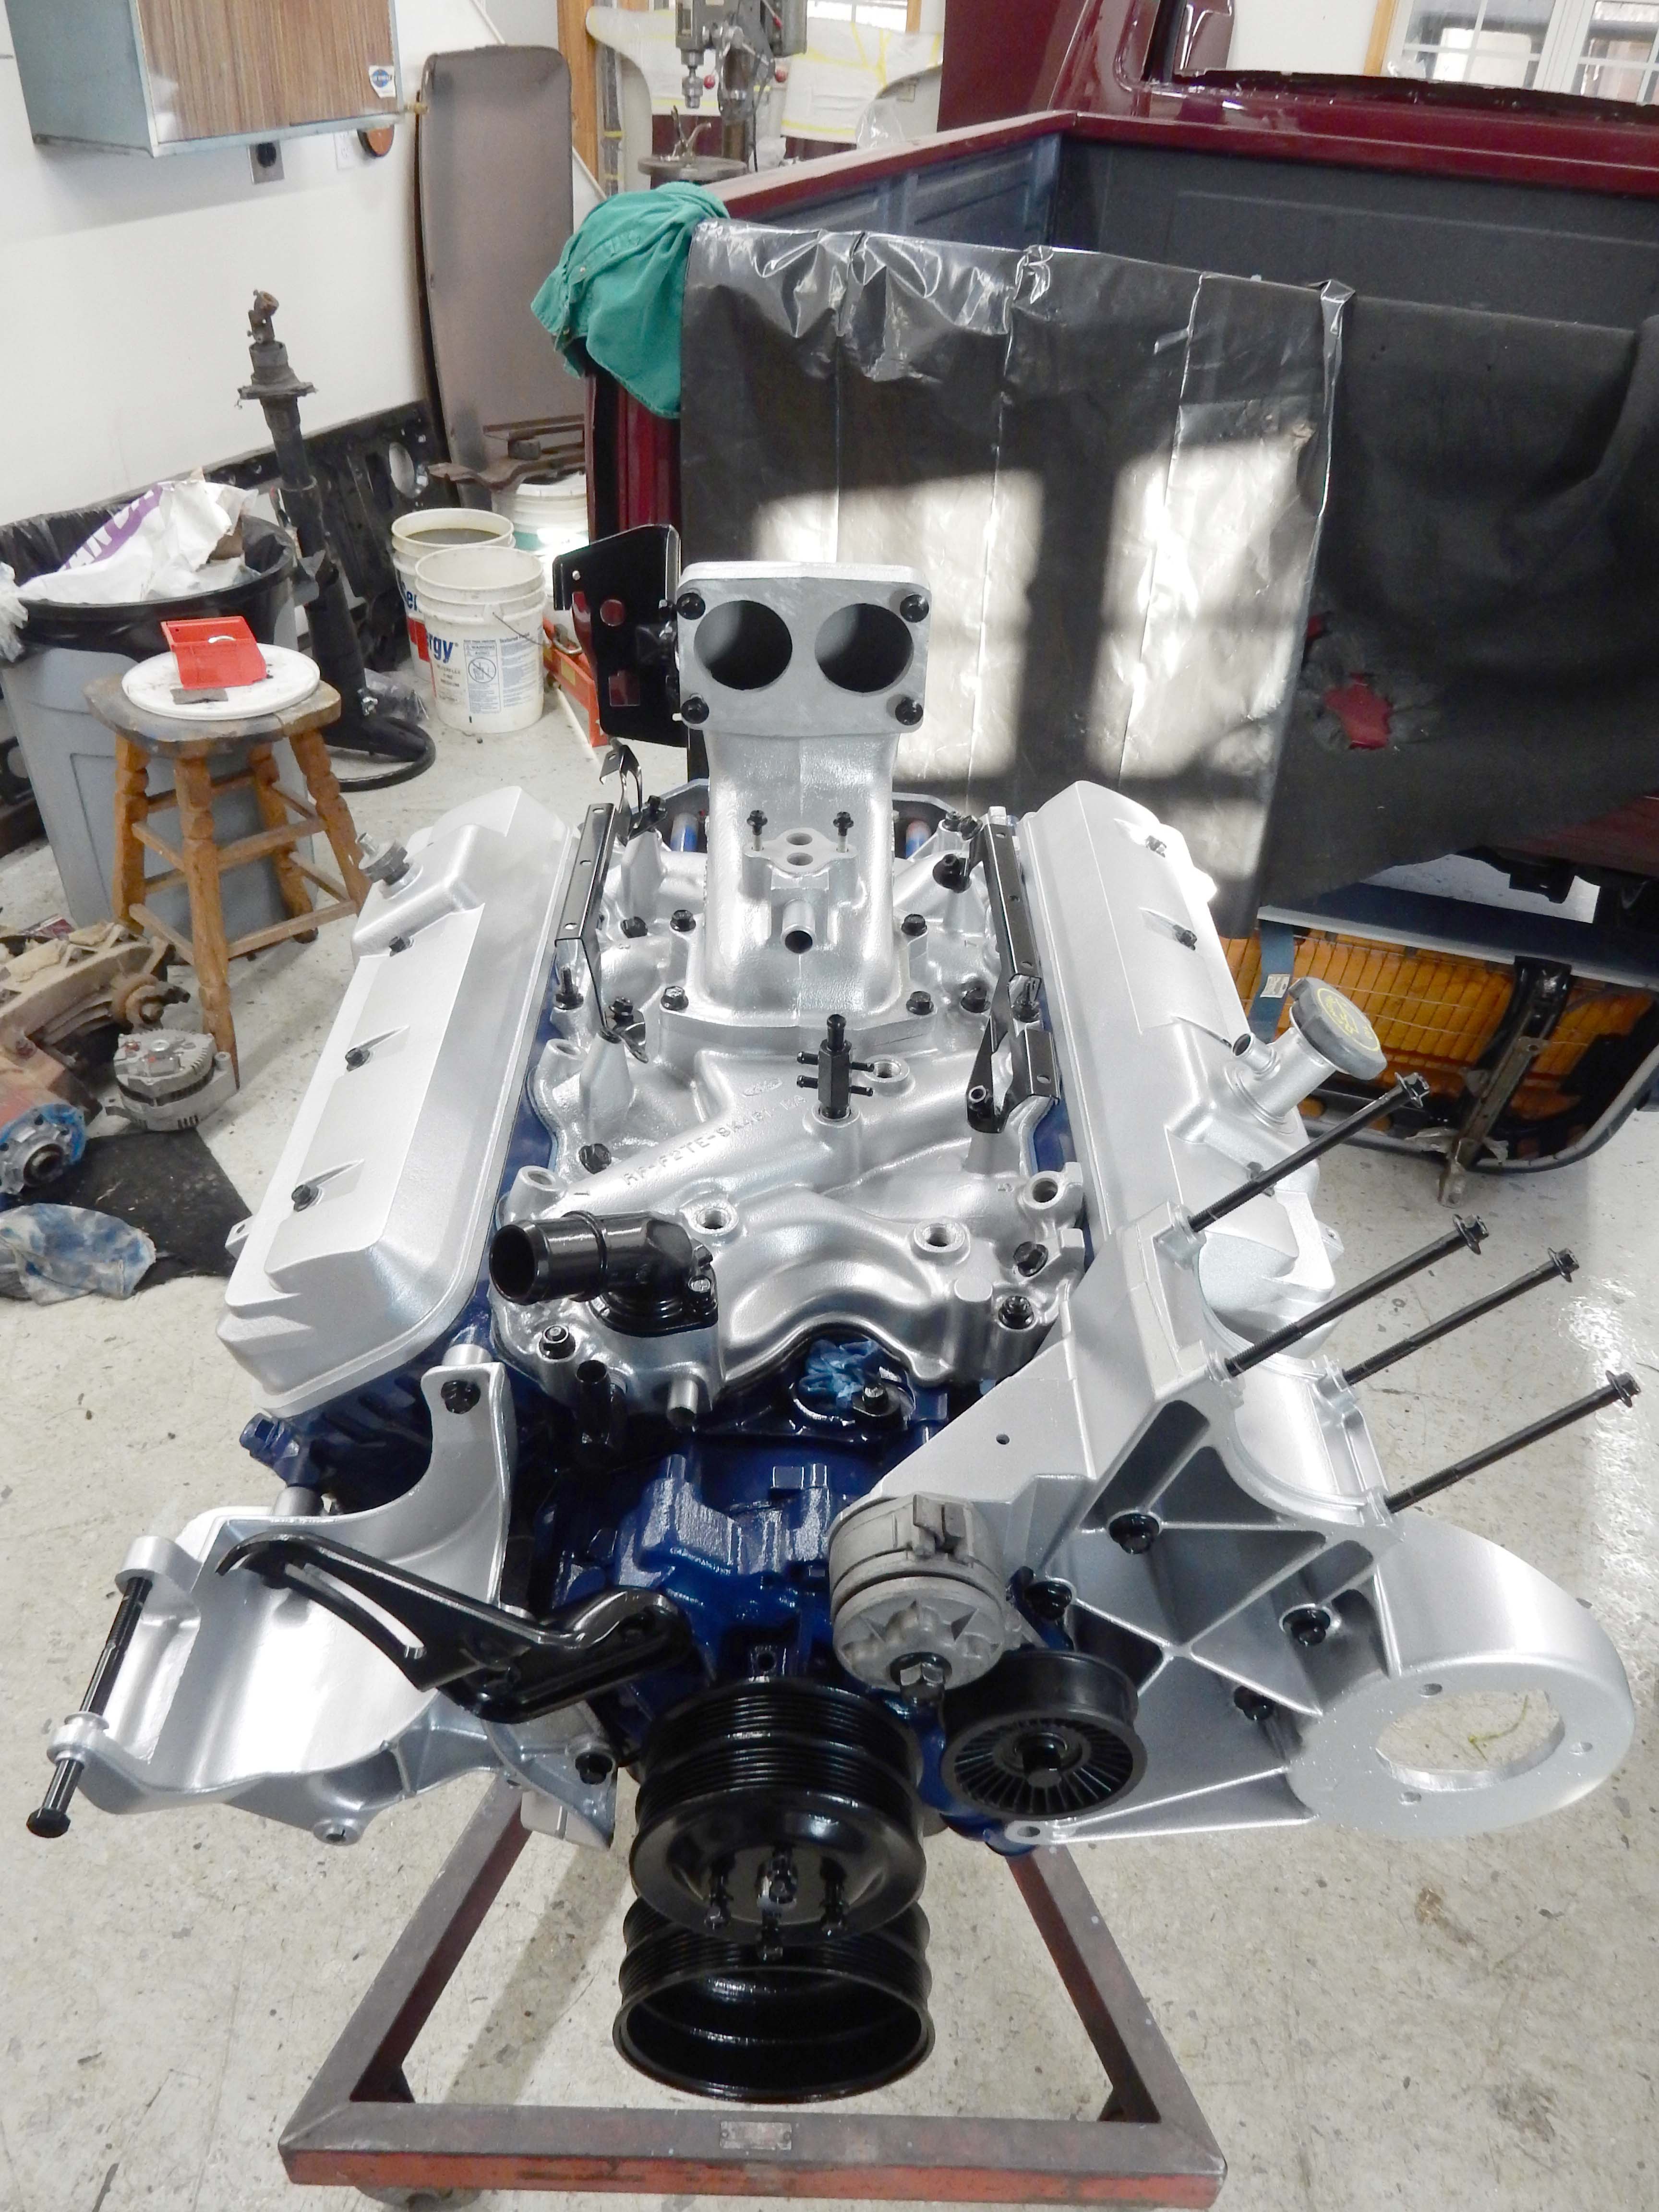
Gary, AKA "Gary fellow": Profile
Dad's: '81 F150 Ranger XLT 4x4: Down for restomod: Full-roller "stroked 351M" w/Trick Flow heads & intake, EEC-V SEFI/E4OD/3.50 gears w/Kevlar clutches
|
|
Administrator
|
Looooooking gooood!
Jim,
Lil'Red is a '87 F250 HD, 4.10's, 1356 4x4, Zf-5, 3G, PMGR, Saginaw PS, desmogged with a Holley 80508 and Performer intake. Too much other stuff to mention. |
|
Administrator
|
Thanks, Jim.
 Had a discussion about the PC'ing of parts with my brother today. He asked if I was creating another trailer queen like Dad's truck. I assured him that while the engine is going to be a jewel under the hood, I was just about done with the PC'ing. However, then I got to thinking about a few other things that need attention. One is the fuel rail. As we discussed in this thread, I have two fuel rails - one that takes a 3-screw regulator and one that takes a 2-screw regulator. Having re-read the posts there I guess I'll go with the 2-screw rail because that appears to be the latest design - which has screws accessible from the top instead of the bottom, and two o-rings instead of one. But that rail is the one that needs the most attention, so I'll have to blast and powder coat it. May try the new epoxy/finish coat trick in black. Oh yes, Jim - you've suggested tapping the ear of a 3G alternator, but I've forgotten what size. I've measured the hole and compared it to a 3/8 tap and I wouldn't get full threads. But, it looks like 10mm would work. Is that what you've suggested? After all, it was your alternator.
Gary, AKA "Gary fellow": Profile
Dad's: '81 F150 Ranger XLT 4x4: Down for restomod: Full-roller "stroked 351M" w/Trick Flow heads & intake, EEC-V SEFI/E4OD/3.50 gears w/Kevlar clutches
|
|
Administrator
|
3G's come either with a 8mm tapped hole or a clearance hole.
(Different Lester numbers) The 8mm can be tapped 3/8-16. The clearance hole needs a Helicoil to bring it to 3/8-16. At least that's what I've done in the past. I suppose you could use a 10mm flange head bolt because your alternator doesn't need to pivot. IIRC,10mm is .401", at least 10mm/40 caliber bullets are. IDK how well a 10x1.25 bolt would slide in my adjuster bracket/quadrant. One nice/interesting thing about metric fasteners. The tap drill size is always fastener minus thread pitch. So a 6x1 takes a 5mm drill and 10x1.25 would take an 8.75mm bit. WAY easier than letter and number bits for fractional fasteners.
Jim,
Lil'Red is a '87 F250 HD, 4.10's, 1356 4x4, Zf-5, 3G, PMGR, Saginaw PS, desmogged with a Holley 80508 and Performer intake. Too much other stuff to mention. |
| Edit this page |