Muminvaters F250 scale 1:13
|
Administrator
|
Man, that is a LOT of hours! But probably similar to what some of us put in for restorations or transformations on the full-sized vehicles. So it makes sense.
And the idea of a book on the results is a good one. In my case I use this forum to document what I've done, but a book that you can display at a show is good. 
Gary, AKA "Gary fellow": Profile
Dad's: '81 F150 Ranger XLT 4x4: Down for restomod: Full-roller "stroked 351M" w/Trick Flow heads & intake, EEC-V SEFI/E4OD/3.50 gears w/Kevlar clutches
|
|
to create a book is fine thing. Totally other stuff than a model of course. But I like to have it in my shelf. And in the case the pick up will be sold, I still have book with report.

_____________________________________________________
Winter winds take flight, circling over my grave. A haunting voice amidst the trees, rising up across the sea.... (Katatonia) _____________________________________________________ |
|
In reply to this post by muminvater
so, the electronics. My favorits - lol -
 All i know about electricity is that it exists. So you can imagine that it was hard work for me to create a circuit diagram All i know about electricity is that it exists. So you can imagine that it was hard work for me to create a circuit diagram  and the cabling. But in the end everything works and I am 5cm taller and the cabling. But in the end everything works and I am 5cm taller  assy group 32 / electrician equipmentthe purchased parts 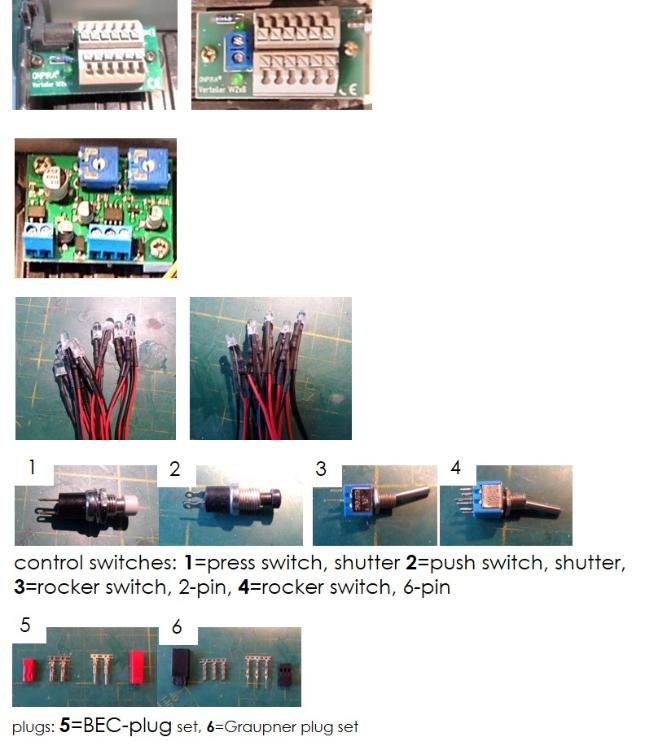 Power distributor with 6 connections. The left one with connection with the grid. The flashing electronics. The timing of light and pause can be adjusted on the two potentiometers. LEDs with 5mm and 3mm diameter. The color of the light is 3000K warm white. 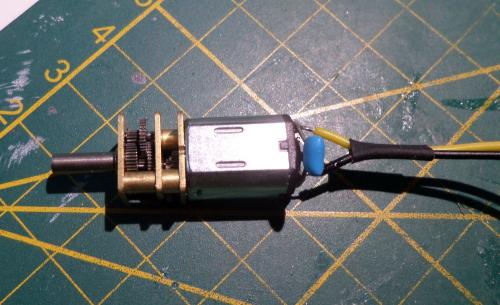 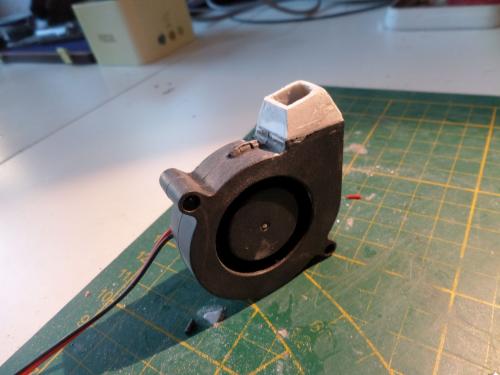 For the wiper a gear motor with 30Rpm. This is a Radial fan from PC area. good speed for a wiper. Unfortunately still big. 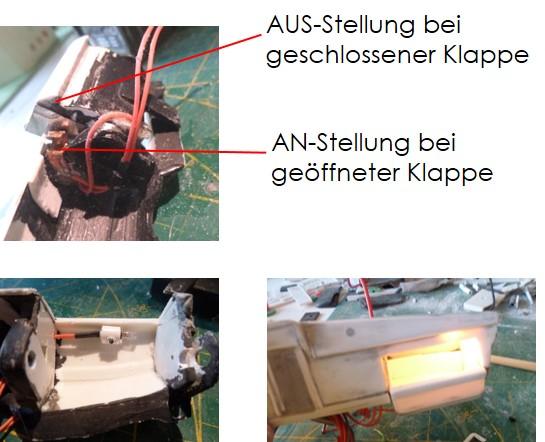 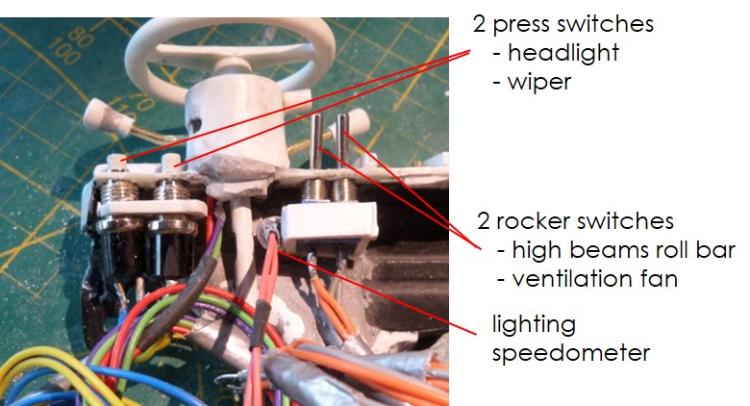 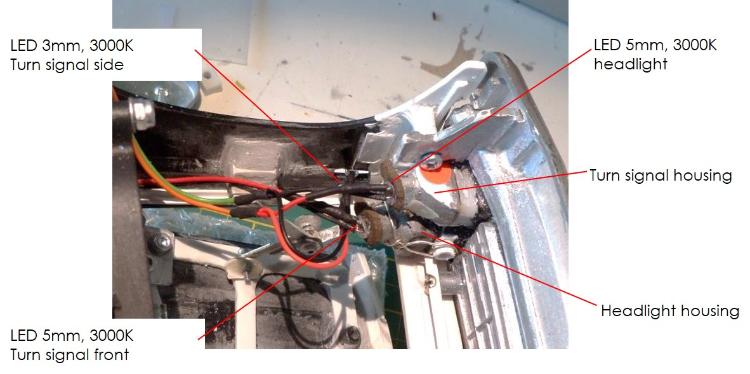 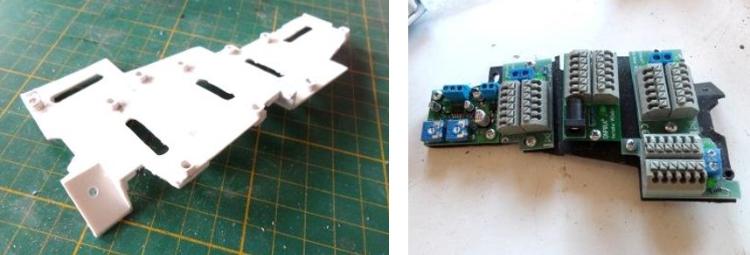 It was to decide: build up the engine compartment like the origin or should I use the space for electronic equipment? The first option entails to have separate box for the electronics outside of the car and in my opinion, that is bad option. 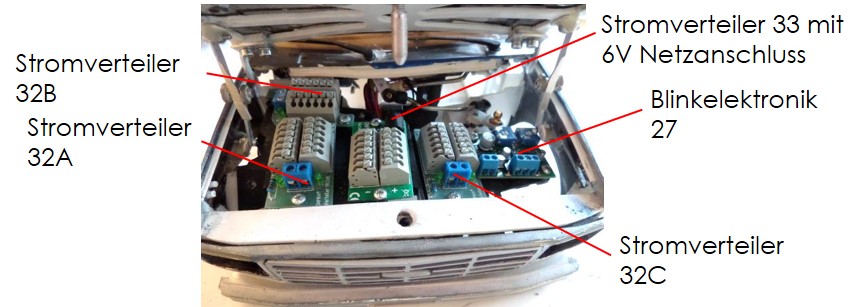 flashing electronics 27 : can be set exactly to the original flashing rhythm using the potentiometers. power distributer 32A: controlled by flashing electronics for turn signal left power distributer 32B: controlled by flashing electronics for turn signal right power distributer 32C: controlled by press switch1: set headlights, lighting of speedometer and glove box power distributer 33: controlled by press switch 2 wiper motor, by rocker switch 1 high beams, rocker switch 2 ventilation fan, push switch 1 for brake light 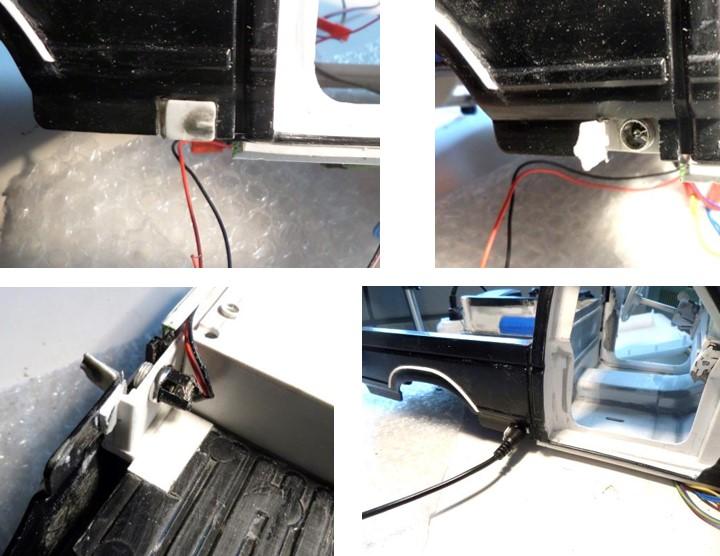 The 6V mains connection was placed behind a flap on the right-hand side of the car. If necessary, the power can then be easily connected. assy group 31 / sealingsI looked for different profiles from the window area. It should be a profil with a tube in best case, otherwise I would also take a lip-profile. 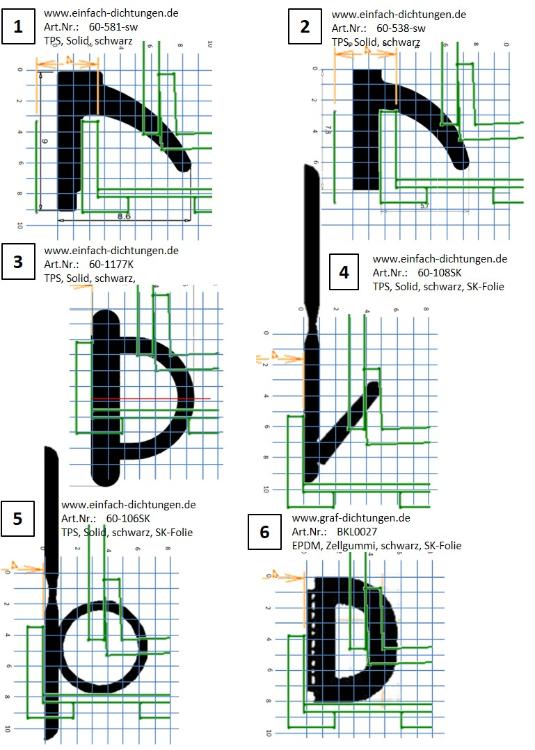 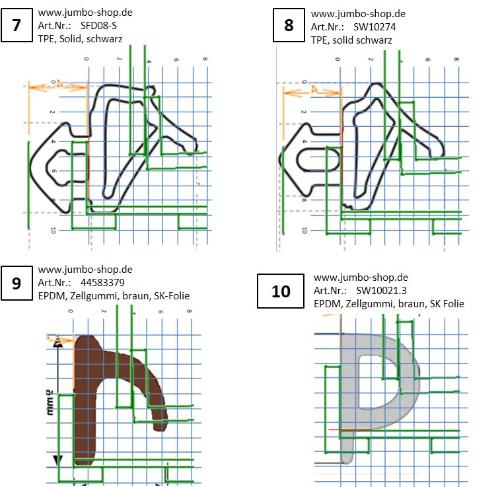 In the end none really fits well and I remember (dark and far away...) when I was still in job (it was in company for car sealings) I had already organized a piece out of waste that is good enough for my model and that suits well.  _________________________________________________________________________________  Now, there is only one assembly group to report left. the number 29, the steering is still in work and I report when it´s done. Also when further steps will be finished. see you here  Tobias Tobias
_____________________________________________________
Winter winds take flight, circling over my grave. A haunting voice amidst the trees, rising up across the sea.... (Katatonia) _____________________________________________________ |
Re: Muminvaters F250 scale 1:13
|
Very impressive Tobias!
Before beginning this kind of project, do you list all the assembly groups you're planning to proceed with? If so, I am curious about that groups list, how many of them do you need for a model that kind?
Jeff / 1984 F350 Crew Cab 4x4/5.8L w351 4V/ T18/ D50 4.10 front/ 8' bed.
Restored 2019-2022. Nicknamed «Big Brother 1984», due to its soooo-looong shape & nod to George Orwell's 1984 famous novel. |
|
Administrator
|
In reply to this post by muminvater
I think placing all of the electronics under the hood was a good idea. I don't know where else you could have put it, and there you can easily get to it.
 But that sure is a lot of connections! And a lot of LED's. 
Gary, AKA "Gary fellow": Profile
Dad's: '81 F150 Ranger XLT 4x4: Down for restomod: Full-roller "stroked 351M" w/Trick Flow heads & intake, EEC-V SEFI/E4OD/3.50 gears w/Kevlar clutches
|
|
In reply to this post by BigBrother-84
Hi Jeff, this project was running out all boundaries. It was planned as model of the body with all closures and some highlights and the purchased chassis (XC-CC01 from Tamiya) you see in the first post from me. However, the XC-CC01 chassic does not fit - it has another scale although they sell body and chassis as 1:10. But the body is 1:13 if you make the trouble and measure it. And so one thing leads to another. One day I realized, it will be better to have a part list and so it grows step by step. My projects do have a "headline". Two examples: one model stand under the headline: "can I combine these different materials and what happens?" There was a PE foil, ABS plastic, brass, cyanacrylat glue, aluminum-filler and aqua-paint. An interesting mix. Another was a HERPA car model. Do you know HERPA? It´s for the model railway H0 1:87 very tiny. The headline was: "is it possible to build a retractable top for this and when yes can I cover it with fabric?" And so the Ford pick up stands und the headline "is it in scale feasable (for me) and to witch conditions?" To your question how many groups I need: there are 32 assembly groups. Eventually you can add one for the colors. 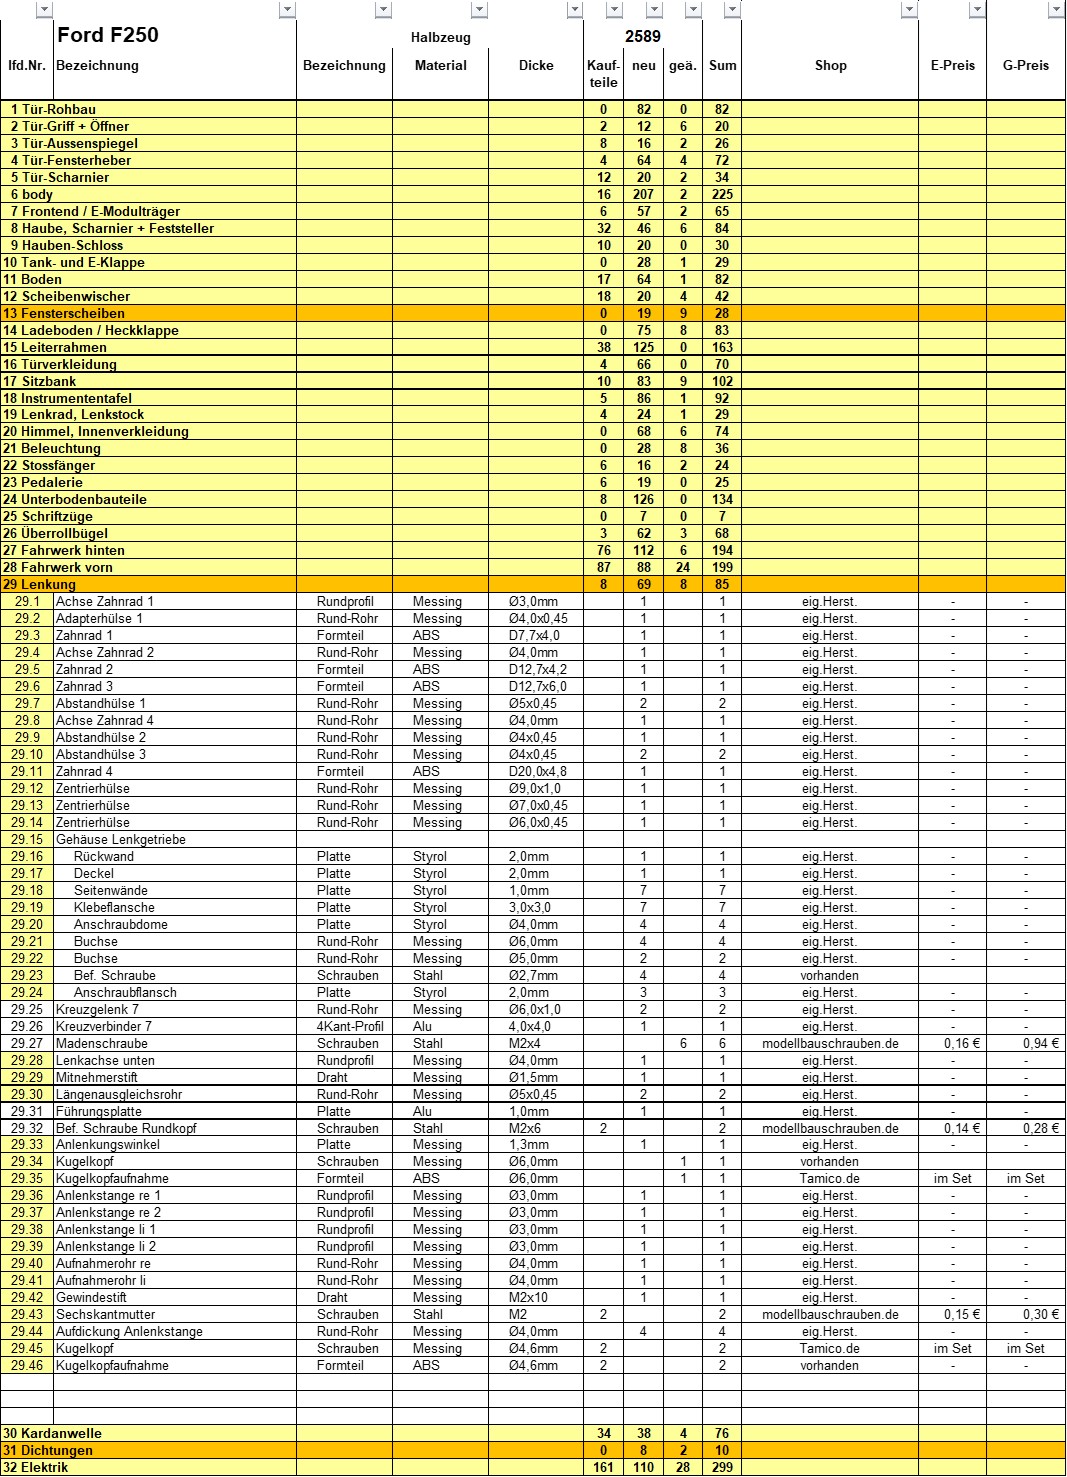 greetings,  Tobias Tobias
_____________________________________________________
Winter winds take flight, circling over my grave. A haunting voice amidst the trees, rising up across the sea.... (Katatonia) _____________________________________________________ |
|
In reply to this post by muminvater
Hello guys,
yeah - the steering is done! 
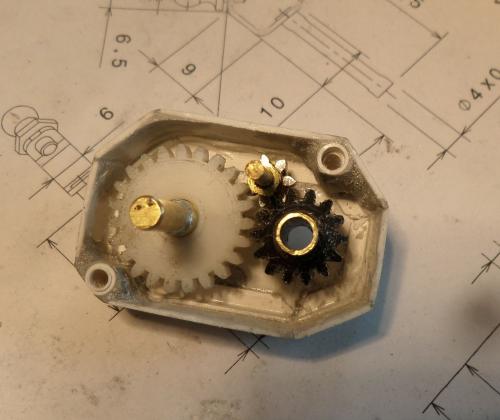
It was bit tricky, the devil was in the details. I started with the tie rods and the lower steering shaft. The steering tube can be pushed in to compensate the deflection of the body. 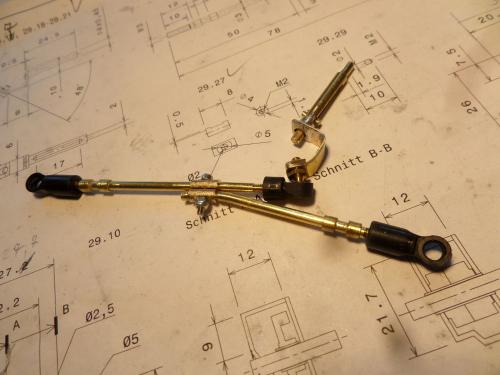 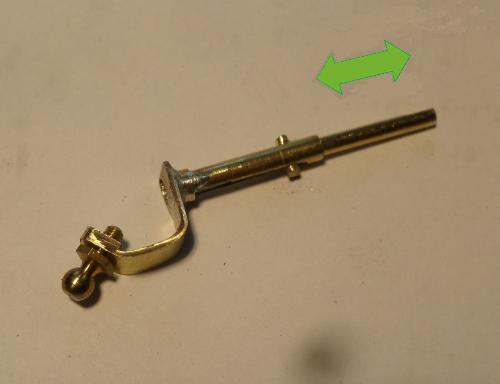 The steering gear box witch should have a scaling faktor from 1:3. More was not possible, the box would become too big. And it must have 3 gears, 2 for the scaling, 1 for change in direction. After all I thought, if the steering wheel is turned left, the steering shaft must turn left too 
 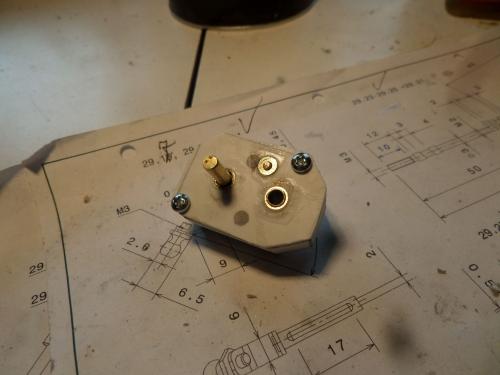 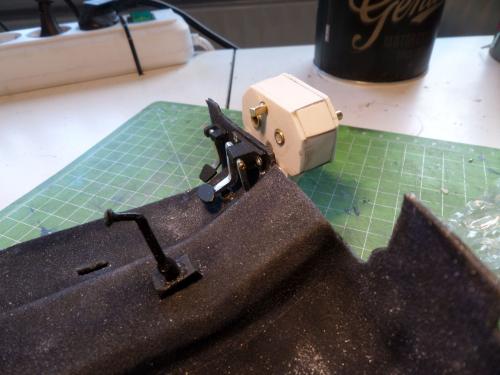 The gear box is screwed to the floor after it´s fastening to the upper steering shaft. So far so good  and then everything got out of hands... and then everything got out of hands...
1. the steering wheel broke into pieces 2. the gear box has an gear too many 3. the cardan joint did not work correct 4. the fastening of Allen screw on flat shaft did not work  This is always a good time for a break and an extra coffee... 1. The steering wheel was soft and weak plastic part and when turn it with your fingers through the open door you need some energy. So I have build it up out of brass. 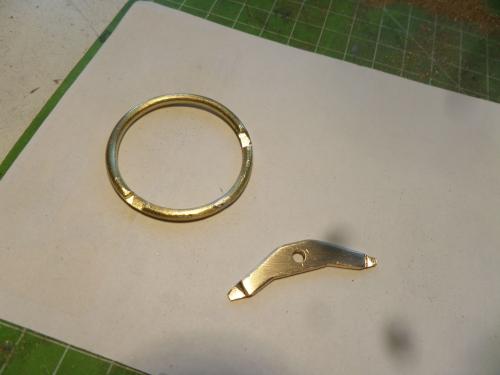  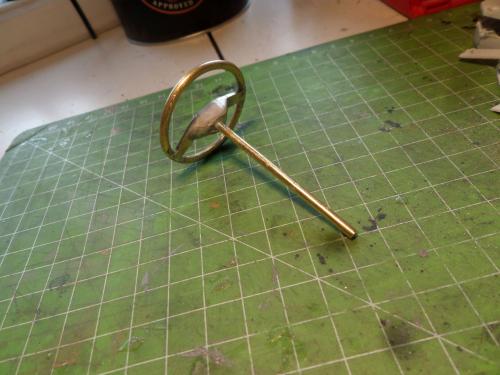
2. The gear box... I had thought and thought but not thought through to the end. If the hook at the end of the lower steering shaft swings to the right, the car turns left. So the 3rd gear is useless. That means the box can be built smaller. 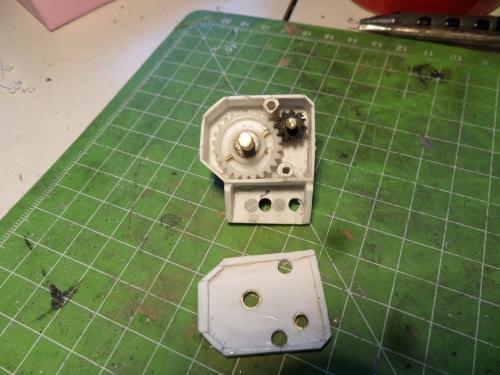 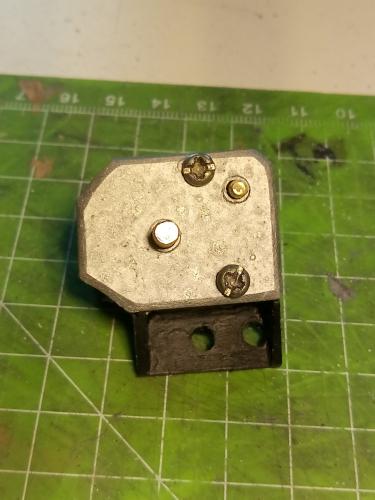 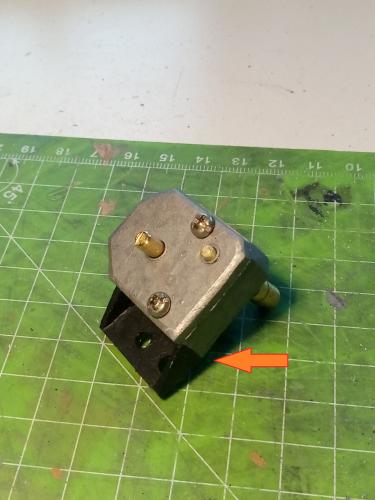 The bracket for gear box is bent about 10° (arrow). So it isn´t necessary to use a cardan joint to the upper steering shaft. 3. The cardan joint needed some special screws and threrefor some special cut outs. 4. The Allen screw attachments on the flattened shaft didn´t work right. It had to be screwed a little way into the shaft so that it could be guaranteed to be carried along. 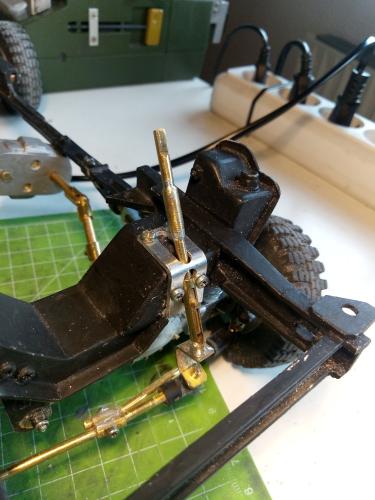 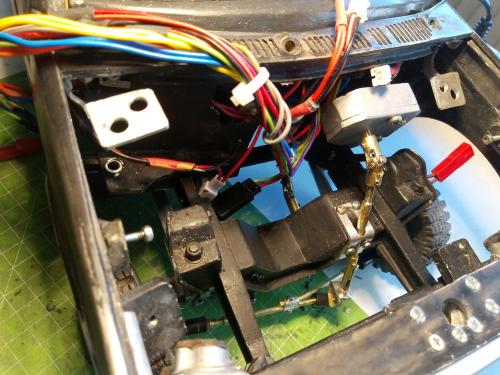 So that the steering can work, a guide must be installed. The elongated holes must be very close to the steering shaft. 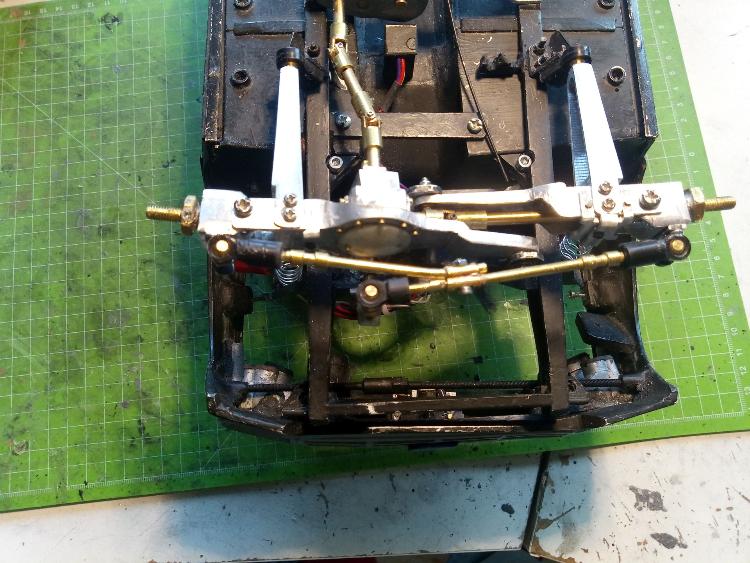 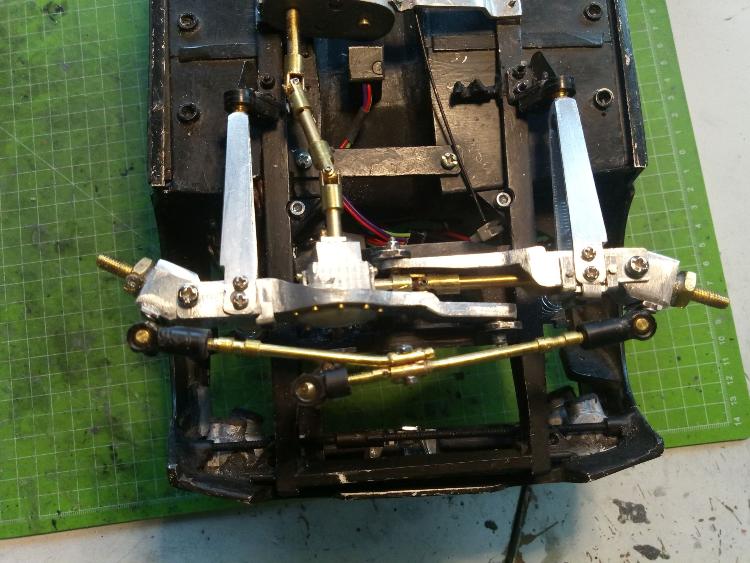 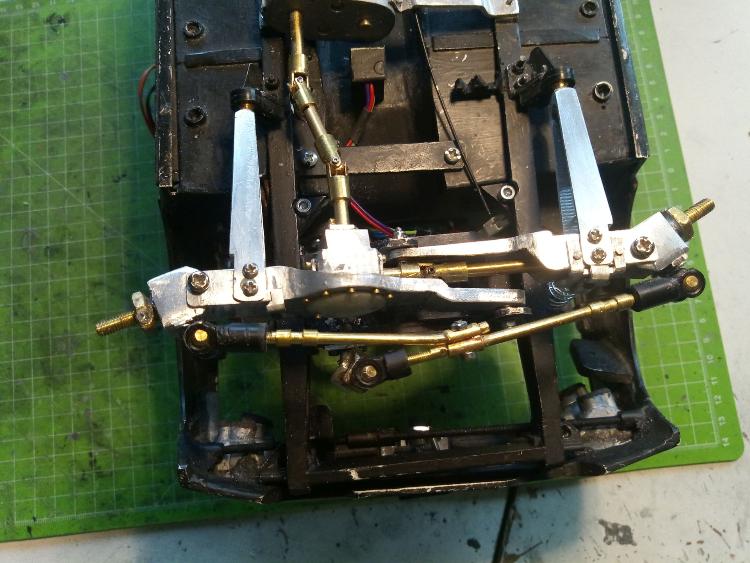 neutral position for driving straight ahead max left steering angle max right steering angle You can also see the angle-difference of the inner wheel to outer wheel. Obviously the implementation of the steering harness was sucsessfull  At the end, it works. Greetings,  Tobias Tobias
_____________________________________________________
Winter winds take flight, circling over my grave. A haunting voice amidst the trees, rising up across the sea.... (Katatonia) _____________________________________________________ |
|
Administrator
|
I'm still gobsmacked!
 So, did you rebuild the steering box? I think I missed that. Either way, it is impressive! And that steering wheel is awesome. It is obvious that it is for a Bullnose. 
Gary, AKA "Gary fellow": Profile
Dad's: '81 F150 Ranger XLT 4x4: Down for restomod: Full-roller "stroked 351M" w/Trick Flow heads & intake, EEC-V SEFI/E4OD/3.50 gears w/Kevlar clutches
|
Re: Muminvaters F250 scale 1:13
|
Simply amazing, Tobias!
And I LOVE the telescopic steering shaft! 
Jeff / 1984 F350 Crew Cab 4x4/5.8L w351 4V/ T18/ D50 4.10 front/ 8' bed.
Restored 2019-2022. Nicknamed «Big Brother 1984», due to its soooo-looong shape & nod to George Orwell's 1984 famous novel. |
|
In reply to this post by Gary Lewis
Hi Gary,
no, you did not miss something  I reported it only in that one post that there was first a 3 gear box that then had been modified. Tomorrow, I start the automatic transmission box. have a nice day... greetings  Tobias Tobias
_____________________________________________________
Winter winds take flight, circling over my grave. A haunting voice amidst the trees, rising up across the sea.... (Katatonia) _____________________________________________________ |
|
In reply to this post by muminvater
moin moin,
as announced: the transmission. In this case very simple - it is only a dummy. 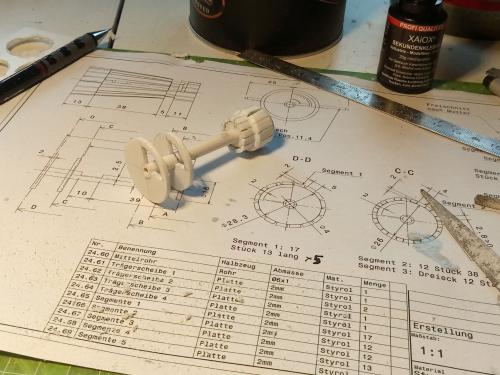 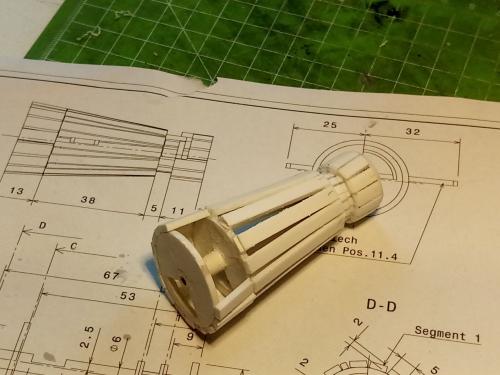 A spine with 5 discs and a lot of segments for the covering. The cut outs in ths discs are prepared for the cable of the hazard lights switch witch is positioned directly under the rear end of the transmission. 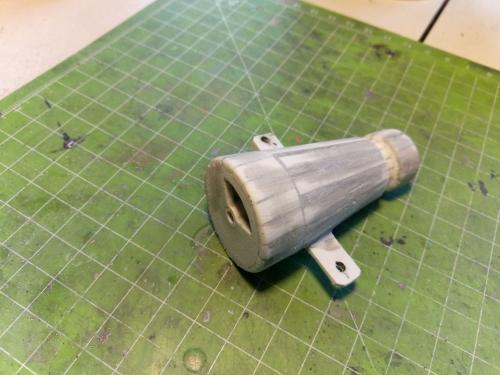 The gaps were filled with my Aluminum filler and sanded while positioned in a cordless screwdriver.  I didn't fill and sand much, it shouldn't be too smooth, also the paintwork was just "nudged". I didn't fill and sand much, it shouldn't be too smooth, also the paintwork was just "nudged".
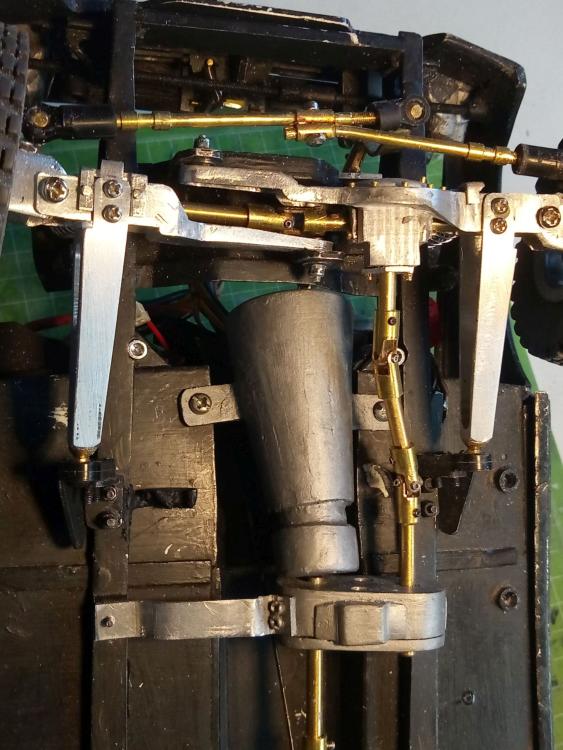
It is always the same! You only see the errors when it's finished  The groove is not parallel... Why couldn´t I see this before painting??? The groove is not parallel... Why couldn´t I see this before painting???
However, a lot of the days will follow with the chance to correct. I stay optimistic... Geetings,  Tobias Tobias
_____________________________________________________
Winter winds take flight, circling over my grave. A haunting voice amidst the trees, rising up across the sea.... (Katatonia) _____________________________________________________ |
|
Administrator
|
I know it is easier than all the other stuff, but it is still impressive - even with the groove not being parallel.

Gary, AKA "Gary fellow": Profile
Dad's: '81 F150 Ranger XLT 4x4: Down for restomod: Full-roller "stroked 351M" w/Trick Flow heads & intake, EEC-V SEFI/E4OD/3.50 gears w/Kevlar clutches
|
|
Hello to you, for to complete the front brakes I need some informations from you.
- where are the connections on the caliper for the brake line? on the top, bottom, side upper or lower? - how is the course of the brake line starting from the caliper? I guess it must go to the middle of the car because of the rotation axis of the twin beams but I´m not sure if it is done so. Some pics were great. Greetings,  Tobias Tobias
_____________________________________________________
Winter winds take flight, circling over my grave. A haunting voice amidst the trees, rising up across the sea.... (Katatonia) _____________________________________________________ |
|
Administrator
|
Connection at the top.
Bleeder at the top. The brake hose goes to a clip at the frame rail (inboard of the caliper) and metal tube goes from there to the brake proportioning valve/safety switch. 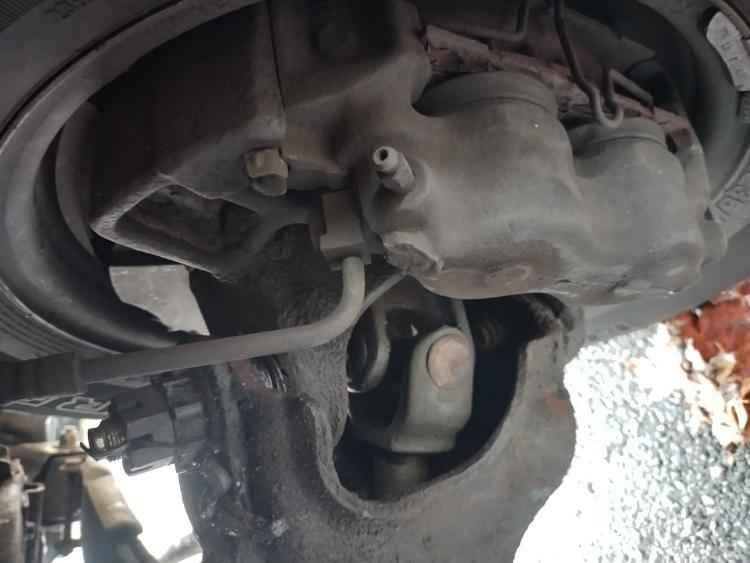 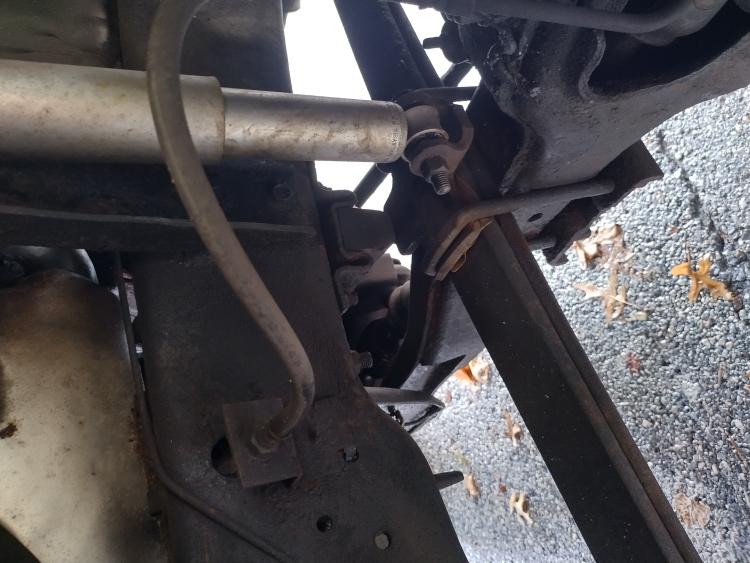
Jim,
Lil'Red is a '87 F250 HD, 4.10's, 1356 4x4, Zf-5, 3G, PMGR, Saginaw PS, desmogged with a Holley 80508 and Performer intake. Too much other stuff to mention. |
|
Hi Jim,
thanks for the turbo answer!! 
_____________________________________________________
Winter winds take flight, circling over my grave. A haunting voice amidst the trees, rising up across the sea.... (Katatonia) _____________________________________________________ |
|
Administrator
|
I'm sorry my pictures are sideways.
I just wanted to edit in some visual reference.  
Jim,
Lil'Red is a '87 F250 HD, 4.10's, 1356 4x4, Zf-5, 3G, PMGR, Saginaw PS, desmogged with a Holley 80508 and Performer intake. Too much other stuff to mention. |
|
lol, don´t worry, I just noticed it
 and will not built it up in 90° twisted way... although - who knows? and will not built it up in 90° twisted way... although - who knows?
_____________________________________________________
Winter winds take flight, circling over my grave. A haunting voice amidst the trees, rising up across the sea.... (Katatonia) _____________________________________________________ |
|
In reply to this post by muminvater
so, it is done...
 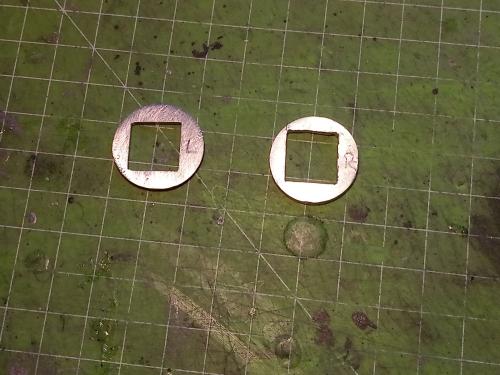 As I said, the front brake discs had to be redone due to the modified linkages.I decided to use aluminium, copper and brass instead of styrene. There is still no space in the width, so the brake disc has to sit on the linkage and for this it has the square cut-out. 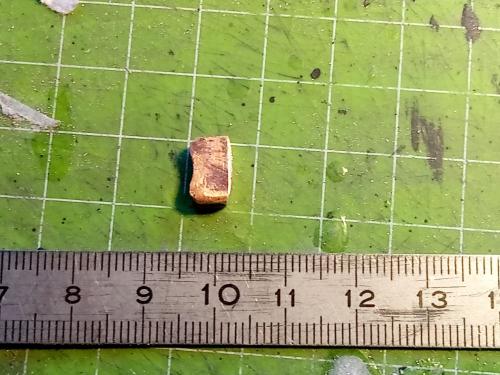 The brake caliper is soldered together from copper. 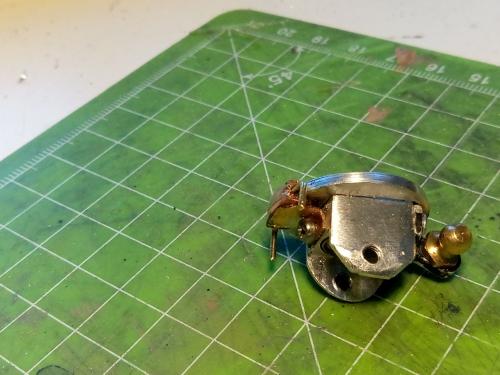 An L-bracket is soldered to the back of the brake caliper as a bracket and the brake disc is glued to the brake caliper. 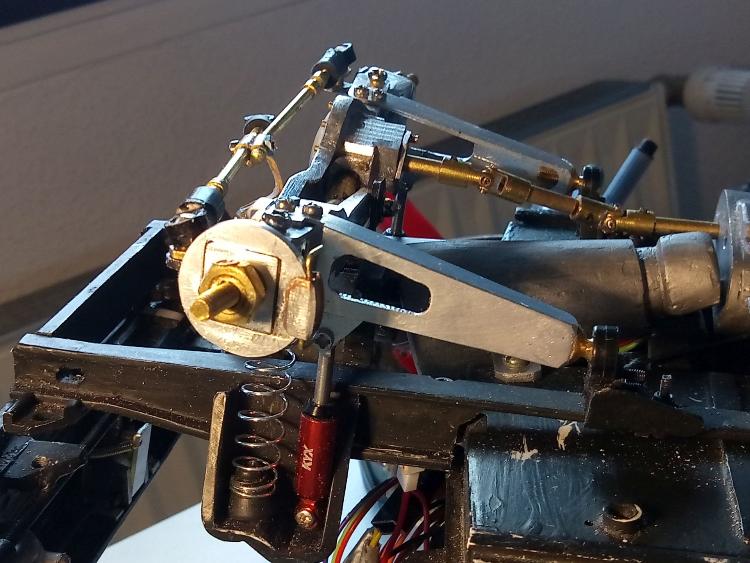 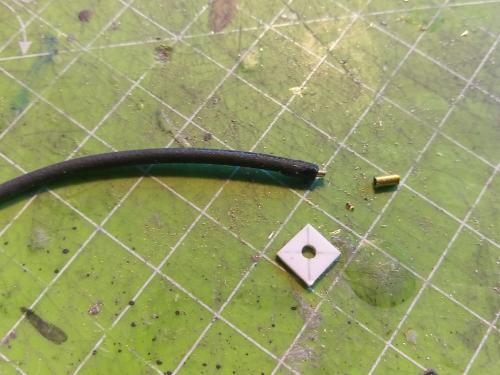 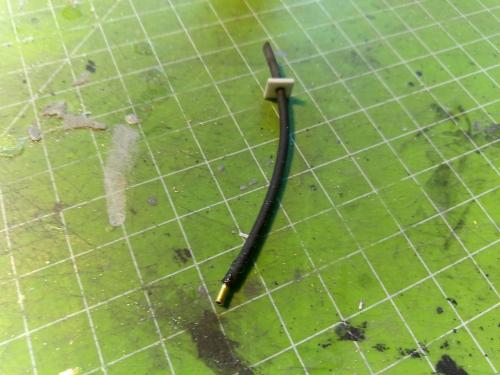 The single parts of the brake hose: hose with brass connection already installed, pipe collar for connection to the brake caliper and the cover or lead-through plate on the chassis frame. 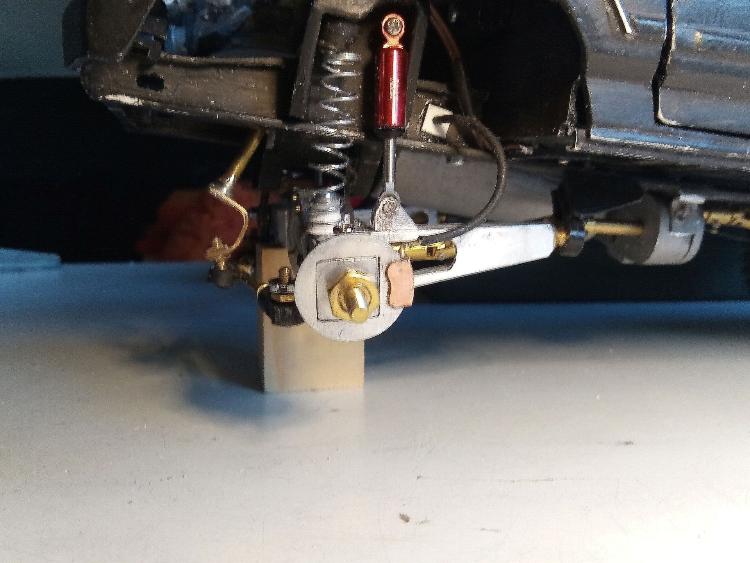 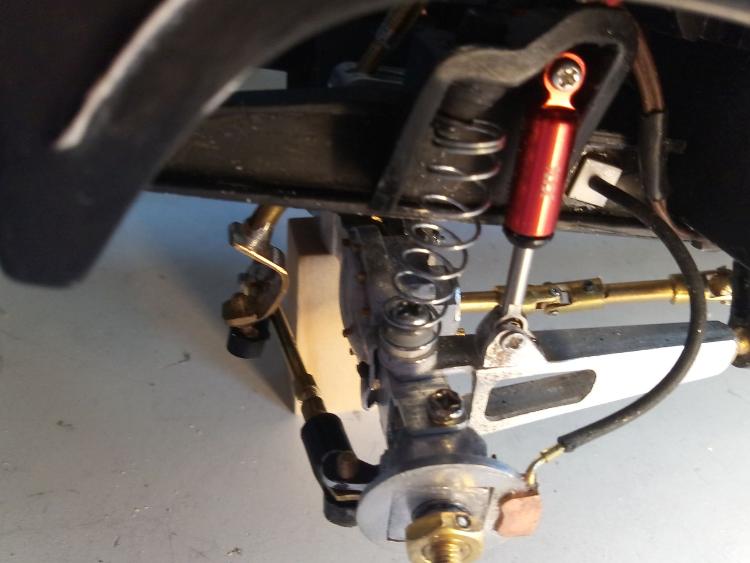 wish you a pleasant weekend  Tobias Tobias
_____________________________________________________
Winter winds take flight, circling over my grave. A haunting voice amidst the trees, rising up across the sea.... (Katatonia) _____________________________________________________ |
|
Administrator
|
I know I say WOW about every time you post, Tobias, but I don't know what else to say. It is just amazing how much intricate detail there is in that thing. WOW!

Gary, AKA "Gary fellow": Profile
Dad's: '81 F150 Ranger XLT 4x4: Down for restomod: Full-roller "stroked 351M" w/Trick Flow heads & intake, EEC-V SEFI/E4OD/3.50 gears w/Kevlar clutches
|
|
Administrator
|
In reply to this post by muminvater
Very nice attention to detail!
Your modeling skills are amazing, Tobias 
Jim,
Lil'Red is a '87 F250 HD, 4.10's, 1356 4x4, Zf-5, 3G, PMGR, Saginaw PS, desmogged with a Holley 80508 and Performer intake. Too much other stuff to mention. |
| Edit this page |

