Help On 3G Page
|
Administrator
|
Looking at the evtm and looking at the harness, that is accurate. What isn't accurate is in the 86 they show the splice locations and they have S101, 102, and 103 "Near fuel tank selector switch Taped Over".
 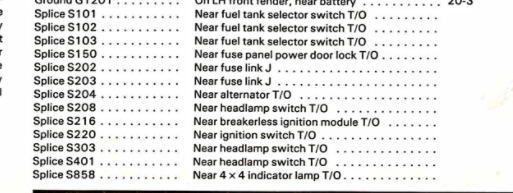 I do like the single page view but agree that it isn't needed for the measurements based on what we know so far.
Scott
'Camano' 1986 F250 Supercab XLT Lariat 460/C6 'Chanute' 1980 F350 C&C 400/NP 435 - Gin Pole But there ain't nothin' wrong with the radio |
|
In reply to this post by ArdWrknTrk
Just came across this post and thats what I was looking at, it looks like one can simply unplug C610 toss it and then make two connections at the cab side of C610 for the key hot and the main power wire which is where the shunt was originally at. That is what I am thinking of doing on my truck after seeing this post. Just need to see if one can buy the C610 connector as sure one could use regular spades I personally rather use a connector that I can put the spades into and have a more secure OE looking connection. I know my Ammeter doesnt currently work anyways so for me I will just toss all the wiring in a box to put up in storage from the alternator to the regulator and make my two wire hook up and then run a single new dedicated charge wire for my 3G. Then one day I hope to get the retro series of Dakota Digital dash cluster and I can wire in under the hood for the volt gauge.
"Old Blue" - '56 Fairlane Town Sedan - 292-4V, Ford-O-Matic transmission, 3.22:1
'63 Belair 2dr sdn - 283-4V, Powerglide transmission, 4.56:1 '78 Cougar XR7 - 351-2V, FMX transmission, 2.75:1 9inch "Bruno" - '82 F150 Flareside - 302-2V, C6 transmission, 2.75:1 9inch, 31x10.50-15 BFG KO2 |
|
In reply to this post by ArdWrknTrk
Correct, thats why if I convert my ammeter to a volt gauge if Dakota Digital doesnt release the Retro cluster I will be using a relay in my auxiliary box that will be key hot triggered to switch the volt gauge on feeding it power directly from the battery. I dont care how low the voltage is in the cab I care about what my alternator is putting out to the battery. For now I will drive the truck without a amp gauge/volt gauge Ive been driving it years with a non functional amp gauge and never had a problem so I should be fine till I get everything converted over one way or another.
"Old Blue" - '56 Fairlane Town Sedan - 292-4V, Ford-O-Matic transmission, 3.22:1
'63 Belair 2dr sdn - 283-4V, Powerglide transmission, 4.56:1 '78 Cougar XR7 - 351-2V, FMX transmission, 2.75:1 9inch "Bruno" - '82 F150 Flareside - 302-2V, C6 transmission, 2.75:1 9inch, 31x10.50-15 BFG KO2 |
|
Administrator
|
In reply to this post by Rusty_S85
Rusty & Jim - I'm sorry, but I'm dense. I don't see the reason for leaving half of C610. Either take both sides or leave both sides of the connector. But why leave half of it?
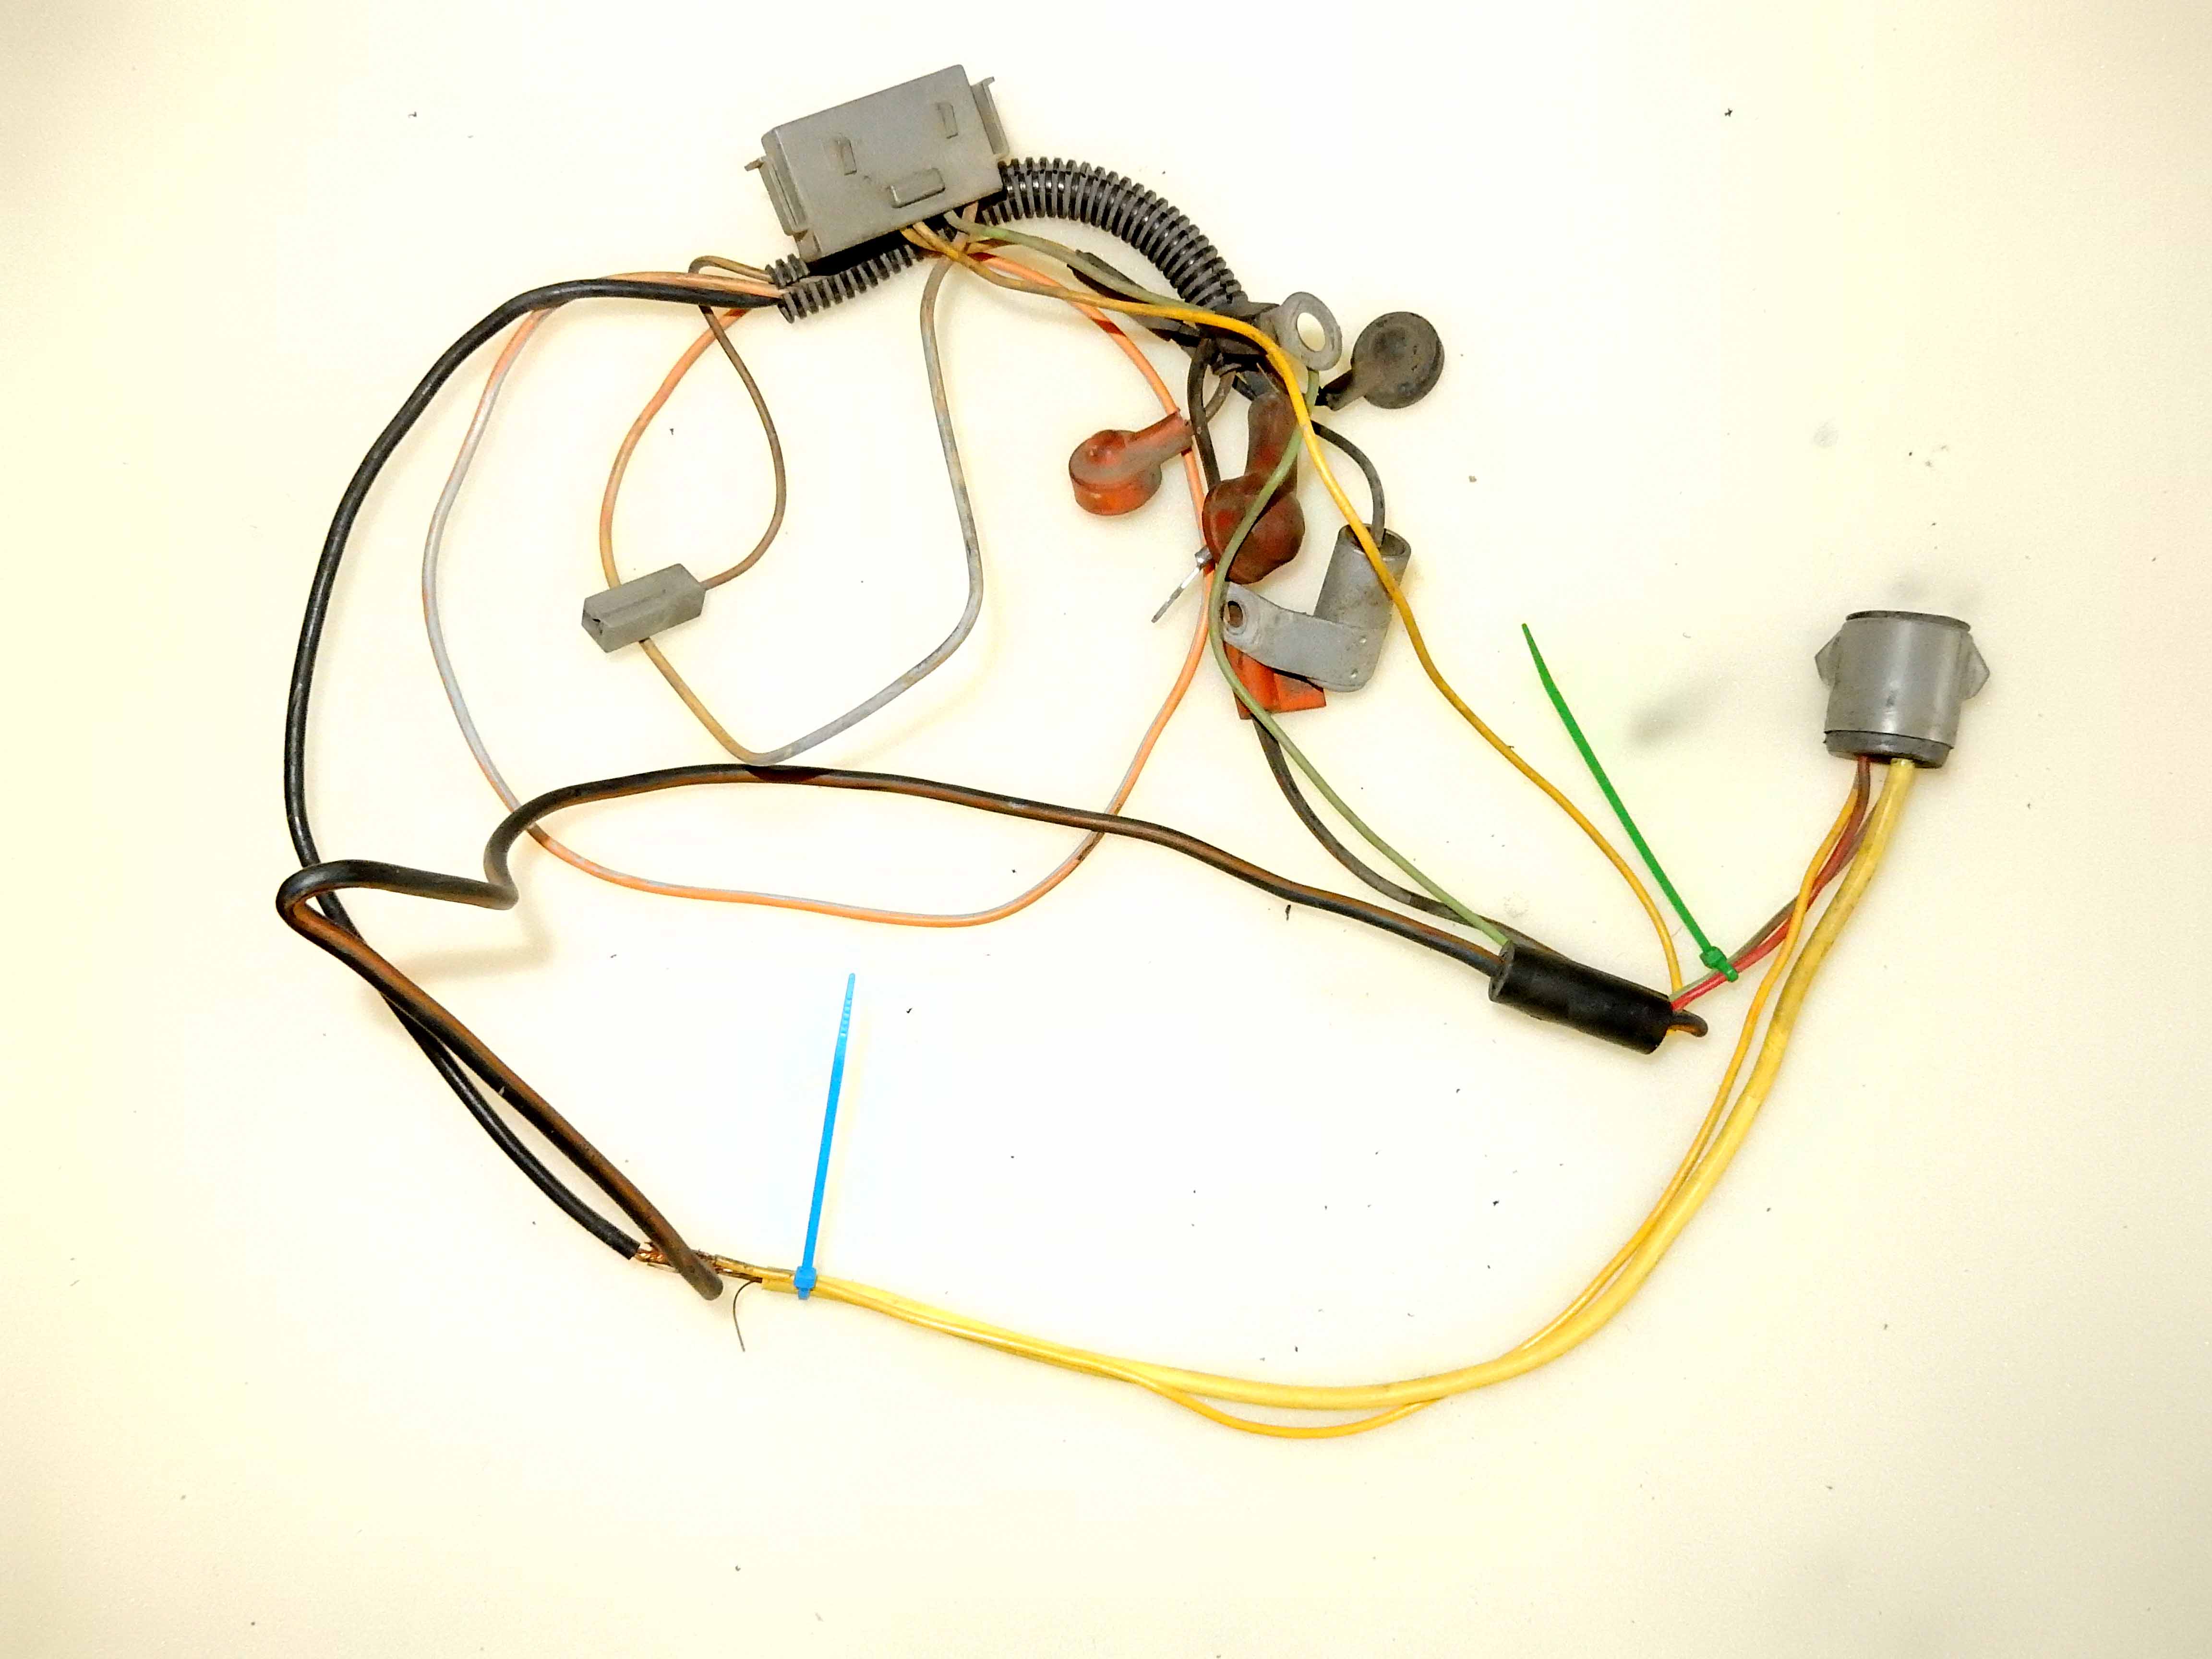
 I think we should recommend leaving both sides, but cut the alternator side wires as shown in the pic below. That let's you go back to a 1G or 2G alternator if you decide to do so for some reason in the future. And it lets you do your soldering on the bench instead of in the truck. Here's where I'd cut: Green Zip Tie: Cut the R/O and Y/LG wires that go to the ammeter at the green zip tie. If you want a voltmeter then tie your relay in there. If you want to measure voltage at the ignition switch, like Scott did, use the LG/R wire to one of the wires and ground the other one.Blue Zip Tie: Cut the big Yellow wire and the Y/LG wires where the blue zip tie is. That gives you as much of each wire as possible, and maybe they'll be long enough to go to the megafuse and 3G harness, respectively, without splicing in.Again, I am dense so please 'splain to me why it seems you are saying to keep half of C610. Did I misunderstand? 
Gary, AKA "Gary fellow": Profile
Dad's: '81 F150 Ranger XLT 4x4: Down for restomod: Full-roller "stroked 351M" w/Trick Flow heads & intake, EEC-V SEFI/E4OD/3.50 gears w/Kevlar clutches
|
What I am thinking of is sourcing another C610 connector if I could source one since I dont want to cut my original. This way I can splice in for my key hot excite wire for the alternator and for the battery hot wire that provides power to the interior of the truck and thus everything else after the key. One could simply just use spade terminals but I have seen them come loose way too often on jobs at work and I personally would prefer to have a actual connector. So my options would be to cut the harness I have, source the pig tail and make my own harness, or chop the truck side of C610 and make a new weather lock connector. From the looks of the wiring diagram the truck side of C610 provides power to your headlight switch as well as what appears to be the rest of the truck. You also have coming through C610 they key hot excite wire to activate the charging process of the alternator through the voltage regulator. So unplug C610 which will disconnect all of this, make a connection at C610 for the yellow wire which provides power to the cab of the truck and thus the rest of the truck through the ignition switch and run it to the battery removing the shunt. The yellow light green wire and red and orage wire in the C610 for the ammeter would be left unconnected leaving the ammeter dead on the inside. Then the light green and red excite wire for the alternator through the C610 connector needs to be connected to the excite wire on the regulator of the 3G alternator to activate it to make it charge. The sense wire on the 3G can simply be looped back to the battery lug on the alternator. Basically you will only need two wires out of C610 which is the yellow wire for battery hot to the inside of the cab and the key hot excite wire to the regulator. The rest is a bunch of wires for the shunt, the charge wire, and regulator wires. You could simply cut the wire but honestly it would be easier to just simply unplug the C610 connector and make your connections at this connector, either through a pigtail like I personally would prefer or through bulk wire with crimped on spade terminals to plug into the OE connector. Im actually putting a saved search for that harness to hopefully find a NOS one as I dont want to cut up my original harness for the pig tail and the wire to make my connections. For those that want to go the same route the numbers are as follows E0TZ-14305-D : 40-60A alternator w/ammeter and oil pressure gauge E0TZ-14305-H : 70-90A alternator w/ammeter and oil pressure gauge Id take either one as I am going to chop most of the wire out of it just for the pigtail itself.
"Old Blue" - '56 Fairlane Town Sedan - 292-4V, Ford-O-Matic transmission, 3.22:1
'63 Belair 2dr sdn - 283-4V, Powerglide transmission, 4.56:1 '78 Cougar XR7 - 351-2V, FMX transmission, 2.75:1 9inch "Bruno" - '82 F150 Flareside - 302-2V, C6 transmission, 2.75:1 9inch, 31x10.50-15 BFG KO2 |
|
Administrator
|
In reply to this post by Gary Lewis
Sorry guys. I forgot the pic.  Here 'tis: Here 'tis:
Gary, AKA "Gary fellow": Profile
Dad's: '81 F150 Ranger XLT 4x4: Down for restomod: Full-roller "stroked 351M" w/Trick Flow heads & intake, EEC-V SEFI/E4OD/3.50 gears w/Kevlar clutches
|
|
Administrator
|
John - As I'm looking at the 2G wiring for you I need to know if you are keeping the shunt or replacing it and where you want to monitor voltage.
There's no problem keeping the shunt if you aren't adding high-current devices in the cab. The shunt is a smaller wire than the rest of the harness and there's a small voltage drop across it, which is what the ammeter measures. So leaving the shunt means your lights won't be quite as bright nor your blower run quite as fast as they would if it was removed, but I doubt you'll see/hear/feel the difference. And if you have a headlight relay then there will be no difference for the headlights with or without the shunt. And you said you are getting a voltmeter. Do you want to monitor battery voltage or voltage in the cab? Monitoring battery voltage will require a relay but will give a better picture of the alternator's output. Cab voltage will be easier as you can use the LG/R wire coming from the ignition switch and not have to have a relay. But the voltage will change some as you bring on more electrical load in the cab due to loss in the wiring (including the shunt if you keep it), connectors, and ignition switch. I'll eventually do schematics for all of the variations, but I'd like to start with whatever scenario you are planning to use.
Gary, AKA "Gary fellow": Profile
Dad's: '81 F150 Ranger XLT 4x4: Down for restomod: Full-roller "stroked 351M" w/Trick Flow heads & intake, EEC-V SEFI/E4OD/3.50 gears w/Kevlar clutches
|
|
Administrator
|
Honestly, I'm not sure what route I want to go here. Recall I do have that electric choke and I believe a built in relay somewhere in that circuitry??? I need to study that. Admittedly, electrical is my weakness. Frankly, don't foresee me adding anything else into the electrical of my Truck. I had considered an Amp for my stereo, but the more I think about it, don't think I will. I do have the headlight relay. I think I like the idea of monitoring the battery voltage over cab voltage though. Think I'll throw it out there to the gang.....which route would you gents go? Jim, Gary....Thanks!!!
John
"Blackie" - 1986 F150 4x4 - Mildly warmed over 351W HO - Original owner |
|
Administrator
|
You should have the relay shown below. and should be able to tap into either the Gy/Wh wire or the W/Bk wire somewhere around C233A, as shown by the red oval. That will make it easy, and because there's not much else on the circuit should make it a reasonable representation of battery voltage. That's what I'd do.
And I'm glad you brought it up as I'd forgotten the HO choke relay, even though Jim has reminded me several times.  Also, there's the question of the shunt. If you have a headlight relay the only other major consumer of power is the blower motor. So you could easily leave the shunt in place and you might have a slight drop in speed on the blower motor, but it would be slight. And since electrical wiring isn't your forte I'd leave the shunt in place and use the choke relay for your voltmeter's source. And if that sounds good to you then I'll make that my first scenario for the 2G to 3G conversion. 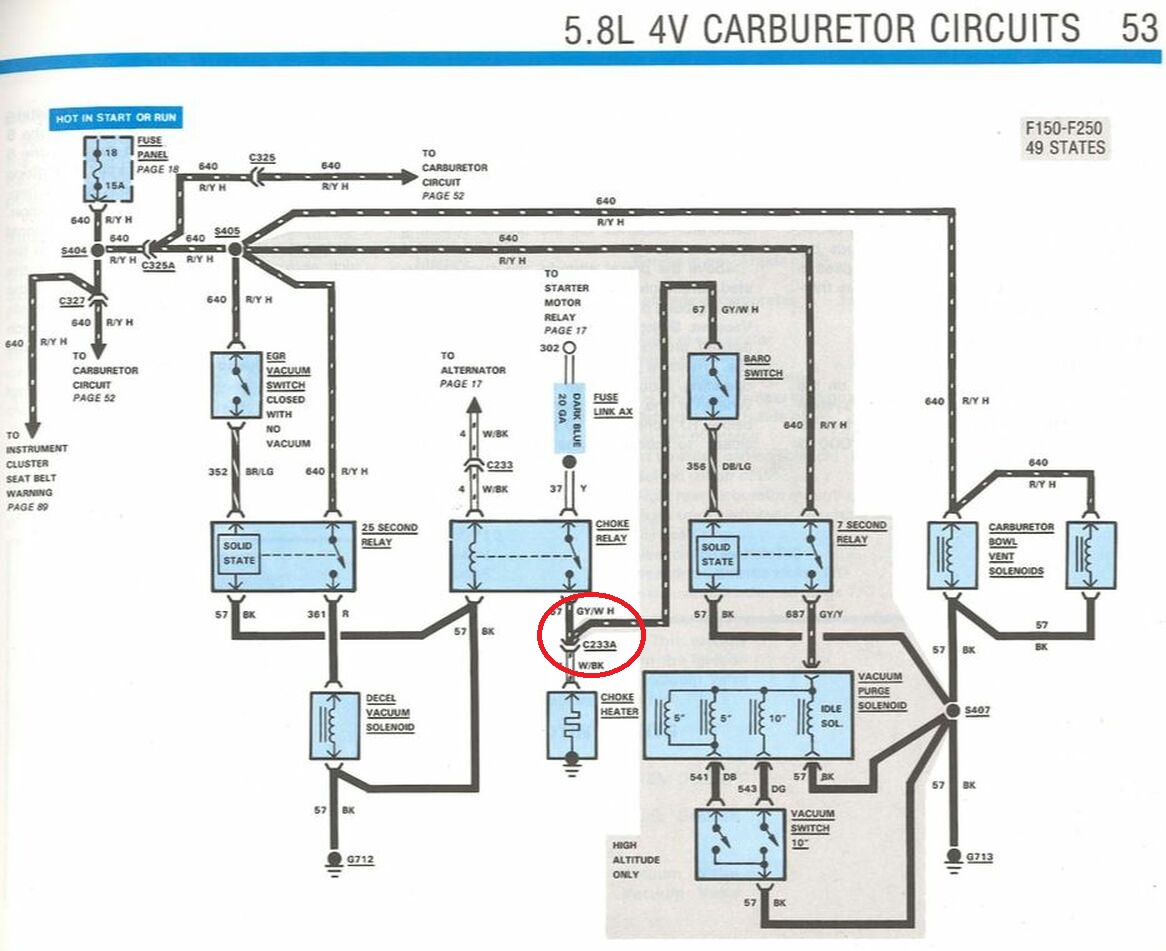
Gary, AKA "Gary fellow": Profile
Dad's: '81 F150 Ranger XLT 4x4: Down for restomod: Full-roller "stroked 351M" w/Trick Flow heads & intake, EEC-V SEFI/E4OD/3.50 gears w/Kevlar clutches
|
|
Administrator
|
Gary, can you advise as to where that relay is located in my wiring? I see it in the schematic but would like to take a physical look at it. Can you direct me to the page that shows where these things are located? I think it would help me immensely to know this.
Also, and perhaps a bit off topic, but isn't there concerns regarding that blower motor and the need for a relay to it? Kinda like our headlights. Seems Scott brought that up and I've read about it here somewhere? If I wanted to go the route we discussed directly above regarding my Alt mod, would that be off a different circuit. Thoughts on wiring in a relay to that blower motor after the Alt mod route I'm looking at or is that even an issue with my 86?
John
"Blackie" - 1986 F150 4x4 - Mildly warmed over 351W HO - Original owner |
|
Administrator
|
Unfortunately I don't remember where the choke relay is, and its position doesn't show that I can find.
 Maybe someone else can help us out? On the blower, let me make that a separate post...
Gary, AKA "Gary fellow": Profile
Dad's: '81 F150 Ranger XLT 4x4: Down for restomod: Full-roller "stroked 351M" w/Trick Flow heads & intake, EEC-V SEFI/E4OD/3.50 gears w/Kevlar clutches
|
|
Administrator
|
Yeah, hopefully someone can tell me. I want to confirm the existence of the relay and know where it is. I know the drawing says it is present, but I want to see it. I nearly burned up a vehicle years back by "assuming" something electrical and I will not repeat that experience again. Thanks!
John
"Blackie" - 1986 F150 4x4 - Mildly warmed over 351W HO - Original owner |
|
Administrator
|
In reply to this post by Gary Lewis
Ok, as shown below the blower is fed power from the function selector switch and then is grounded via the blower switch. So to do it the best way you need two relays - one triggered by the function selector switch and feeding power to the blower, and another that grounds the motor in Hi.
Why just Hi? Because it would take two more relays to provide the grounds in M1 and M2, and there's no need for a relay in Lo. And since you aren't really worried too much about M1 nor M2 as their current isn't nearly that of Hi, just put a relay in for the ground in Hi. 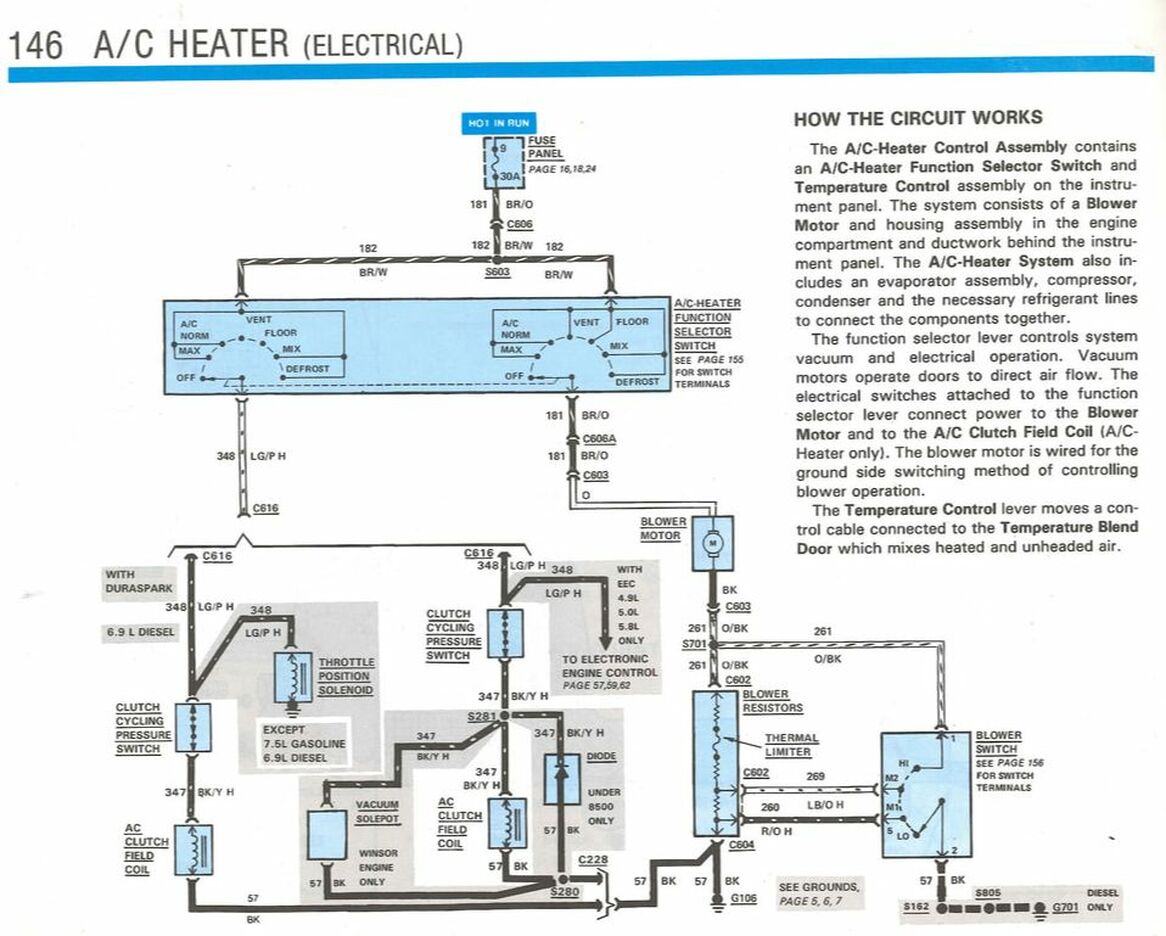
Gary, AKA "Gary fellow": Profile
Dad's: '81 F150 Ranger XLT 4x4: Down for restomod: Full-roller "stroked 351M" w/Trick Flow heads & intake, EEC-V SEFI/E4OD/3.50 gears w/Kevlar clutches
|
|
Administrator
|
Also the Blower Relay and the alternator changes are separate circuits/harnesses so you don't have to necessarily make plans for the Blower Relay at the same time. It has the benefit of being in a great location for a relay to be added.
On the choke relay, they really do make that tough to find from the evtm. At least we know it's between the Fender Mounted Relay (Fuse Link AX) and the choke  Speaking of relays, I agree with Gary and Jim's recommendation to use a relay with the voltmeter despite me not doing so. When time and weather permits I am going to run a test comparing both positions. The problem is that this is highly dependent upon the tester's truck. In my case I have the blower relay, headlight relay, power window relay, leds, etc so the results of my test won't be at all representative of a stock truck. The voltmeter relay on the other hand would be consistent across the board for users.
Scott
'Camano' 1986 F250 Supercab XLT Lariat 460/C6 'Chanute' 1980 F350 C&C 400/NP 435 - Gin Pole But there ain't nothin' wrong with the radio |
|
Administrator
|
Tangent but since we are talking about wiring - I tore my dash harness down into each circuit and measured the wires to the nearest inch rounding up.
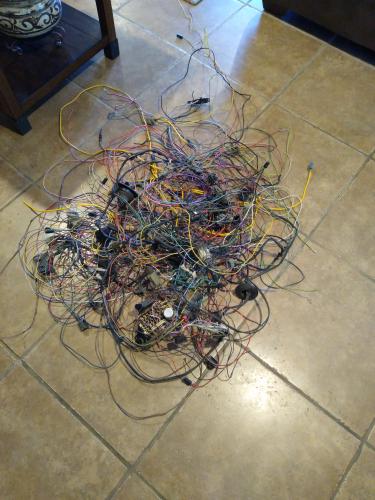 May not have much use to it but interesting info to have. I wasn't able to get all circuits due to cutting pieces out for others or myself but quite a few were unmolested. I penciled them all in my evtm so at some point will find a way to get them to Gary. Mildly interesting: found an unlisted T/O connector and the Exterior Lamp circuit is drawn incorrectly in the EVTM (86).
Scott
'Camano' 1986 F250 Supercab XLT Lariat 460/C6 'Chanute' 1980 F350 C&C 400/NP 435 - Gin Pole But there ain't nothin' wrong with the radio |
|
Administrator
|
LOL! I have a similar view, albeit on the floor of the attic and still quasi attached to a dash. Just found and cut out the Bk/Wh windshield washer wire from the windshield wiper switch to the connector, which actually takes you all the way to the driver's side headlight as that's where the washer ground is. And since I wanted a solder & play connection I needed all the wire I could have.
Anyway, I'm curious about what you found. Maybe put that in another thread to make the title somewhat relevant?
Gary, AKA "Gary fellow": Profile
Dad's: '81 F150 Ranger XLT 4x4: Down for restomod: Full-roller "stroked 351M" w/Trick Flow heads & intake, EEC-V SEFI/E4OD/3.50 gears w/Kevlar clutches
|
|
Administrator
|
Ok, here's a stab at a 2G to 3G conversion with no shunt and using the choke relay for the voltmeter.
My concern is that it might be easy to miss the wires I've added in the Done pic. Do they need to be in red? Or should I put red arrows showing the junctions? Other comments? Here's what you have when you start: 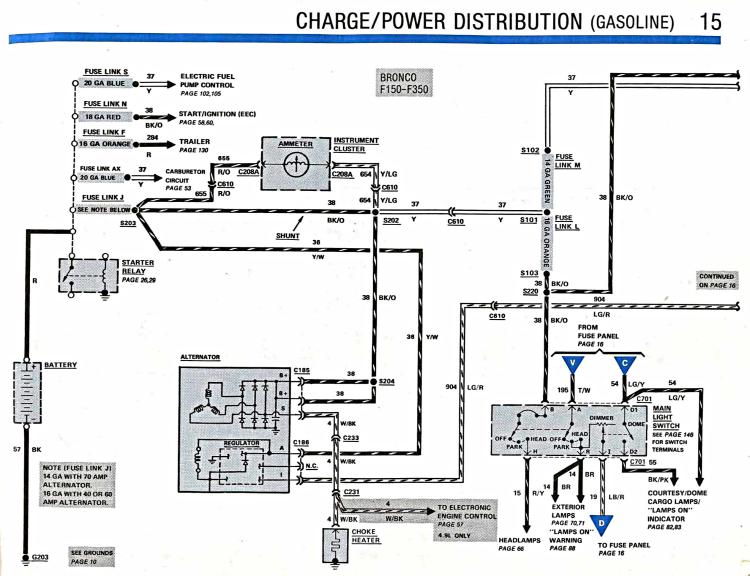 Here's where to cut: 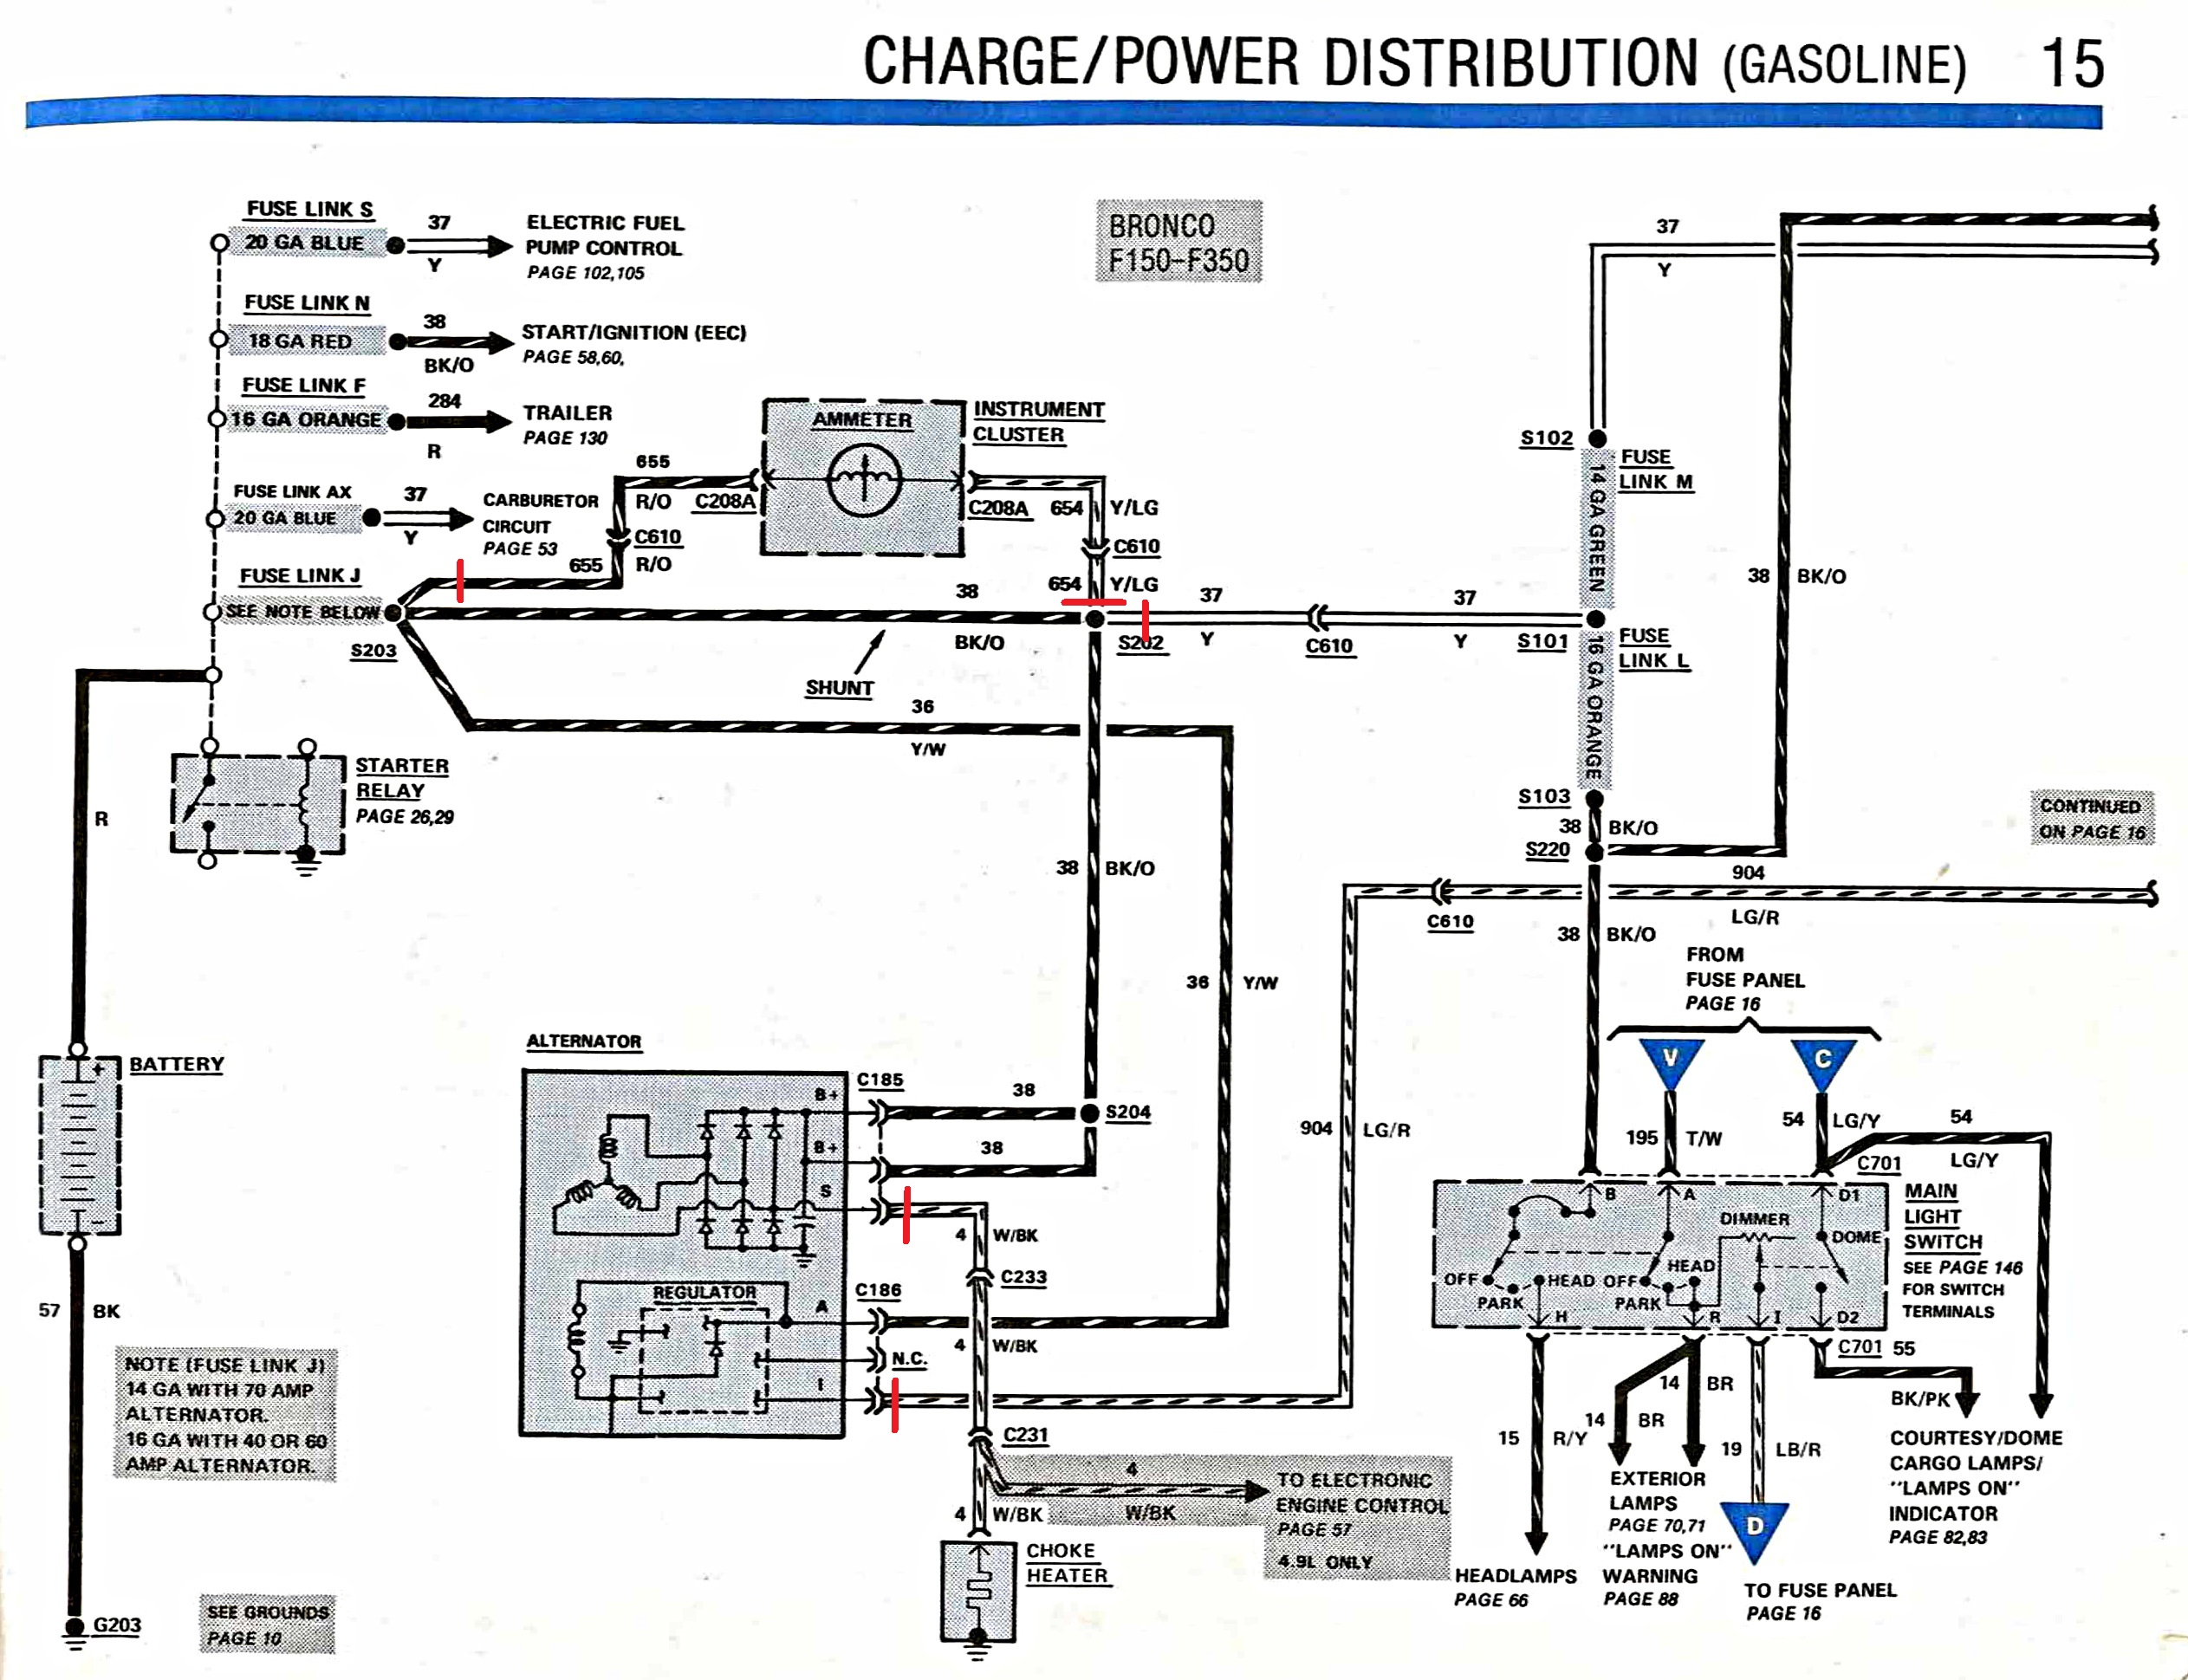 And here's what it should look like when done: 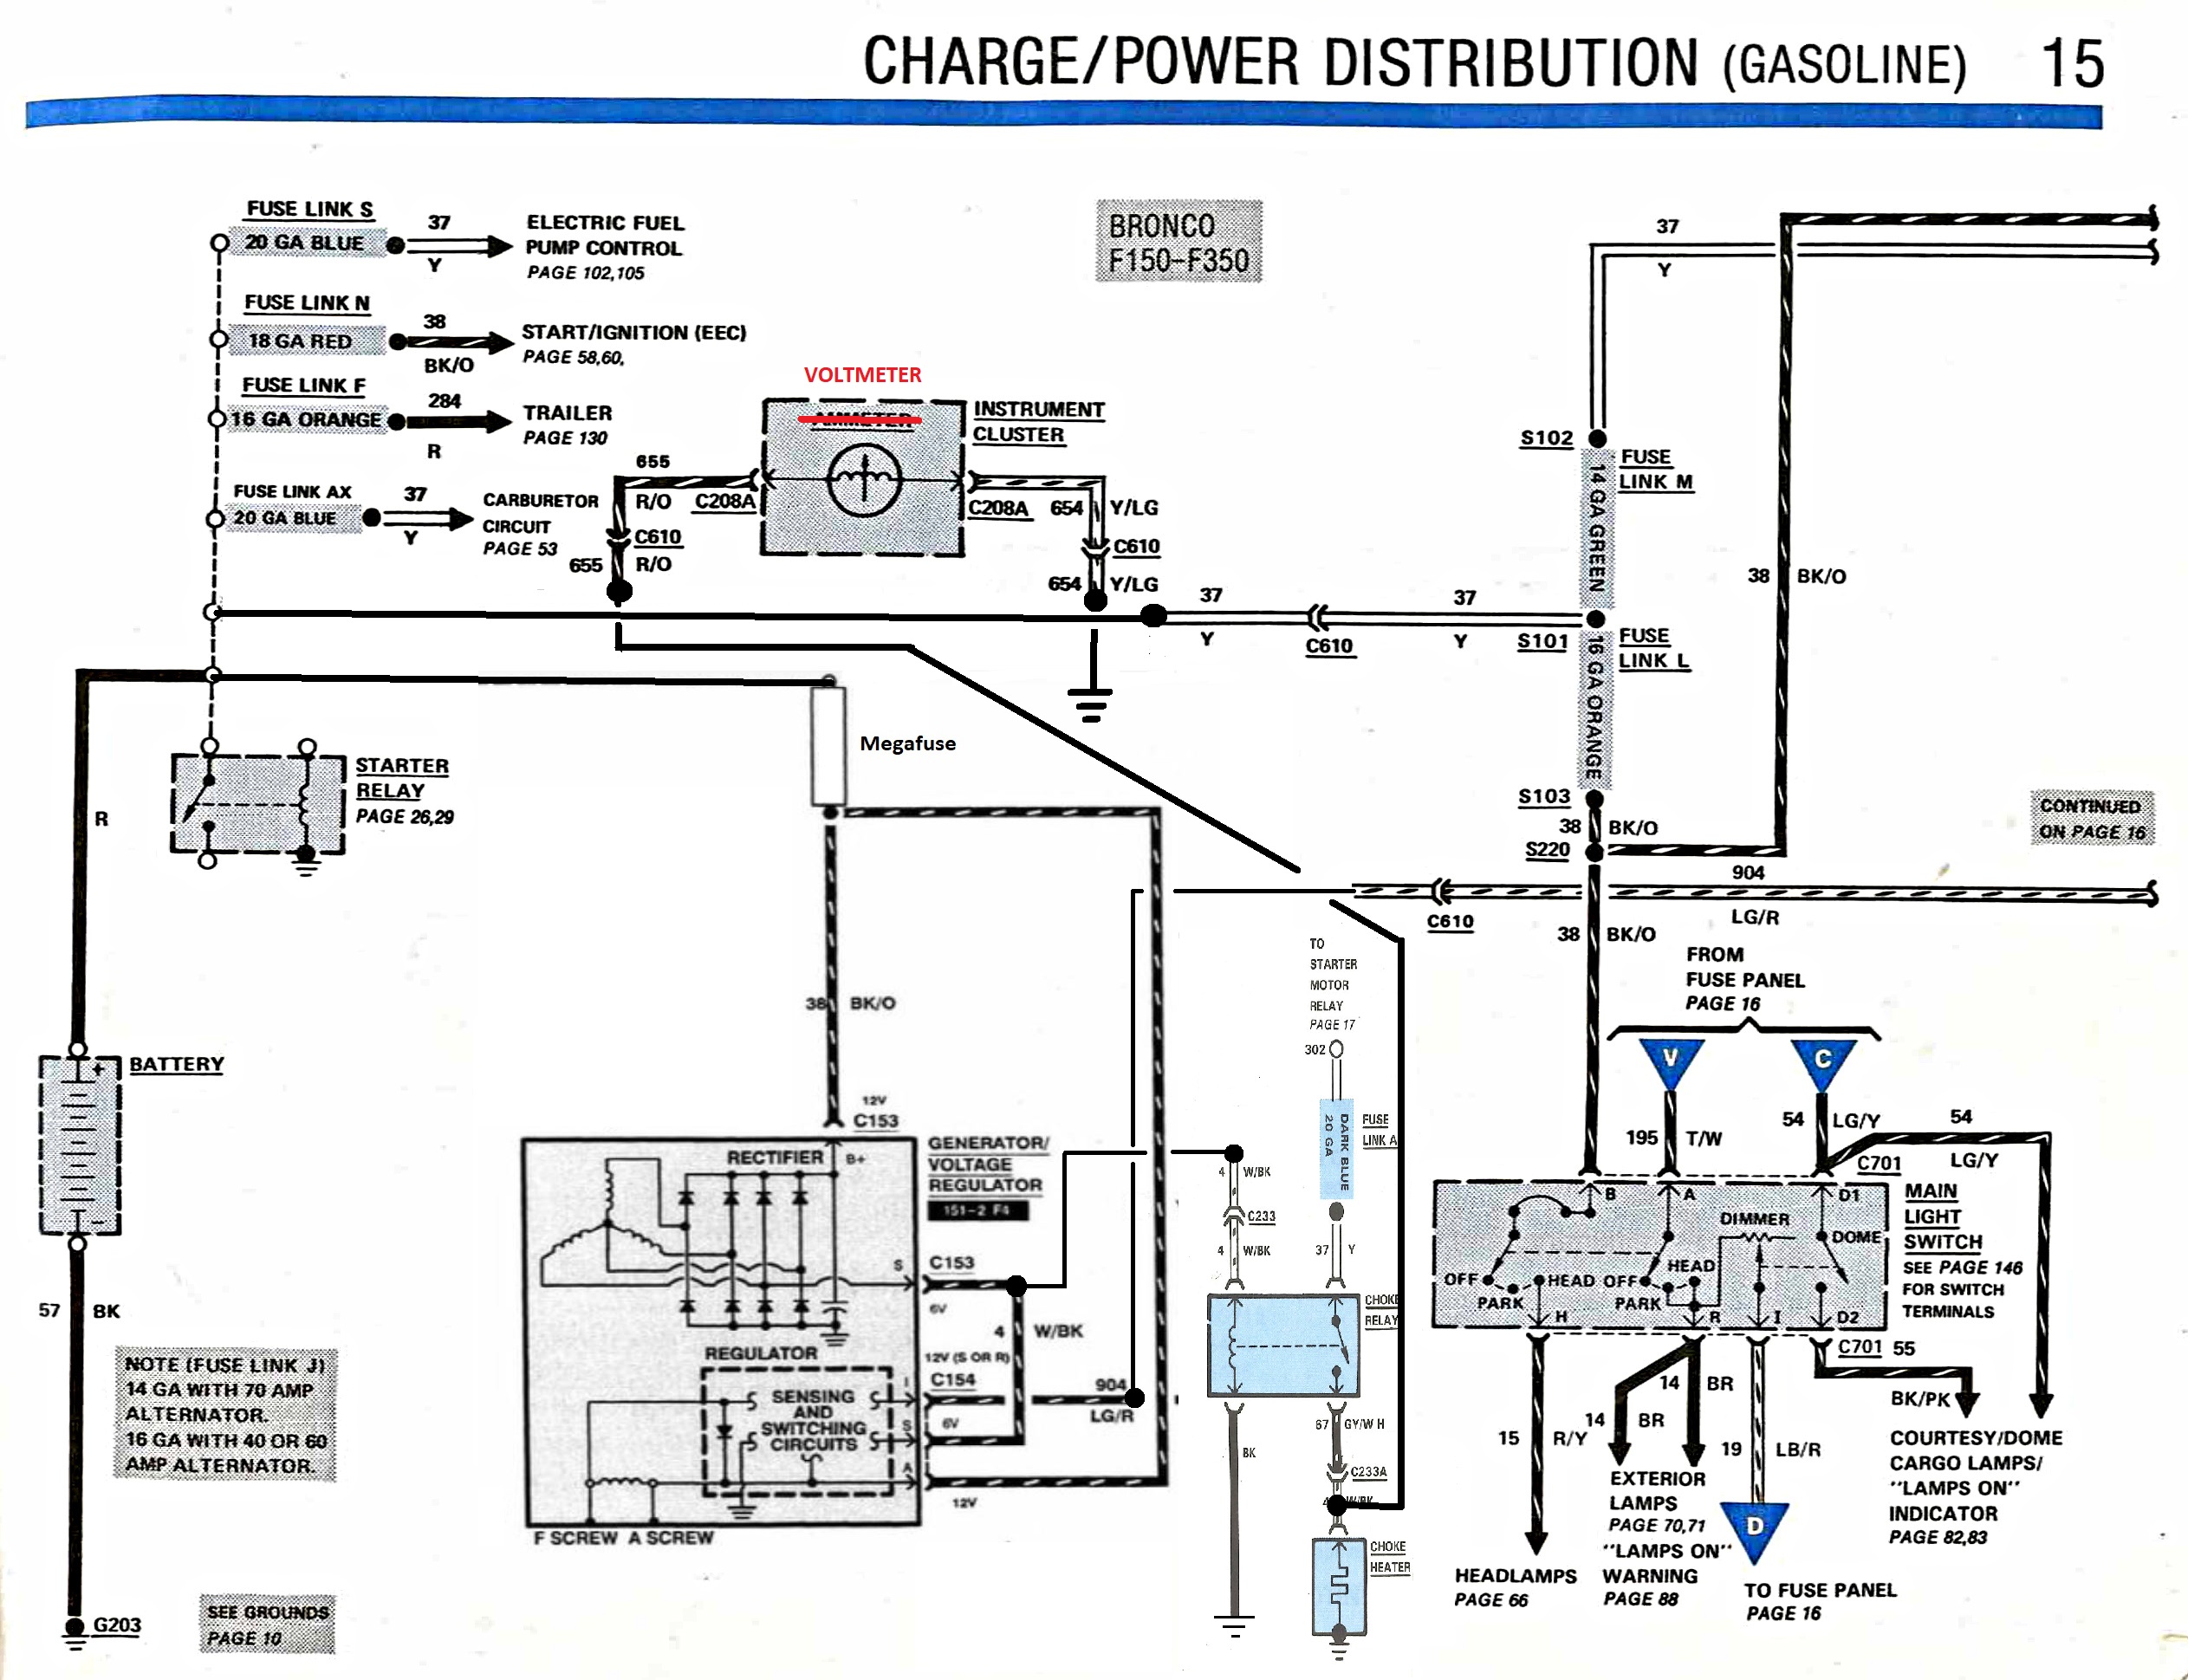
Gary, AKA "Gary fellow": Profile
Dad's: '81 F150 Ranger XLT 4x4: Down for restomod: Full-roller "stroked 351M" w/Trick Flow heads & intake, EEC-V SEFI/E4OD/3.50 gears w/Kevlar clutches
|
|
Administrator
|
I'd highlight the added wires. Also, if you have a picture of the harness, show the splices in the harness. Ultimately, when the schematic is done display both the before and after schematic along with the harness on our 3G upgrade page. Thanks!
John
"Blackie" - 1986 F150 4x4 - Mildly warmed over 351W HO - Original owner |
|
Administrator
|
Good idea to highlight the added wires. Just like I did on the 1G wiring.
 And, you know I have a pic of the 2G wiring.  How's this look? And, does the fact that the red "cut" line crossed the LG/R wire and the R/O wire on the left confuse? You are only supposed to cut the R/O wire, as said. How's this look? And, does the fact that the red "cut" line crossed the LG/R wire and the R/O wire on the left confuse? You are only supposed to cut the R/O wire, as said.
And, when you get it together I'll certainly want a pic of the harness. 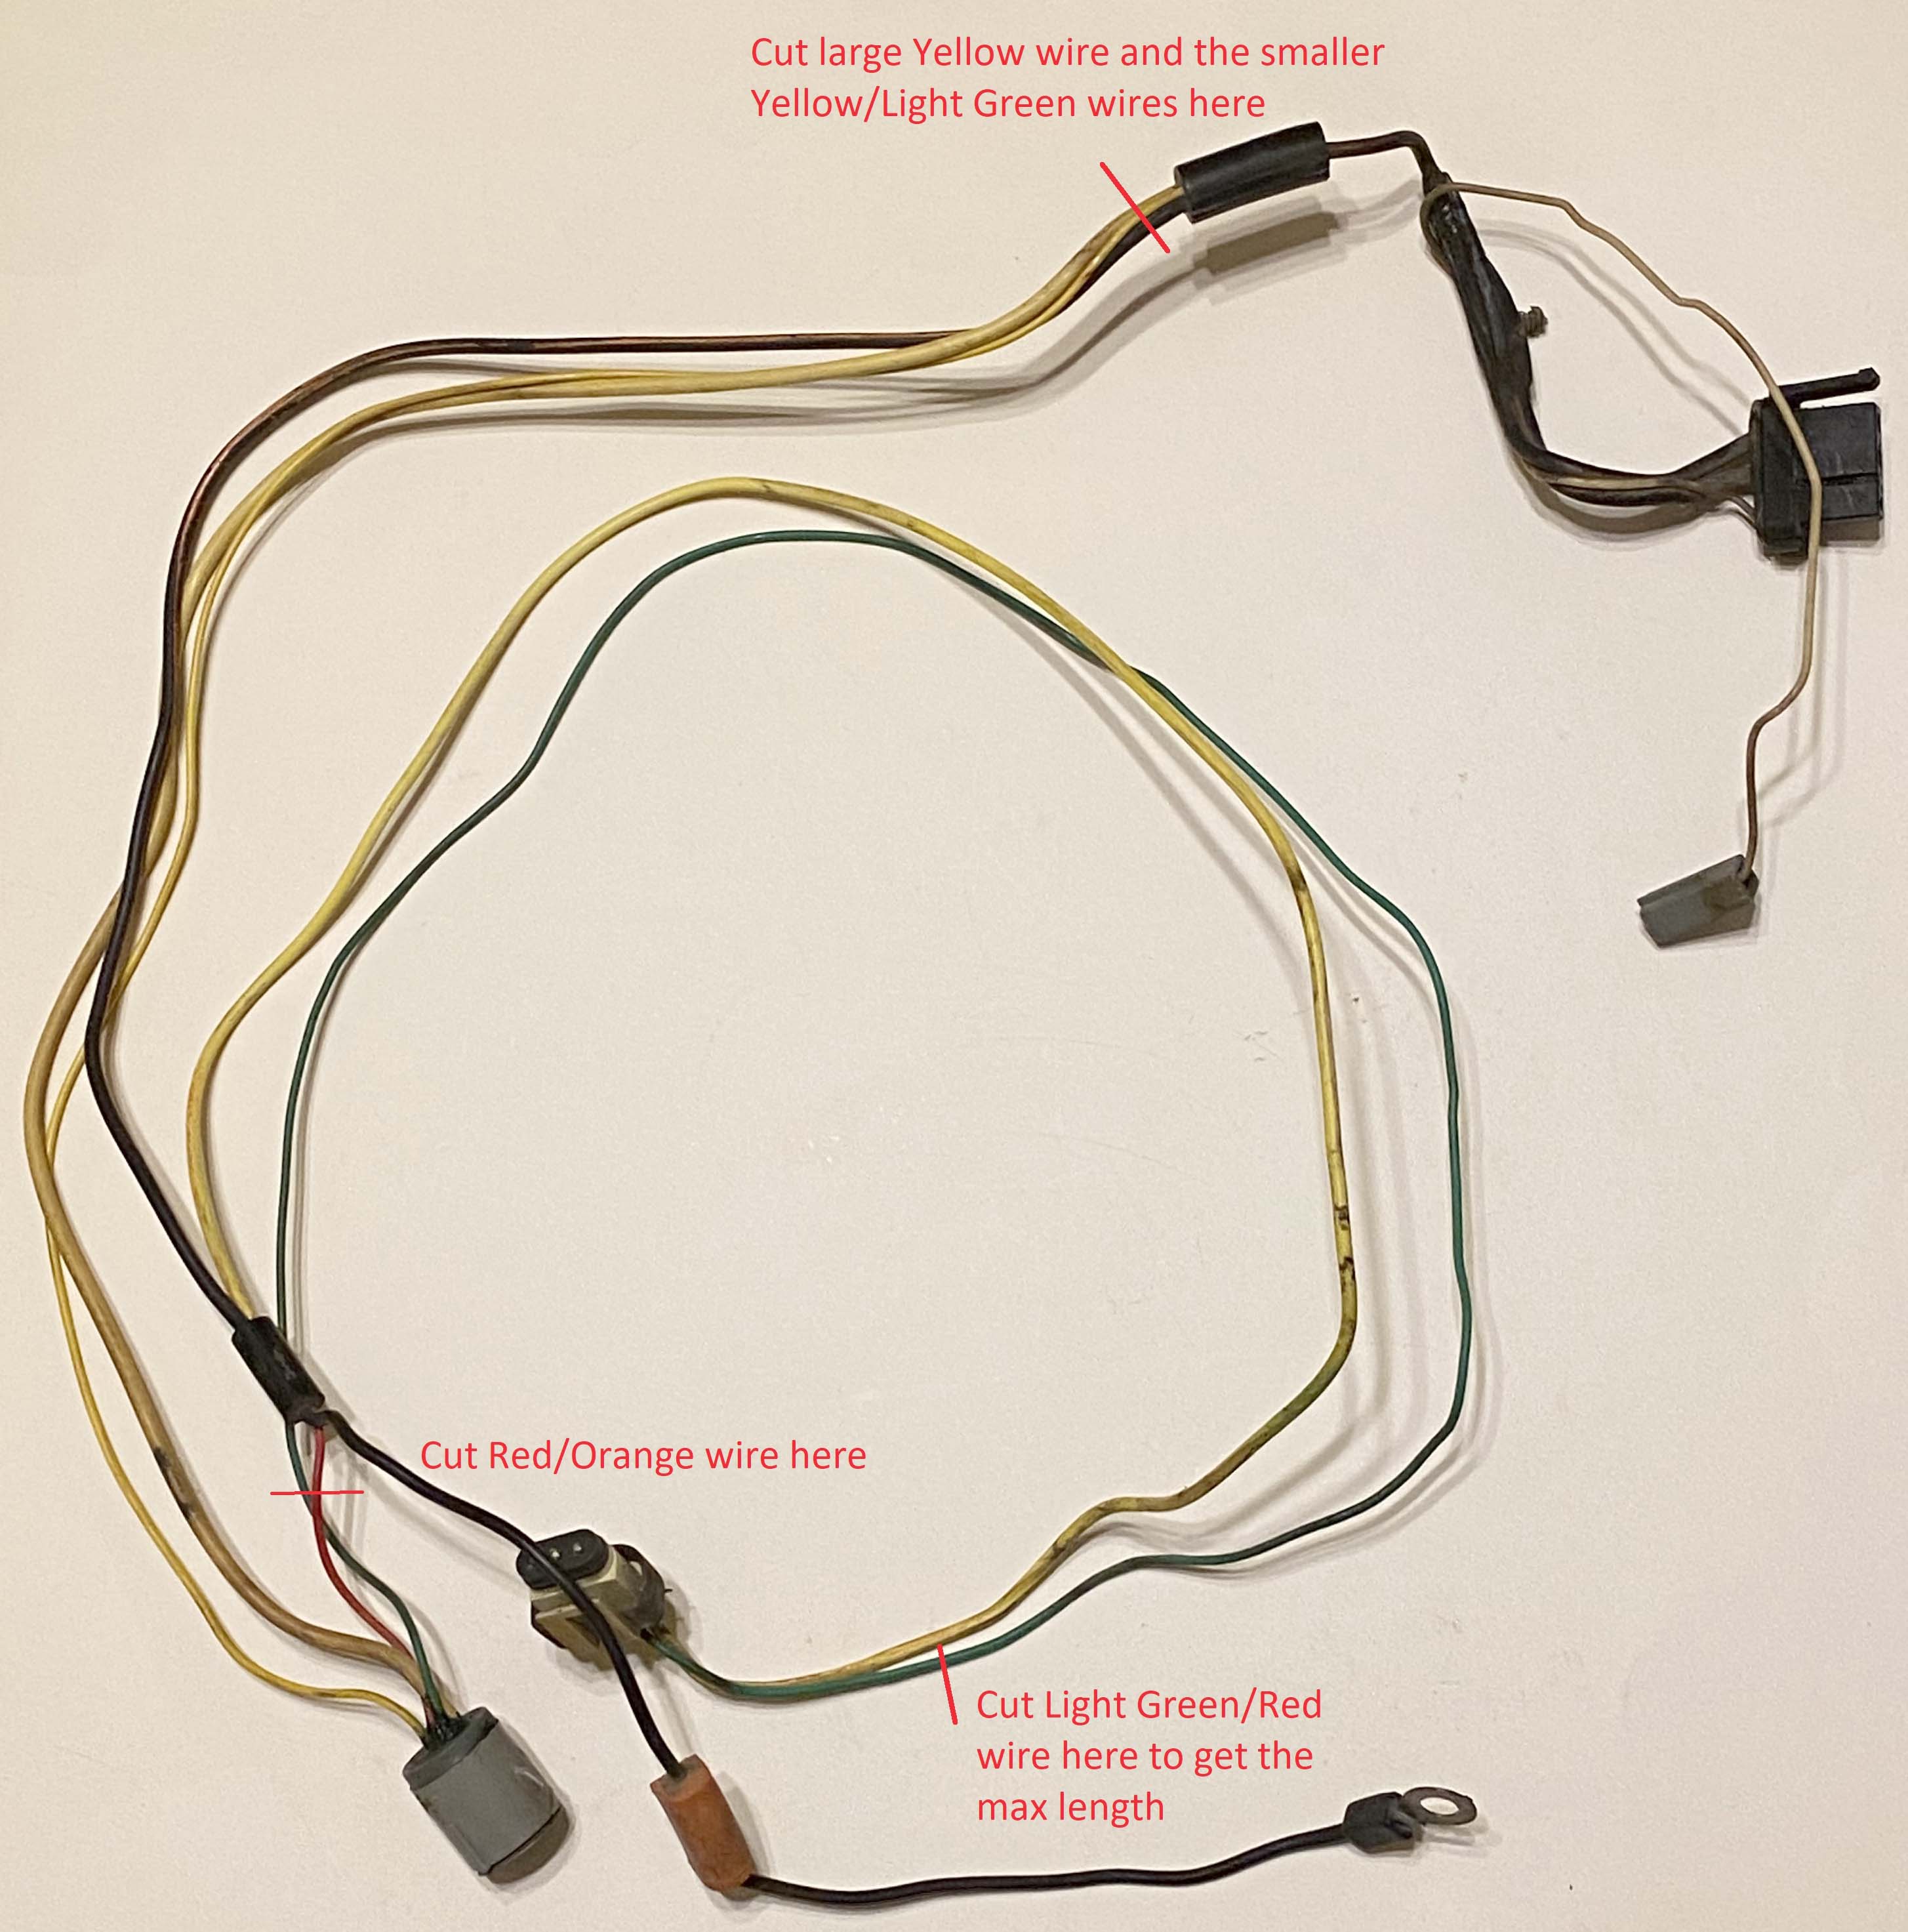
Gary, AKA "Gary fellow": Profile
Dad's: '81 F150 Ranger XLT 4x4: Down for restomod: Full-roller "stroked 351M" w/Trick Flow heads & intake, EEC-V SEFI/E4OD/3.50 gears w/Kevlar clutches
|
|
But isnt the hot wire from the choke relay a reduced voltage or did Ford change that when they went to the relay setup?
"Old Blue" - '56 Fairlane Town Sedan - 292-4V, Ford-O-Matic transmission, 3.22:1
'63 Belair 2dr sdn - 283-4V, Powerglide transmission, 4.56:1 '78 Cougar XR7 - 351-2V, FMX transmission, 2.75:1 9inch "Bruno" - '82 F150 Flareside - 302-2V, C6 transmission, 2.75:1 9inch, 31x10.50-15 BFG KO2 |
| Edit this page |

