Big Blue's Transformation


Administrator
|
Thanks guys
Scott
'Camano' 1986 F250 Supercab XLT Lariat 460/C6 'Chanute' 1980 F350 C&C 400/NP 435 - Gin Pole But there ain't nothin' wrong with the radio |
|
Administrator
|
Ok, today was get-the-radiator-support-in day. And, I'm happy to say that I got it done. But, not w/o some
 The big issue was where to tighten it down since there is a lot of adjustment available side-to-side. The first thought was that I'd just position it neatly between the two fenders. But then I remembered that the hood hasn't been aligned with the fenders so I thought I'd better do some checking. Looking at the truck I realized that the front fenders curve in but that the bed is straight, so I ran a string down both sides, lightly touching the bed, like this: 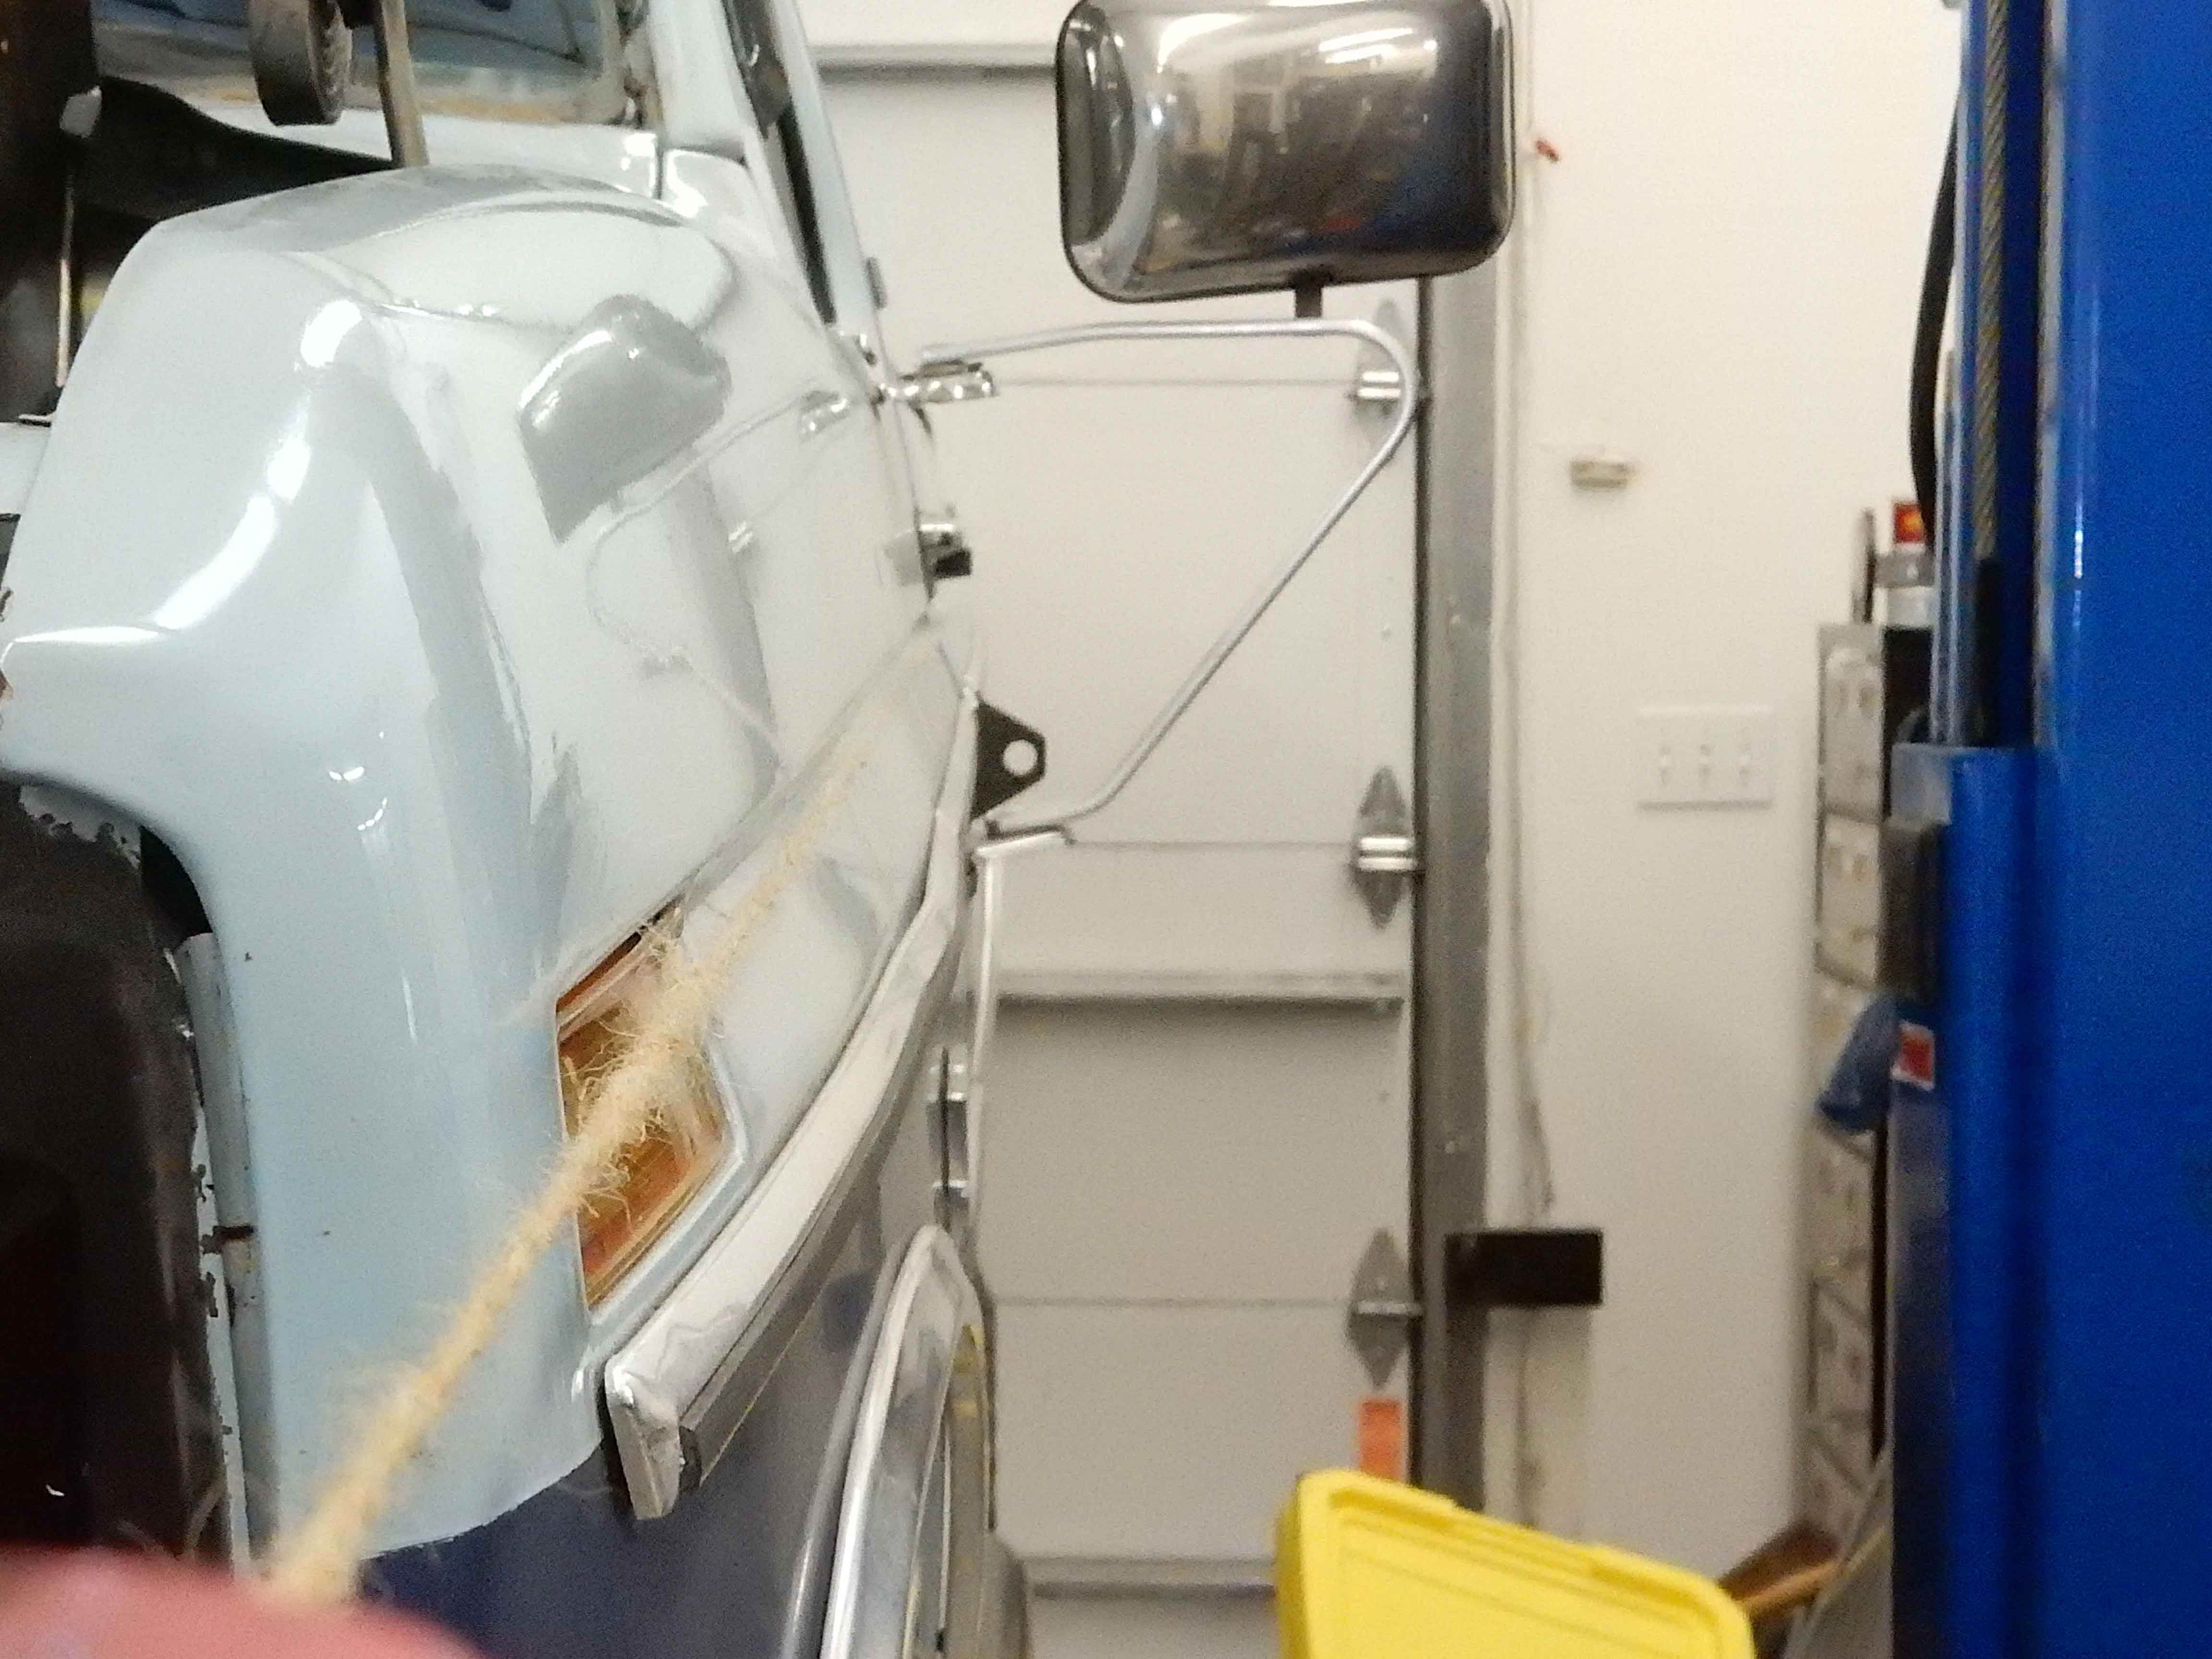 Then I checked the gap between the fenders and the string and found that the passenger's side was 1" farther in than the driver's side. Given that, I moved the radiator support all the way to the passenger's side and snugged it down. Then I pulled the PS fender in and snugged it down, and the DS fender out and snugged it down. And now there's 1/4" difference, but the hood lines up fairly well. Then there's the question of leveling the radiator support and the fenders. You'll remember that the frame horns had been tweaked, so I didn't trust to measure across them. But the Sky crossmember was dead-on level so I used that as my reference and shimmed the radiator support so that it was level. But, the fenders were still out quite a bit. At this time I don't have the captive nuts on the fender support so can't snug them up when I pull the fenders up or down. But I did that by using the corner brackets that tie the fenders to the radiator support, and have gotten the level as shown below. I'm going to call it a day and go mow, but will check in later to see if anyone has suggestions on how to get things spot-on. 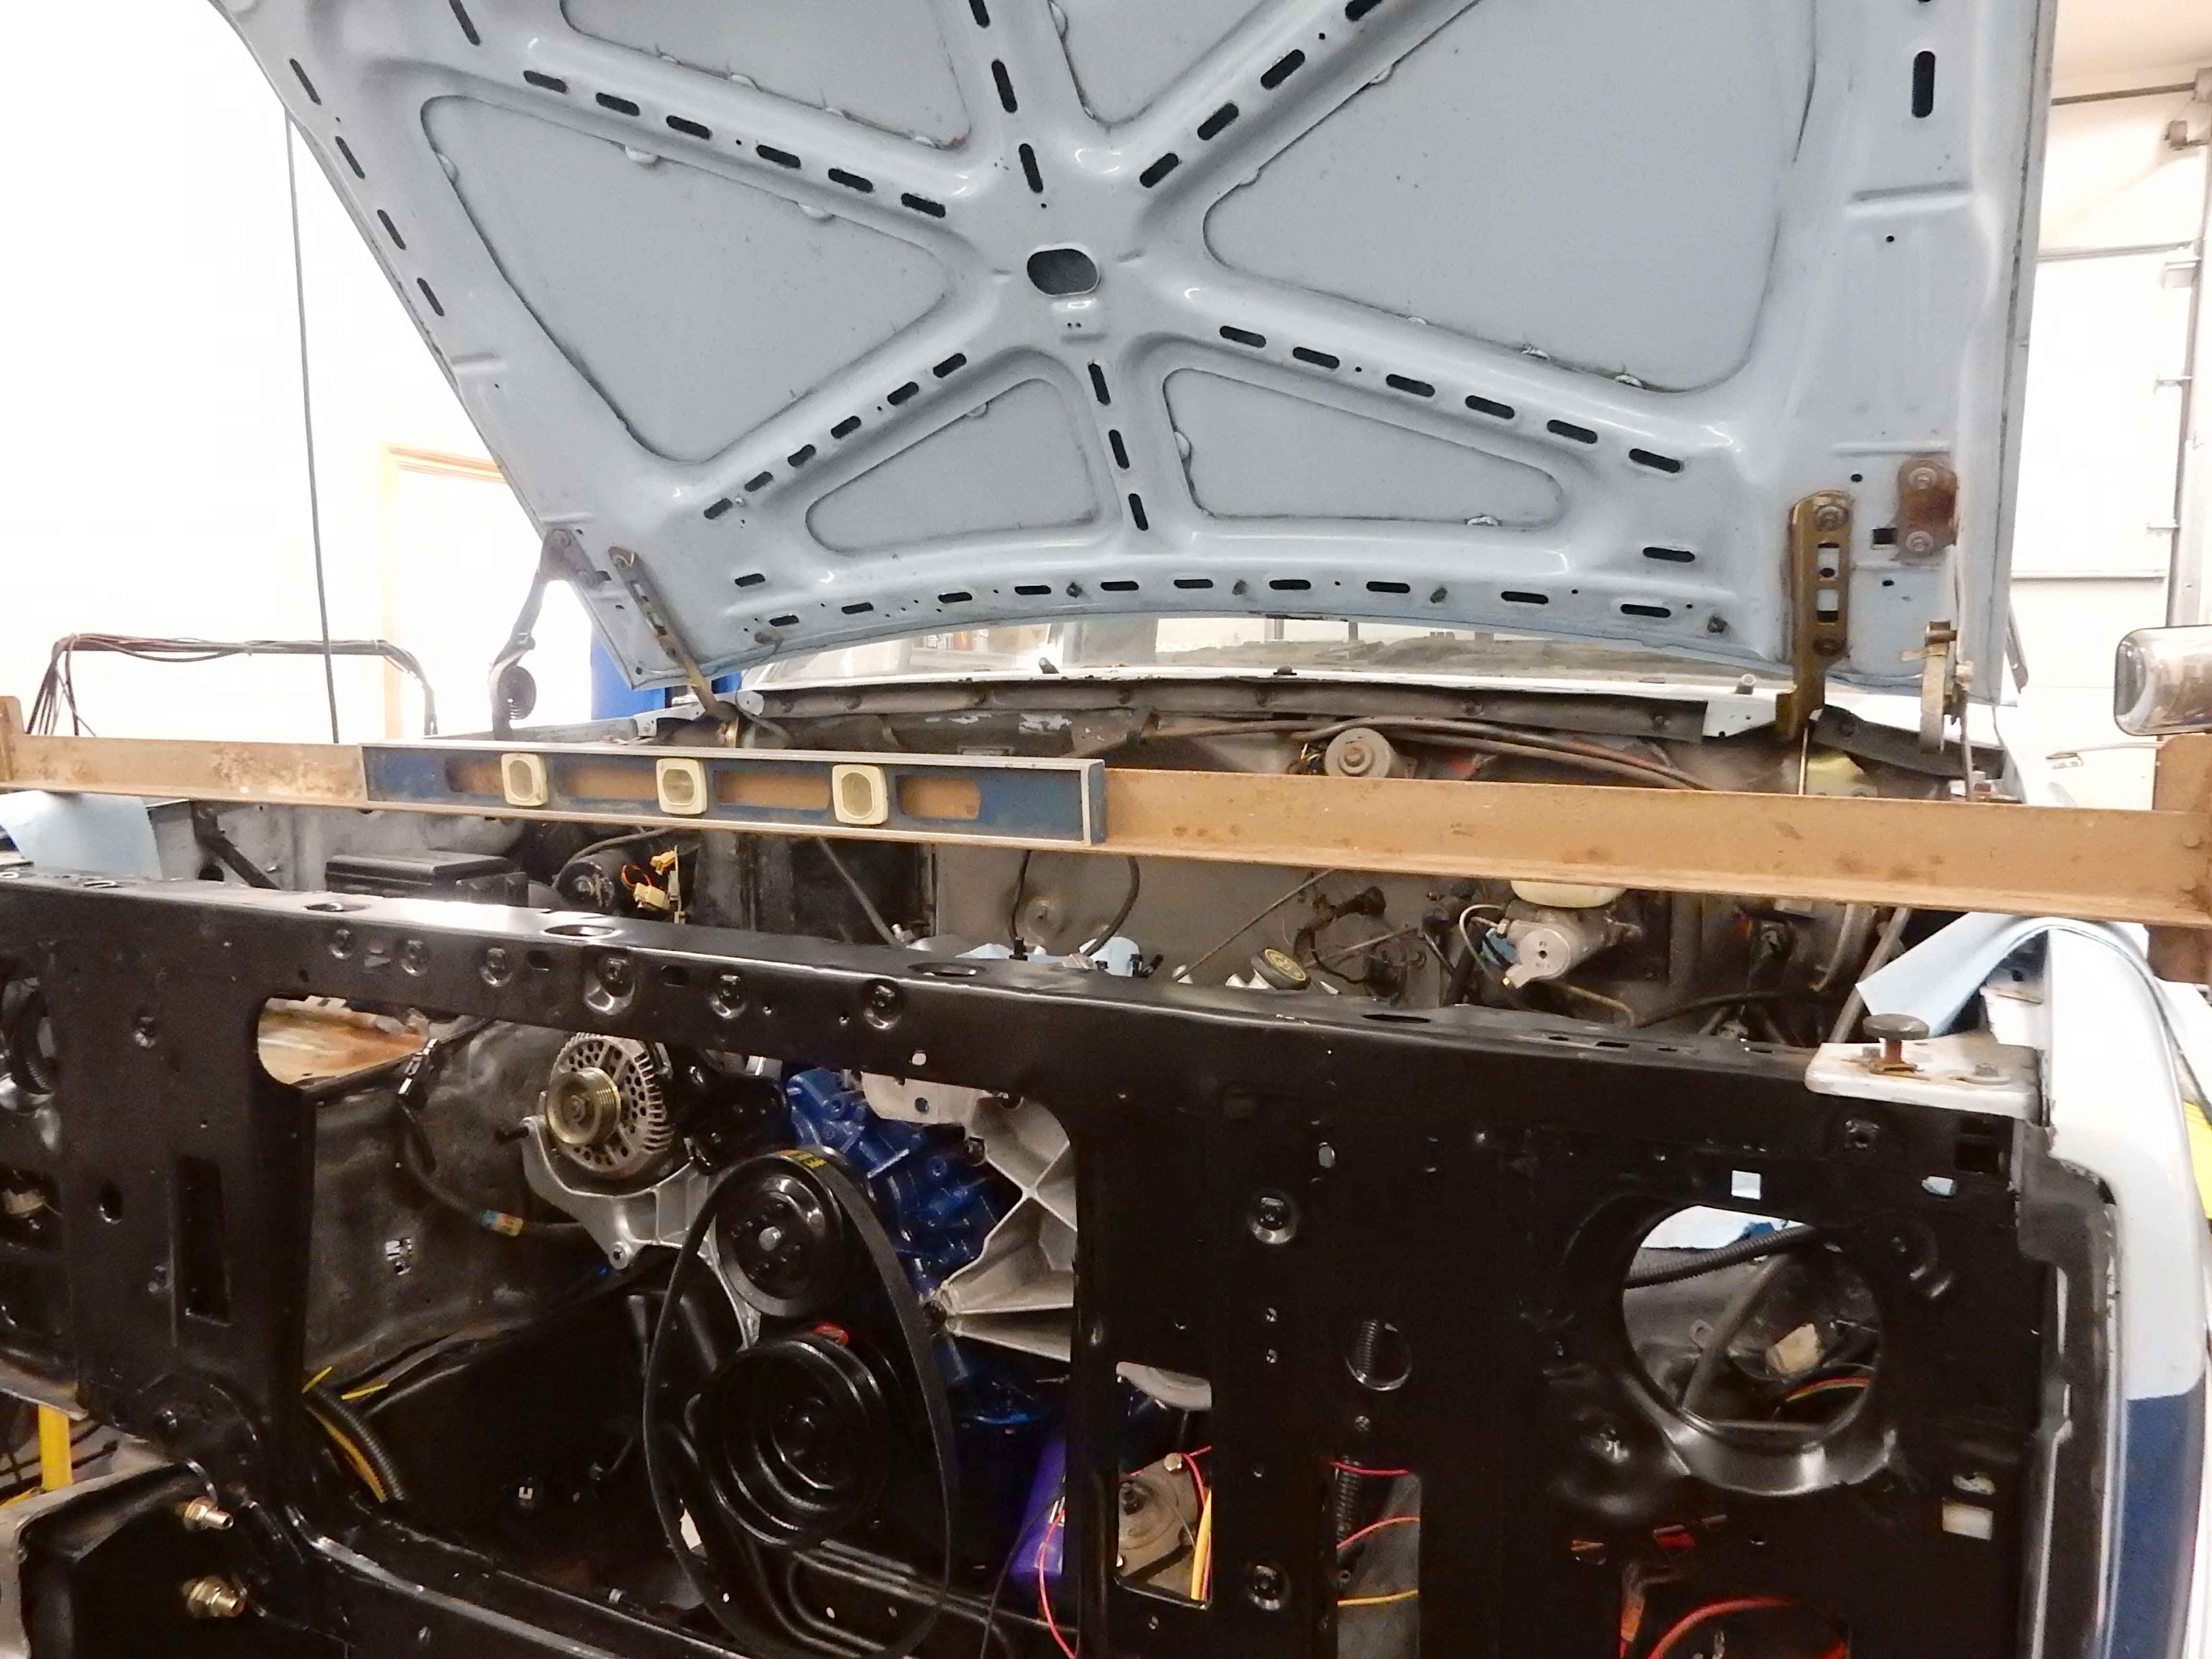 
Gary, AKA "Gary fellow": Profile
Dad's: '81 F150 Ranger XLT 4x4: Down for restomod: Full-roller "stroked 351M" w/Trick Flow heads & intake, EEC-V SEFI/E4OD/3.50 gears w/Kevlar clutches
|
|
Administrator
|
Got the headlight sockets in today, as shown below. I've included a pic of part of the package one of them was wrapped in, but I'm not sure that they actually came out of that package originally. That's because that part number appears to be for a relay socket. And, because the package says "Made in Portugal" and the connectors say "Taiwan".
Anyway, it appears that the orange is plastic and apparently the white is ceramic. The terminals are fairly thick, so should hold their tension well. I hope to do that wiring tomorrow, so will show how they go on then. 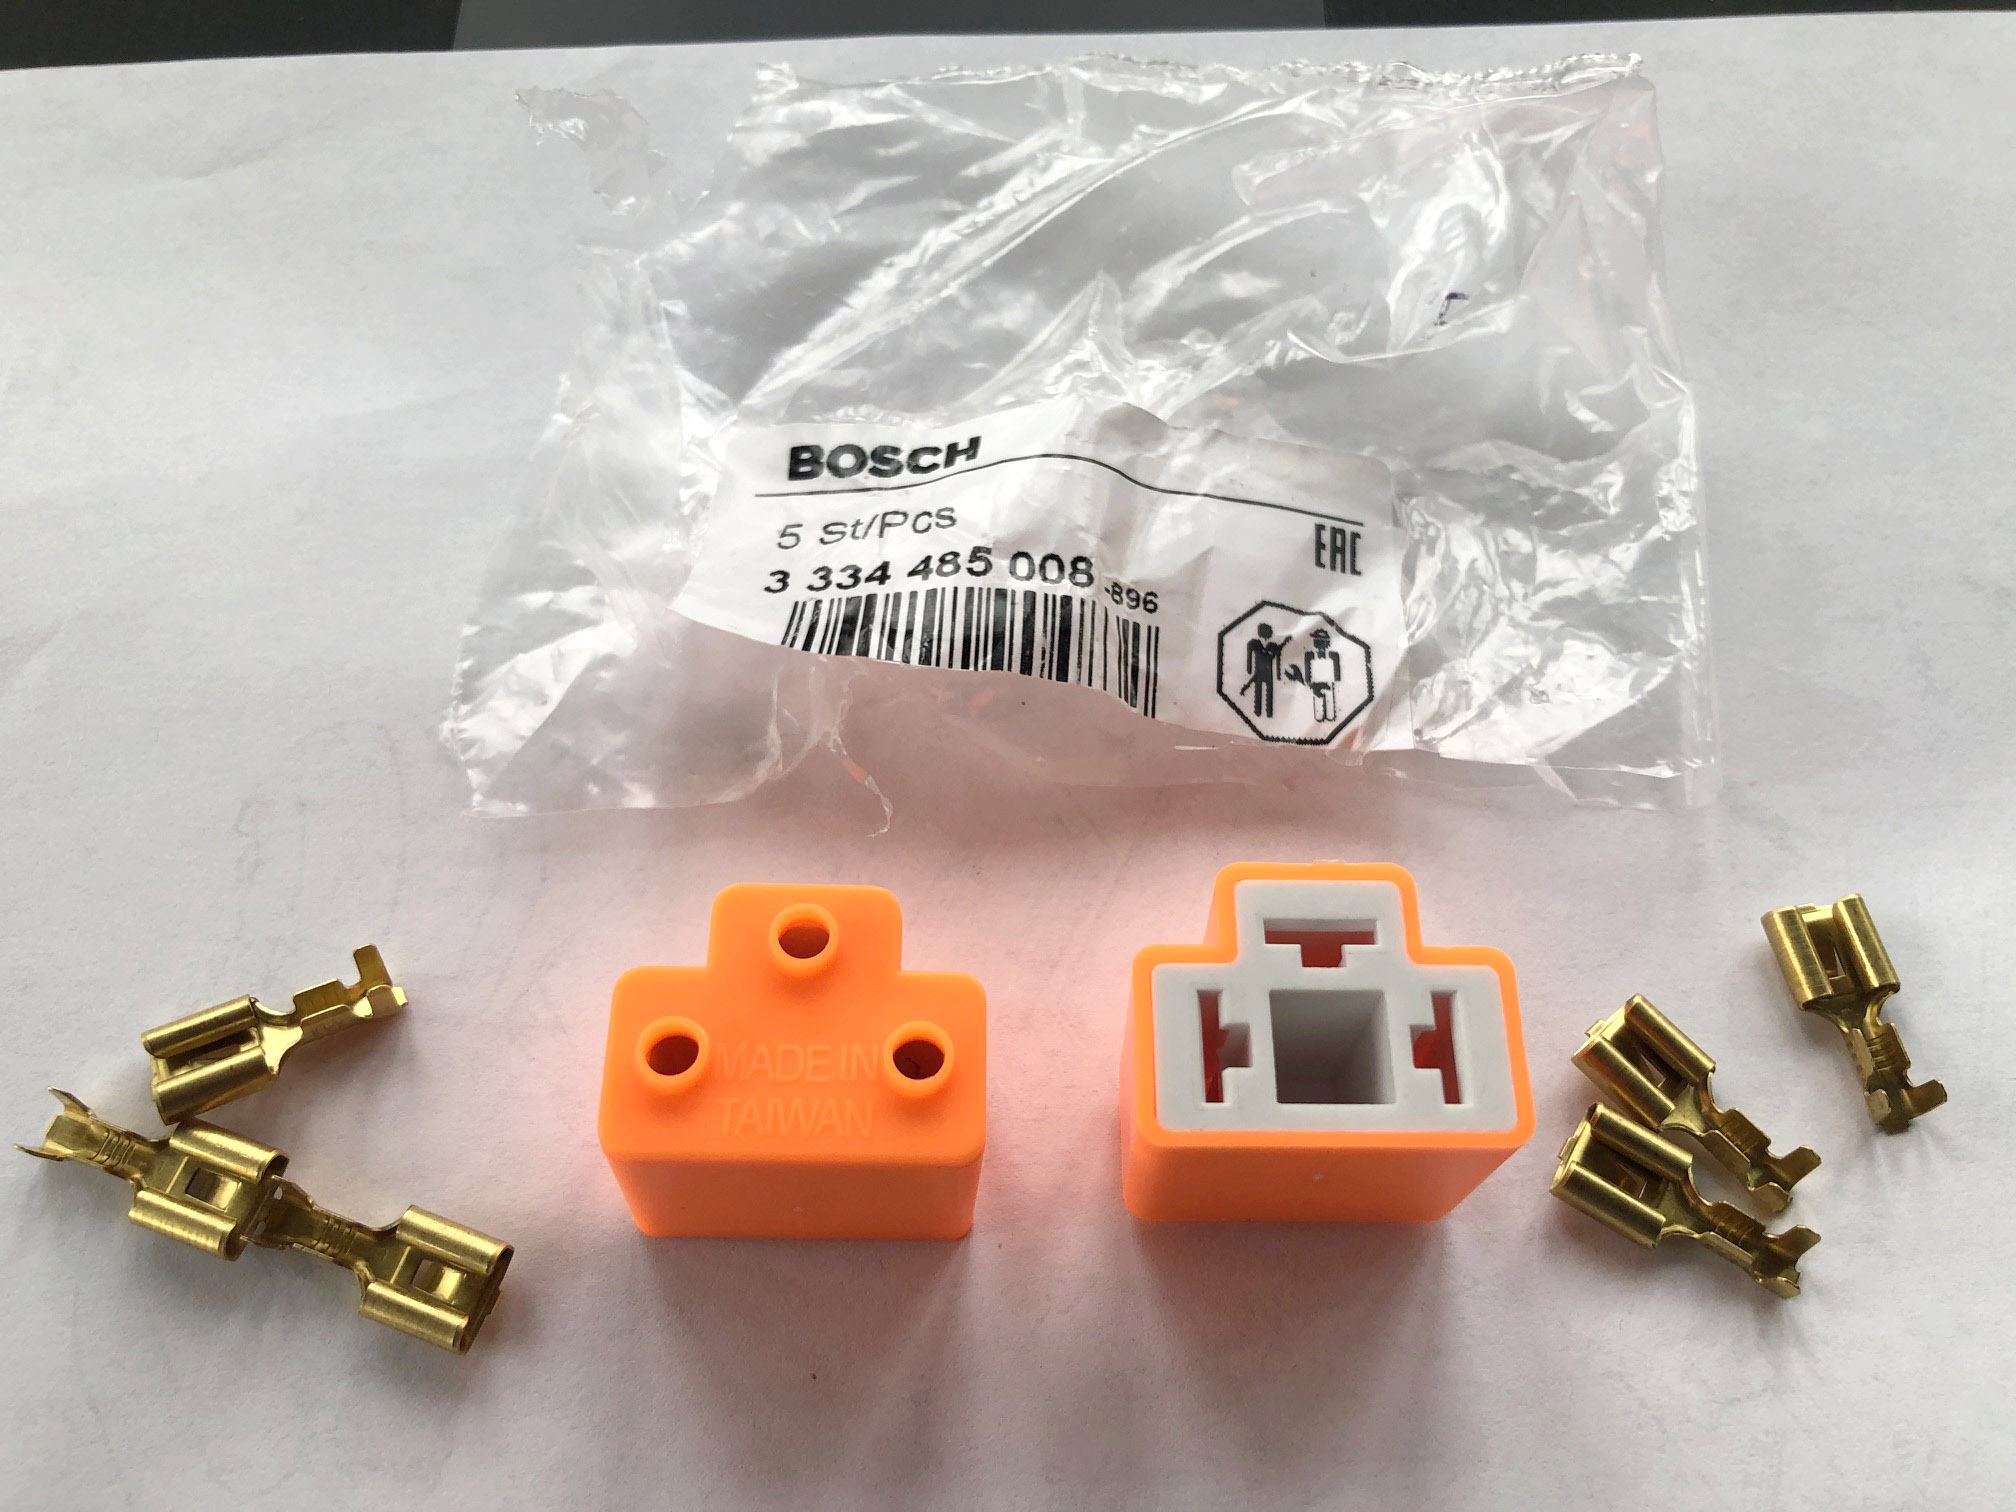
Gary, AKA "Gary fellow": Profile
Dad's: '81 F150 Ranger XLT 4x4: Down for restomod: Full-roller "stroked 351M" w/Trick Flow heads & intake, EEC-V SEFI/E4OD/3.50 gears w/Kevlar clutches
|
|
Administrator
|
Those look good. They definitely appear substantial.
So the orange is a hard plastic meaning you have to re-terminate your wires? Would be nice if they were a silicone material. Can you fit two 12awg wires or two 14awg wires in a single hole in the orange?
Scott
'Camano' 1986 F250 Supercab XLT Lariat 460/C6 'Chanute' 1980 F350 C&C 400/NP 435 - Gin Pole But there ain't nothin' wrong with the radio |
|
|
In reply to this post by Gary Lewis
I'm looking forward to the wiring lesson!
1981 F 150 Custom 300 ci with a fully rebuilt 1968 240 head Carter YFA T-18 3.25 9" rear 2WD
dual gas tanks 1990 Lincoln Town Car 5.0 AOD Home town Mc Kenzie, TN |
|
Administrator
|
Scott - I seriously doubt you can get oversized wires through that hard shell, nor two #14's. But I'll check tomorrow.
Frank - I doubt this will be a wiring lesson. My plan is to put pigtails on the passenger's side connector and use them to join the run from the PDB to the driver's side. On the driver's side the wires will go directly in. We shall see how that goes. 
Gary, AKA "Gary fellow": Profile
Dad's: '81 F150 Ranger XLT 4x4: Down for restomod: Full-roller "stroked 351M" w/Trick Flow heads & intake, EEC-V SEFI/E4OD/3.50 gears w/Kevlar clutches
|
|
Administrator
|
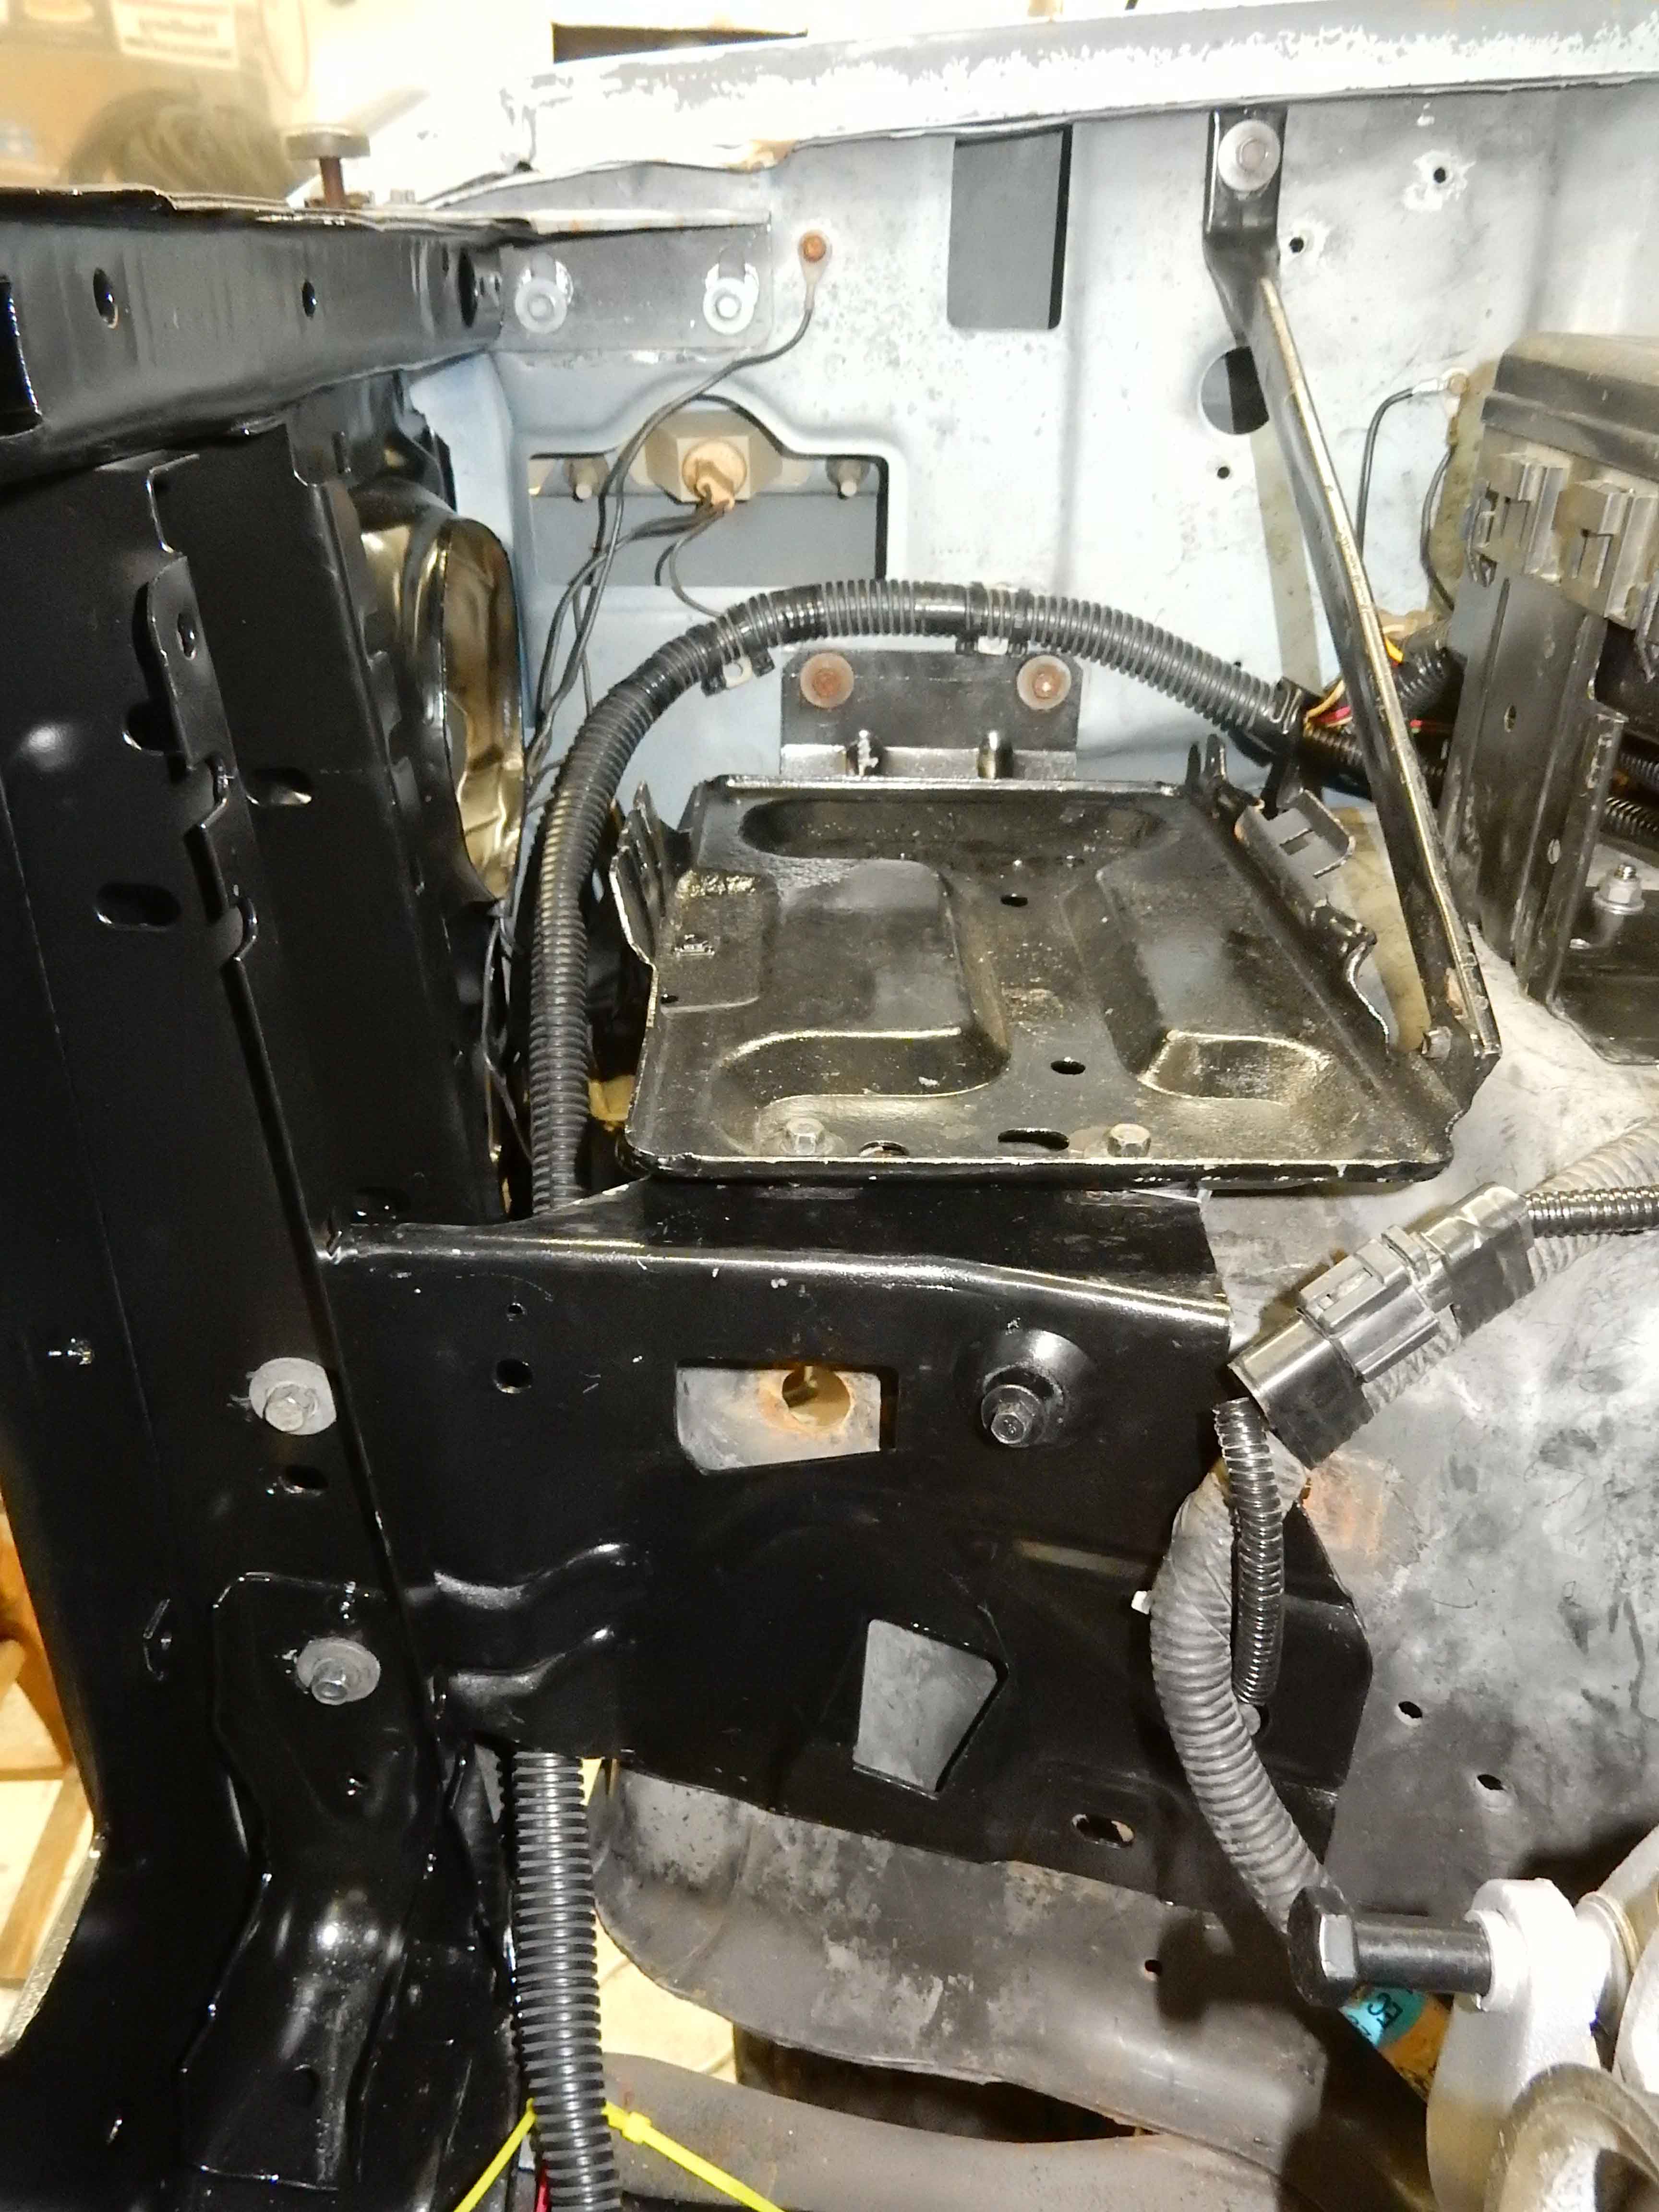
Ok, mid-day report and a minor change in plans. First, the "new" later style battery tray and brace came in, so I had to test fit it. Perfect! Bolts right to the radiator support, as Shaun said it would. And it supports the battery tray very solidly. This is certainly the way to do it. I'll even be able to provide some support to the fender liner via the hole in the lower right corner of the brace.
  And now for Scott's question about wire sizes into the headlight connector's shell. Hopefully the pic answers it. But, just to make sure, the #10 conductor goes in but the insulation won't. The #12 is a good fit, and the #16 is big enough you aren't going to get two of them in. So since I'm running #10 as the high beam hot and #12 as the low beam hot (what I had on hand), I'll put pigtails in of smaller wire and make joints outside to the larger wires that run across the radiator support. (I'm not running a ground across the radiator support, but will have separate grounds tying the cab, fenders, and radiator support together - as Ford did in the later years. 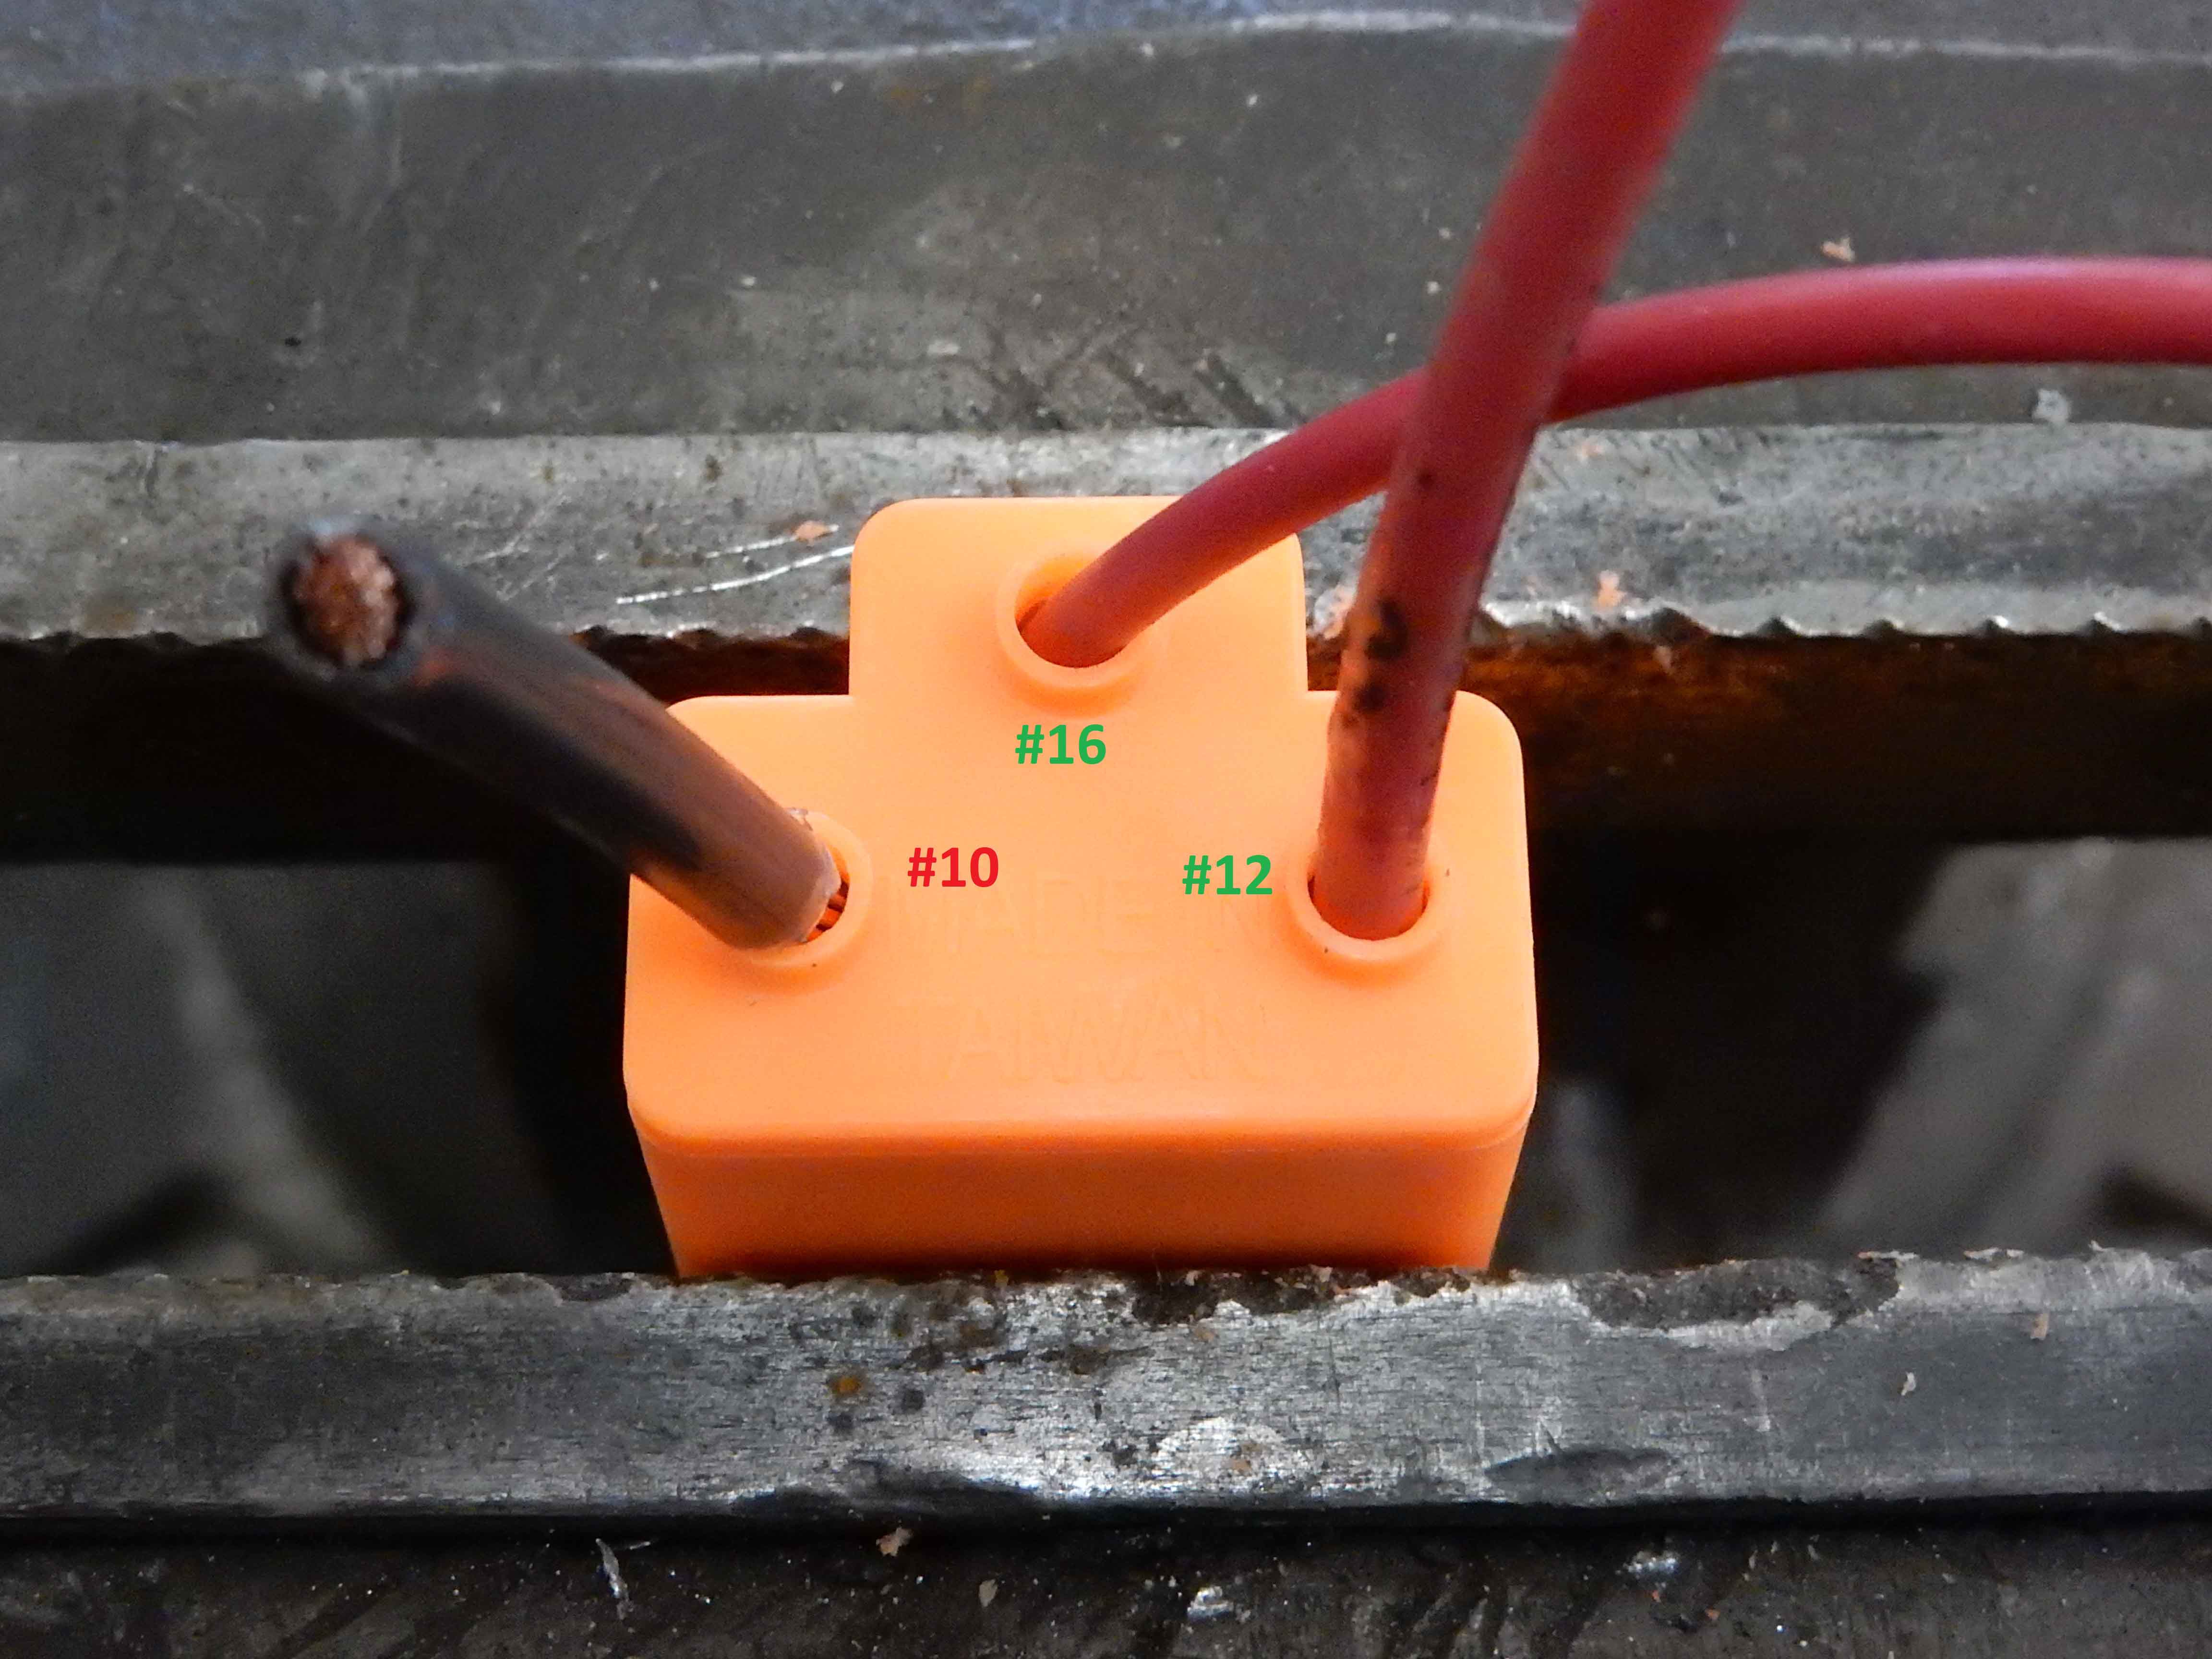
Gary, AKA "Gary fellow": Profile
Dad's: '81 F150 Ranger XLT 4x4: Down for restomod: Full-roller "stroked 351M" w/Trick Flow heads & intake, EEC-V SEFI/E4OD/3.50 gears w/Kevlar clutches
|
|
Administrator
|
Good to know on the sizes. Since I joined my two headlights in the passenger side terminals with 12awg looks like they won't work for me unfortunately.
Rather than a short jumper and join on the high beam, what about just slightly enlarging the hole with a drill bit?
Scott
'Camano' 1986 F250 Supercab XLT Lariat 460/C6 'Chanute' 1980 F350 C&C 400/NP 435 - Gin Pole But there ain't nothin' wrong with the radio |
|
|
I forgot to mention that the inner fender liner will bolt up to the support as well, but I'm glad you figured that out.
|
|
Administrator
|
In reply to this post by kramttocs
Ceramic is pretty hard and brittle, even if you could get a good crimp in the terminal.
If the terminal is too full to fit the retainer in the ceramic socket how can you use the 12 or 10Ga wire?
Jim,
Lil'Red is a '87 F250 HD, 4.10's, 1356 4x4, Zf-5, 3G, PMGR, Saginaw PS, desmogged with a Holley 80508 and Performer intake. Too much other stuff to mention. |
|
Administrator
|
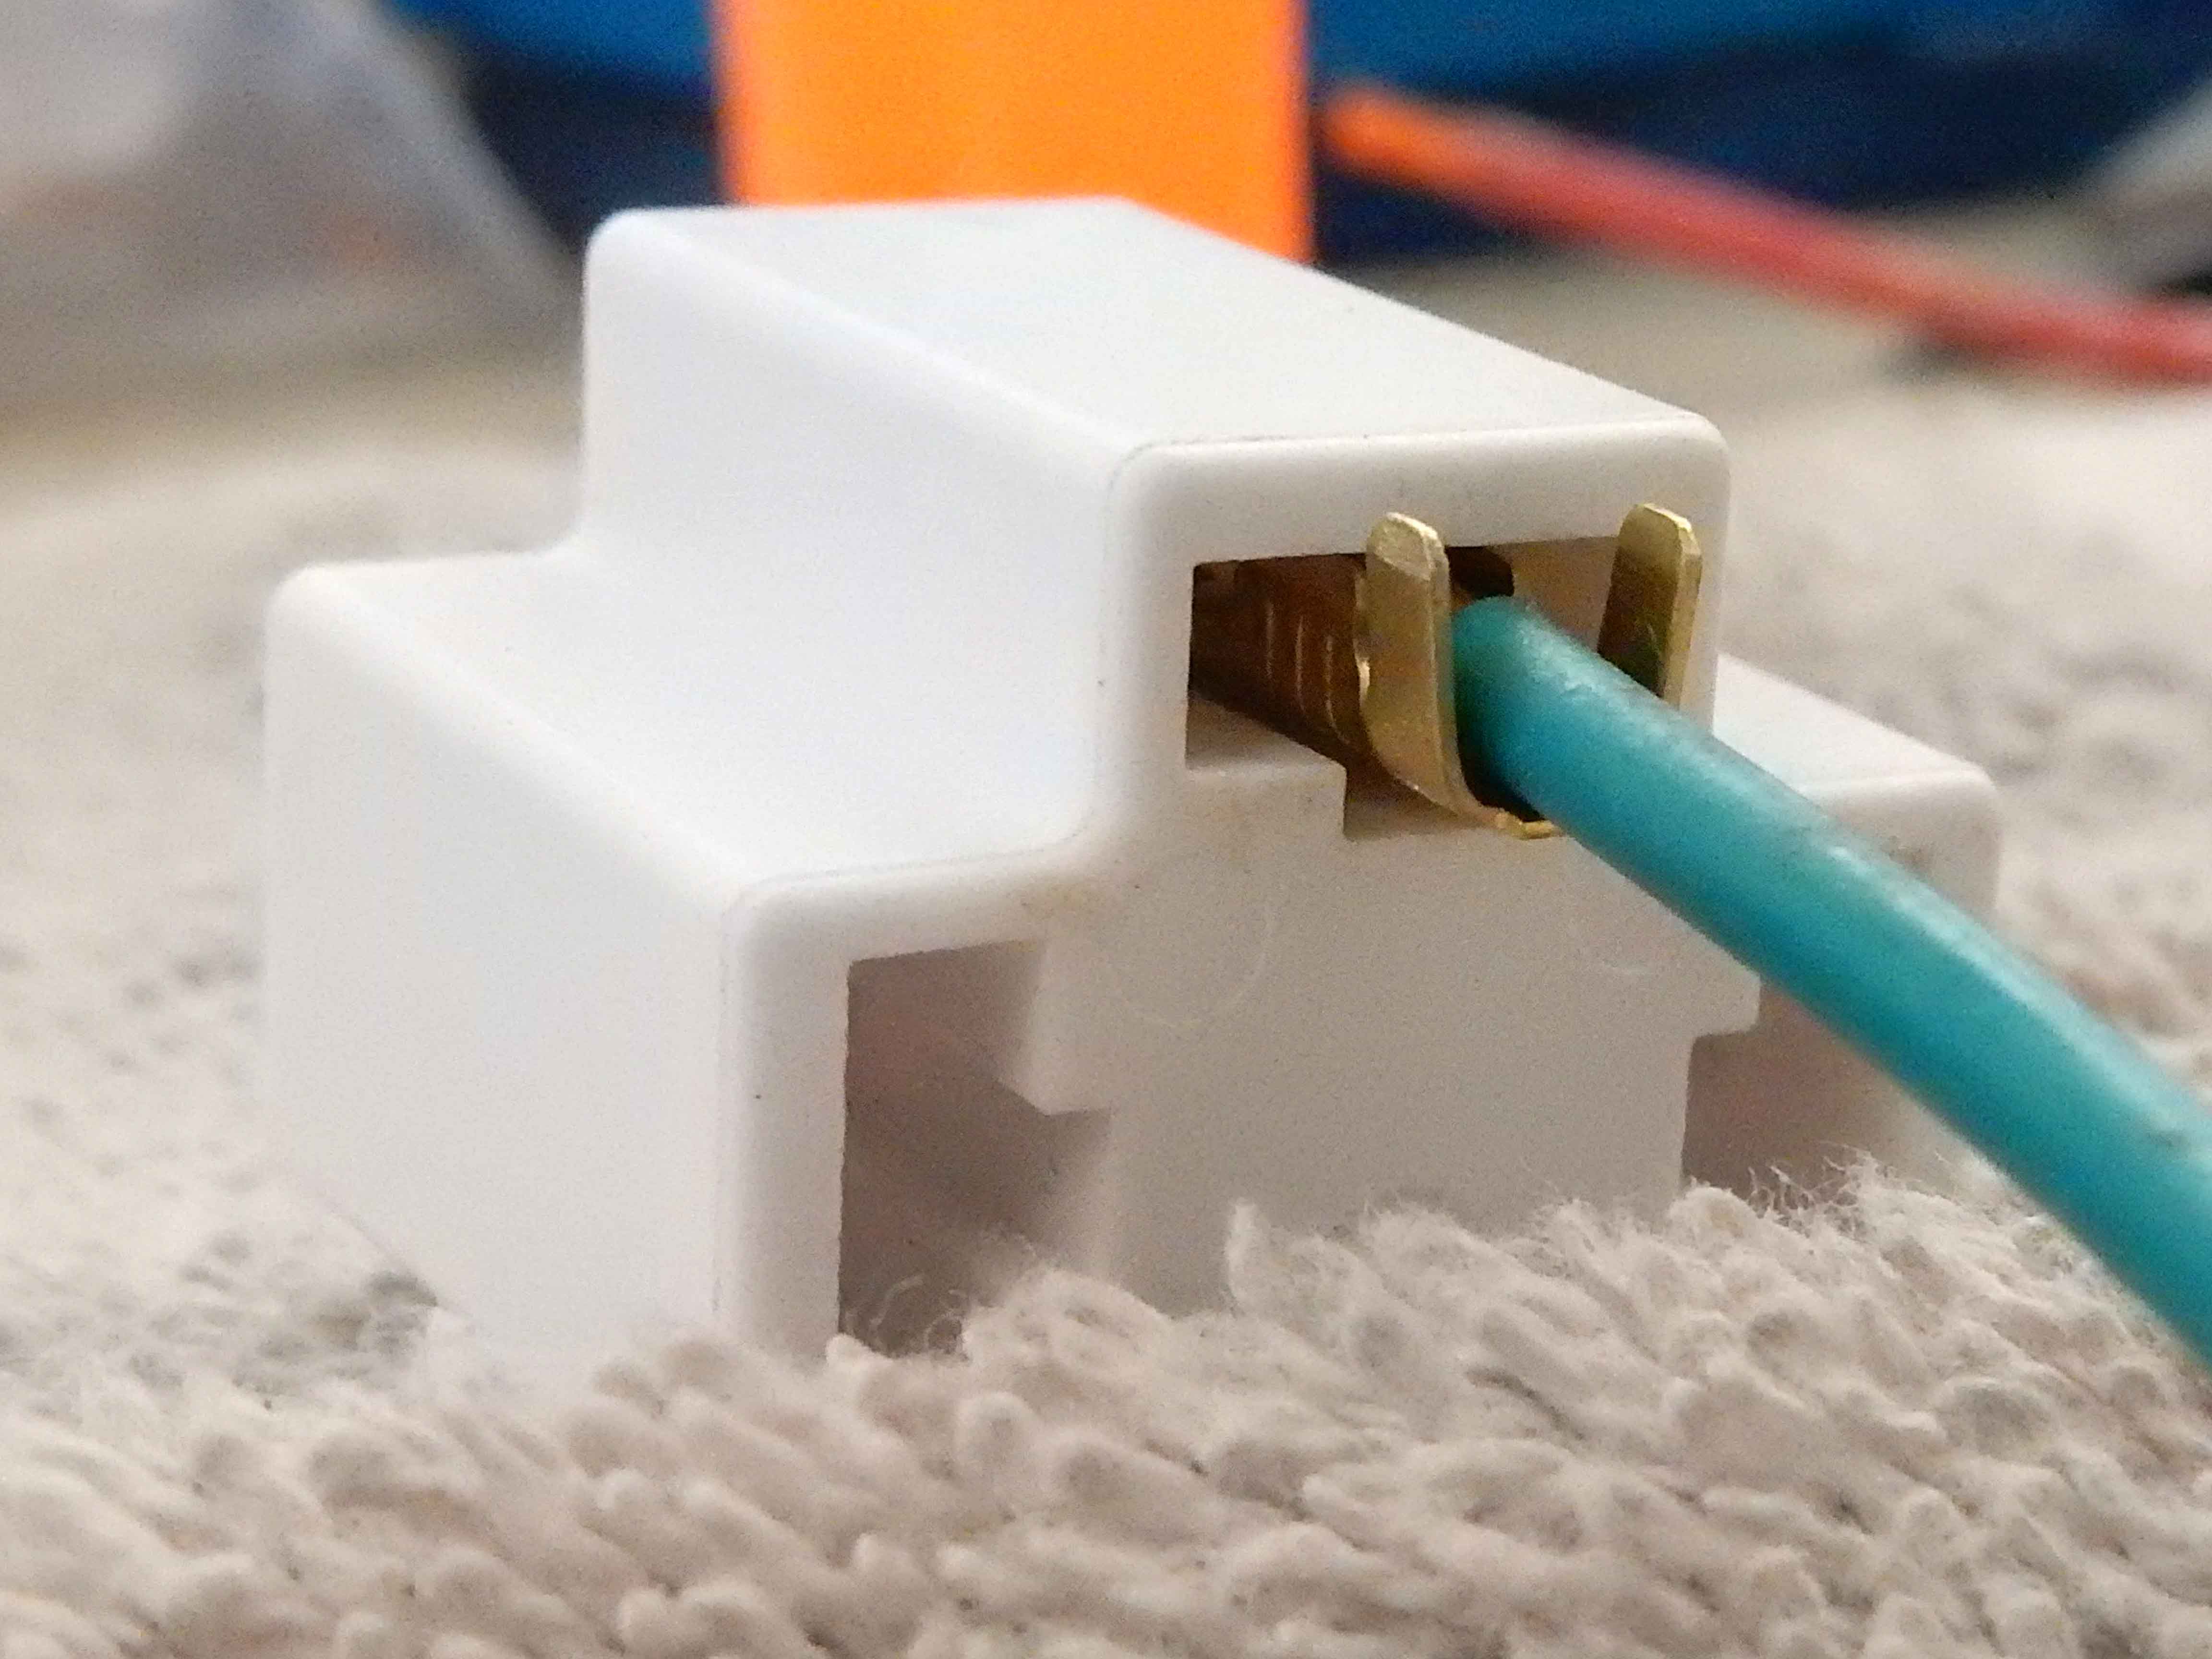
Jim has a really good point - it isn't the hole in the outer shell but the opening in the inner insulator into which the terminal has to go. I think 14 gauge wire is about the max that you can get in the terminals and get the terminal into the connector. Here's a pic of a #14 wire laying in the terminal and it looks like when you crimp the arms over the insulation, if you do that, it'll just fit.
 But here's a #12 wire laying in there, and I seriously doubt that it would fit if the arms are crimped over the insulation. And while you could crimp the arms over the wire itself and not the insulation, and then use heat-shrink over the arms, I'm not sure that would go in. 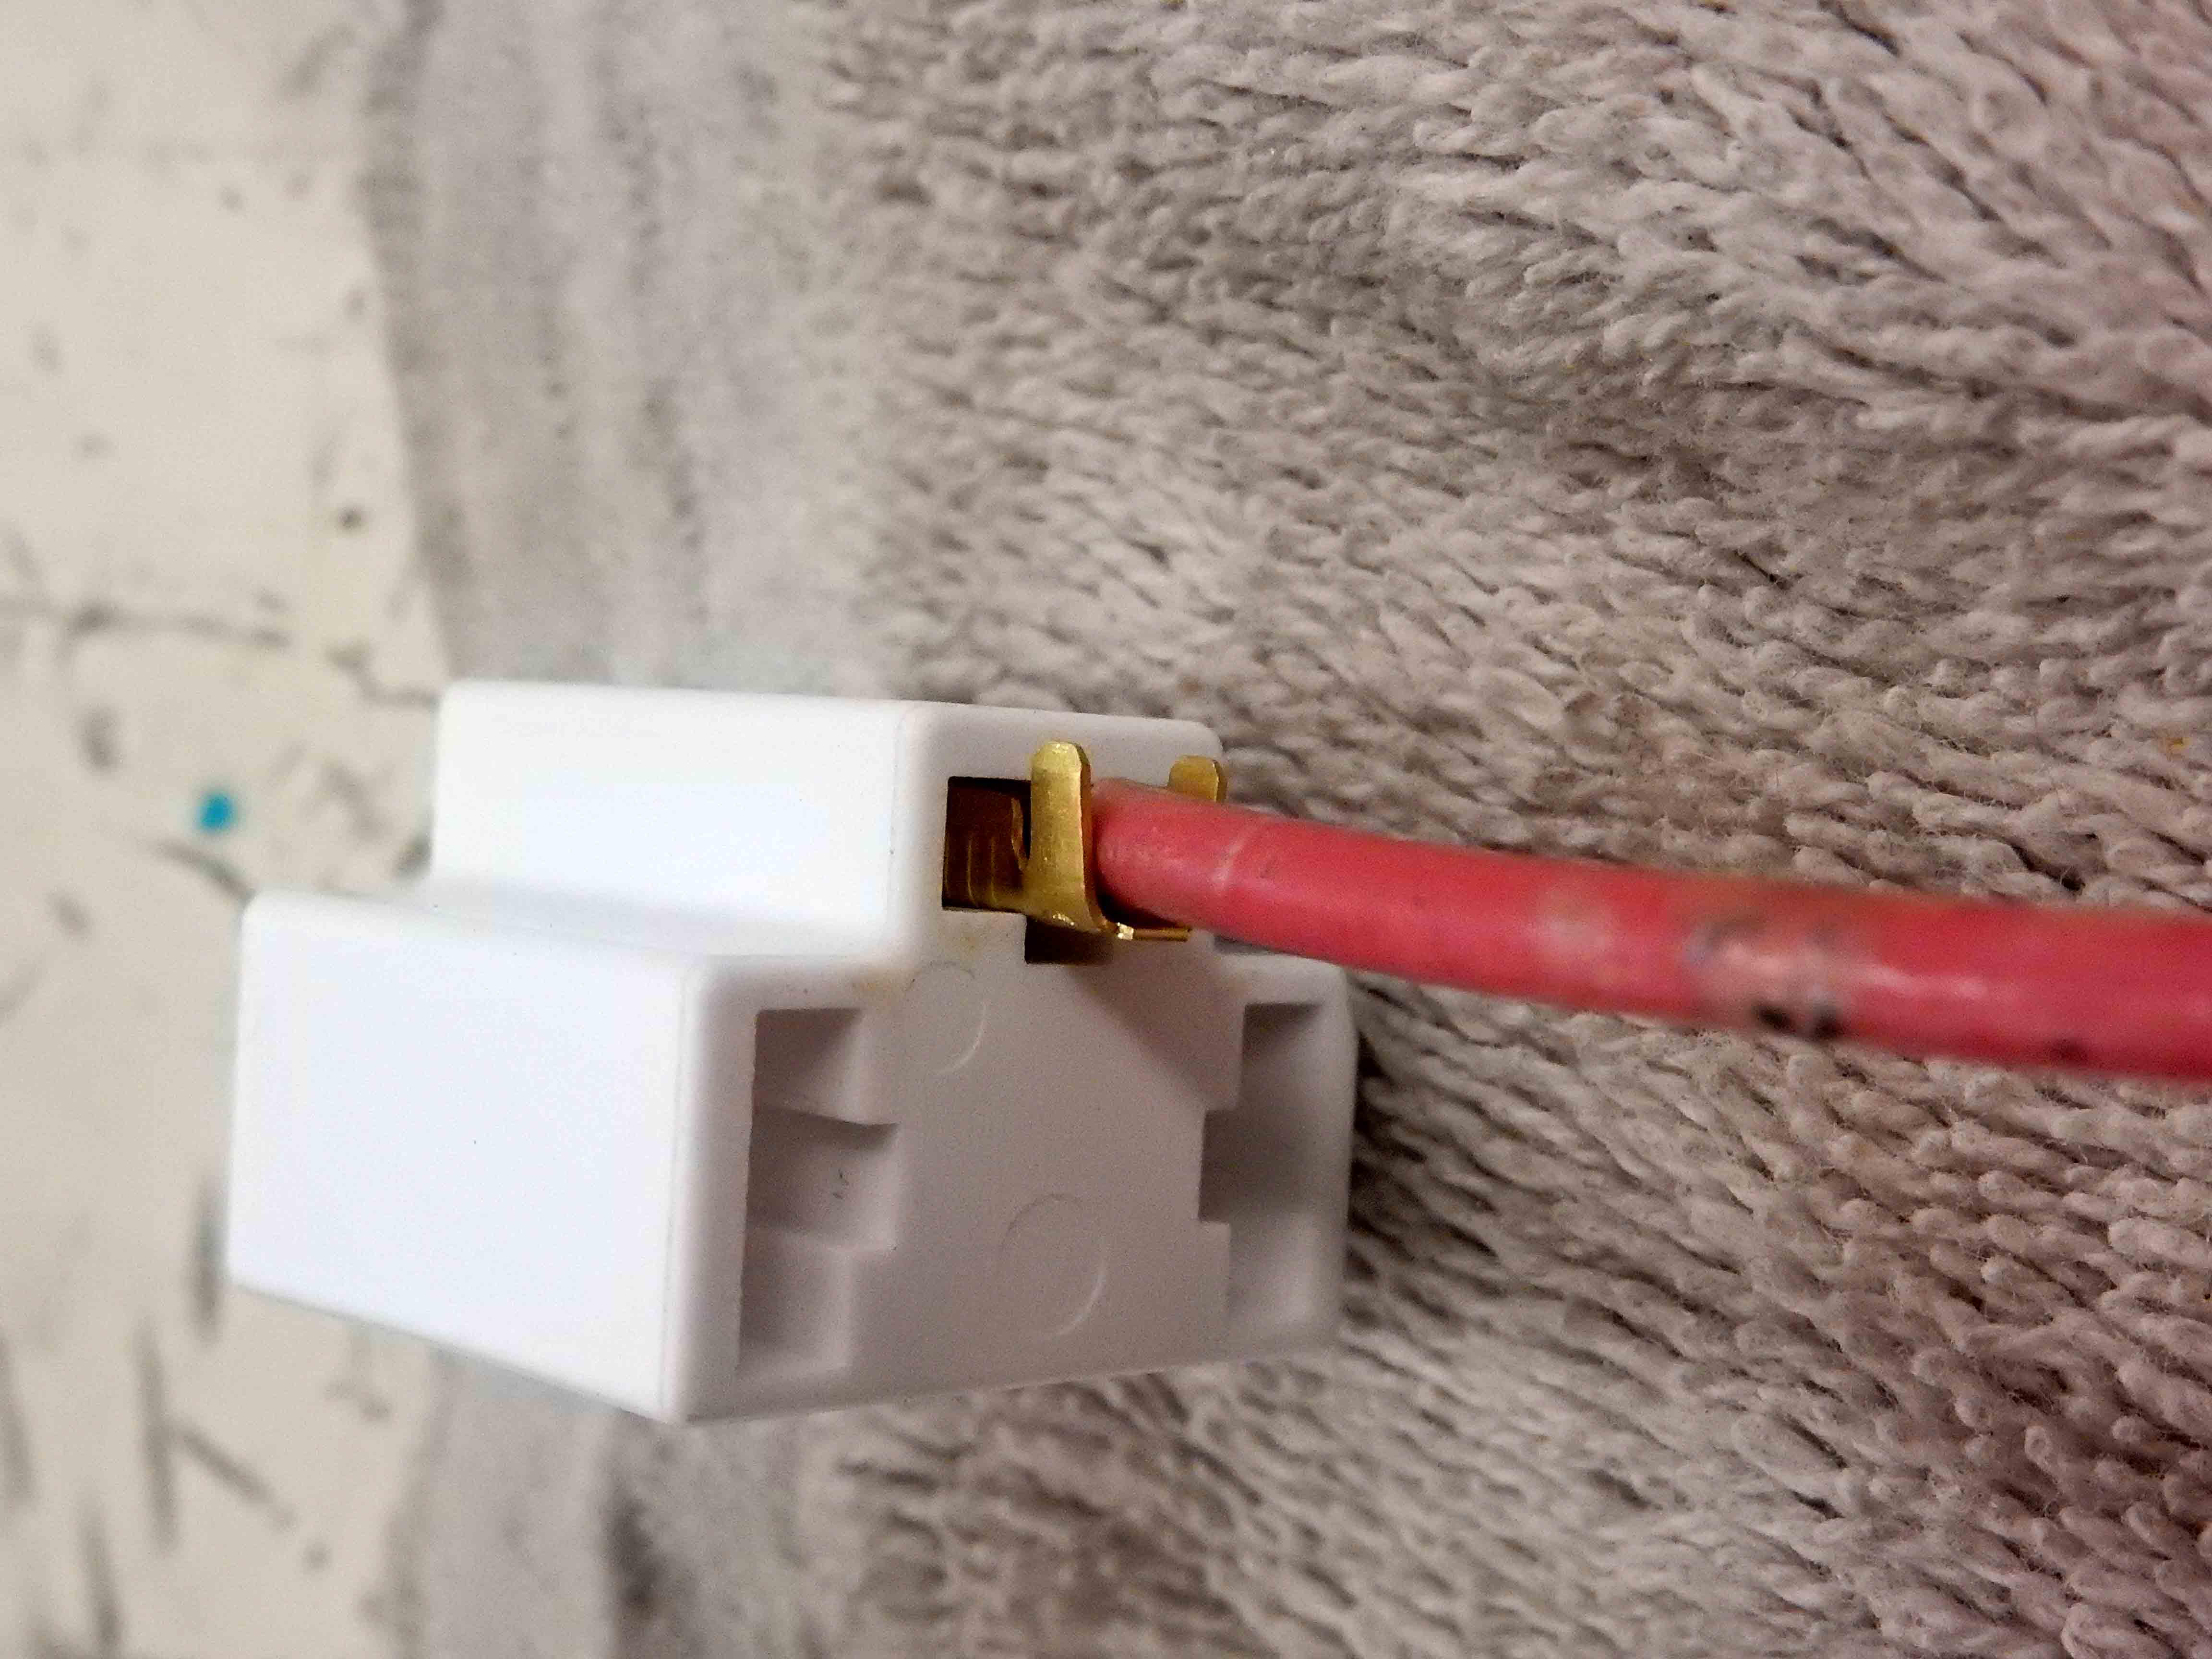 As for what I did today, I got the radiator support fully installed. I realized that some of the fasteners for it will be difficult to get to after wiring and other things are done, so I needed to get them in and tightened now. Toward that end, the first job was getting all the nuts off the old radiator support and installed on the new one. Then I positioned the fenders and tightened the fasteners to them down. But since the driver's fender was a bit high I loosened the bolts at the cab, sat on the fender, and tightened the bolts down. (Dad used to say "Use your best asset", and grin.) Not sure I gained much, but I tried. Then I put the fasteners in for attaching the fender liner to the radiator support and tightened things down there. That only left attaching the fender liner to the battery tray brace. But, the u-nut is supposed to clip into the fender liner and the bolt come through the brace into it. However, the hole in my fender liner is enlarged such that the nut won't stay in place, so I put the u-nut on the brace and brought the bolt in from the wheel opening side with a fender washer. So, here's what it all looks like. The wiring is run below the battery tray, and I'm happy to say that the convolute can still be moved so it isn't being pinched. But, I have yet to lengthen the wires to the marker light, so the battery tray will have to come out so I can get to the wiring. But the brace doesn't have to, so the fender liner bolt can stay in. 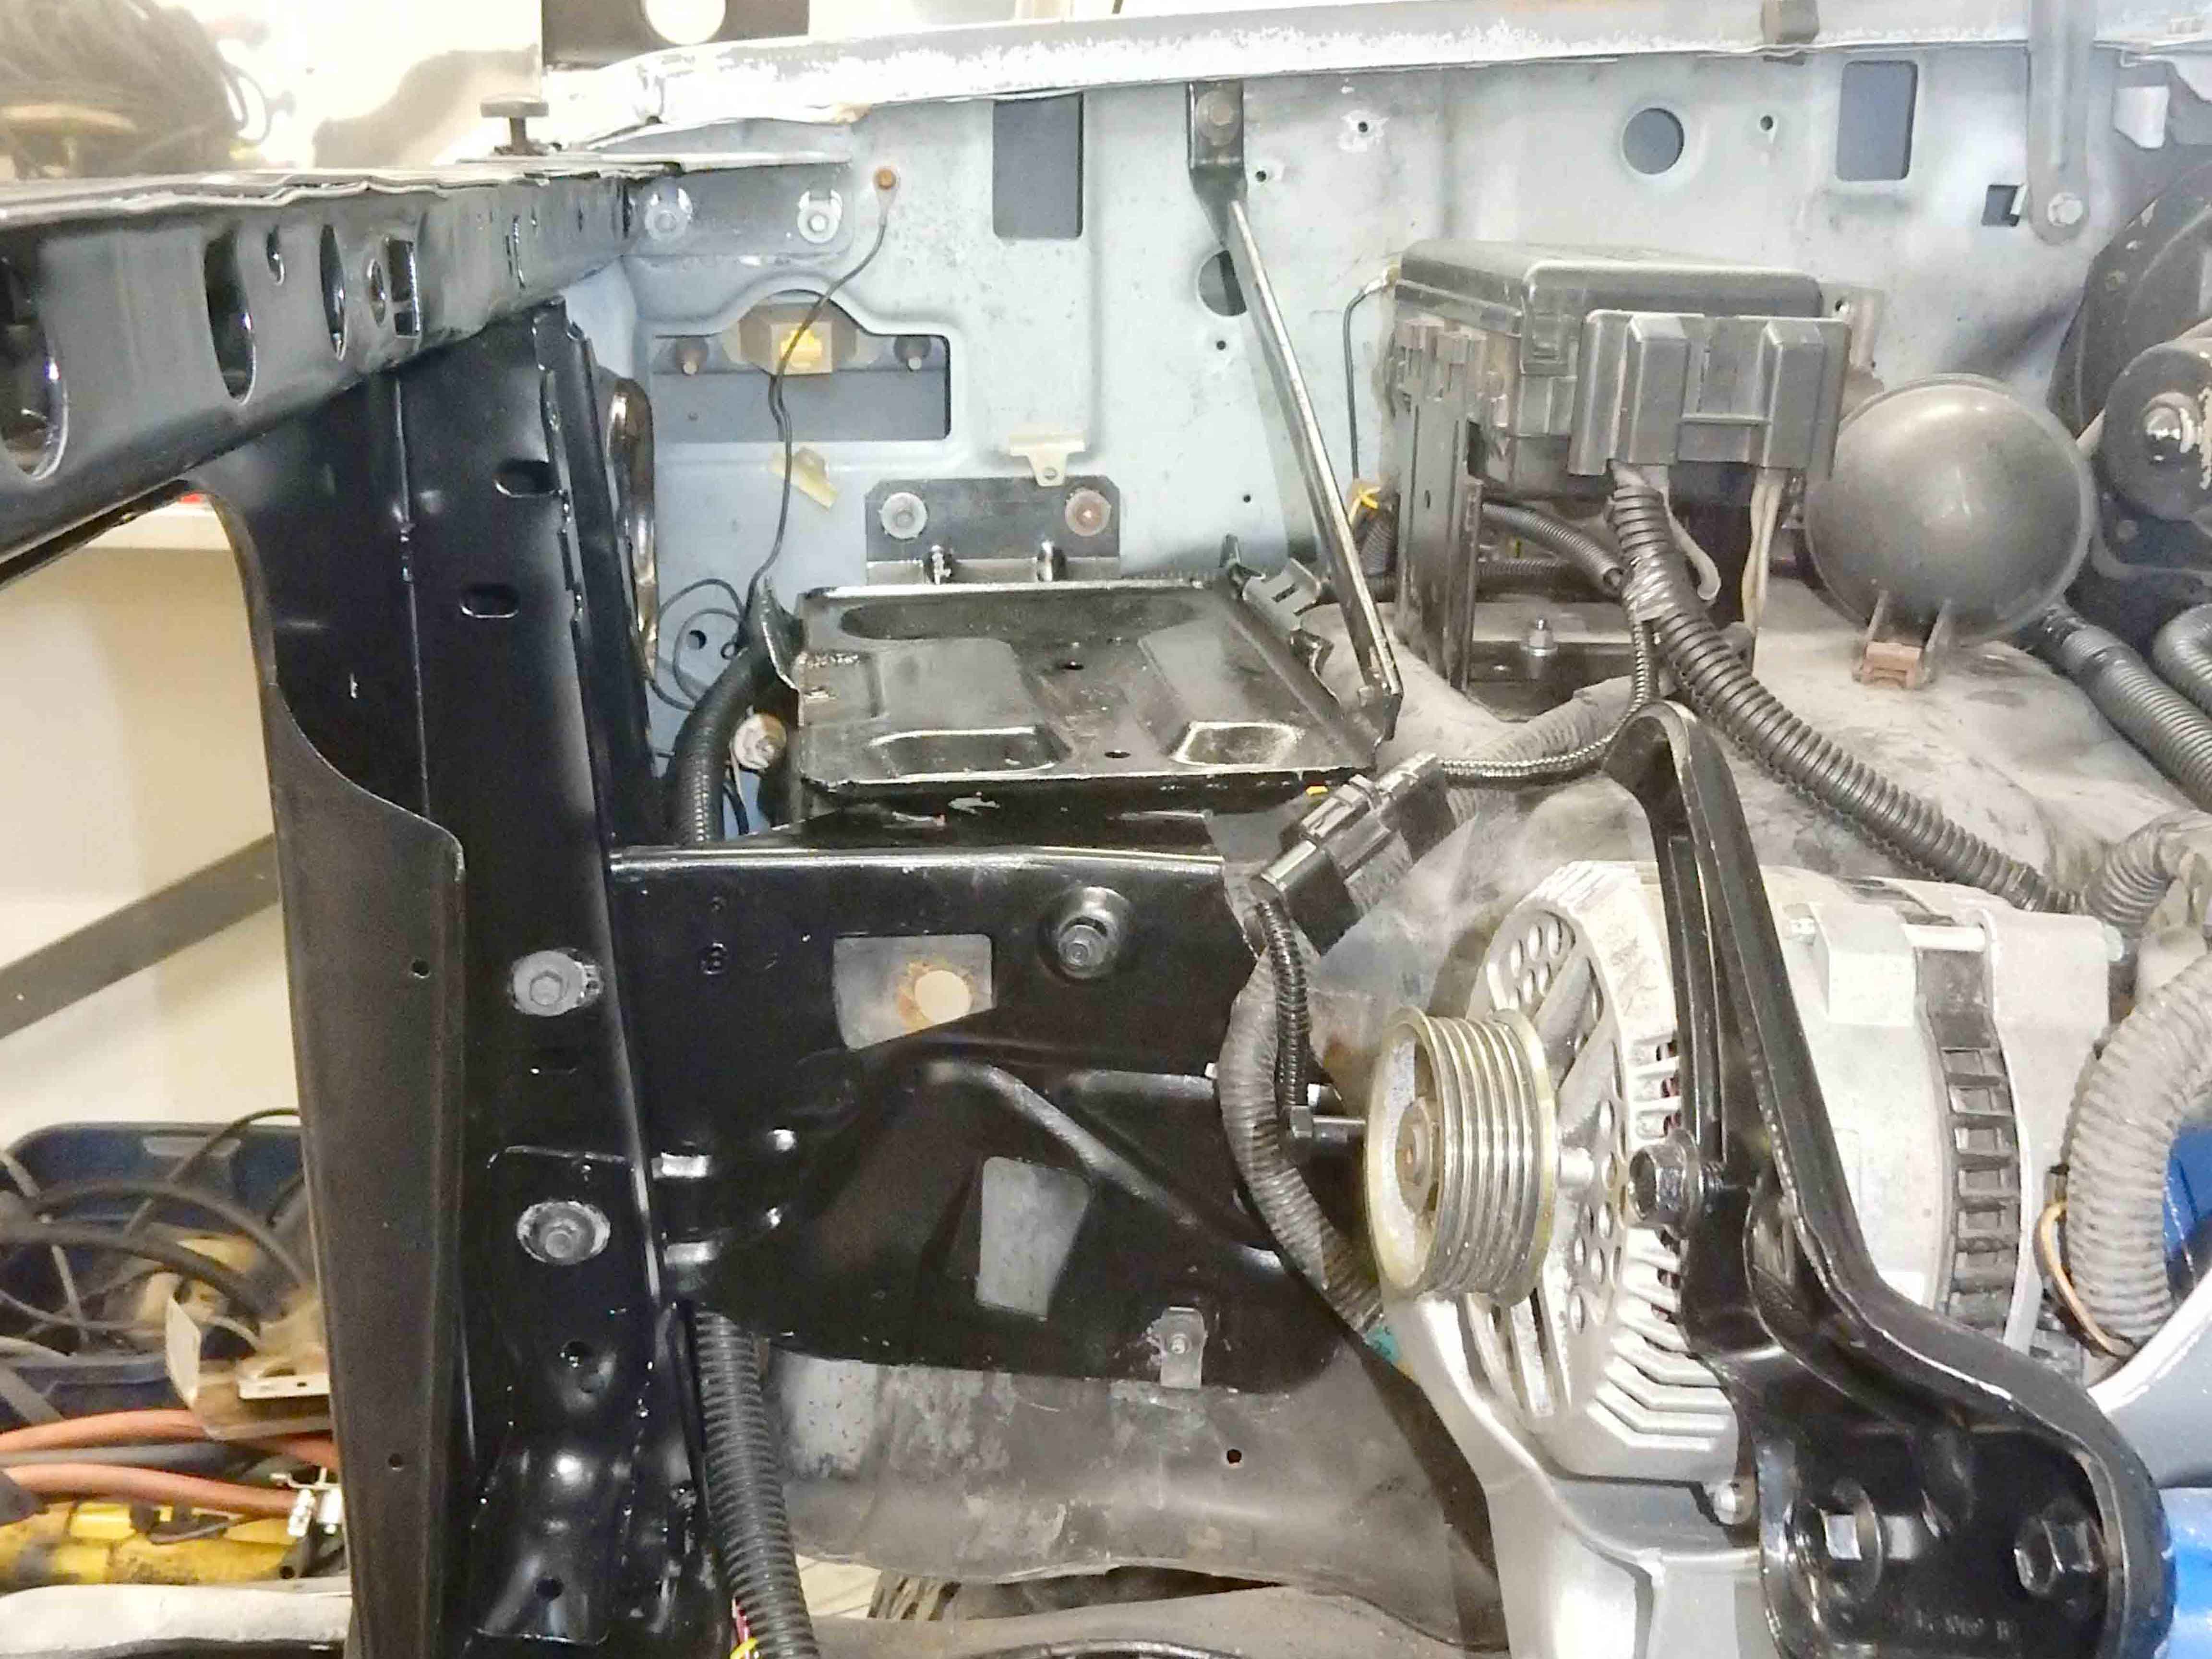
Gary, AKA "Gary fellow": Profile
Dad's: '81 F150 Ranger XLT 4x4: Down for restomod: Full-roller "stroked 351M" w/Trick Flow heads & intake, EEC-V SEFI/E4OD/3.50 gears w/Kevlar clutches
|
|
|
I believe I did the same for my inner fender liner mount as mine was also enlarged.
The nice thing about your PDB being mounted on that inner fender is that it's no different than all the solenoids, vacuum hoses, and wiring that is on the 85-86 EFI trucks. Looks almost factory.
|
|
Administrator
|
In reply to this post by ArdWrknTrk
Yeah, I wasn't talking about drilling ceramic - I could only see that ending poorly
 That comment was only for the orange plastic part. That comment was only for the orange plastic part.
We may have interpreted that post differently. I didn't see any mention of the terminal not fitting into the ceramic part so I may have been focusing on a different part of the problem. The terminals are likely 16-14 as you said. From the looks of it, I would say with the right gauge terminal and some txl 12awg wire you wouldn't have any issues. With txl, even that 14awg terminal would likely get it done. At 10awg though, even with txl, it might be pushing it. On my drivers side I have 12awg txl in each of the three terminals with heat shrink over them and they fit with no issue at all. Not having the ceramic one I can't say if the slots are thinner or not. On my passenger side I have a 'double' terminal (posted the number in the latest headlight relay thread) in each of the three slots with two 12awg txl's in each AND heat shrink. Those do bulge the plastic housing a bit at the back. Not enough for any concern and without the heatshrink I don't believe it would but I would be very skeptical about that setup working with the ceramic. I know it's what you have on hand but I might pass on the 10awg and pick up some 12 - it would still satisfy your overkill requirement 
Also, I have the 12awg txl and 10awg txl on hand and can get OD measurements if interested.
Scott
'Camano' 1986 F250 Supercab XLT Lariat 460/C6 'Chanute' 1980 F350 C&C 400/NP 435 - Gin Pole But there ain't nothin' wrong with the radio |
|
Administrator
|
Shaun - That was the plan, to look like Ford did it. Maybe I'll get the 7.5L HO decal done to go on that dual snorkel air cleaner and finish off the look.
Scott - I will measure the slot and the material in the terminal then you can do the math to see what will fit. But I learned today that the kids will probably be here next weekend, so I need to get the last bit of the wiring done ASAP. I'm going to look for smaller wire around the shop, but if not I'll press on with the #10 for the high beam and #12 for the low beam. I'll put #14 pigtails on and solder and heat shrink to the larger wires. Sort of a bus with drops to the headlights, with local grounds. That will let me get the run across the radiator support done, which then let's me put the auxiliary battery tray in, place the smart battery isolator, and terminate the supply from the passenger's side. Then the batteries could go in, the starter in, and I'd have the electrical system finished. I think. Well, no. I just had a thought about the fuel system, which has electric fuel pumps. The question is whether I put the '85 system back in or go with the later system with the fuel delivery modules. Here are some thoughts: 1985 System: It'll go right back in as I have all the parts. But, I'll only be able to have one tank as I don't have the electric switch and valve combo and don't want to spend the money on something that is both expensive and would be eliminated when I go to EFI. And, I'd want to clean up the horrible twists and bends in the lines and pull out the hot fuel handling system as well as the dead-head style fuel pressure regulator and go with the return style regulator I have. But why put all that work into it?FDM's: This is the EFI system and has the pumps, sending unit, and switching valves in the tank, so the supplies and returns are just wye'd at the back of the engine, and I have the hoses from Huck. If I did this now I could install the return-style pressure regulator I got from Vernon, assuming a Holley 12-803BP can handle the pressure that the FDM's put out. And the only electrical changes would be to eliminate the dropping resistor in the feed to the pump, as Bill said I have to do, and to eventually come up with the Arduino solution as the FDM's sender is the later style that won't work properly with a Bullnose.Thoughts?
Gary, AKA "Gary fellow": Profile
Dad's: '81 F150 Ranger XLT 4x4: Down for restomod: Full-roller "stroked 351M" w/Trick Flow heads & intake, EEC-V SEFI/E4OD/3.50 gears w/Kevlar clutches
|
|
Administrator
|
Hmmm, no thoughts on the fuel system?
Anyway, I got the passenger's side headlight connector wired up today. But in order to do that I had to install that headlight, which took a while as I had a hard time finding all the parts. (Note to self: Do a better job of filing things away.) I did find enough parts to get that headlight on, but will need to find more to get the driver's side headlight on.  And, along the way I realized that now is the time to put the ground between the radiator support and the passenger's fender. In the pic below you can see the radiator support end of the ground jumper above the orange headlight connector. And, you can tell that I have a bit left to do to neaten up the wiring to the marker light and turn signals by adding some convolute, but I'll do that tomorrow. 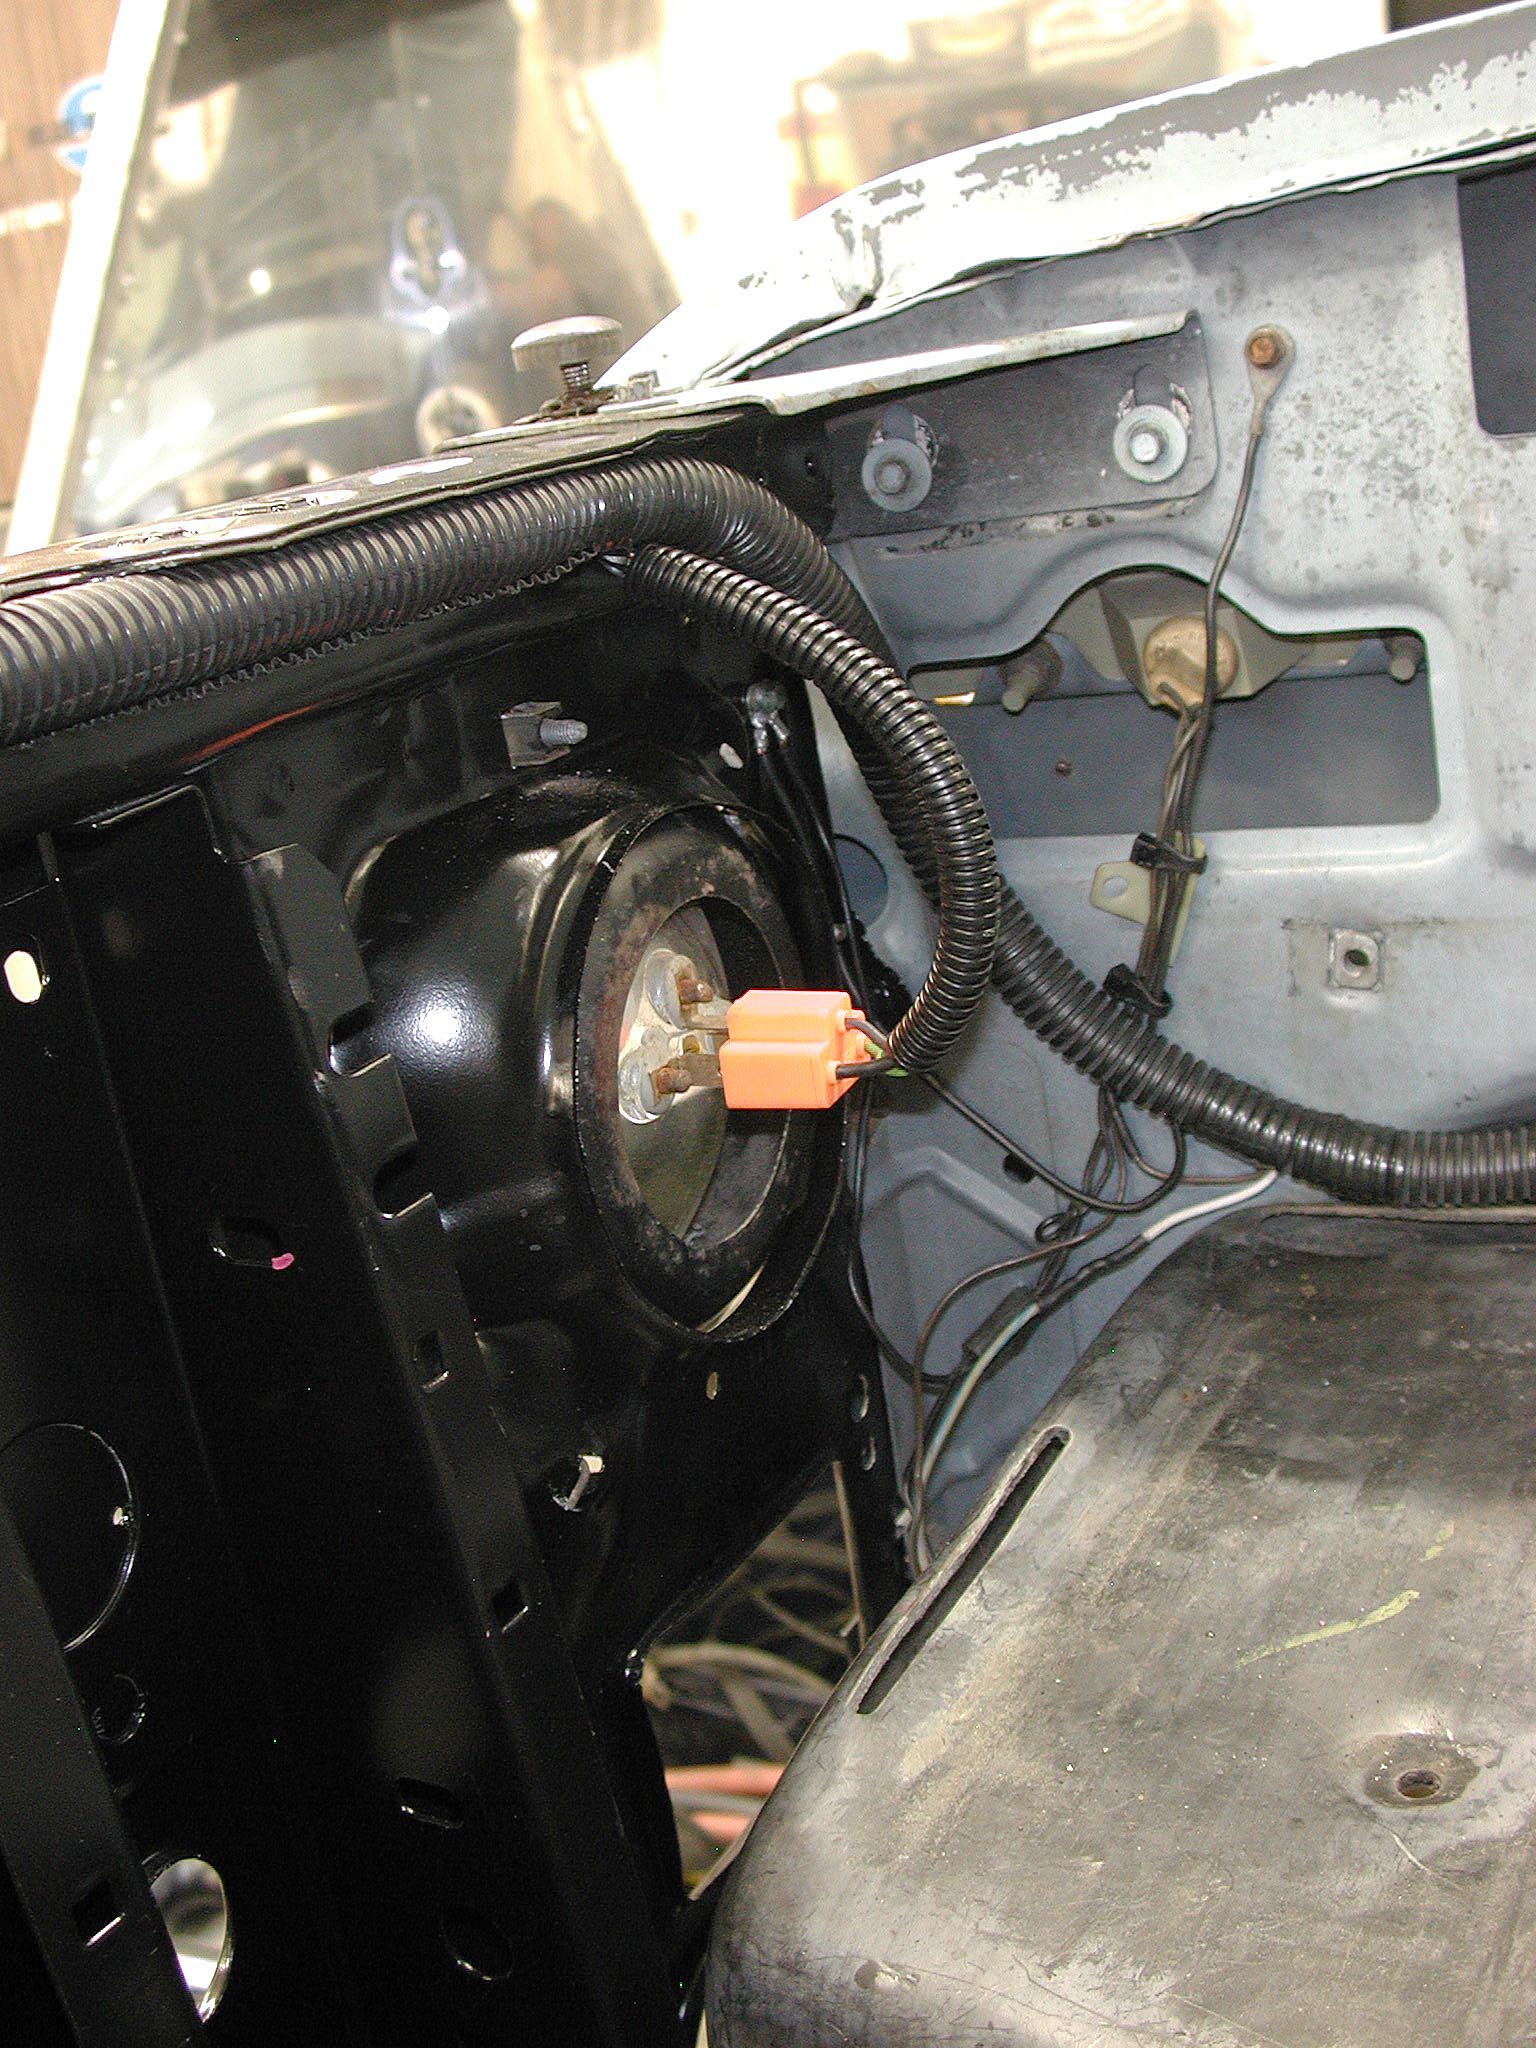 Now, here's how I did the headlight connector itself. Here you can see a #12 black wire for the ground, which I think is about the max you can get in, and what I think are #14's, but might be #16's, from my spare harness. That gives me the factory wire colors, and the smaller wires are only about 9" long so I don't think the voltage loss will be enough to worry about. 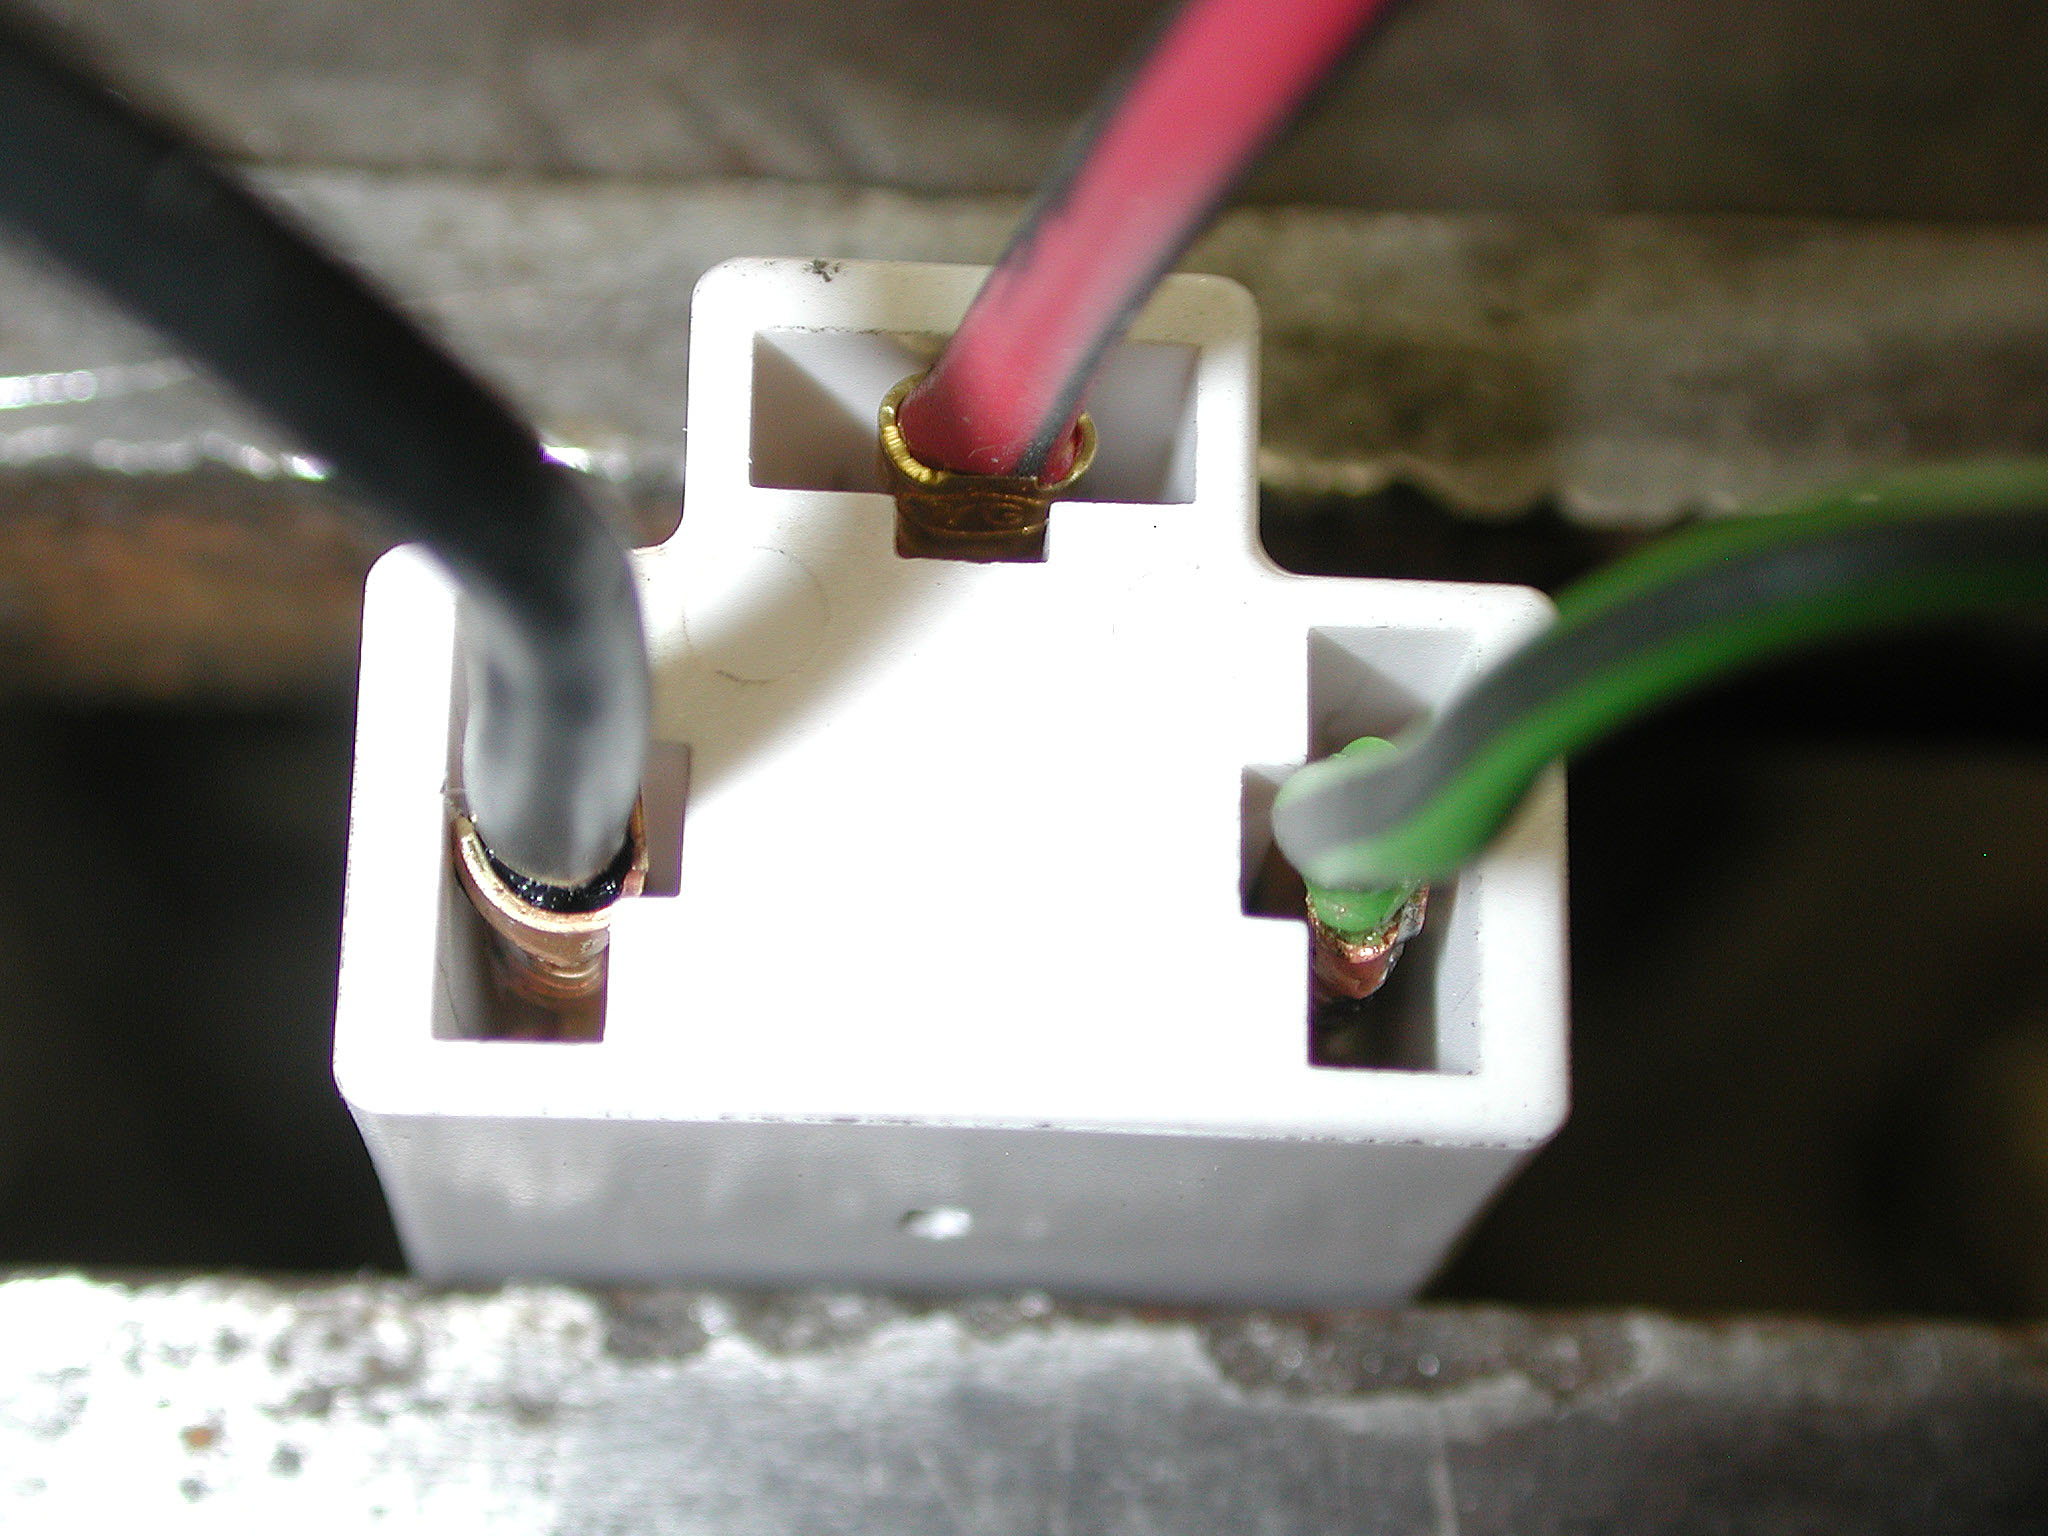 As for how I spliced into the #10 and #12 headlight feeders, I did that by cutting about 1/2" of insulation off the heavier wire, wrapping the smaller wire around it and soldering it, and then slipping the adhesive-lined heat-shrink over it. Here is a shot of the #12 having already been spliced and the heat shrink on it, and the #10 having been soldered but the heat-shrink not applied yet. 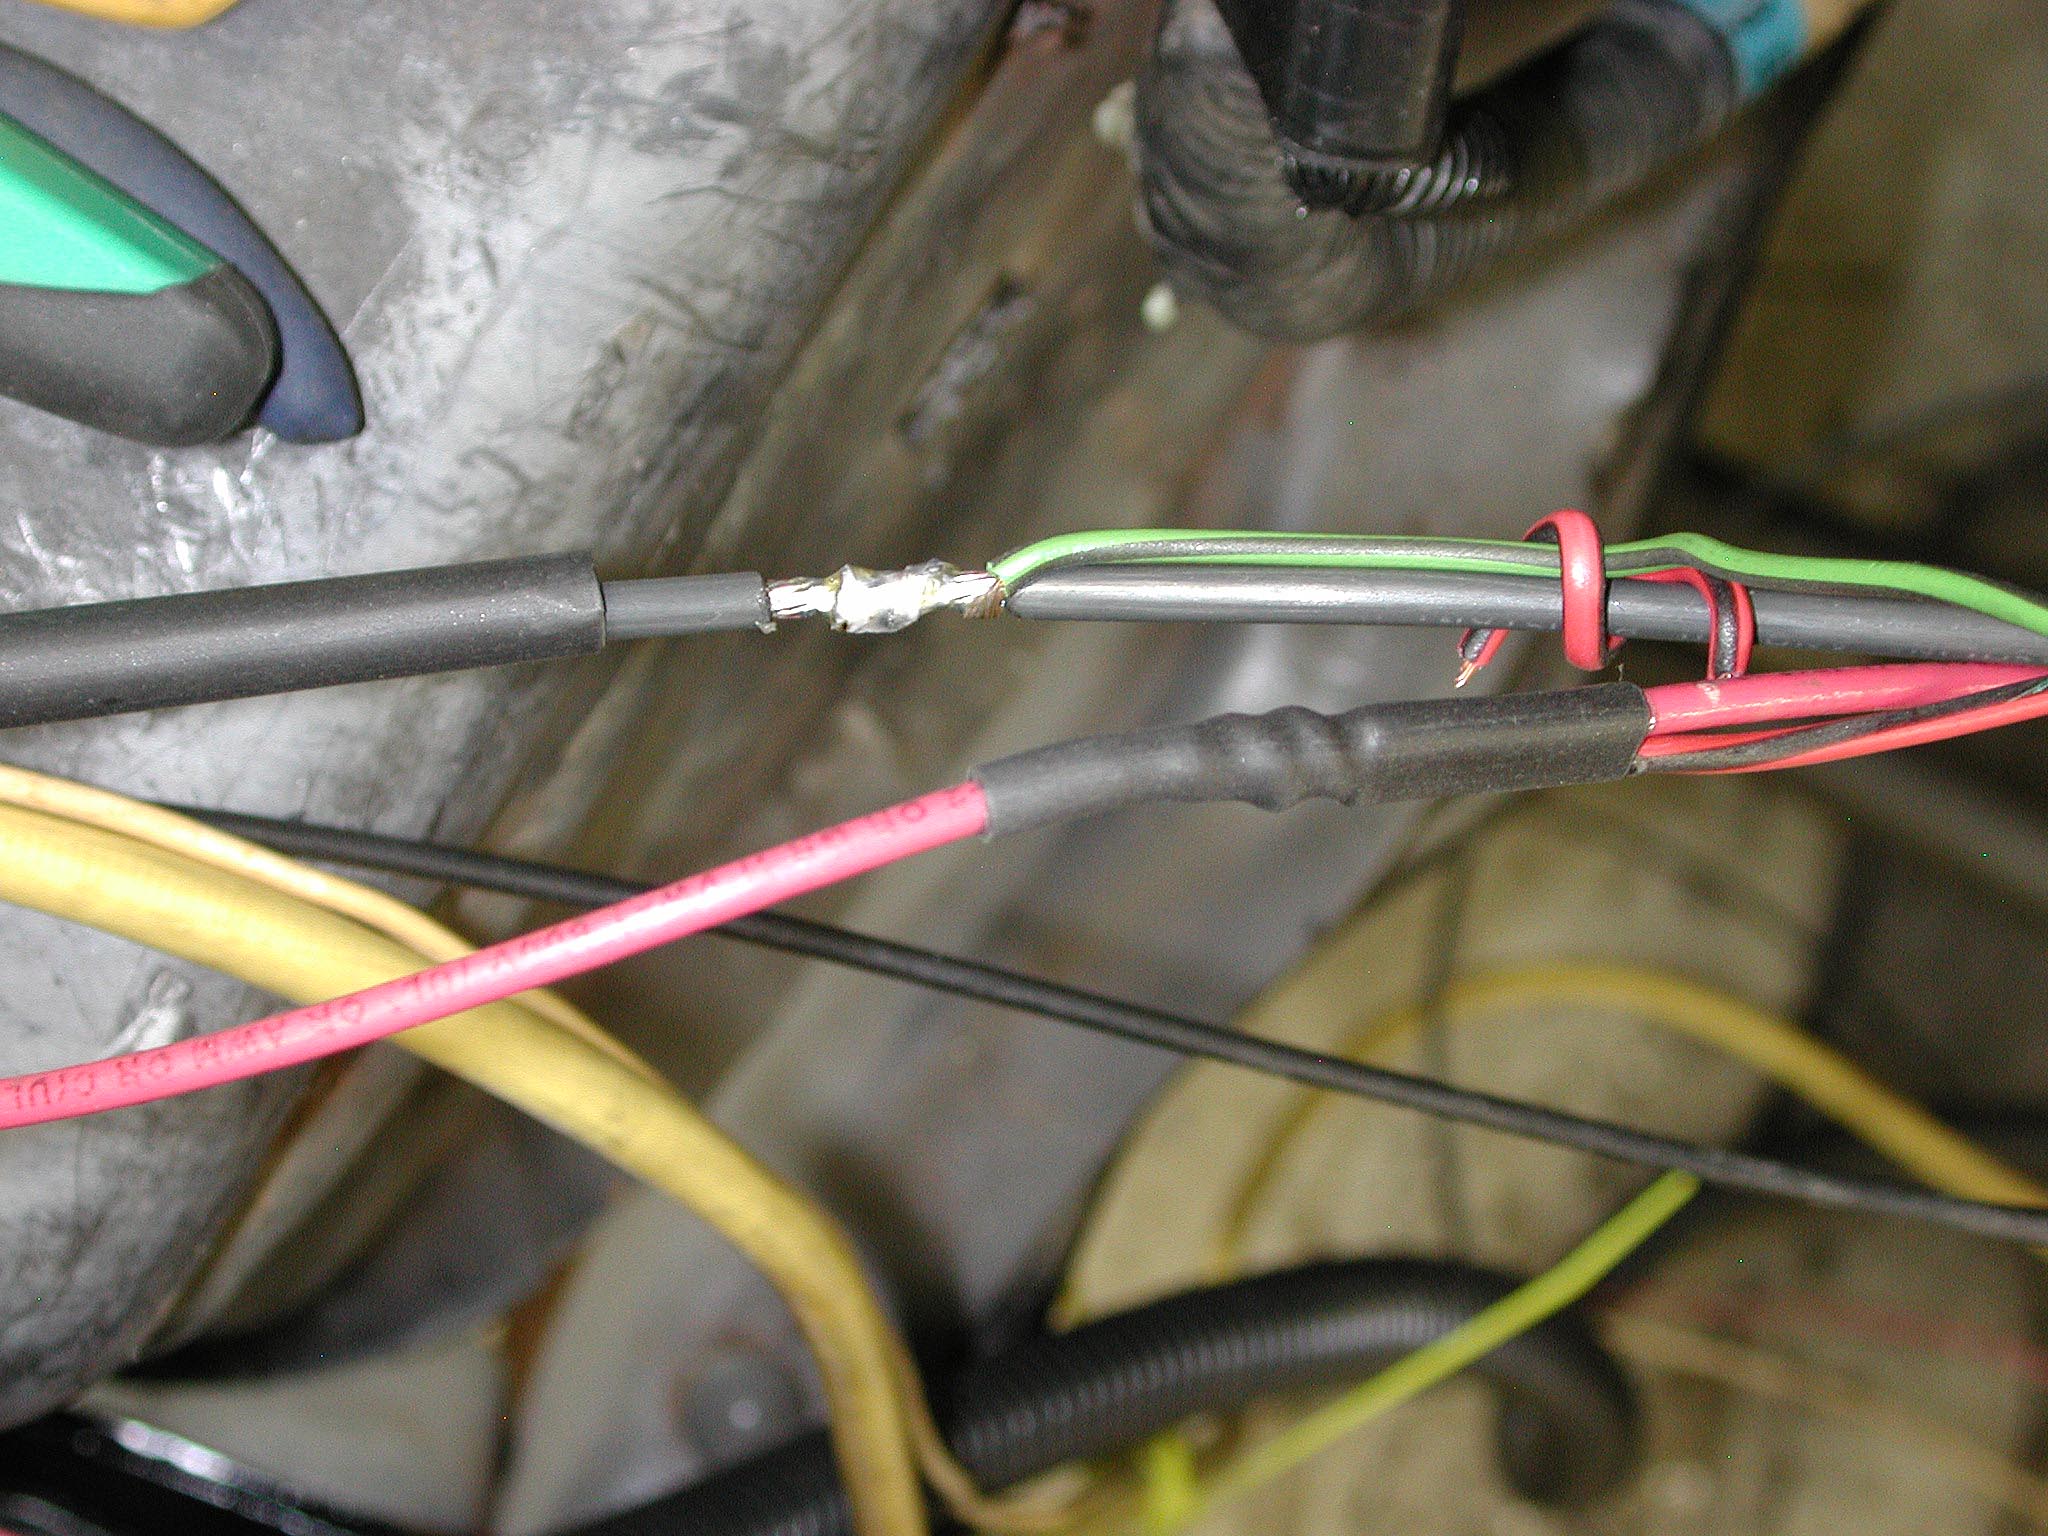
Gary, AKA "Gary fellow": Profile
Dad's: '81 F150 Ranger XLT 4x4: Down for restomod: Full-roller "stroked 351M" w/Trick Flow heads & intake, EEC-V SEFI/E4OD/3.50 gears w/Kevlar clutches
|
|
Administrator
|
On the fuel, I'd say it depends upon how quickly you want it on the road right now before taking it down in a few months.
The fastest would be the bullnose setup and don't mess with the bends or remove the hot fuel or anything like that. That would get you running with a known config quickly. Or you can do the efi stuff and either take the time now to get the sending unit and such converted or run it with the bare minimum. Either way this would be the best labor/time wise in the long term as you aren't having to remove the bullnose stuff later. *Disclaimer: I don't have a good idea of what all this change entails beyond the items you just mentioned* Personally I'd lean toward the bullnose setup to get it running for this summer and enjoying it in nice weather but it's definitely a 'your call' situation.
Scott
'Camano' 1986 F250 Supercab XLT Lariat 460/C6 'Chanute' 1980 F350 C&C 400/NP 435 - Gin Pole But there ain't nothin' wrong with the radio |
|
Administrator
|
That's the kind of feedback I was looking for. And if nothing else was happening I think I'd agree with you. However, our kids & grandkids are set to arrive Saturday and all work on the truck is going to come to a halt. So I'm doubting it'll be running this summer.
Our kids need a safe place, so we are thrilled to share ours with them. But they don't know where they are going from here, nor when. So it may be a while before I get back to the truck. Having said that, if I get back to it soon then I think I'll go for "quick and dirty", meaning the '85 stuff, and get it on the road. But if it runs into the fall before I get back to it then I'll probably go for the EFI approach. Thanks!
Gary, AKA "Gary fellow": Profile
Dad's: '81 F150 Ranger XLT 4x4: Down for restomod: Full-roller "stroked 351M" w/Trick Flow heads & intake, EEC-V SEFI/E4OD/3.50 gears w/Kevlar clutches
|
|
Administrator
|
Gary,
I think your immediate priority with the truck should be getting to a point where you can hit pause, and not have many (if any) loose ends. End a chapter???? Family will always come first. And obviously yours will have to SIP for at least the next couple of weeks. Stay well
Jim,
Lil'Red is a '87 F250 HD, 4.10's, 1356 4x4, Zf-5, 3G, PMGR, Saginaw PS, desmogged with a Holley 80508 and Performer intake. Too much other stuff to mention. |
|
Administrator
|
Jim - That's the goal. I plan to have the electrical system done and the shop fairly well cleaned by end-of-day Saturday. That, I think, will be the point where I can hit pause.
Here's what I think that entails: Passenger's side headlight, marker, and turn signal wiring secured - some convolute, tape, and zip ties.Main battery tray installed - 8 bolts that have already been in and are readyAux battery tray in - just a few bolts that are to-handWiring run across the radiator support - rubber-lined clamps to the readyDriver's side headlight installed - gotta find more of the plastic sliders and two more of the machine screws that hold the headlight bezel to the bucket. But, if push comes to shove I could guestimate where the headlight will be based on the passenger's side and not have to have the headlight in to do the connector.Driver's side headlight connector wired and installed - easy peasySmart battery isolator installed and the big yellow cable from the PDB on the passengers side terminated to it.General tie-down of the wiring on the driver's side fender liner.Having said all that, the document to put in the PDB to show which fuse & relay is what might be good to get done now before I forget where I documented that stuff. Anyway, I'm close. The pause is upon me and I just need to get a bit more done.
Gary, AKA "Gary fellow": Profile
Dad's: '81 F150 Ranger XLT 4x4: Down for restomod: Full-roller "stroked 351M" w/Trick Flow heads & intake, EEC-V SEFI/E4OD/3.50 gears w/Kevlar clutches
|
|
|
I didn’t have an immediate thought. I agree with Scott, Jim and you.
It got me thinking again as to what I’m going to do when the day comes that I can’t get parts for the fuel tanks. The rear sender for my truck is apparently unobtanium now. Inline fuel pump? Can I put a “manual” pump on this engine? Maybe a rock tied to a hose so it will stay on the bottom?!  Glad your family has a safe place to come to. Enjoy!
Dane
1986 F250HD SC XLT Lariat 4x4 460 C6-Sold 1992 Bronco XLT 4x4 351W E4OD 1998 GMC Sierra SLE K1500 350 4L60E Arizona |
| Edit this page |