|
Administrator
|
Thanks, Bob. I guess I'll look for a larger hose.
Oddly enough, it occurred to me that "HOPB1450" is 1/4" x 50', so I Googled Bostitch HOPB3850 and got hits. But, no one carries it. Amazon's page for it says "We're sorry. The Web address you entered is not a functioning page on our site." And Walmart says it is out of stock. But I'll just keep my eyes open for a 3/8" hose with a 200 psi rating and field-repairable fittings. As for the air bags, I'm sure that the Daystar cradles will attach to the axle and the bags to the frame, so the air lines should attach to the body somewhere. And I'm kinda liking the idea of them being on the control panel for the compressor in the tool box. That way there won't be anyone messing with them and they shouldn't get hit. Looks like I'll have the electric line between the compressor and the inverter to come out of the box as well as the air line to the tank. So if I bring the air bag lines up in that bundle and protect it then it should be clean and solid.
Gary, AKA "Gary fellow": Profile
Dad's: '81 F150 Ranger XLT 4x4: Down for restomod: Full-roller "stroked 351M" w/Trick Flow heads & intake, EEC-V SEFI/E4OD/3.50 gears w/Kevlar clutches
|
|
Administrator
|
In reply to this post by Gary Lewis
That's really interesting Gary.
I'd never put mine on a scope, but I knew you had one and thought you'd find it enlightening. We would usually only use a large hose when doing demanding jobs like sheathing or roofing where you have multiple guns firing quickly and using a splitter nearer the work. ( I'd also have my Emglo wheelbarrow compressor with Honda engine supplying the air) As I said, I think the chuck or valve will be limiting, and in that case, no need for a larger hose. Pieces are coming together, and progress is being made! While I was being pushy, I think you will have a better truck and more versatile setup in the end.
Jim,
Lil'Red is a '87 F250 HD, 4.10's, 1356 4x4, Zf-5, 3G, PMGR, Saginaw PS, desmogged with a Holley 80508 and Performer intake. Too much other stuff to mention. |
|
Administrator
|
You? Pushy? No, I really appreciate the help. And, I do think the truck is going to be stellar. Very capable, very strong, and quite useful.
![]() I'm hoping a 3/8" hose will be big enough to do the job well, but small enough to be easily stored. But I can easily try my bigger hoses with the pressure dialed down to protect them. So, we shall see. As for the waveform, I was a bit surprised by the voltage, but things seem to work nicely on it so I'm not worried. While the compressor was running today I looked it over for airflow. The inlet in the plastic housing is at the nose of the motor, and there are several outlets toward the back end. So I'm thinking of creating a box on the end of the toolbox into which the compressor goes. It would have a central divider that goes up against the plastic housing, or maybe down over the plastic housing, to keep air from circulating in the box. And there would be a lid on it. Then the side of the toolbox would have an inlet and an outlet with screens. So the compressor would pull air from under the wing of the toolbox and discharge air back under the wing, but about 18" apart. Further, in the path of the air coming in or going out there could be a little power steering cooler, through which the compressed air flows. It would probably be plumbed from the head to it via pipe for rigidity, and then hose from it out through the side of the box and then down to the tank. Clear as mud?
Gary, AKA "Gary fellow": Profile
Dad's: '81 F150 Ranger XLT 4x4: Down for restomod: Full-roller "stroked 351M" w/Trick Flow heads & intake, EEC-V SEFI/E4OD/3.50 gears w/Kevlar clutches
|
I think for most use the 1/4" hose would be fine. The foreseeable (but hopefully not likely) use that I can see for you needing the highest possible flow rate would be if you need to reseat a tire bead. You'd pull the valve in that situation (if you thought of it, which you now will!) so the valve stem would still be the main restriction, but not as much as normal. And you'd want to minimize all other restrictions. Would a 1/4" hose be enough there? Probably, especially at 200 psi. So like I said before, don't take my statement to be worth more than it is. But 1/4" just seems small to me.
Bob
Sorry, no '80 - '86 Ford trucks "Oswald": 1997 F-250HD crew cab short box, 460, E4OD, 4.10 gears "Pluto": 1971 Bronco, 302, NV3550 5 speed, Atlas 4.3:1 transfer case, 33" tires "the motorhome": 2015 E-450-based 28' class C motorhome, 6.8L V-10 "the Dodge": 2007 Dodge 2500, 6.7L Cummins |
|
Administrator
|
There's not enough price difference to worry about, and the size difference is probably not too much either. So I think I like the idea of 3/8".
And, I'll remember to pull the stem if I have to do that. ![]() Now, just have to remember to get the Coyote automatic deflators and with the compressor mounted and the hose bought I'll be good to go! Oh wait. Maybe I need an engine, tranny, t-case, front axle, .....
Gary, AKA "Gary fellow": Profile
Dad's: '81 F150 Ranger XLT 4x4: Down for restomod: Full-roller "stroked 351M" w/Trick Flow heads & intake, EEC-V SEFI/E4OD/3.50 gears w/Kevlar clutches
|
|
Administrator
|
If that's the case be sure to use 3/8 couplers, otherwise you're just adding -a tiny- volume to the tank
I thought all the cool kids seated beads with a long shot of starting fluid and a thrown match? I've done it with the rim on the ground. I still think a Cheetah tank is safer. I wanted to see you with onboard air AND electricity. I should have known where this would go....
Jim,
Lil'Red is a '87 F250 HD, 4.10's, 1356 4x4, Zf-5, 3G, PMGR, Saginaw PS, desmogged with a Holley 80508 and Performer intake. Too much other stuff to mention. |
|
Administrator
|
Dad would have said "If that's a compliment I thank you."
Gary, AKA "Gary fellow": Profile
Dad's: '81 F150 Ranger XLT 4x4: Down for restomod: Full-roller "stroked 351M" w/Trick Flow heads & intake, EEC-V SEFI/E4OD/3.50 gears w/Kevlar clutches
|
|
In reply to this post by ArdWrknTrk
I've seen videos of doing it that way. I've also seen it done with just compressed air. The compressed air method is a lot less dramatic. To my way of thinking, that's a good thing! However, it does require pretty good flow rate. A ratchet strap around the outside of the tire to sort of squeeze the beads onto the rim looks like it helps too (so far I haven't had to reseat a bead, so I'm only going off what I've seen).
Bob
Sorry, no '80 - '86 Ford trucks "Oswald": 1997 F-250HD crew cab short box, 460, E4OD, 4.10 gears "Pluto": 1971 Bronco, 302, NV3550 5 speed, Atlas 4.3:1 transfer case, 33" tires "the motorhome": 2015 E-450-based 28' class C motorhome, 6.8L V-10 "the Dodge": 2007 Dodge 2500, 6.7L Cummins |
|
Administrator
|
I haven't seen it done, but I did get a first-hand report (pun intended) from my brother. They were towing their ATV's back home and lost two tires on the same side of the trailer. He called me and I found two of them at the Walmart close to them. They dropped the trailer, leaving someone on guard, and got the tires.
When they got back the highway patrol was there and he asked how they were going to seat the beads when all they had was a little air bottle. My nephew put a ratchet strap around the tire, whipped out the WD40, squirted it in, and tossed in a match. Boom! The tire was seated. The patrolman was impressed! But my question to my brother is why they didn't take the wheels to WallyWorld and have them mount the tires.
Gary, AKA "Gary fellow": Profile
Dad's: '81 F150 Ranger XLT 4x4: Down for restomod: Full-roller "stroked 351M" w/Trick Flow heads & intake, EEC-V SEFI/E4OD/3.50 gears w/Kevlar clutches
|
|
Administrator
|
You can make a Cheetah with any tank, some scrap metal and a 1" ball valve..
Using a tie-down is SOP with my 235/85's but I don't see how that works if the wheel is still on.
Jim,
Lil'Red is a '87 F250 HD, 4.10's, 1356 4x4, Zf-5, 3G, PMGR, Saginaw PS, desmogged with a Holley 80508 and Performer intake. Too much other stuff to mention. |
|
Administrator
|
Jim - Maybe you can describe a Cheetah a bit better? I don't understand what it is.
On a new topic, today I got started on the electrical part of Big Blue's transformation. This has been worrying me for quite some time, but I think I'm starting to get my head around it. 
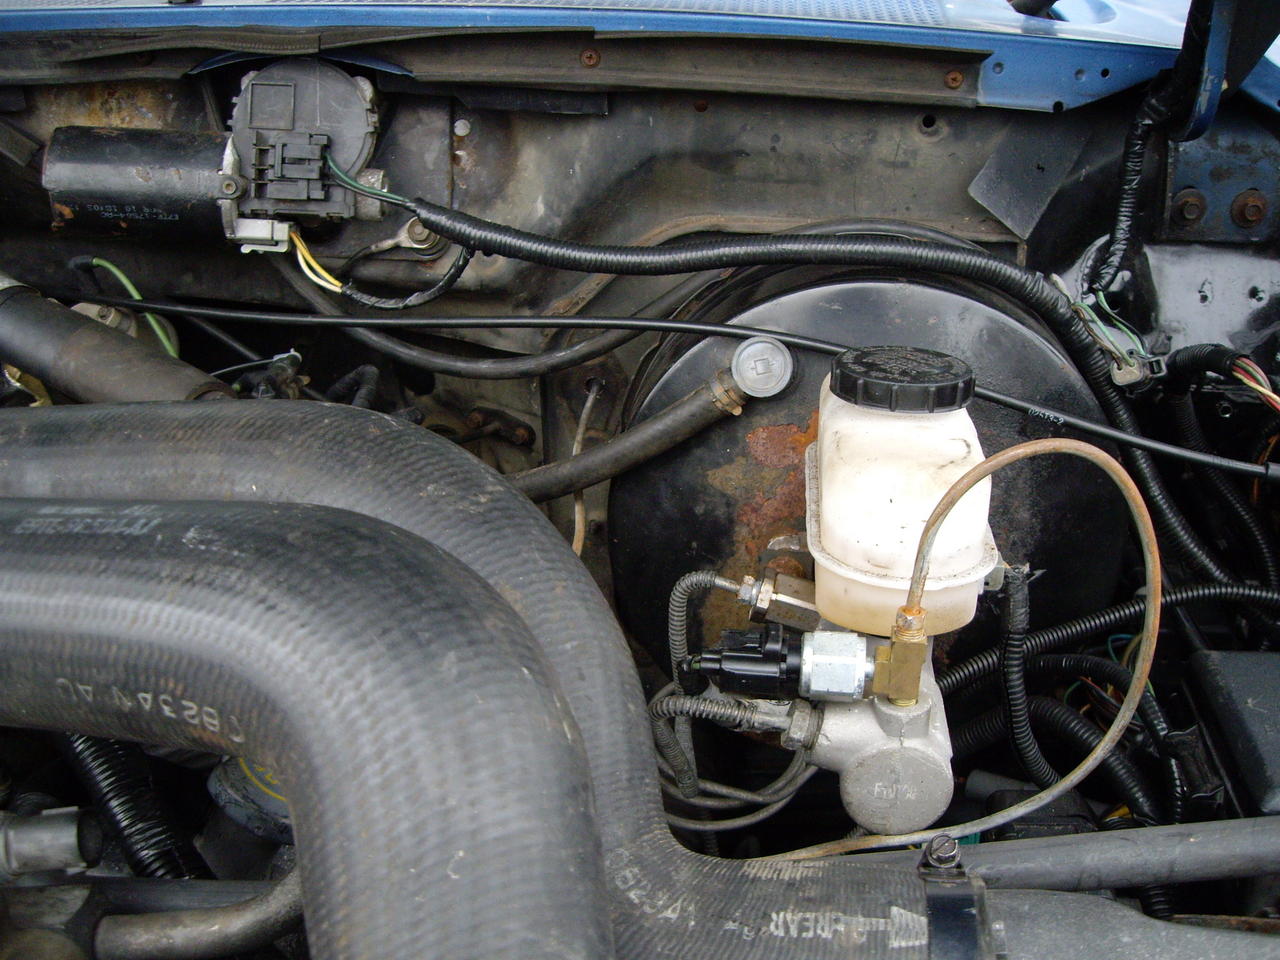
In the pic below is the wiring harness(s) I got from Mark/Dyn Blin, which was from a CA-spec 1996 F250 with a 460 and, therefore, EEC-V. And your vantage point is as if you are standing on top of the cab looking into the engine compartment. The wiring to the ECU is cut, but that's no biggee as I may not put the computer in the stock location and would, therefore, have to lengthen the wires. But otherwise it is seemingly all there. My efforts so far have been to ID each of the terminals to understand what I have. I'm not yet done with that but probably have 90% of them figured out, but I'll probably have to ask y'all about some of them. Anyway, the plans are to fully understand what I have and then start pulling out what, if any, I don't need. For instance, the big bulkhead connector that would go into the cab won't be used as such since the Bullnose trucks don't have all of the electronics that supports. But, I'll need some of the wires as somewhere in there are the ones for the OBD-II data link connector as well as the Check Engine light and probably some other necessary functions. Plus, some of those wires are power from the various fuses, and I may be able to use them to replace the fusible links. Having said that, maybe that's making things too complex. I discovered that this harness utilizes a standard fender-mounted starter relay. On the right side in the pic is a large ring terminal that goes to the battery side of the relay in conjunction with the output line from the alternator. The one in the pic has two short fuselinks to the large yellow wire that runs across the radiator support to the power distribution box where it ends on a stud that powers the whole of the PDB. But there's no megafuse. Just the two fuselinks on that yellow wire and a fuse link on the end of the alternator's charge cable where it hits the starter relay. So, I could use a standard starter relay and drop the Bullnose fuselinks onto it. That would simplify things significantly from what I'd planned and make doing this conversion much more straightforward. Also, I can come off the PDB's power stud with a wire to the auxiliary battery, but take it through the smart battery isolator. Maybe this won't be as tough as I thought?
Gary, AKA "Gary fellow": Profile
Dad's: '81 F150 Ranger XLT 4x4: Down for restomod: Full-roller "stroked 351M" w/Trick Flow heads & intake, EEC-V SEFI/E4OD/3.50 gears w/Kevlar clutches
|
|
Administrator
|
https://www.amazon.com/TSI-Cheetah-Bead-Seating-Tool/dp/B000VNHWUM
https://buytsi.com/product/ch-5-2/
Jim,
Lil'Red is a '87 F250 HD, 4.10's, 1356 4x4, Zf-5, 3G, PMGR, Saginaw PS, desmogged with a Holley 80508 and Performer intake. Too much other stuff to mention. |
|
Administrator
|
Now I understand. Thanks!
Gary, AKA "Gary fellow": Profile
Dad's: '81 F150 Ranger XLT 4x4: Down for restomod: Full-roller "stroked 351M" w/Trick Flow heads & intake, EEC-V SEFI/E4OD/3.50 gears w/Kevlar clutches
|
|
Administrator
|
There are videos on the TSI page.
I may have underestimated the size of the ball valve, but they do work well. Says the 5gallon model works for something like up to 22" tires
Jim,
Lil'Red is a '87 F250 HD, 4.10's, 1356 4x4, Zf-5, 3G, PMGR, Saginaw PS, desmogged with a Holley 80508 and Performer intake. Too much other stuff to mention. |
|
I believe that red connector with the light blue label on it is for the Cruise Control deactivation switch, otherwise known as the switch that could catch half of Ford's lineup on fire from the early 90's to 2002.
|
|
Administrator
|
Interesting! I haven't investigated it yet, but there's a fuse holder integrated into it and something said on that label 'bout a non-repairable fuse. I wonder if that was from a recall. But I plan to use the stock Bullnose cruise system, so probably won't use that anyway.
Gary, AKA "Gary fellow": Profile
Dad's: '81 F150 Ranger XLT 4x4: Down for restomod: Full-roller "stroked 351M" w/Trick Flow heads & intake, EEC-V SEFI/E4OD/3.50 gears w/Kevlar clutches
|
|
Usually if that blue label is there, that means it has been "repaired". And the fuse is how they repaired it. If the internals of the switch failed and things got too hot, the fuse would blow, and power would be cut to the switch, taking away the ignition source for the fire.
By 2002 Ford had finally recognized the oops (Texas Instruments was the switch supplier) and a new replacement switch was utilized in all future vehicles. I believe they also changed the wiring so that it wasn't a 12v constant, which was why so many of them spontaneously combusted. My Ranger is a 2003, and the first thing I checked before I bought it was that it had the updated switch. A lot of people lost their vehicle and even their homes from this issue, and it's sad that it took so long to be remedied. |
|
Administrator
|
In reply to this post by Gary Lewis
The 1993-97 switch was only hot with the ignition on, and it was on the top of the MC not below like the 1997 F150 and the 1998 F250/350. Here is mine:
Bill AKA "LOBO" Profile
"Getting old is inevitable, growing up is optional" Darth Vader 1986 F350 460 converted to MAF/SEFI, E4OD 12X3 1/2 rear brakes, traction loc 3:55 gear, 160 amp 3G alternator Wife's 2011 Flex Limited Daily Driver 2009 Flex Limited with factory tow package Project car 1986 Chrysler LeBaron convertible 2.2L Turbo II, modified A413 |
|
Administrator
|
In reply to this post by salans7
My neighbor Ben's pickup was destroyed by a master cylinder fire.
Texas Instruments only built the deactivation switch to Ford engineering's specs. (with the Kapton diaphragm, they were told to use) There were two rounds of retrofit switches. With the first, the fuse was stupidly placed on the downwind leg of the switch, doing exactly NOTHING while the current was using corrosion to find ground after the embrittled seal allowed glycol past. So, 'too hot' is only the issue leading to the fluid feeding what is essentially an Al/Mg fire. Resistance would be come less and less as the corrosion increased. There is a fine line where the switch itself is functional, and a failed switch that is bleeding enough current to heat the brake fluid above its combustion temp, and use the corrosion as kindling for a metal fire.
Jim,
Lil'Red is a '87 F250 HD, 4.10's, 1356 4x4, Zf-5, 3G, PMGR, Saginaw PS, desmogged with a Holley 80508 and Performer intake. Too much other stuff to mention. |
|
Administrator
|
I appears that my plans to not use that wire are good, although not predicated on the fire danger. But I'm curious to see which version of the repair this is, so will check it out - when I can. (The neighbor is coming over with his "bed bar" to get the electrical part of it done, so I don't know if it'll be today.
Gary, AKA "Gary fellow": Profile
Dad's: '81 F150 Ranger XLT 4x4: Down for restomod: Full-roller "stroked 351M" w/Trick Flow heads & intake, EEC-V SEFI/E4OD/3.50 gears w/Kevlar clutches
|
| Edit this page |
