"Rocky" - 1981 F250 Restoration
|
Oh they did mention it. :) If you go back a page or two, this is what led to my discovery of an entire bath towel stuffed into the bottom of the duck bll!
 I still do get water after removing it though, it's just a very slight seep. It's coming from the bottom of where what I'm calling the "horn" of the air vent (the upside-down-U shaped piece) sticks into the vent duct itself. The area behind it is clean now. I have a new reason to suspect the gasket. In fact I'm sure of it now despite others getting lucky with not having to replace it. Because I just pulled off my vent panel and the bottom of that gasket is damp from last night's snow melting (where I'm pointing) and there are visible tracks where the water was seeping under it: 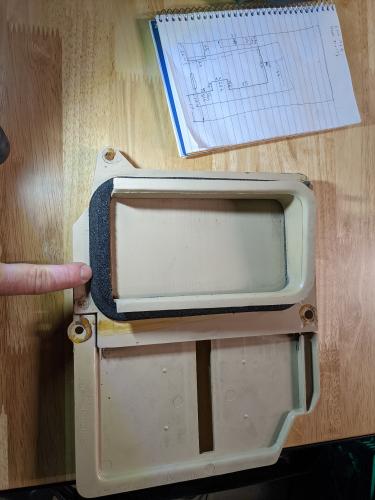 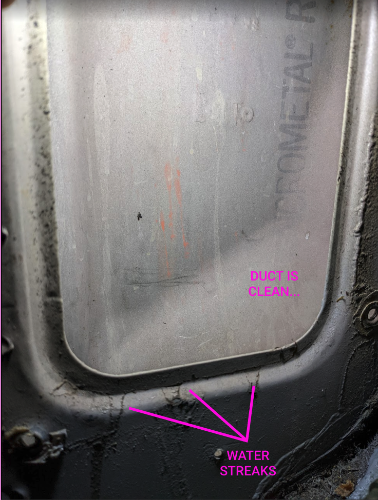 I suspect most folks are either having their gasket completely disintegrate (in which case I suspect the "horn" that sticks into the air duct would just pass water AROUND it where it would drip off the bottom) or remains just serviceable enough to do its job. But I was wrong earlier when I said mine was completely dust. Only my passenger side is. My driver's side is still there, just super flat and stiff. I suspect it's now doing more harm than good and is actively "wicking" water into the cabin, like a sponge, or candle wick. I'll replace it tomorrow to verify. I spent most of the day organizing the garage but did get two other things done. I mentioned earlier that my windshield wiper tank had cracked too badly to repair so I bought a replacement. But it wasn't the one in the pictures in Documentation on this site. It was some other thing, and it didn't line up very well at all. Jerry rig time! I had a deck tie plate left over from another project. I cut that so the right side had a bit of a notch to fit into the right side slot on the body, then drilled for two screws on the left side. I put standoffs behind the left side screws to avoid interfering with the hood release cable, then attached the tank to the rail. It seems to work fine. It looks like the new tank is leaking but it's not, that's just spillage from sloppy handling! 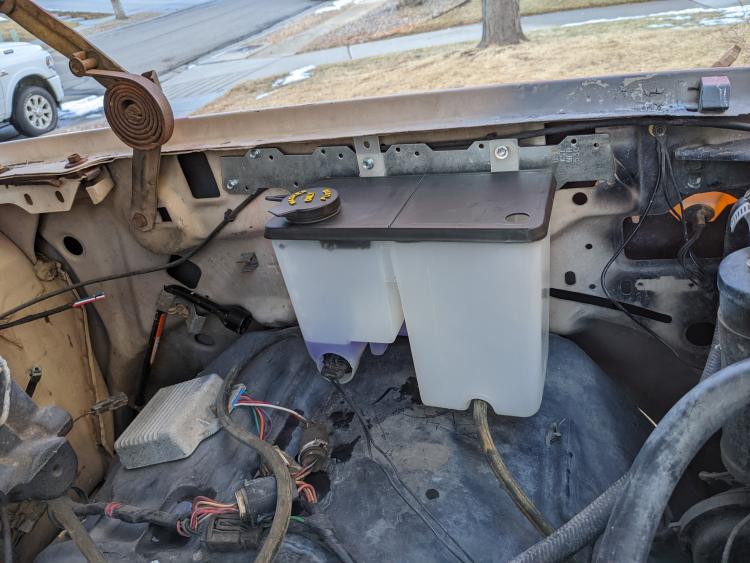 I also got my voltmeter installed. It seems to work fine so hopefully I can start finalizing the dash/panel reinstallation tomorrow! 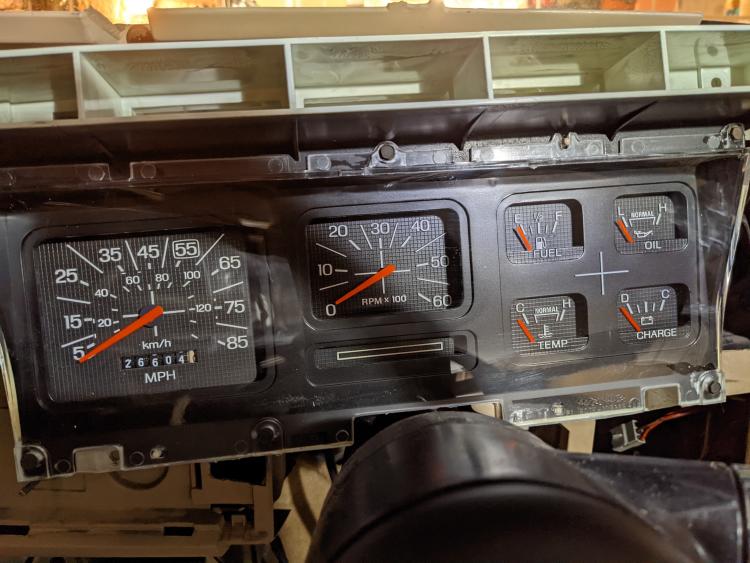
--
1981 F-250 Custom. 6.6L V8, 4 barrel Holley carb, ARA aftermarket A/C. |
|
I hate to say this but I bet you are getting water from above at the firewall / cowl / side panel and it is landing on that "horn" and following it down to the bottom and making it look like its coming from inside where the air would be.
Being you have that vent off I would try and run water down into the cowl and see if the water is coming in at that opening or some where else. When you cleaned out the vent area down to the duck bill did you run water in the cowl and that opening to flush out anything you could not get out? I did not have water in my garage but I do have 190 PSI air and used that to blow it clean, and me dirty LOL I hope I am wrong and a new soft gasket fixes the issue. Dave ----
Dave G.
81 F100 flare side 300 six / AA OD / NP435 / 2.75 gear http://cars.grantskingdom1.com/index.php/1980-Ford-F100?page=1 81 F100 style side 300 six/SROD parts truck -RIP http://cars.grantskingdom1.com/index.php/1981-Ford-F100 |
|
Maybe I'm confused about what you guys are referring to as the "duck bill" and where this dirt would be? That air duct behind the vent is completely clean and the bottom is unobstructed. I can see all the way down it with an inspection mirror. Is there something else above this area you're talking about instead?
--
1981 F-250 Custom. 6.6L V8, 4 barrel Holley carb, ARA aftermarket A/C. |
|
i remember the explanation of finding the towel. the only way that i know of for it to get there would be from removing the vent and stuffing it in. "why" is the mystery. maybe to stop a draft. maybe to control water. " If walls could talk." right?
the problem that I keep thinking of is how to best control water that drains through this channel by design. I have these vents on a truck project that I started last month. they all have the openings but only some have the vents. usually non a/c tucks of early years. mine is an 83 f100 non a/c but I discovered to have the exact same dealer air as yours. it seems to me that the vent could benefit from some type of rain guard not unlike the stick-on ones for the side windows. but that would need to go inside the a pillar duct. |
Yeah, we'll probably never know. But I do have a working theory. This leak at the bottom of the air vent caused water to drip down the side wall, under the kick trim, under the dimmer switch, then under and into the carpet. There is some rust damage to the floor pan on the left side in that area. It's minor, but a few holes were starting to form. I suspect a previous owner saw these holes and mis-diagnosed the problem, assuming that's how water was getting in directly. This area is just to the rear and right of the "duck bill" and the towel had been stuffed in there from the back/bottom. I wonder if they were trying to catch what they assumed was spray/splashing from the left front wheel working its way up there. Anyway, it's Colorado. It doesn't rain that much and I can cover the entire cowl in the winter to keep snow out. I rigged up a new gasket out of some (waterproof/closed cell) shipping foam I had from a recent package and threw the air vent back in. I adhered it to the trim panel with Lexel, my favorite silicone-based sealant. Here are the rough measurements if anybody cares. Sorry for my bad handwriting: 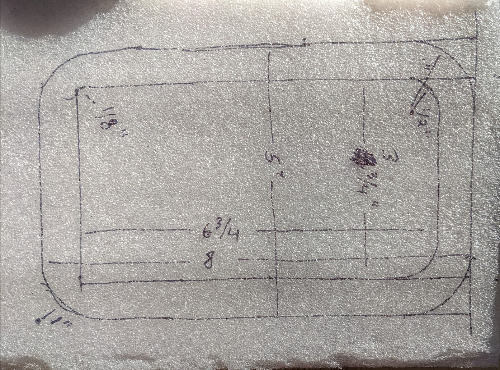 You know I was thinking the same thing. It's crazy to me that there isn't some kind of water diverter inside the duct above where this panel installs. But speaking of which I noticed today I have another possible water ingress point. The grommet around my speedometer cable is deteriorating. Replacing it would be challenging though I can probably cut a piece of neoprene and/or put some sealant around the hole. But while studying the area I noticed there's some residue from what clearly must have been some kind of rain diverter. It looks like the hood-to-cowl seal but shorter. It hangs over the two firewall penetrations shown here: 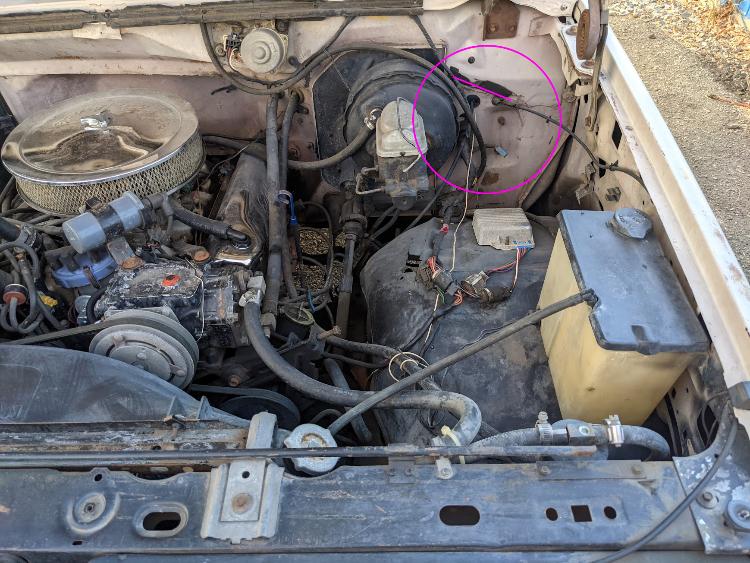 I'm sure I can jerry rig something, but was wondering if anybody had input on what this part originally was. I've been all up and down the Illustrated Parts Diagram but I'm either missing it or it's not specifically called out...
--
1981 F-250 Custom. 6.6L V8, 4 barrel Holley carb, ARA aftermarket A/C. |
|
yes, the speedo cable grommet is an issue. and the cowl /hood seal does not go far enough. this is by far my favorite truck, but it is nowhere near perfect! very agricultural if I'm honest. but to me it's part of the charm. I have tried a few different ways to replace the speedo grommet but the best I have come up with is a two-piece method where a rubber grommet fits the firewall but leaves a hole large enough to fit a piece of 3/8 fuel hose. take 3" of fuel hose and split it lengthwise and install on the cable and slip into the grommet about halfway. seal the hose to the grommet with the slit at the bottom. Black rtv does well if there is no lexel nearby
|
|
Definitely getting some "project fatigue" here. But here's how the driver's door came out:
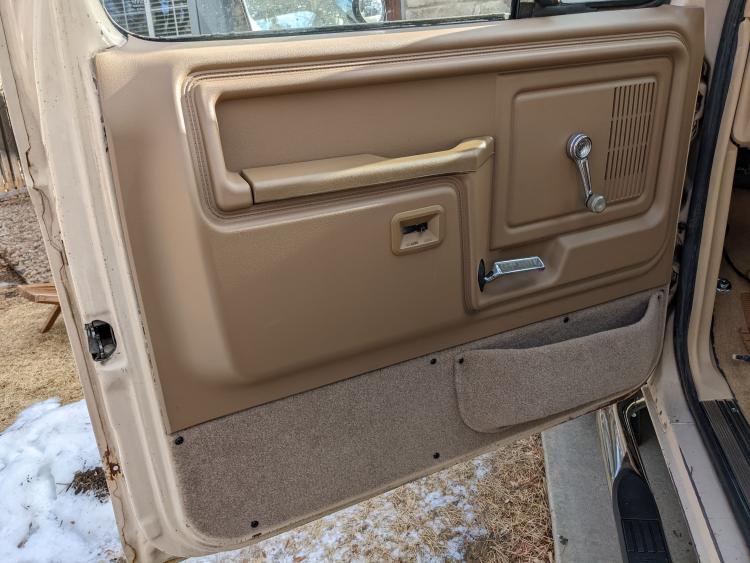 For those that are wondering about the slide locks, my passenger door has my original (to the vehicle) lock with the spring plate reattached by zip ties. My driver's side door now has the Dennis Carpenter lock. I'm pleased to report it's a complete assembly, with a spring plate as well. I know that was a concern for some. As far as "unicorn parts" go, I'm definitely glad there's a supplier for this part now, and kudos for the very reasonable price. I bought this https://www.dennis-carpenter.com/trucks/door/door-lock-amp-latch/e1tz-1022168-b-door-lock-or-latch-control-asy and $13.95 is just a crazy good deal for such an elusive item. I was already prepared to pay north of $80 for various 3D printing and metal-bending services to try to remake one. That said this part is definitely not perfect, so caveat emptor. The surface texture is "sand-papery", hard to describe but it's much rougher to the touch than the old one. Also, the part is only available for the passenger's side, so you either have to mount it upside down on the driver's side or deal with it. I stupidly tried to sharpie the "LOCK" letters on mine and you can see that didn't work out well. Also, there must be some variance in how these are made. I bought two assemblies but one of them didn't "slide" very well, it was very stiff. The other was smoother, so that's the one I used. And the black plastic slider has some whitish "blooming" of some kind (you don't see that in the picture but it's not jet black). Still, for $13.95 I would definitely recommend these to anybody with slide locks. They also sell the lock actuator arm and I'm pleased to report that worked fine to replace my bent one.
--
1981 F-250 Custom. 6.6L V8, 4 barrel Holley carb, ARA aftermarket A/C. |
Re: "Rocky" - 1981 F250 Restoration
|
Administrator
|
That looks great! Well done!
 And that's cheap for those locks. Sure glad we are getting support for things like the slide locks. 
Gary, AKA "Gary fellow": Profile
Dad's: '81 F150 Ranger XLT 4x4: Down for restomod: Full-roller "stroked 351M" w/Trick Flow heads & intake, EEC-V SEFI/E4OD/3.50 gears w/Kevlar clutches
|
|
Had a "good day". Fighting some project fatigue I set aside a few "final items" like the brake controller (it was obstructing the instrument panel reinstallation, despite my most careful placement), getting all the right screws in the right places, etc. I basically just said "good enough" and threw it back together any which way.
But it runs! Not very well. This immediately unmasked a bunch of other issues I've known about but haven't dealt with while the truck wasn't running. Up next on priorities: 1. Engine never comes off high idle, even when fully at temp. This is an aftermarket Holley Street Warrior carb with an electric choke. I have the installation manual for it but it doesn't have much in the way of troubleshooting details. Time for some Internet sleuthing. 2. A small amount of smoke comes out of the hood after driving it a bit. I panicked at first but I think it's just some of the dampness of my coolant leak cooking off. There wasn't enough to clearly see the color, but it sure didn't smell like hydrocarbon. Anyway, a new radiator should arrive in the next few days so I can put that one to bed. 3. The alignment is all over the place. But I expected that. I'm still torn on whether to do it myself. I want to - but it's going to be pretty nasty out for awhile. It sure would be easier if I could find a reputable shop to handle it. 4. Parking brake doesn't work. After driving an automatic for awhile I kind of mentally tuned out how important this is (I've had the truck chocked for the past 2 months anyway). Sure you can throw it in gear when you park it. But it means you can't get out of the truck without shutting it off!  5. All the other stuff I already had on the list: fix the rear fuel tank (I'm replacing it) and filler neck (it's missing), install the spare tire carrier, install the front winch, finish the rear light/trailer connector wiring, install the brake controller, etc. But it's closer!
--
1981 F-250 Custom. 6.6L V8, 4 barrel Holley carb, ARA aftermarket A/C. |
Re: "Rocky" - 1981 F250 Restoration
|
Administrator
|
Light at the end of the tunnel!!!!
 Yes, you have several things on the punch list, but you have plans for them already, so they aren't surprises. And while there may be some surprises along the way, I'll bet you sort them out easily. 
Gary, AKA "Gary fellow": Profile
Dad's: '81 F150 Ranger XLT 4x4: Down for restomod: Full-roller "stroked 351M" w/Trick Flow heads & intake, EEC-V SEFI/E4OD/3.50 gears w/Kevlar clutches
|
|
In reply to this post by taskswap
Carb issues can drive you nuts. Been going thru that myself. Learn how the choke setup works for that carb. Then adjust it right. All kinds of Internet goodness for carbs and chokes.
If you haven't, change the shocks, then see if it drives better. I thought I needed alignment, but tires and shocks fixed it. It was bouncing itself all over the place.
Randy
Mt. Airy, NC 81 F-150 STYLESIDE regular cab 2wd. 302 Auto Zone crate. 5 spd M5od-R2 |
|
From some initial research I wonder if I have a vacuum leak. The thing is, this engine was professionally rebuilt by an engine shop, and the rebuilder was the one that installed the carb. My feeling is that the carb was almost certainly adjusted properly, or at least close to properly, when it was first put in. So before I start messing with adjustments I figured I'd look at "other stuff" first. And my understanding from some docs from Holley is that a vacuum leak can cause this. So I guess I'll start by looking for that first. Probably not a bad thing to do anyway.
But before I get any more run time on the engine, the radiator arrived today. It's cold out today and supposed to snow tomorrow but I might try installing it on Friday. I don't want to run the engine any more with low coolant and there's no point adding more if I'm about to replace the radiator anyway. So I guess that's my next project.
--
1981 F-250 Custom. 6.6L V8, 4 barrel Holley carb, ARA aftermarket A/C. |
Re: "Rocky" - 1981 F250 Restoration
|
Administrator
|
You can check for vacuum leaks by the "smoke test".
Gary, AKA "Gary fellow": Profile
Dad's: '81 F150 Ranger XLT 4x4: Down for restomod: Full-roller "stroked 351M" w/Trick Flow heads & intake, EEC-V SEFI/E4OD/3.50 gears w/Kevlar clutches
|
|
Ha that's a new one on me! I was going to try the propane trick (where you do basically the same with a small propane torch, unlit - if you put it anywhere near a vacuum leak it'll get sucked in and cause the engine to surge a bit, but won't cause any harm).
Pulled my old radiator today. I'm glad I did, it was corroding badly in spots, had an obvious rock (bullet?) hole punched straight through the fins, narrowly missing the tubes, and if it hadn't been leaking at the petcock would sure to have started somewhere else. It looks OEM but I'm fairly sure it's not original because one of the two lower isolators had been replaced with some kind of square generic 3x3 waffle-looking pad, and one upper bolt was incorrect to the vehicle (it was a simple bolt and nut with a pair of washers, rather than Ford's bolt-and-panel-clip setup.) Fluid came out a bit milky but as far as I can tell by eye, mostly what you'd expect from old coolant in an old radiant. A small cupful looks normal green. It's only in a large bucket that you notice the cloudiness. So my hope is fresh coolant will be all she needs. I'm all ready to get my new one installed, but I hit a snag. I bought new hoses, thermostat, gaskets, etc... but didn't buy a new water pump. I really want to replace the one that's on there but there's a bewildering array of options available online and I can't figure out why some are $25 and some are $90. https://www.garysgaragemahal.com/water-pump-s--illustrations.html seems to list D6AZ-8501-A as the right pump for my 351M-400 ('81 6.6L V8). But when I find that part on eBay the various vendors who list it say it's not compatible. I'm used to those being "you have to know what you're buying" but when I go to cross-reference it at Jegs or Summit their prices run anywhere from $25 to $190! My only experience with water pumps was Mazda 13B rotaries and there was really only an option or two for that. Has anybody bought and had a good experience with a specific pump for this V8 engine? Otherwise it's tempting to buy something that seems close, but not actually install it right now. I don't actually know how old my water pump IS. The engine was rebuilt 3-4 years ago and that's a common replacement item in that task so maybe I can skate by awhile on what I have...
--
1981 F-250 Custom. 6.6L V8, 4 barrel Holley carb, ARA aftermarket A/C. |
Re: "Rocky" - 1981 F250 Restoration
|
Administrator
|
I agree that you've found the right part number. Don't know why others say it won't fit, but they are wrong.
However, I frequently use Rock Auto's catalog to find things, and see if this help. I haven't drilled down to see if any of those also show that part number.
Gary, AKA "Gary fellow": Profile
Dad's: '81 F150 Ranger XLT 4x4: Down for restomod: Full-roller "stroked 351M" w/Trick Flow heads & intake, EEC-V SEFI/E4OD/3.50 gears w/Kevlar clutches
|
|
are you just covering the bases, or does it need a new pump? you already said the engine was pro rebuilt.
|
|
I don't know, really. I mean, I know the engine was rebuilt, and I've never heard of a shop doing that and not replacing the W/P. At the same time, it's on my "mental view of the world" for "if you have your cooling system drained you may as well do XYZ" list. Like, I have no reason to believe the thermostat needs to be replaced, but I have the parts so I'm doing those... That said I'm definitely leaning toward NOT doing it. Just coming to terms with that I guess...
--
1981 F-250 Custom. 6.6L V8, 4 barrel Holley carb, ARA aftermarket A/C. |
|
I sometimes struggle with that, replace it while you’re in there, but what if the one you have in there will last 50 years?
When I was doing the head gaskets on our Xterra I decided the water pump was working fine so I didn’t disturb it. I did replace the knock sensor, that was a mistake, I should have relocated it.
Dane
1986 F250HD SC XLT Lariat 4x4 460 C6-Sold 1992 Bronco XLT 4x4 351W E4OD 1998 GMC Sierra SLE K1500 350 4L60E Arizona |
|
it's sad to say but good parts seem to be getting harder to acquire. if it aint broke don't fix it is ringing true more than ever. fewer good replacement parts but decent re-engineered parts if you are willing to restomod.
|
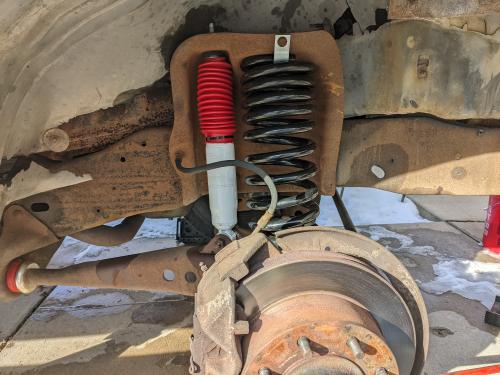
I couldn't have said it better myself. Minor progress this weekend. I replaced my right front shock and spring. It took longer than I expected but mostly because I had Dad's helper.  My youngest daughter is the only child out of 5 even remotely interested in going out in the snow to "help" Dad work on the truck, but she makes up for it by being intensely interested. I have no doubt she'll do a project like this herself one day. Everything takes longer when you have to explain every little thing you're doing, but I wouldn't change it for the world. My youngest daughter is the only child out of 5 even remotely interested in going out in the snow to "help" Dad work on the truck, but she makes up for it by being intensely interested. I have no doubt she'll do a project like this herself one day. Everything takes longer when you have to explain every little thing you're doing, but I wouldn't change it for the world.
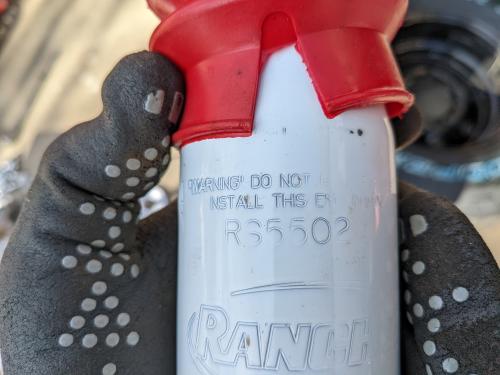
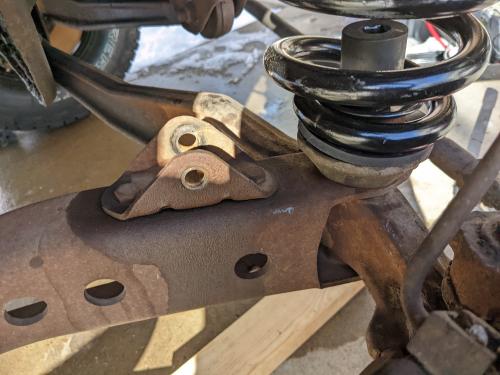
I had a couple minor mishaps. I got thrown for a loop by the labeling on the shock. It comes out fairly clearly in the photo, but in my hands it clearly looked like it said "Do Not Install This End Down" the only way "down" could be! I also lost the top nut for the right front shock and had to borrow the one from the left, because apparently this Rancho shock has a different thread than the old stock shock used and I didn't have a matching nut on hand. And finally I discovered that my lower shock mount bracket holes are slightly elongated. I went ahead and reassembled it as is because LMC is apparently back-ordered for this part and the ones on ebay are super expensive, like $65 apiece. It's only about 1/16" out of round - enough to care about but maybe not enough to throw out the part. It's tempting to have somebody weld it. It's even more tempting to use this as an excuse to get a welder again.  I'm no master, but I can do some basic work and this is so close I could probably fill it just with 1-2 tacks... What to do... I'm no master, but I can do some basic work and this is so close I could probably fill it just with 1-2 tacks... What to do...
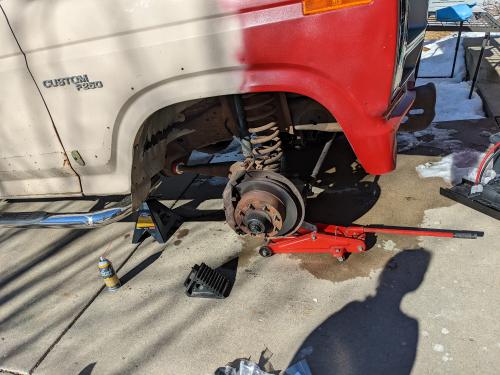    I also got the radiator reinstalled. Sort of. I got that Champion the rest of you recommended and it's a real piece of work. With the cost of aluminum these days it's amazing how cheap it was. But it doesn't seem to sit quite right. I replaced the lower isolators since mine were shot, so I don't think it's that, and I'm pretty sure I reinstalled the top brackets properly. But it tilts toward the engine - there's about a 1/4" gap between the top of the radiator and the front rail of the engine compartment. Is this slight tilt just something normal that I didn't notice when I removed the old one? Or did I screw something up?
--
1981 F-250 Custom. 6.6L V8, 4 barrel Holley carb, ARA aftermarket A/C. |
| Edit this page |

