"Rocky" - 1981 F250 Restoration
Re: "Rocky" - 1981 F250 Restoration
|
Administrator
|
There are always regrets. Frank Sinatra sang "Regrets, I've had a few" in the song My Way. So it seems likely that when we build our trucks "my way" we discover later a few things we'd have done differently.
But you are making good progress. Keep on keeping on!
Gary, AKA "Gary fellow": Profile
Dad's: '81 F150 Ranger XLT 4x4: Down for restomod: Full-roller "stroked 351M" w/Trick Flow heads & intake, EEC-V SEFI/E4OD/3.50 gears w/Kevlar clutches
|
|
Thanks.
 I think the support and encouragement is the best part of a forum like this. I think the support and encouragement is the best part of a forum like this.
I decided in the end not to do anything more on my hood. I'll always know I "can", but also that it's not worth the time. :) I realized I can keep practicing painting on the tailgate as my next step, which is good because it's going to be cold for a few days but the tailgate is removable and I can work on it in my garage... Speaking of being cold for a few days, that's going to slow down progress but also waiting on parts will too. I need to do my radiator (Jegs hasn't replied on the shipping damage yet), voltmeter (just got the shipping notification from Rocketman that it's on its way!), camper tiedowns (drilling is boring, procrastinating this one), winch (being lazy), driver's side door (waiting on parts), side trim (too cold to paint), and climate control panel (waiting on parts). Since I'm kind of stuck or don't want to be bothered with many tasks, I decided to tackle my radio trim. The ClassicCarStereos unit came with a bit of a trim ring but my bezel was obviously cut for just about a 1-DIN unit at some point: 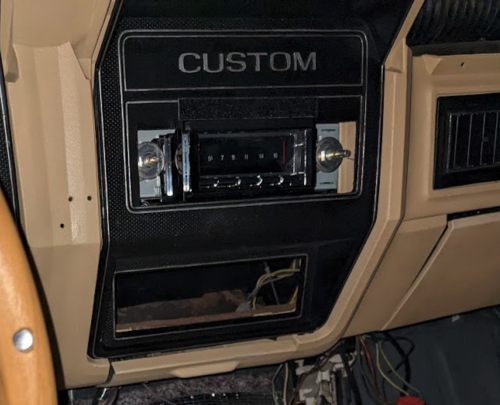 I needed a filler plate so I figured I'd give a go of 3D modeling and printing it. Here's what I came up with: 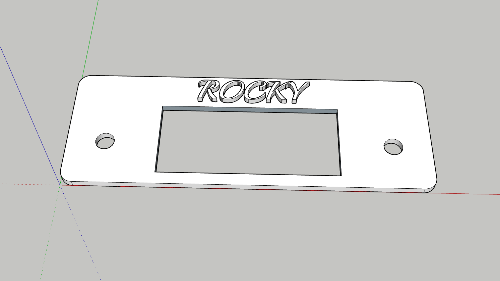 We'll see how it turns out...
--
1981 F-250 Custom. 6.6L V8, 4 barrel Holley carb, ARA aftermarket A/C. |
Re: "Rocky" - 1981 F250 Restoration
|
Administrator
|
I like the idea of a filler plate. And I like the idea of a place to hold 3D drawings that have been printed. Just haven't gotten to it yet, but will.
Gary, AKA "Gary fellow": Profile
Dad's: '81 F150 Ranger XLT 4x4: Down for restomod: Full-roller "stroked 351M" w/Trick Flow heads & intake, EEC-V SEFI/E4OD/3.50 gears w/Kevlar clutches
|
|
Administrator
|
In reply to this post by taskswap
Plate looks really good.
Just mentioning this since I noticed it the other day but LMC has a Radio Delete Cover: 49-6416 https://www.lmctruck.com/1980-96-ford/fd-1980-86-dashboard-components Again, you've got a great solution but just might come in handy for others if they don't have a printer and want clean edges.
Scott
'Camano' 1986 F250 Supercab XLT Lariat 460/C6 'Chanute' 1980 F350 C&C 400/NP 435 - Gin Pole But there ain't nothin' wrong with the radio |
I actually own that cover. It's pretty nice actually, with a raised "Ford" logo in the center. If somebody is deleting their radio I'd recommend it. It doesn't work in my case for two reasons. First, even if I wanted to cut/drill the center of it out to use as a radio bezel, the raised section doesn't line up very well. Second, and this may be a deal breaker for some even using it as a "delete" panel, it's not actually tall enough. The panel is the right size to cover a standard 1-DIN hole, if you've had one of those cut in a center console bezel. But mine had the more oddly shaped tetris-style cutout with a narrower 3/4" or so rectangle cut out above it. What I made in this model is a panel that will fit what you'd have if you cut out everything inside the silver detail line around that whole center section. This might be attractive to anybody who's had some hackery done to their bezel. I'll attach the file here if anybody wants it, though it's really nothing special. Actually, one word of caution, surface textures on 3D prints aren't going to be all that nice with respect to matching a Ford interior. My plan is to just use this as a backer plate and either sand/paint it to give it a matte texture, or maybe do a wood veneer on it While we're talking radios, what are y'all doing about mounting them? I feel like I need to make some kind of metal sleeve or brackets to hold the radio in place, and there's not much that seems ideal to attach things to...
--
1981 F-250 Custom. 6.6L V8, 4 barrel Holley carb, ARA aftermarket A/C. |
|
Administrator
|
Good to know about the plate height since most that are hacked up will be the knob style.
For a lot of the interior parts I 3d printed for my truck I did some light sanding, black paint and 2k clear (which I also did to the factory woodgrain). Close inspection will show the lines but to most passengers it'd never be noticed. What are you using for the print material? I went to a double din so had to do some extra work but even with that I got a jy bracket that screws to the back of a radio and then clips to the dash support. Took it and riveted it to the radio sleeve at the correct height so it would set level. So now the sleeve clips onto the dash support. I know Gary has a single din but can't recall if he used a clip screwed into the back of the radio or used a sleeve and hooked it in.
Scott
'Camano' 1986 F250 Supercab XLT Lariat 460/C6 'Chanute' 1980 F350 C&C 400/NP 435 - Gin Pole But there ain't nothin' wrong with the radio |
|
This post was updated on .
I'm going to be trying the same approach (sand and paint). For the material I'm giving "ABS sanded black". I haven't tried a material sanded by the printer (I'm using CraftCloud3d, I don't own a printer myself) so I'm curious to see what kind of surface finish that has. I'll post photos. As for the rest though I think I made a mistake on this panel. I wasn't thinking through the mounting. All the other car radio installs I've done were more modern setups where the radio installs in a sleeve or carrier of some kind, and that's attached to a frame or rails behind the bezel. So I have some muscle memory from all that, and totally wasn't factoring in that these radios need to attach to the FACE. It's not just trim, it's the actual primary mount. Given that, I think I'll redo this trim panel. Instead of making it sit flush with the entire bezel, I'll make it sit proud, and try to work out some kind of springy "fingers". Maybe something like how this is done... 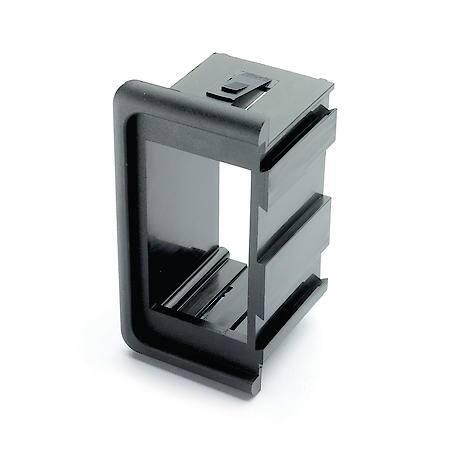 I'm conflicted.
--
1981 F-250 Custom. 6.6L V8, 4 barrel Holley carb, ARA aftermarket A/C. |
|
Rattle cans and cold weather are not great. Sounds like you and I have comparable paint jobs and impatience!
1985.5 F-150 XL Explorer standard cab 5.0 EFI AOD 4x4
Daily Driver. We call her Eunice the Ute. 1982 Bronco XLT Lariat 351W AOD 4x4 Code name Esperanza, or Espy to her friends. Please see my Project thread for the blow by blow. 1984 F-350 XL Centurion crew cab 460 T19 4x4 "Eylza Dual-little" |
Re: "Rocky" - 1981 F250 Restoration
|
Administrator
|
In reply to this post by kramttocs
I used a Ford bracket. I thought I posted a link to it in this thread, but maybe not.

Gary, AKA "Gary fellow": Profile
Dad's: '81 F150 Ranger XLT 4x4: Down for restomod: Full-roller "stroked 351M" w/Trick Flow heads & intake, EEC-V SEFI/E4OD/3.50 gears w/Kevlar clutches
|
|
Administrator
|
In reply to this post by taskswap
There are brackets that attach to the front or side of the radio and then screw into the 4 holes on the plastic part of the dash (above and below) that provide the front support. The different radio styles had different brackets - knob style being more of a plate and the 'modified' din style being split with a bracket on either side.
Take a look here: https://www.garysgaragemahal.com/radios1.html Hopefully that helps you out 
Scott
'Camano' 1986 F250 Supercab XLT Lariat 460/C6 'Chanute' 1980 F350 C&C 400/NP 435 - Gin Pole But there ain't nothin' wrong with the radio |
|
Thanks all. I saw that page but didn't understand what this part was actually doing. I couldn't find a picture until recently. I don't know how I missed that eBay listing for that exact part but I just bought it, looks like a metal trim ring that the radio knobs can fasten to, and then it fastens to the center of the dash... I guess we'll see if my radio fits it, but it looks good.
--
1981 F-250 Custom. 6.6L V8, 4 barrel Holley carb, ARA aftermarket A/C. |
|
Hey guys, I'm puzzling through my kick panel air vents again.
So I have the "02105 Vent, Cowl Side" that seems to decode to E1TZ-1002105-A (left) and E1TZ-1002104-A (right) for my interior color. My vents are in pretty good condition and I plan to reuse these panels. But they leak. Like, a lot. The driver's side is the main problem. Any rain, windshield wiper fluid, melting snow, or whatever else drains down through the top cowl cover causes the bottom of the vent panel to drip down onto the driver's side floor pan. It's not a deluge, but definitely a problem. The air duct itself is clean and free of blockage now. I suspect what's happening is there must be some kind of seal around the 2" or so "horn" that sticks out from the back of the air vent into the duct itself. Looking at pictures of other similar parts it seems like there was a foam seal of some kind (mine has turned to dust) so obviously I can gin something up to replace that. But I'm kind of puzzled because that surely would not be enough to keep water from pooling on top of that "horn" and working its way into the cabin... 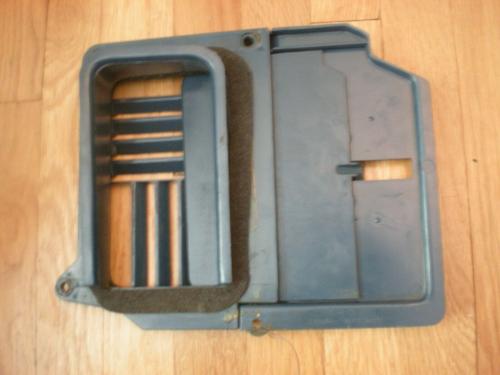 I'm wondering if anybody has this vent panel and has had the same problem? And has any thoughts on whether maybe some rubber weatherstripping instead of the foam would help solve it more permanently? I may or may not get this A/C going and would really like to have the vent as an option if possible...
--
1981 F-250 Custom. 6.6L V8, 4 barrel Holley carb, ARA aftermarket A/C. |
|
Administrator
|
An odd design for water control, right?
When I was working with Detroit Muscle Tech to get gaskets for the heater box I sent him a set of vents as well so he could make the gaskets for these. Both the ones between the sliding door part of it and the seal to the cab itself. I don't see them on his site though and probably not a lot of incentive to produce them since they are easily recreated with off the shelf weatherstripping. That said, I'd probably forego the weatherstripping and go with something like OSI Quad.
Scott
'Camano' 1986 F250 Supercab XLT Lariat 460/C6 'Chanute' 1980 F350 C&C 400/NP 435 - Gin Pole But there ain't nothin' wrong with the radio |
|
I'm thinking the same thing. I'm a fan of OSI Quad but I have a few tubes of Lexel on my workbench looking for an excuse to be used and it's a similar "sticks to sand and water" type of versatile stuff. I'm tempted to try the old electricians trick: run a strip of electrical tape on the face of the pillar around the vent hole then applying the sealant to the trim. The sealant sticks to and seals against the tape, but it's still "peelable" without breaking the trim if need be.
This is a crazy design, to be honest. It's one of those things that makes me love these old trucks, actually. There's so much "kinda sorta works" that you'd never see in a modern car. I'm not a fan of beige walls...
--
1981 F-250 Custom. 6.6L V8, 4 barrel Holley carb, ARA aftermarket A/C. |
|
Administrator
|
I hadn't heard of that trick before but that's a great idea

Scott
'Camano' 1986 F250 Supercab XLT Lariat 460/C6 'Chanute' 1980 F350 C&C 400/NP 435 - Gin Pole But there ain't nothin' wrong with the radio |
Re: "Rocky" - 1981 F250 Restoration
|
In reply to this post by taskswap
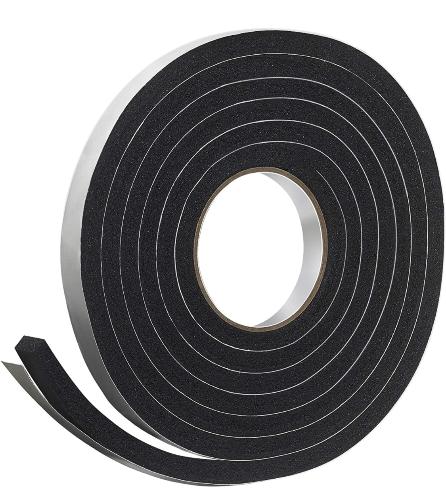
Why not custom made gasket using some neoprene sticky weather strip?
Jeff / 1984 F350 Crew Cab 4x4/5.8L w351 4V/ T18/ D50 4.10 front/ 8' bed.
Restored 2019-2022. Nicknamed «Big Brother 1984», due to its soooo-looong shape & nod to George Orwell's 1984 famous novel. |
|
I actually have some of what I think is that exact same roll that I may try. My one concern was it's not really waterproof. It keeps air out pretty well but water seems to creep along its face by capillary action. So I was brainstorming alternatives.
Got my voltmeter conversion back from RCC Innovations. Seems fine but one word of caution, their Web site is not super clear. I paid extra for what I thought was having the face converted/repainted to read 10-14V instead of D - C. I didn't realize only certain cores were eligible for that (and mine is not). So I guess I'm stuck with a D-C face. Oh well, not a huge deal. Waiting on parts. Jegs had FedEx pick up the damaged radiator and they shipped a new one. Which is good but... another delay. I'm starting to think hard about what the real "blockers" are before I can feel comfortable driving Rocky again. It's been ages. I'm sure there are some of you here who do their own alignments. I've never done one and while I know there are guides and videos on this I kind of wanted to float the general question - is it madness for a newbie to do this DIY? There are guides on rebuilding automatic transmissions too but it's probably not something I'd tackle. I've done basic suspension work before, replacing shocks and struts in other cars. Is this one of those "take it to an expert, you'll regret it" type things or?
--
1981 F-250 Custom. 6.6L V8, 4 barrel Holley carb, ARA aftermarket A/C. |
|
As many projects as you have tackled, why not try the alignment deal? There aren't many adjustments on the Twin I beam, right? String it and check the toe. Check the others - depending on your truck, you may have to take it somewhere witih proper equipment anyway.
When I got my truck last March, I thought it would need an alignment for sure, but after new tires and shocks, I don't feel like it needs much of anything other than maybe rebalancing the tires. One can get caught up in a lot of projects before they go driving in their trucks. And the project can get stuck in the driveway or yard and interest wanes and before you know it, it's no longer a viable project. I have to keep mine going or I might fall into that trap. So I limit myself to small projects I can complete fairly quickly. Your dash board project alone would have likely stalled me. I had to do the blend door fix, but did it in a weekend. I am fortunate to have a truck that has been driveable since day one and only needed weekender projects, though. Keep barreling along. I read every post and enjoy seeing it.
Randy
Mt. Airy, NC 81 F-150 STYLESIDE regular cab 2wd. 302 Auto Zone crate. 5 spd M5od-R2 |
|
This post was updated on .
In reply to this post by taskswap
I am shocked no one posted why you are getting water in through the vents. I did not replace the seals on my vents and I dont get any water in through them and I dont feel any air coming in either. As for the water coming in. With the vents off feel down to the bottom were the air comes in and if you dont see dirt up to the top it cant be far below it. Clean out all the dirt to the bottom. There is a"duck bill" seal down at the bottom that traps the dirt and it keeps building up and will not let the water pass through. I have driven my truck in some pretty heavy rain and wash it before shows and dont get any water from them. Now if you have that all cleaned out and still getting water have someone run water in the cowl and you with a light from inside start checking under the dash where the firewall & cowl meet & over to that side wall and look for water coming in there. If it is then the seam sealer has gotten hard and is pulling away or you have rust holes and needs to be fixed. Dave ----
Dave G.
81 F100 flare side 300 six / AA OD / NP435 / 2.75 gear http://cars.grantskingdom1.com/index.php/1980-Ford-F100?page=1 81 F100 style side 300 six/SROD parts truck -RIP http://cars.grantskingdom1.com/index.php/1981-Ford-F100 |
|
absolutely right! of course this is so much easier to see and do without the fenders on, however, it is still very accessible by pulling away the back of the inner fender liner. the "duck bills" are not really needed except to keep debris and leaves etc. from being drawn in. the thing they do best is clog. pay attention to the cowl especially. it is not level! it is high on the passenger side and the gutter feature of it runs downhill to the driver side and many times the driver side will seem to be full of mulch/composting leaves.
the cowl itself is an issue. its two parts welded together and caulked from side to side. poorly at best. Hard to reach all but necessary to strip out all caulk and rust treat before re caulking and proper sealing and paint. look inside where the floor pans come up and roll forward to meet the firewall, rusting here says the cowl leaks and often the firewall insulator soaks it up until it has gotten really bad. by this time the dash and everything else needs to be pulled to fix it thoroughly. because fixing one side of a rusted through panel doesn't fix anything. best example... rear fender wheel arches. |
| Edit this page |


