Search Forum
Rembrant's new non-Bullnose project
1 ...
45678910
... 15


1 ...
45678910
... 15
Oh it's not so bad once you get into it. I've spent a lot of time working with cup/cone style bearings in with my work, so that part was straight forward for me. We'll see how it does when it's finally on the road haha, that will be the real test!
1994 F150 4x2 Flareside. 5.0 w/MAF, 4R70W, stock.
1984 F150 4X2 Flareside. Mild 302 w/ 5spd. Sold. 1980 F150 4X4 Flareside. 300i6 w/ 5spd. Sold in 2021. 1980 F100 4X2 Flareside. 351w/2bbl w/NP435. Sold in 1995 |
|
Good job Cory! I’m with Gary, haven’t done that, looks like fun!
Dane
1986 F250HD SC XLT Lariat 4x4 460 C6-Sold 1992 Bronco XLT 4x4 351W E4OD 1998 GMC Sierra SLE K1500 350 4L60E Arizona |
Re: Rembrant's new non-Bullnose project
|
I did it once before, will be starting into it again, hopefully tonight. "Fun" isn't a word I'd use to describe it! But it isn't rocket science. You need a couple of specialized tools, but nothing that wild. And then you need a LOT of patience!
Bob
Sorry, no '80 - '86 Ford trucks "Oswald": 1997 F-250HD crew cab short box, 460, E4OD, 4.10 gears "Pluto": 1971 Bronco, 302, NV3550 5 speed, Atlas 4.3:1 transfer case, 33" tires "the motorhome": 2015 E-450-based 28' class C motorhome, 6.8L V-10 "the Dodge": 2007 Dodge 2500, 6.7L Cummins |
Re: Rembrant's new non-Bullnose project
|
Administrator
|
In reply to this post by Rembrant
If you have a good pattern and excellent backlash, as you say, it should be smooth sailing.
Congratulations Cory! If setting up new gears be sure to break them in much like you would an engine. Varying load and giving the diff time to cool off. Anyone who has a 9" in their truck really has it easy because you can do it on the bench.
Jim,
Lil'Red is a '87 F250 HD, 4.10's, 1356 4x4, Zf-5, 3G, PMGR, Saginaw PS, desmogged with a Holley 80508 and Performer intake. Too much other stuff to mention. |
Hey Jim, I re-used the old gears, and they actually looked to be in really nice condition. The spider gears show a little wear, but the ring and pinion almost looked like they were just unwrapped. I bought this rearend from a Junkyard and had it shipped out east. It was the specific one I needed with the gears I wanted, and it was listed as being a low mileage unit with under 100k on it. I had intended to just throw it under the truck as it arrived. After moving it around a few times, I noticed the pinion was sticky and notchy to turn by hand. It wasn't loose, but it wasn't smooth either. When I pulled the diff cover I found out why. It was full of rust and dirt. Where it came from and how it got so dirty I have no idea. Here's a picture of the inside of the pinion seal as pulled, and the inside of the housing showing all the dirt/rust. 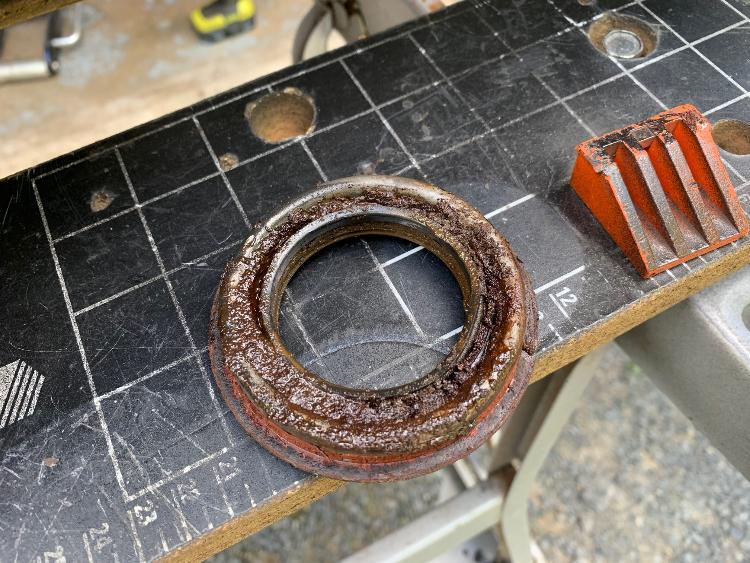 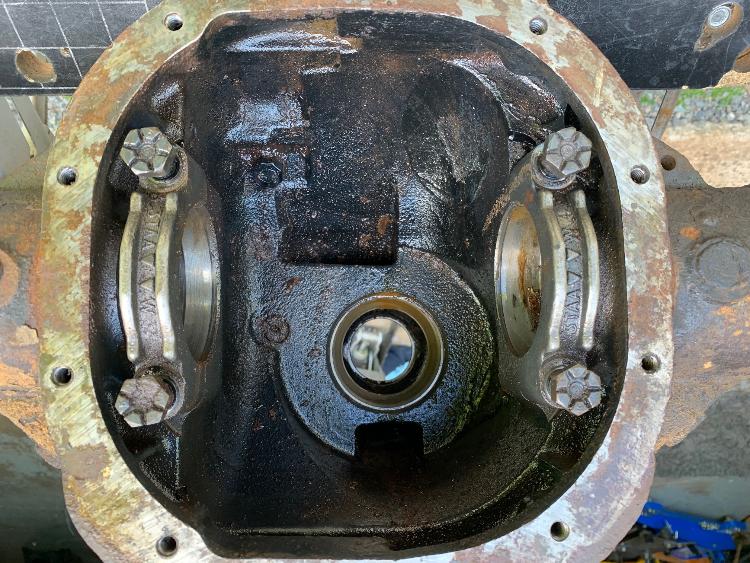 Most of it wiped away. The axle tubes were actually pretty clean, with just a small patch of rust closer to the wheel end of one tube. The axle vent was plugged solid, but the tube had only a little 1/16" orifice inside it which I found odd. Anyway, I don't know if the vehicle had been in a flood of dirty water or otherwise submerged, or something else. I've opened up some pretty old diffs before and never found dirt and debris like what was in this one, and this one is only a 2001 so it's not that old, but it was in a junkyard and maybe it has been laying outside for 20 years, who knows. Once I got everything cleaned up, I decided to reassemble it with all of the same shims in the same locations, and that worked out pretty well I must say. The pattern in the paint was not 100% perfect, but then again the gears were not new either. In any case, the pattern was still very good. According to the Ford manual, backlash can be between 0.008" and 0.015" (with 0.012" to 0.015" preferred), and all reassembled it measured at about 0.0135", so I thought it wasn't worth messing with. Pinion bearing preload for new bearings was between 16-29 in/lbs, and I got it set to 25. I was worried that if I tried to push the power bar one more time that I'd go over 29, so I left that alone too. That crush sleeve takes a lot of force, so I wasn't going to be too precise with it haha. Anyway, it all worked for now. Ask me again when I finally get the truck on the road!
1994 F150 4x2 Flareside. 5.0 w/MAF, 4R70W, stock.
1984 F150 4X2 Flareside. Mild 302 w/ 5spd. Sold. 1980 F150 4X4 Flareside. 300i6 w/ 5spd. Sold in 2021. 1980 F100 4X2 Flareside. 351w/2bbl w/NP435. Sold in 1995 |
Re: Rembrant's new non-Bullnose project
|
Administrator
|
I read where you said you re-used the old gears, so you are fine there!
 Yeah, that diff was buried in a mud hole (either in the truck, or in the junkyard) I was just pointing out to anyone that might be regearing (or like me, blew up their carrier, requiring new gears and a full setup that they ought to give them a chance to "court & marry" before.... 
Jim,
Lil'Red is a '87 F250 HD, 4.10's, 1356 4x4, Zf-5, 3G, PMGR, Saginaw PS, desmogged with a Holley 80508 and Performer intake. Too much other stuff to mention. |
|
In reply to this post by Nothing Special
Ya, exactly. Only tool I actually had to buy to do this job was the inch pounds arm style torque wrench for checking the pinion bearing preload. I have a couple inch pound wrenches already, but they're the click style. I have hydraulic presses and bearing puller kits at work, so that's were I did the work on the carrier and pinion shaft. I know you probably don't need any advice lol, but my pro tip(s) would be to always grease the bearing races and the holes you're pressing them into and they'll go in (and on) much better. I also put a very thin coating of gasket maker on the outside (metal part) of the pinion seal and axle seals. They probably don't need it, but I do it anyway, and it makes them a little easier to install. The grease makes bearings go in so much easier than doing them dry. Other than that, lots of patience as you said haha. Keep all the old bearing races for pressing in the new bearing races;).
1994 F150 4x2 Flareside. 5.0 w/MAF, 4R70W, stock.
1984 F150 4X2 Flareside. Mild 302 w/ 5spd. Sold. 1980 F150 4X4 Flareside. 300i6 w/ 5spd. Sold in 2021. 1980 F100 4X2 Flareside. 351w/2bbl w/NP435. Sold in 1995 |
|
In reply to this post by ArdWrknTrk
Oh yes, 100% on the break in, I agree. Maybe I'll do a new gear set someday, but as it was this job was pretty easy the way I did it. By the way, I did do this one on the bench...the whole axle is up there now. Problem is, since I brought each part to the bench individually, the whole thing is now too heavy for me to lift off by myself haha. This is how I roll.
1994 F150 4x2 Flareside. 5.0 w/MAF, 4R70W, stock.
1984 F150 4X2 Flareside. Mild 302 w/ 5spd. Sold. 1980 F150 4X4 Flareside. 300i6 w/ 5spd. Sold in 2021. 1980 F100 4X2 Flareside. 351w/2bbl w/NP435. Sold in 1995 |
Re: Rembrant's new non-Bullnose project
|
Administrator
|
I did say "easily"..
 Paul Campbell (drag racer I knew) even had a lapping fixture for 9" rears. Sometimes he'd plug it in as he left the shop for the night.
Jim,
Lil'Red is a '87 F250 HD, 4.10's, 1356 4x4, Zf-5, 3G, PMGR, Saginaw PS, desmogged with a Holley 80508 and Performer intake. Too much other stuff to mention. |
|
I too build rear axles on a bench or stand and when ready I lift them off with the engine hoist if lou ferigno is not around. then I bolt a pr of wheels to it then roll it under the frame and align the pinion with a floor jack. I work slow but as methodically as possible.
|
|
This post was updated on .
In reply to this post by Rembrant
I haven't updated the old project thread in a while so I thought I'd post up the current status.
I have finally gotten to where all of the big stuff is done, and I now have a whole bunch of little things to do. The newer engine, transmission, and rearend are all solidly installed, along with a new custom driveshaft. I left the old dual exhaust in the truck...well, most of it at least, so I needed new down pipes to connect the new engine to the old pipes. I couldn't get any local shops to make the pipes for me, so I grabbed a bunch of loose fittings and made them myself. Got them all together, and then welded every joint. 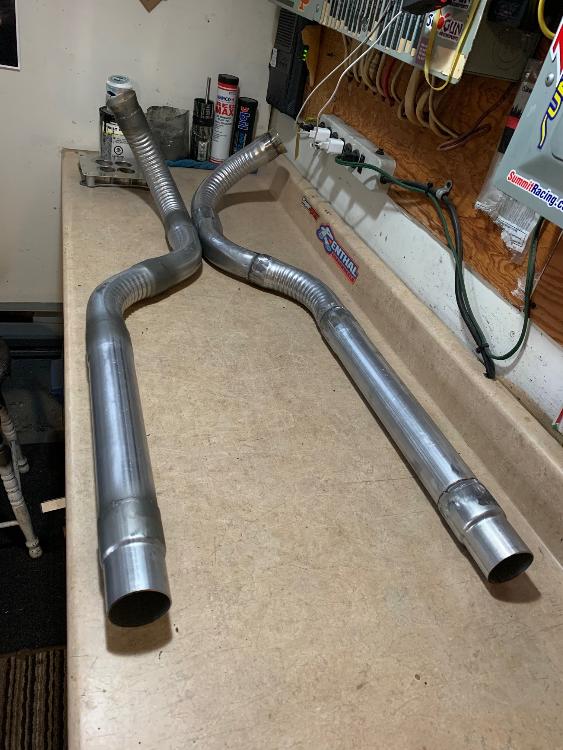 I have been playing around with the carburetor this week. I had to make some custom covers and gaskets for my new carb to work properly on the old Foxbody intake. It has an elongated hole in it for exhaust, which I assume was to heat the factory carb?  I got that all sorted out (I think?). I'm running a 1" spacer under the carb, but it just barely covered that hole so I made a plate out of 16ga aluminum, along with another wider gasket to place under the 1" spacer. I don't have pics, but the elongated hole is now well covered. I hope it works. Next issue, was the TPS. Because I'm running an electronically controlled 4R70W (or AODE-W) from a 1996 F150, there's no kickdown rod or cable, so I need to install a TPS on the carb. This isn't really a big deal. It should look like the below pic: 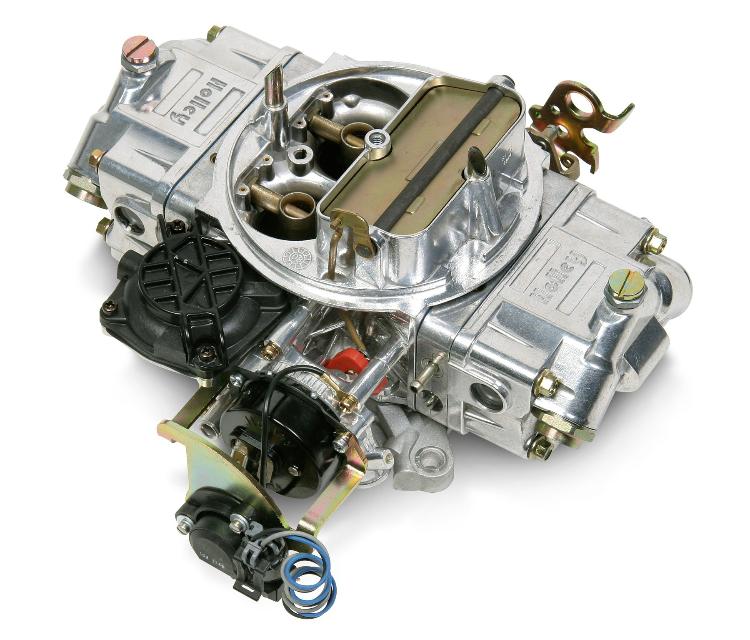 Problem is, my new 500CFM Summit carb came with a rigid dual inlet fuel line that's in the way. 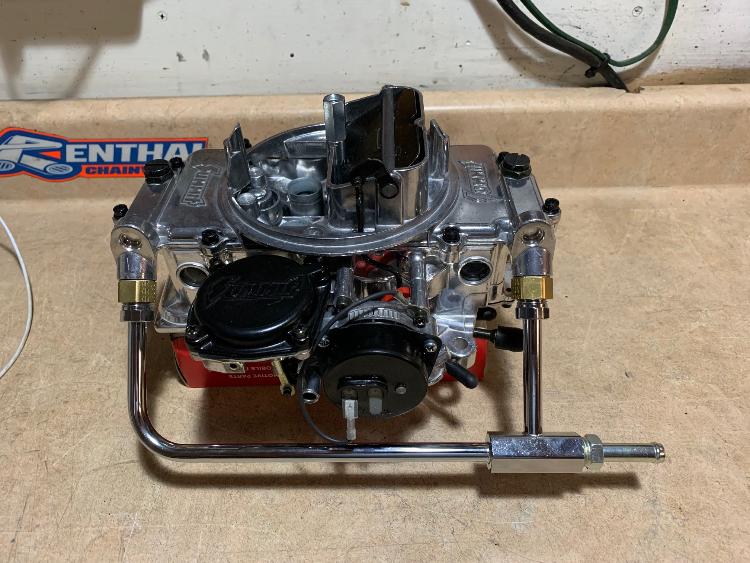 Anyway, not the end of the world, but I'm going to swap out the rigid line for barbs and rubber hoses so I can lower the line enough to give the TPS the room it needs to move. Other than that, I'm waiting for FedEx to bring me a RockAuto order. Next up is new kingpins and front brakes.I've never done kingpins before, so we'll see how this goes. I ordered an adjustable reamer on Amazon for $24 bucks, so hopefully that does the trick to get them fitted. Starting this morning (after my coffee is done) to pull the front hubs and see if I can knock the kingpins out. Fingers crossed.
1994 F150 4x2 Flareside. 5.0 w/MAF, 4R70W, stock.
1984 F150 4X2 Flareside. Mild 302 w/ 5spd. Sold. 1980 F150 4X4 Flareside. 300i6 w/ 5spd. Sold in 2021. 1980 F100 4X2 Flareside. 351w/2bbl w/NP435. Sold in 1995 |
Re: Rembrant's new non-Bullnose project
Nice and clean job! 
Jeff / 1984 F350 Crew Cab 4x4/5.8L w351 4V/ T18/ D50 4.10 front/ 8' bed.
Restored 2019-2022. Nicknamed «Big Brother 1984», due to its soooo-looong shape & nod to George Orwell's 1984 famous novel. |
It's not "fancy", but nobody can see them anyway, and they'll do the job just fine until I can get the truck running and drive it to a muffler shop to have some new work done later.
1994 F150 4x2 Flareside. 5.0 w/MAF, 4R70W, stock.
1984 F150 4X2 Flareside. Mild 302 w/ 5spd. Sold. 1980 F150 4X4 Flareside. 300i6 w/ 5spd. Sold in 2021. 1980 F100 4X2 Flareside. 351w/2bbl w/NP435. Sold in 1995 |
Re: Rembrant's new non-Bullnose project
|
Administrator
|
In reply to this post by Rembrant
Cory, that's looking good!
 The exhaust in your intake is the EGR port.
Jim,
Lil'Red is a '87 F250 HD, 4.10's, 1356 4x4, Zf-5, 3G, PMGR, Saginaw PS, desmogged with a Holley 80508 and Performer intake. Too much other stuff to mention. |
Ahh OK, that's what I had thought originally, but my brother inlaw said he thought it was for carb heating. In any case, it's in an awkward spot for an aftermarket carb/gasket/spacer to cover it. The outer edge of the hole is on the same line as the outer edge of a regular carb gasket and spacer. I was worried it out would burn/blow out. Now I have a 16ga aluminum spacer and 1/16 thick gasket over it, so that should be good enough, at least for a while.
1994 F150 4x2 Flareside. 5.0 w/MAF, 4R70W, stock.
1984 F150 4X2 Flareside. Mild 302 w/ 5spd. Sold. 1980 F150 4X4 Flareside. 300i6 w/ 5spd. Sold in 2021. 1980 F100 4X2 Flareside. 351w/2bbl w/NP435. Sold in 1995 |
Re: Rembrant's new non-Bullnose project
|
Administrator
|
Those gaskets DO like to blow out/burn through.
If you're not running EGR you might look at running a plug in there, or filling it with high temp steel filled epoxy. I'm not exactly sure what yours looks like in the bottom, but I put a plug in my 460 manifold when I no longer had to get smogged every year. I also use the updated pink silicone Ford gasket. I don't know the number for Windsors though...
Jim,
Lil'Red is a '87 F250 HD, 4.10's, 1356 4x4, Zf-5, 3G, PMGR, Saginaw PS, desmogged with a Holley 80508 and Performer intake. Too much other stuff to mention. |
The epoxy idea did cross my mind... I'll have a look at what products are available before I seal it all up for good.
1994 F150 4x2 Flareside. 5.0 w/MAF, 4R70W, stock.
1984 F150 4X2 Flareside. Mild 302 w/ 5spd. Sold. 1980 F150 4X4 Flareside. 300i6 w/ 5spd. Sold in 2021. 1980 F100 4X2 Flareside. 351w/2bbl w/NP435. Sold in 1995 |
Re: Rembrant's new non-Bullnose project
|
Administrator
|
I guess I was just lucky that the 'ear' on a 460 intake has a round port in the bottom that I could tap for a plug.
Don't despair, plenty of head porters pump the thermactor holes directly in the exhaust ports full of high temp silicone to block them off. All you really need to accomplish is to keep the exhaust from pressurizing that thin area where the gasket seals.
Jim,
Lil'Red is a '87 F250 HD, 4.10's, 1356 4x4, Zf-5, 3G, PMGR, Saginaw PS, desmogged with a Holley 80508 and Performer intake. Too much other stuff to mention. |
Re: Rembrant's new non-Bullnose project
|
Administrator
|
As the others said, it is looking good, Cory. But I agree with Jim that the port is for EGR and those tend to burn out. But if you have high-temp silicone or epoxy in there it'll keep the heat from the getting to the gasket and it should hold just fine.
Gary, AKA "Gary fellow": Profile
Dad's: '81 F150 Ranger XLT 4x4: Down for restomod: Full-roller "stroked 351M" w/Trick Flow heads & intake, EEC-V SEFI/E4OD/3.50 gears w/Kevlar clutches
|
|
Yes them pipes look good
 Did you block the cross over ports in the head / intake? I think that is where the EGR port gets the gases from so if they are blocked that should also help let that gasket live as it would not have any gases at it. Dave ----
Dave G.
81 F100 flare side 300 six / AA OD / NP435 / 2.75 gear http://cars.grantskingdom1.com/index.php/1980-Ford-F100?page=1 81 F100 style side 300 six/SROD parts truck -RIP http://cars.grantskingdom1.com/index.php/1981-Ford-F100 |
Bullnose Enthusiasts Forum
›
Projects
|
1 view|%1 views
| Edit this page |


