Rear Bumper/Spare Tire Mount Thoughts
|
Banned User
|
Weld the spindle base to the arm, pointing down. Weld the hub's tube into the bumper, with the larger bearing up. But that component doesn't have to run all the way from the pivot to the latch - it only needs to be close to the bumper AT the latch/stop. A simple flat tab hanging down from the arm that rests against the bumper's rear (visible) face will stop the arm from hitting the t/g. There can be wide ~1/8"-thick UHMW plates on the tab facing the bumper, and on the bottom of the arm facing the bumper. A simple spring-loaded hook (with a wide face) that ramps onto the top of the bumper & grabs the front lip of the bumper under the t/g will secure it. A carefully-placed wing bolt that screws down against the back of that hook will lock it for travel, or stay out of the way for quick access. |
Re: Rear Bumper/Spare Tire Mount Thoughts
|
Administrator
|
Thanks, Steve. I have a tab on the back of the swing arm as a positive stop, and have planned to put UHMW on it to prevent a metal/metal contact. But, the spring-loaded hook idea may be what I'm looking for. I can envision the ramp, probably out of UHMW as well, but haven't pictured the mechanism that will operate the hook. It's an over-center arrangement I'm sure, but do you have a picture of it? It will actually grab the filler panel rather than the front of the bumper as the bumper is a tube. But I do have an angle on the front of the bumper as a filler panel to keep the yuk off the top of the bumper, so could create a slot in that for the hook to grab. However, there's no easy place for the mechanism to go as the spare tire can come down w/in about an inch of the receiver. So I'm struggling with what the mechanism looks like and where it would go. I do appreciate the help.
Gary, AKA "Gary fellow": Profile
Dad's: '81 F150 Ranger XLT 4x4: Down for restomod: Full-roller "stroked 351M" w/Trick Flow heads & intake, EEC-V SEFI/E4OD/3.50 gears w/Kevlar clutches
|
Re: Rear Bumper/Spare Tire Mount Thoughts
|
Administrator
|
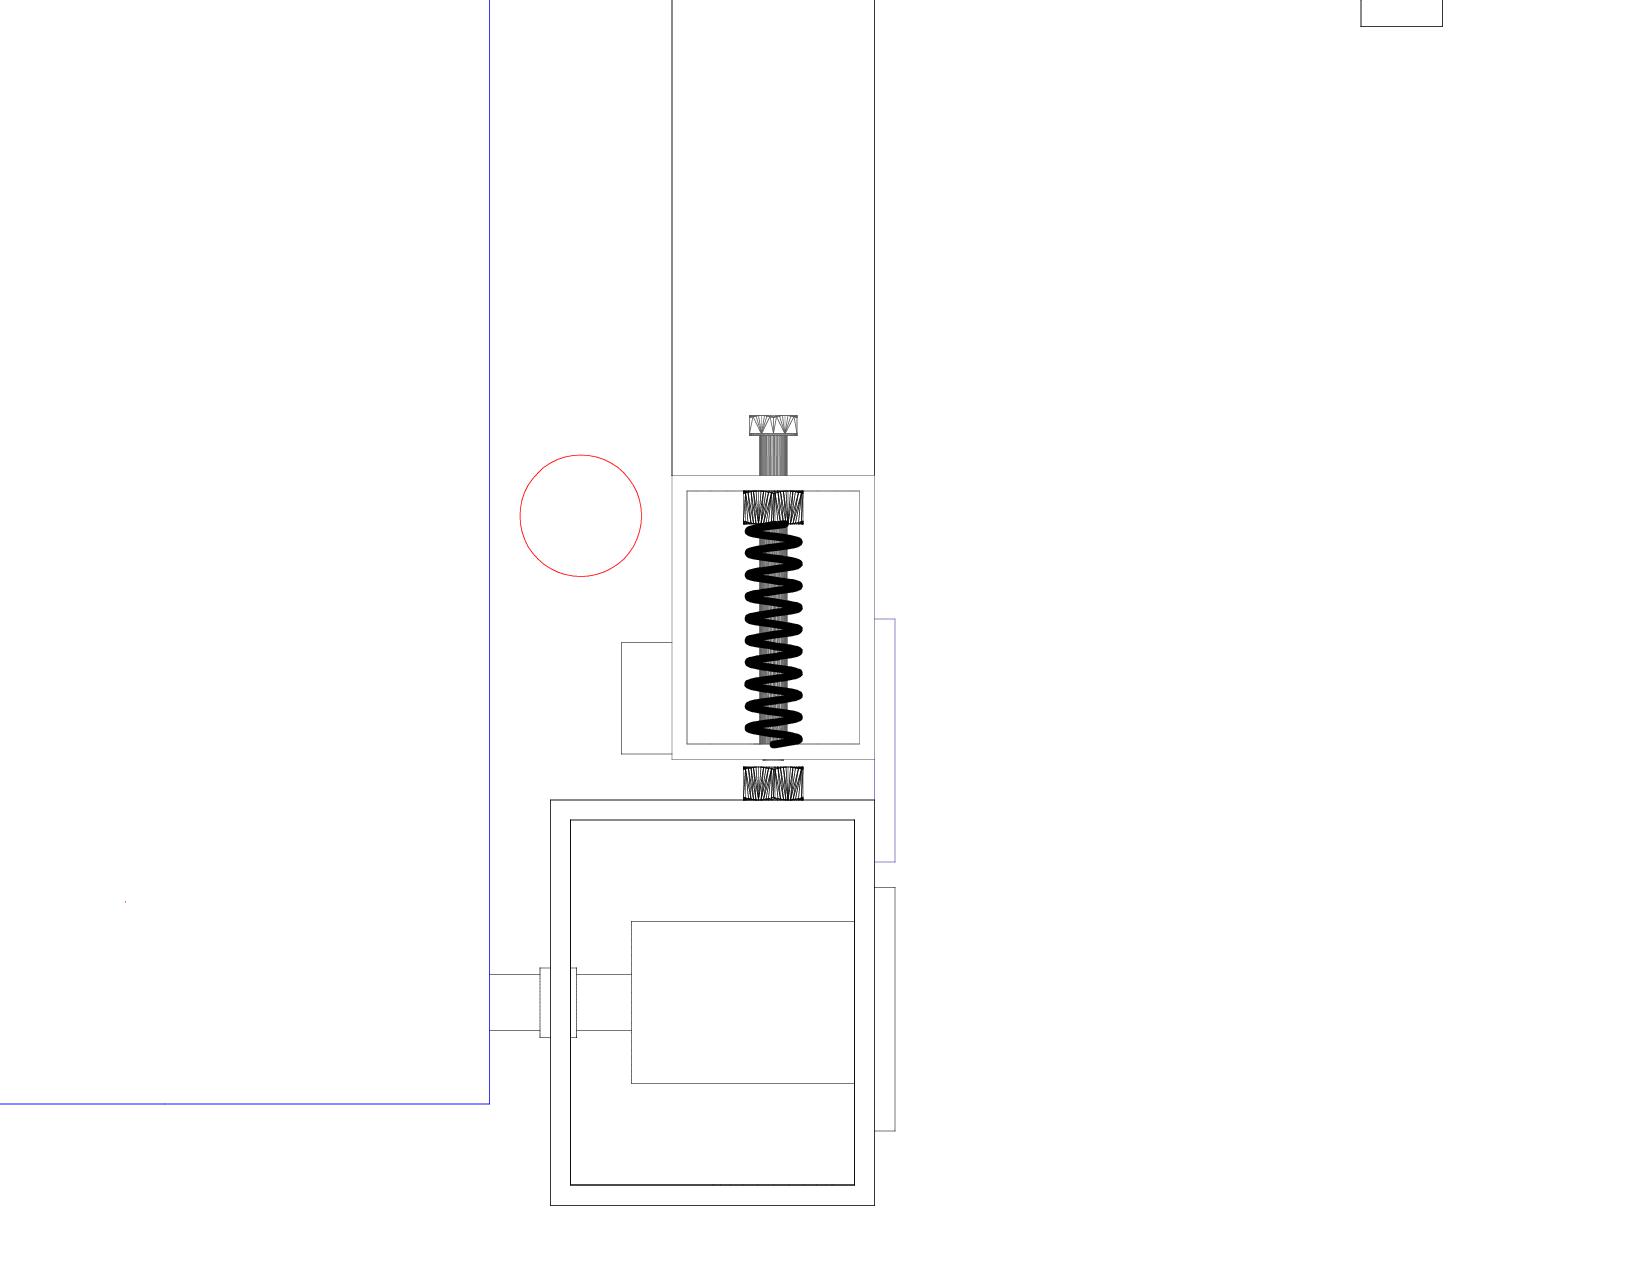
Well, I think I'm "there". I extended the lower swing arm 3" past the center to the left and added a 1/2-13 bolt, a couple of 1/2" nuts, and a spring. In the view from the left side shown below you can see into the left and of the swing arm. The bolt is held up when the swing arm is open by the spring, and then the head of the bolt is against the swing arm when the bolt is fully engaged with the bottom nut, which will be welded to the top of the bumper. But, since it is .445" thick it'll not hit the tailgate when the swing arm is out and the 'gate is open as there is about 1" of clearance there.
In addition, there's the spring-loaded pin-latch. Or, should I say there's supposed to be one? It is apparently shy and all you can see is its knob and the filler/spacer that positions it away from the swing arm.  Intentionally not shown as it hasn't been drawn yet is the UHMW pad that goes on top of the bumper in the center. It'll be 1/2" thick so won't bother the tailgate and it will have a ramp on the rear edge to guide both the swing arm as well as the pin of the pin-latch up and off the bumper. It'll serve as the rest for the swing arm as well as have a notch into which the pin will drop to hold the swing arm closed temporarily. In addition you can see the tab on the back of the swing arm that prevents it from going too far forward and hitting the tailgate. However it hasn't, as yet, been spaced back to allow room for a piece of UHMW to be glued to its from to prevent metal/metal contact. Anyway, tomorrow I'm going to do all of the dimensioning, meaning to add dimensions to the drawing. And, I'll create individual views of each part with those dimensions showing, so the work can get started.  Thanks to everyone for their help in this quest! 
Gary, AKA "Gary fellow": Profile
Dad's: '81 F150 Ranger XLT 4x4: Down for restomod: Full-roller "stroked 351M" w/Trick Flow heads & intake, EEC-V SEFI/E4OD/3.50 gears w/Kevlar clutches
|
|
Banned User
|
In reply to this post by Gary Lewis
The hook can go anywhere along the top of the bumper, wherever it's out-of-the-way of everything else. This shows it mounted to the bumper catching the arm, but it can just as effectively mount to the arm & catch the bumper:  The actual point of the hook needs to be wide, for the reasons I mentioned before. Easier said than done! UHMW is very low-friction, which means glues don't stick very well. I'd plan on screwing the plastic to the bumper. |
Re: Rear Bumper/Spare Tire Mount Thoughts
|
Administrator
|
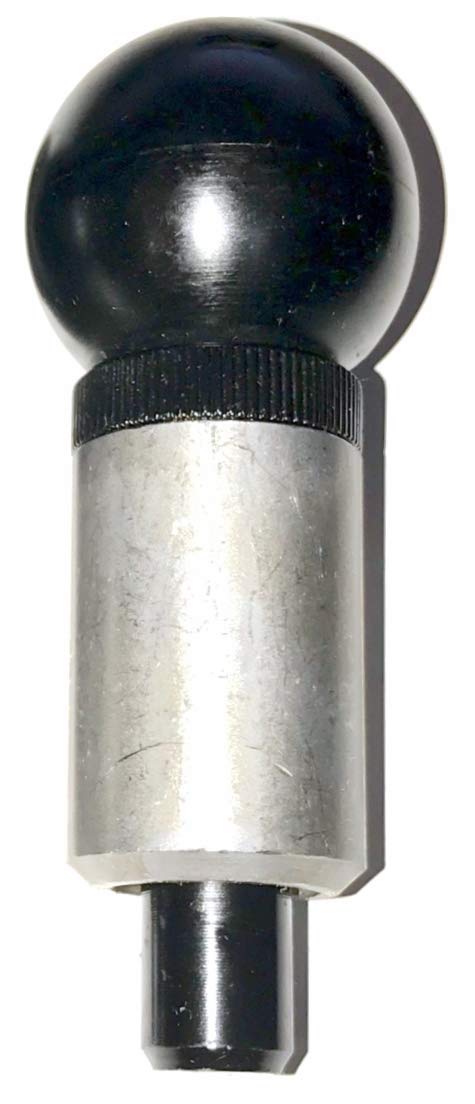
Steve - Thanks. Now I understand. I could have used a spring-loaded hook like that to capture the front of the bumper. But, I found the pop-pin shown below, which is commercially available, and it will work well for the "in camp" latch. However, I still want something that will pull the arm down and ensure it cannot go anywhere when I'm on the road. And for that I'm using the 1/2-13 bolt into a nut welded to the top of the bumper.
As for the UHMW, perhaps I shouldn't have said "glue". Instead, what I should have said is adhesive-backed UHMW. I've found what I'm looking for in a 1/8" thick strip in a roll, but they want $250 for the roll. So I'm still looking for sheets with an adhesive backing for a reasonable price. I can find 1/32" rolls reasonably-priced, but so far not the 1/8". Anyway, I give Ben, the fabricator, the drawings today. He'll look them over and give me a call to work out any issues he sees, and then get started.  
Gary, AKA "Gary fellow": Profile
Dad's: '81 F150 Ranger XLT 4x4: Down for restomod: Full-roller "stroked 351M" w/Trick Flow heads & intake, EEC-V SEFI/E4OD/3.50 gears w/Kevlar clutches
|
Re: Rear Bumper/Spare Tire Mount Thoughts
|
Administrator
|
I think you are right. Simple sheet, countersunk screws, done. And, since I plan on facing the jack stop, which is the piece of angle on the bottom end of the angled part of the swing arm, with UHMW, I could use the same 1/8" sheet as the source and the same batch of screws to secure it.
 Hmmm, as I think about it, if I have them trim the right hand stop, which is a solid chunk of steel, by 1/8" I could face it with UHMW as well. That would slightly cushion things as well as prevent the finish from chipping.
Gary, AKA "Gary fellow": Profile
Dad's: '81 F150 Ranger XLT 4x4: Down for restomod: Full-roller "stroked 351M" w/Trick Flow heads & intake, EEC-V SEFI/E4OD/3.50 gears w/Kevlar clutches
|
|
In reply to this post by Gary Lewis
Gary, I didn't follow this thread originally, but I knew you were discussing it. Came across this truck on CL this morning and it reminded me of you;). https://prescott.craigslist.org/cto/d/humboldt-86-ford-f250/7028125120.html  Also note the lights IN the front bumper. Not sure how functional they are, but that's a clean installation that looks decent imho.
1994 F150 4x2 Flareside. 5.0 w/MAF, 4R70W, stock.
1984 F150 4X2 Flareside. Mild 302 w/ 5spd. Sold. 1980 F150 4X4 Flareside. 300i6 w/ 5spd. Sold in 2021. 1980 F100 4X2 Flareside. 351w/2bbl w/NP435. Sold in 1995 |
Re: Rear Bumper/Spare Tire Mount Thoughts
|
Administrator
|
I'd never noticed that the Bullnose filler panel was vented in front of the radiator.
Anyway, very well spotted Cory! 
Jim,
Lil'Red is a '87 F250 HD, 4.10's, 1356 4x4, Zf-5, 3G, PMGR, Saginaw PS, desmogged with a Holley 80508 and Performer intake. Too much other stuff to mention. |
|
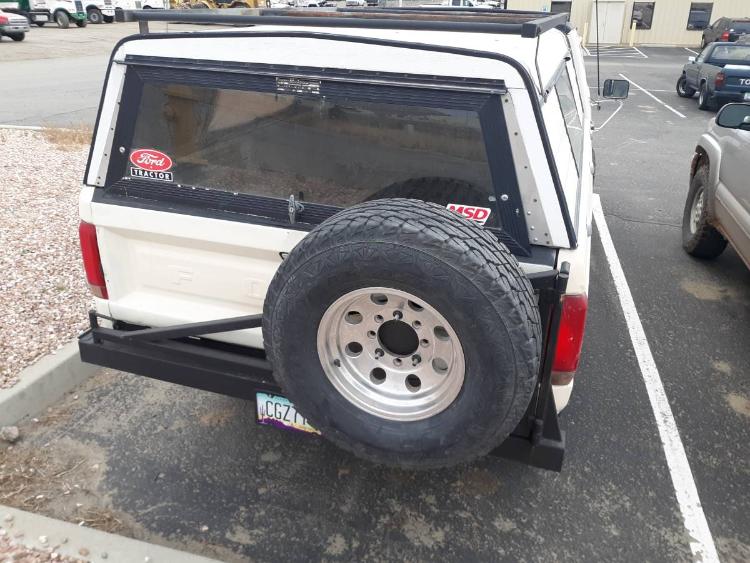
That's quite a nice spare tire carrier, isn't it? Obviously it opens just far enough to let the gate down. It would probably squat the back of my light little Bull...lol, but you guys with the 8-lug trucks, no problemo!
Did Gary ever build a bumper like this?
1994 F150 4x2 Flareside. 5.0 w/MAF, 4R70W, stock.
1984 F150 4X2 Flareside. Mild 302 w/ 5spd. Sold. 1980 F150 4X4 Flareside. 300i6 w/ 5spd. Sold in 2021. 1980 F100 4X2 Flareside. 351w/2bbl w/NP435. Sold in 1995 |
Re: Rear Bumper/Spare Tire Mount Thoughts
|
Administrator
|
I don't think he's gotten that far.
He's too busy powder coating his nuts. But he is going to need something because of that 38 gallon tank.
Jim,
Lil'Red is a '87 F250 HD, 4.10's, 1356 4x4, Zf-5, 3G, PMGR, Saginaw PS, desmogged with a Holley 80508 and Performer intake. Too much other stuff to mention. |
Re: Rear Bumper/Spare Tire Mount Thoughts
|
Administrator
|
In reply to this post by Rembrant
Yes, that is a nice carrier. If the truck wasn't so expensive.....
I've not gotten mine built. It isn't my time that is the problem but that of my friend that was/is going to build it. He has cancer and is going through about his 4th or 5th round of treatment, so has much bigger problems to worry about than my bumper, so I don't mention it. However, I won't need it for a while. The spare is in the middle of the bed, chained to the 5th wheel base, and until I convince my son to go with me on a real overlanding trip it can stay right there. In the interim Janey and I'll use the truck for trips where we don't camp and, therefore, don't need as much storage space.
Gary, AKA "Gary fellow": Profile
Dad's: '81 F150 Ranger XLT 4x4: Down for restomod: Full-roller "stroked 351M" w/Trick Flow heads & intake, EEC-V SEFI/E4OD/3.50 gears w/Kevlar clutches
|
|
I'm liking the light set up in the plate part of the bumper. But if you move to a state that requires a front plate... Kinda screwed. Also not sure how functional that is vs having them set apart. I also noticed above the lights looks like he welded a diamond plate step there.
1985 F-350 XL | 460 | C6 | "Rufus Maximus"
1986 F-150|Standard Cab|4x2|300Six|C6Transmission w/3.08 rear|Name:TBD 2021 Ranger XLT Super Crew | Cactus Grey | black out package | max tow |
Re: Rear Bumper/Spare Tire Mount Thoughts
|
Administrator
|
I have to have a front plate, but I am following Dave's lead ad settling them wide apart.
Jim,
Lil'Red is a '87 F250 HD, 4.10's, 1356 4x4, Zf-5, 3G, PMGR, Saginaw PS, desmogged with a Holley 80508 and Performer intake. Too much other stuff to mention. |
Re: Rear Bumper/Spare Tire Mount Thoughts
|
Administrator
|
I've seriously considered adding lights in the Warn winch bumper on Big Blue - even though people think that's sacrilegious given the rarity of those bumpers. But there's plenty of room to do so and I'm still thinking about it. Besides, I may PC it black since it has rust showing, although the rust does add to the patina.
 Toward that end I've done a lot of reading about extra lighting. And what I've read makes sense - you want the light down low for two reasons:
Gary, AKA "Gary fellow": Profile
Dad's: '81 F150 Ranger XLT 4x4: Down for restomod: Full-roller "stroked 351M" w/Trick Flow heads & intake, EEC-V SEFI/E4OD/3.50 gears w/Kevlar clutches
|
Re: Rear Bumper/Spare Tire Mount Thoughts
|
Administrator
|
Well, it has been a while since I posted on this thread, but with today's discussion with WelderScott I think it is time to revive it. Especially since I need to re-read parts of this thread in order to refresh my thinking.
So, Scott came over today to have us check out some things his '78. And when we got done we looked Big Blue over. During that he asked about the bumper/spare tire mount and suggested that we make it.  He was serious, so I've now dusted off the drawing and am trying to re-learn how to use TurboCAD in 3D. (It isn't intuitively obvious to the casual observer.) And I've created a materials list. I'll hand off some printouts to him at church tomorrow, and will start thinking about this seriously. But I'll document most of the work in Big Blue's Transformation - unless it should be in a thread of its own. Thoughts?
Gary, AKA "Gary fellow": Profile
Dad's: '81 F150 Ranger XLT 4x4: Down for restomod: Full-roller "stroked 351M" w/Trick Flow heads & intake, EEC-V SEFI/E4OD/3.50 gears w/Kevlar clutches
|
Re: Rear Bumper/Spare Tire Mount Thoughts
|
Administrator
|
Remind me the OD of the tubes?
You'll never do this with a fly cutter, but you can sometimes use a hole saw. Often if the angle is acute you'll have to back out and hack off some of the leading edge because most hole saws are only a couple of inches deep. Lather, rinse, repeat....
Jim,
Lil'Red is a '87 F250 HD, 4.10's, 1356 4x4, Zf-5, 3G, PMGR, Saginaw PS, desmogged with a Holley 80508 and Performer intake. Too much other stuff to mention. |
Re: Rear Bumper/Spare Tire Mount Thoughts
|
Administrator
|
Good idea, Jim.
 The tubes are 2 1/2" square for the vertical and angled pieces on the swing arm, and 2 1/2 x 3 1/2 for the horizontal piece. But a 2" hole saw would be the thing to use as the tubes that go into the fish mouthed openings are 2".
Gary, AKA "Gary fellow": Profile
Dad's: '81 F150 Ranger XLT 4x4: Down for restomod: Full-roller "stroked 351M" w/Trick Flow heads & intake, EEC-V SEFI/E4OD/3.50 gears w/Kevlar clutches
|
Re: Rear Bumper/Spare Tire Mount Thoughts
|
Administrator
|
Okay, I'm seeing the sketch in Big Blue's thread.
Guess I'm just used to things like motorcycle frames or pipes when I think of fishmouthed joints I only think of round sections meeting. (my literal mind missing the obvious.  ) )
What do you gain by having the bottom tube wider?
Jim,
Lil'Red is a '87 F250 HD, 4.10's, 1356 4x4, Zf-5, 3G, PMGR, Saginaw PS, desmogged with a Holley 80508 and Performer intake. Too much other stuff to mention. |
Re: Rear Bumper/Spare Tire Mount Thoughts
|
Administrator
|
Let's say the bottom tube is taller rather than wider. The 3 1/2" height instead of 2 1/2" for the rest of the tubing means it engages the full length of the pivot. And, IIRC, the stiffness of a tube goes up with the square of the height, so a 3 /12" piece will be almost twice as stiff as a 2 1/2" high piece. Plus, we have almost 1/3 more area on which to weld.
As for the thickness of the material, let's take that up in BB's Transformation and keep it all together there.
Gary, AKA "Gary fellow": Profile
Dad's: '81 F150 Ranger XLT 4x4: Down for restomod: Full-roller "stroked 351M" w/Trick Flow heads & intake, EEC-V SEFI/E4OD/3.50 gears w/Kevlar clutches
|
| Edit this page |


