Nothing Special's '71 Bronco
|
Administrator
|
Well done! The pic of the tower up through the floor when it was below the floor tells the tale. You really brought it up.
 And the crossmember looks great as well. Can't wait to see the skid plate.
Gary, AKA "Gary fellow": Profile
Dad's: '81 F150 Ranger XLT 4x4: Down for restomod: Full-roller "stroked 351M" w/Trick Flow heads & intake, EEC-V SEFI/E4OD/3.50 gears w/Kevlar clutches
|
Re: Nothing Special's '71 Bronco
|
In reply to this post by ArdWrknTrk
I don't think I need more clearance for the transfer case. I might get some contact when the Bronco flexes, and if that's annoying enough I might change my mind. But for now at least I'm happy with the 1-2 mm I have. So if I can cover up the hole where the sticks come though I'll be happy with that. As to the twin sticks, they do make a double boot for that. I had one once, but it didn't work so well when I had the sticks coming through where the side of the tunnel was angled. So I got two single boots and put them side by side. Now I think I'm going to get one of the double boots again and mount it on the top of the "box" I need to build around the tower. I'm thinking that will work out pretty well. You and me both!
Bob
Sorry, no '80 - '86 Ford trucks "Oswald": 1997 F-250HD crew cab short box, 460, E4OD, 4.10 gears "Pluto": 1971 Bronco, 302, NV3550 5 speed, Atlas 4.3:1 transfer case, 33" tires "the motorhome": 2015 E-450-based 28' class C motorhome, 6.8L V-10 "the Dodge": 2007 Dodge 2500, 6.7L Cummins |
|
Administrator
|
Have you thought about UHMW-PE (ultra-high molecular weight polyethylene)? The guys running RZR's swear by the stuff. I helped my neighbor put a set on his and he raved about it when he got back. Said its like having lubrication on your skid plate - it slides over rocks with ease.
But I don't know quite how you'd use it. The stuff for the RZR's comes formed and there's no place for a rock to catch an edge. So in flat sheets you'd have to create a frame that supports it and has places for it to bolt on, with recessed bolt heads.
Gary, AKA "Gary fellow": Profile
Dad's: '81 F150 Ranger XLT 4x4: Down for restomod: Full-roller "stroked 351M" w/Trick Flow heads & intake, EEC-V SEFI/E4OD/3.50 gears w/Kevlar clutches
|
Re: Nothing Special's '71 Bronco
|
I have thought about it, but I'm not going to use it. If I had a completely flat belly and could just slap a flat sheet of it on I might do that. But I don't, I don't know how to build it around everything that stick below the frame and I don't want to take on an indefinite project like that. So steel it is.
Bob
Sorry, no '80 - '86 Ford trucks "Oswald": 1997 F-250HD crew cab short box, 460, E4OD, 4.10 gears "Pluto": 1971 Bronco, 302, NV3550 5 speed, Atlas 4.3:1 transfer case, 33" tires "the motorhome": 2015 E-450-based 28' class C motorhome, 6.8L V-10 "the Dodge": 2007 Dodge 2500, 6.7L Cummins |
Re: Nothing Special's '71 Bronco
|
In my motorhome thread Gary asked about timing and project list for the Bronco. I thought I'd answer that here in my Bronco thread.
We've got a little over a month before our trip to Hurricane, Utah. The plan is to spend a few days 'wheeling at Sand Hollow and a couple days exploring Zion and Bryce Canyon National Parks. We need the Bronco for both activities, so we really need it for this trip! As for what's left, getting the gears set up is the big one. I could see that being done in a few hours if everything goes well, or in a few weeks if it goes the other way. We'll just have to see! Installing the axle shouldn't be a big deal. I've done it several times through this project. Installing new ball joints is a bit of a wild card as I've never done it before. But I don't think it should take too long. Axle shafts, spindles, hubs and brakes need to go on. That should be a few hours. Then there will probably be a handful of little things like bleeding brakes. But i'm not going to try to list all of those kind of things now. And I need to get my mud tires balanced (plus one isn't holding air) and get the Bronco aligned. That is the bare minimum to get it driving. I also would like to get the shifter holes covered up. That means some simple sheet metal work and getting some boots installed. If I could I'd love to get a skid plate made. But I'm thinking that will get pushed back to after this trip. I think that about covers it. I got started on the gears tonight and have some progress I'll put in another post.
Bob
Sorry, no '80 - '86 Ford trucks "Oswald": 1997 F-250HD crew cab short box, 460, E4OD, 4.10 gears "Pluto": 1971 Bronco, 302, NV3550 5 speed, Atlas 4.3:1 transfer case, 33" tires "the motorhome": 2015 E-450-based 28' class C motorhome, 6.8L V-10 "the Dodge": 2007 Dodge 2500, 6.7L Cummins |
|
Administrator
|
Here's hoping it goes together easily and you are done before you know it.
Gary, AKA "Gary fellow": Profile
Dad's: '81 F150 Ranger XLT 4x4: Down for restomod: Full-roller "stroked 351M" w/Trick Flow heads & intake, EEC-V SEFI/E4OD/3.50 gears w/Kevlar clutches
|
Re: Nothing Special's '71 Bronco
|
In reply to this post by Nothing Special
Tonight I finally got started setting up my gears. I'm starting with a new-to-me axle housing, the diff that was in my old housing, and new gears. So I'm pretty much starting from scratch.
I got my axle housing with the pinion shaft still installed, so I measured the shim thickness behind the inner race (that's what sets pinion depth) and started there. And the OX locker puts the case shims behind the pressed-on bearings, so I used what I had from my old axle as a starting point. My first move was to put the diff in without the pinion to see if I was even close on the case preload. Turned out there was .004" freeplay side-to-side. So it wasn't horribly far off, at least close enough to stick the pinion in and start seeing where that needed to be. The Dana 44 doesn't have a crush sleeve! It uses shims behind the nose bearing to set preload. But for now I'm not putting any shims there. Instead I'm just torquing the pinion nut far enough to give me the proper pinion preload. After I get everything else dialed in I'll get the shims figured out to get the correct pinion preload with the pinion nut torqued correctly. So with the pinion in I threw the case back in. On my first attempt it had no backlash, so I loosened the caps and tried moving it away from the pinion (remember, I have .004" freeplay at this point). That gave me .002" backlash (it should be .006" - .010"), so not really too far off. I also checked the total torque-to-turn and found it was about 4 lb-in above the pinion torque-to-turn. It should be 5-15 lb-in more with the correct case preload. Next I pulled the "button side" bearing off the diff and measured the shims there. I had .054". Adding shim thickness on the button side would increase my backlash and increase my case preload, both of which were too low. I started with .010" more shim (going to .064"). That got rid of my freeplay (and added some preload). It also gave me .004" backlash, still a little too low, but I decided it was close enough to run a pattern. This is what I got. I'd sure welcome any helpful advice on reading patterns, but it doesn't look too bad to me. I'm thinking maybe it's telling me that I'd be better off increasing the pinion depth to get the pattern a little lower on the ring gear teeth. But I'm not sure if I should try to dial in the backlash and case preload before I make any pinion depth changes. And speaking of case preload, I'm only at 5 lb-in over the pinion torque-to-turn now, so I still need to add more preload. Here's a picture of the pattern on the drive side: 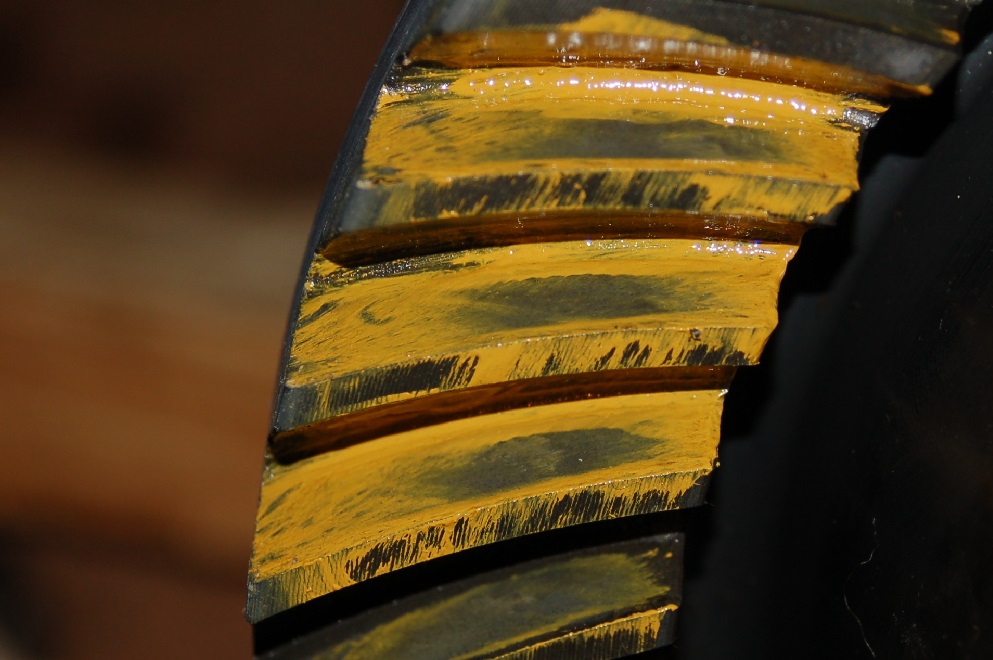 And here's the coast side pattern: 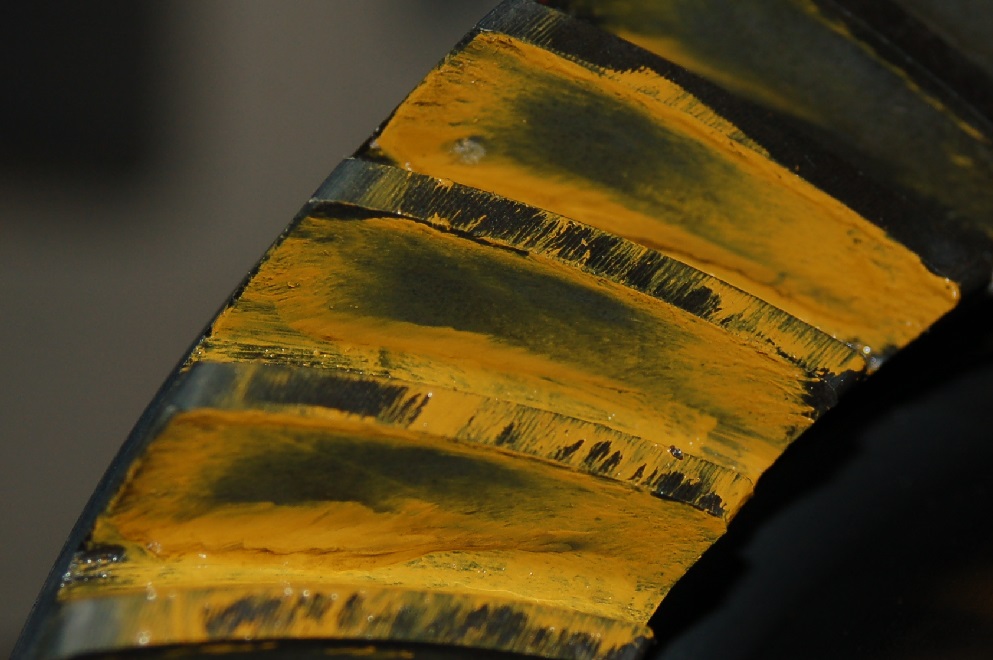
Bob
Sorry, no '80 - '86 Ford trucks "Oswald": 1997 F-250HD crew cab short box, 460, E4OD, 4.10 gears "Pluto": 1971 Bronco, 302, NV3550 5 speed, Atlas 4.3:1 transfer case, 33" tires "the motorhome": 2015 E-450-based 28' class C motorhome, 6.8L V-10 "the Dodge": 2007 Dodge 2500, 6.7L Cummins |
|
Administrator
|
I've not done an axle setup, so take this with a lot of salt. But I've read about it and from what I've read you are really close. And I don't have a clue what order to do things in. So I'll hang out and see what the others have to say.
Gary, AKA "Gary fellow": Profile
Dad's: '81 F150 Ranger XLT 4x4: Down for restomod: Full-roller "stroked 351M" w/Trick Flow heads & intake, EEC-V SEFI/E4OD/3.50 gears w/Kevlar clutches
|
Re: Nothing Special's '71 Bronco
|
This post was updated on .
In reply to this post by Nothing Special
I thought I'd also show how I am doing some of the more challenging things, but I'm putting this in a separate post to avoid each post from getting too cluttered.
I'm not using set-up bearings. I know "they say" you need to. But I tried that last time and everything changed on me when I went to the "real" bearings, so I had to start all over. It is easier working with set-up bearings, but if I'm going to have to set up the gears with the real bearings anyway I don't see the point in doing it twice. But the OX locker has the case shims behind the case bearings (some diffs, like the ARB, put the shims behind the races). That means I need to press the case bearings on and off the differential every time I need to change shims. Putting the bearings on isn't that hard. I use a hammer with a softer metal piece between the bearing and hammer. It takes quite a few swings to get it on all the way, but they don't have to be real hard swings. But getting them off is tougher. I ran into that when I installed the OX a few years ago, so back then I made this puller to get them off. The "block" at the bottom has a thin flange that goes under the bearing and pulls against its inner race. And you can sort of see in the picture, but it's actually two pieces that come in from opposite sides. The round piece is just a spacer and the bolt through the plate on top pushes against a piece that fits inside the bearing and pushes it on the diff. It's not blazingly fast, but it does go pretty easily. 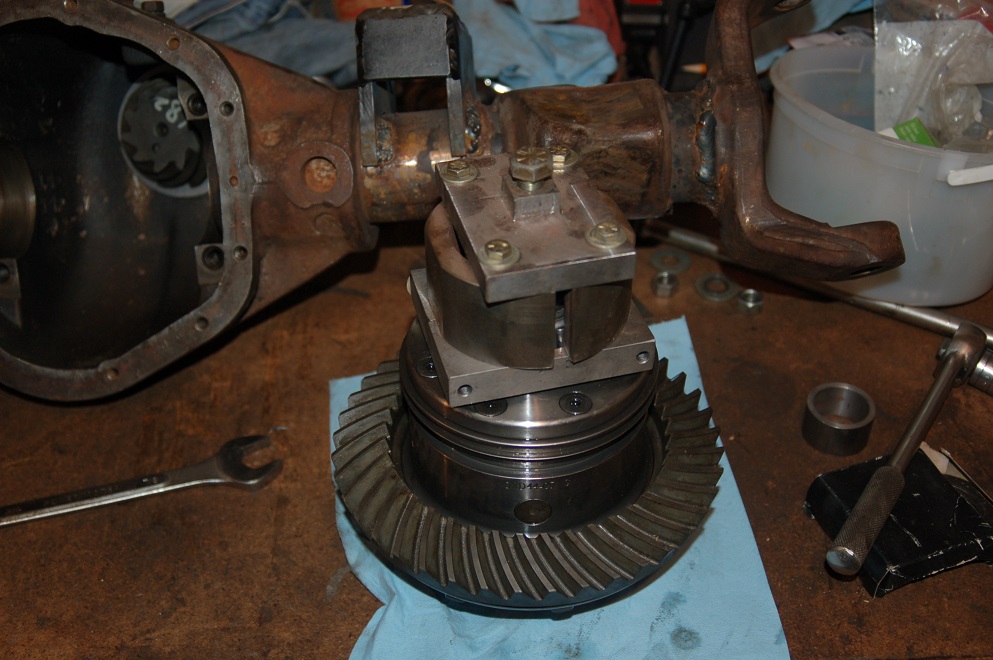 (edit to add: Here's another picture of the bottom "block" separated into its two halves. And the piece that pilots in the bearing and pushes it on is sitting on top of the bearing.  ) When I installed the OX in my old axle I used a hammer and a block of wood to drive it into the housing. And prying it out is actually pretty easy (you put a wrench on a ring gear bolt and turn the pinion, when the wrench hits the housing it pushes the diff out). So I was going to do it the same way this time. But then I heard of a simple, cheap way to make a housing spreader. A couple of plates cut from some 3/8" scrap steel with a couple tubes welded to the ends. Bolt the plates to the housing and put some threaded rod through the tubes. Turn the nuts on the inside to spread it apart and the case just drops in! 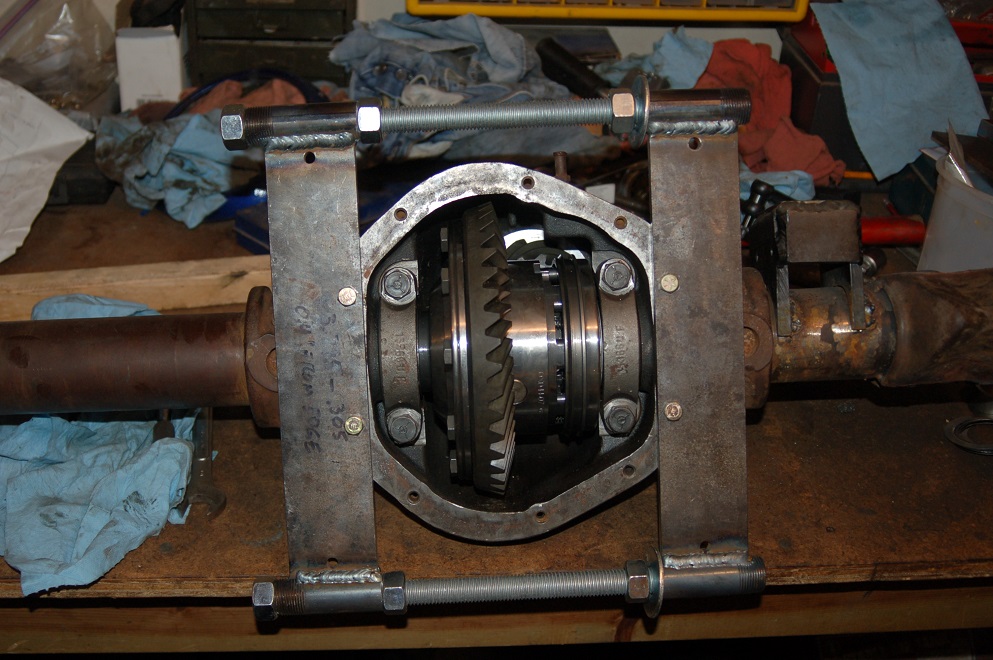 I'll add more tool pics as I use more tools.
Bob
Sorry, no '80 - '86 Ford trucks "Oswald": 1997 F-250HD crew cab short box, 460, E4OD, 4.10 gears "Pluto": 1971 Bronco, 302, NV3550 5 speed, Atlas 4.3:1 transfer case, 33" tires "the motorhome": 2015 E-450-based 28' class C motorhome, 6.8L V-10 "the Dodge": 2007 Dodge 2500, 6.7L Cummins |
|
Administrator
|
It makes sense to me not to use set-up bearings if you have to don it over again. And that puller looks slick.
But the case-spreader is ingenious! Brandon/Bruno2 and I talked about how to do that and we didn’t come up with any good ideas. That one is magic!
Gary, AKA "Gary fellow": Profile
Dad's: '81 F150 Ranger XLT 4x4: Down for restomod: Full-roller "stroked 351M" w/Trick Flow heads & intake, EEC-V SEFI/E4OD/3.50 gears w/Kevlar clutches
|
Re: Nothing Special's '71 Bronco
|
In reply to this post by Gary Lewis
As you saw in my next post, things are looking pretty good at the moment I've posted the pictures and questions on another forum I'm on where there are quite a few people who have set up gears multiple times. I'm hoping someone there helps me out. Otherwise I'll just have to muddle through. Isn't it! It's so simple anyone could come up with it. But most of us didn't (I sure didn't). When I saw it I decided I had to try it.
Bob
Sorry, no '80 - '86 Ford trucks "Oswald": 1997 F-250HD crew cab short box, 460, E4OD, 4.10 gears "Pluto": 1971 Bronco, 302, NV3550 5 speed, Atlas 4.3:1 transfer case, 33" tires "the motorhome": 2015 E-450-based 28' class C motorhome, 6.8L V-10 "the Dodge": 2007 Dodge 2500, 6.7L Cummins |
|
In reply to this post by Nothing Special
I agree, that spreader is cool!
Dane
1986 F250HD SC XLT Lariat 4x4 460 C6-Sold 1992 Bronco XLT 4x4 351W E4OD 1998 GMC Sierra SLE K1500 350 4L60E Arizona |
Re: Nothing Special's '71 Bronco
|
Not sure if you do Facebook or not. A group popped up on my page the other day and I joined it.
Gear Install and Technical Group. Seems to be a lot of expertise in that group. Might check it out if you do Facebook.
Bruce aka Moose--1978 F250 LWB Flareside, Dana 60's w/ 4:10's, 460, c6
|
Re: Nothing Special's '71 Bronco
|
I am not a Facebooker, but thanks!
I didn't get as much help as I'd hoped for on my other forum, but two people said they thought it was good enough as it sat there, especially for a front axle. With that advice I still decided I'd try to narrow in on it a little better, so tonight I got 2 more in-and-outs done. I decided that the pinion depth was probably close enough that I should get the backlash where it belongs before I decide if I wanted to change the pinion. So my first step tonight was to add .011" to the button side of the case and take .005" out of the flange side (which turned out to have .044" from before, so now down to .039"). That should add .006" preload (and I was still a bit low) and give a bit more backlash. It did just that, with .007" backlash (spec is .006" - .010") and now the total torque-to-turn was 9 lb-in over the pinion torque-to-turn (spec is 5 - 15 lb-in). I could live with those numbers! Running the pattern I got much the same as I got last night. Here's the drive: 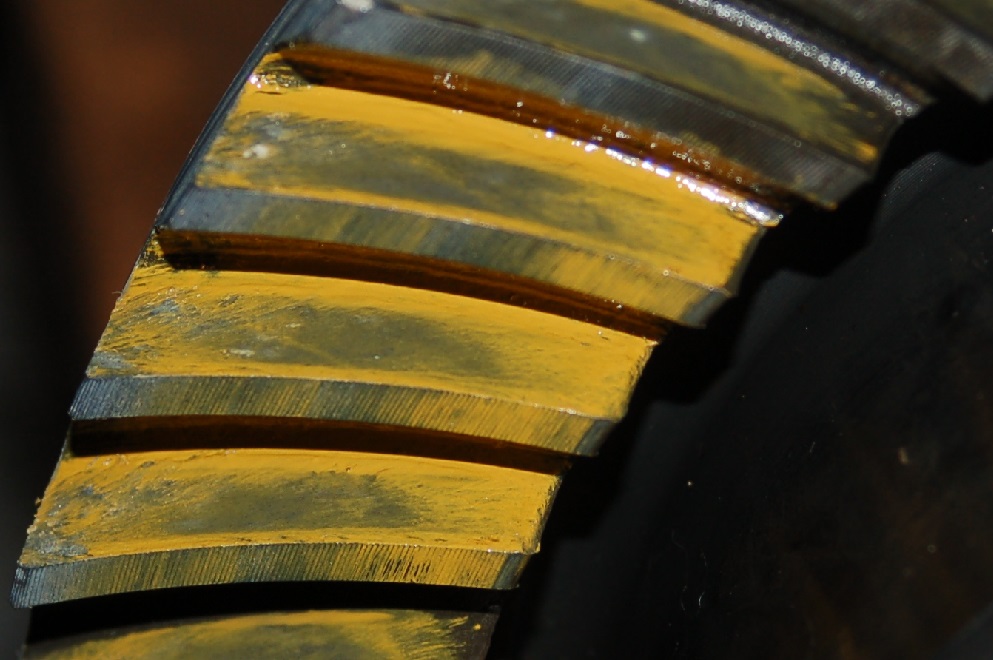 and here's the coast: 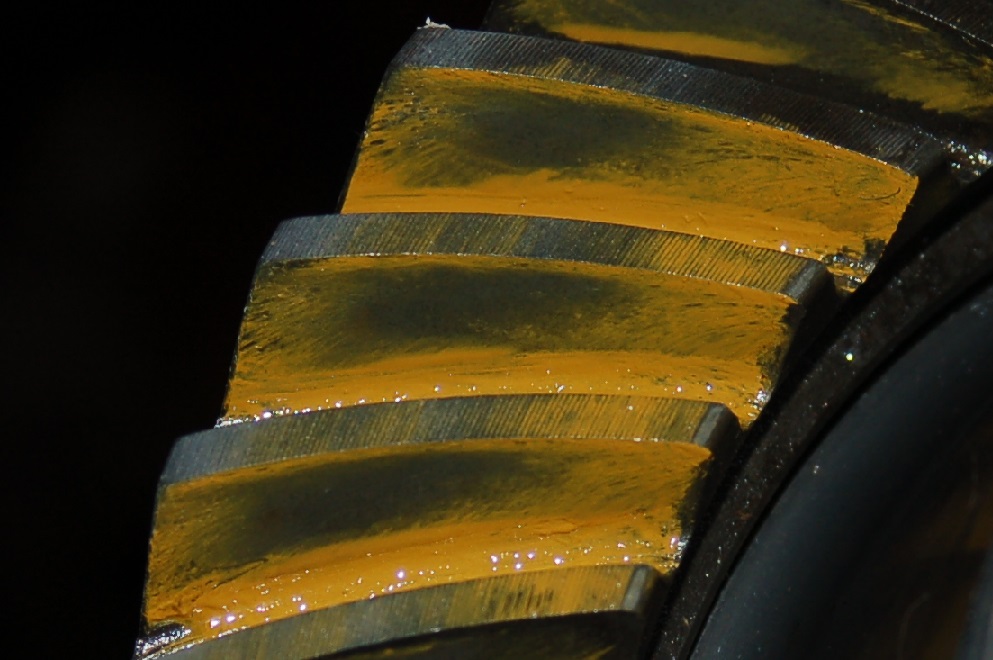 I was thinking that seemed probably good enough, but if anything still a bit high, so I decided to shim the pinion a little deeper to see what it did. I added .010" behind the inner pinion race and left the case shims where they were. That gave me .0075" backlash, and 5 lb-in from the case preload. I'm not sure why the torque dropped. The pattern I got confirms that I moved the pinion deeper, and that's a very good thing, because it means I sort of know what I'm doing! Here's the drive side: 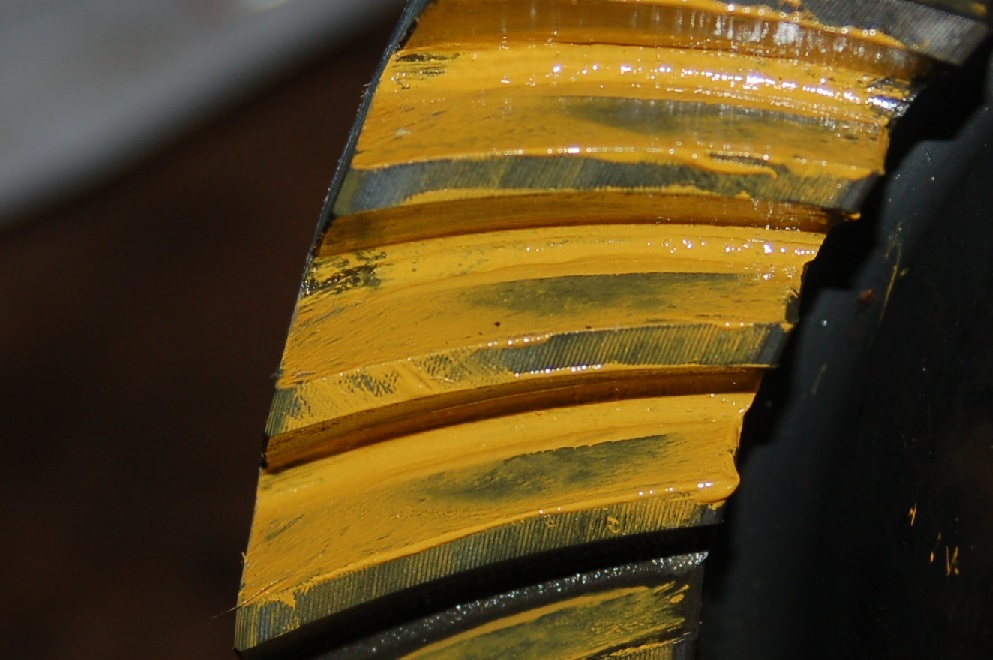 and here's the coast: 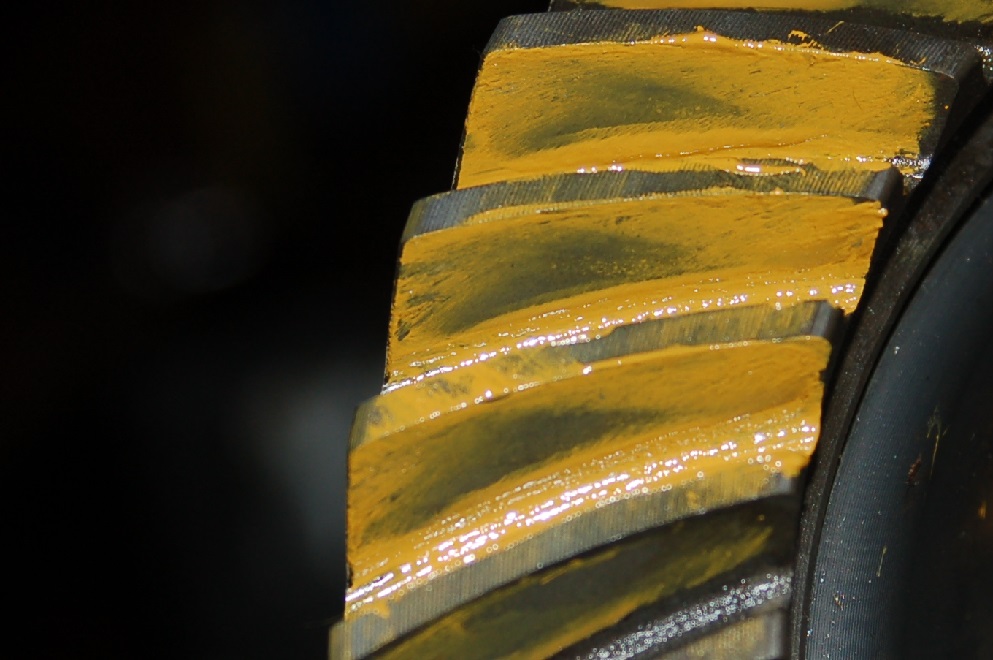 As I said, it confirms I went deeper. And now I'm definitely too deep. So I'm thinking that I want to take probably .008" - .010" back out (after just putting .010" more in). Once I have the pinion depth dialed in I need to put an oil baffle in. That goes where the shims are and will add shim thickness. So I'll need to take out shims to compensate. I think now I'm going to figure that I know where I want to be and I'll add the baffle while taking the .008" - .010" out. I'm thinking that should be the last time I need to put the pinion in I'm liking where the backlash is, so I'm not going to try to change it. But i think I will add a little more shim on both sides of the case to increase the case preload a bit more. But that will be a job for a different day!
Bob
Sorry, no '80 - '86 Ford trucks "Oswald": 1997 F-250HD crew cab short box, 460, E4OD, 4.10 gears "Pluto": 1971 Bronco, 302, NV3550 5 speed, Atlas 4.3:1 transfer case, 33" tires "the motorhome": 2015 E-450-based 28' class C motorhome, 6.8L V-10 "the Dodge": 2007 Dodge 2500, 6.7L Cummins |
|
Administrator
|
Interesting that shimming the pinion deeper dropped the preload. Given that, won't removing about the same amount of shims bring the preload back up? IOW, you may not need to shim the case.
Gary, AKA "Gary fellow": Profile
Dad's: '81 F150 Ranger XLT 4x4: Down for restomod: Full-roller "stroked 351M" w/Trick Flow heads & intake, EEC-V SEFI/E4OD/3.50 gears w/Kevlar clutches
|
Re: Nothing Special's '71 Bronco
|
In reply to this post by Nothing Special
And here are a few more pictures of the homemade tools I'm using.
First is another picture of part of the case bearing puller to show it a little better. I'll add that to the earlier tools post where I talked about that as well. 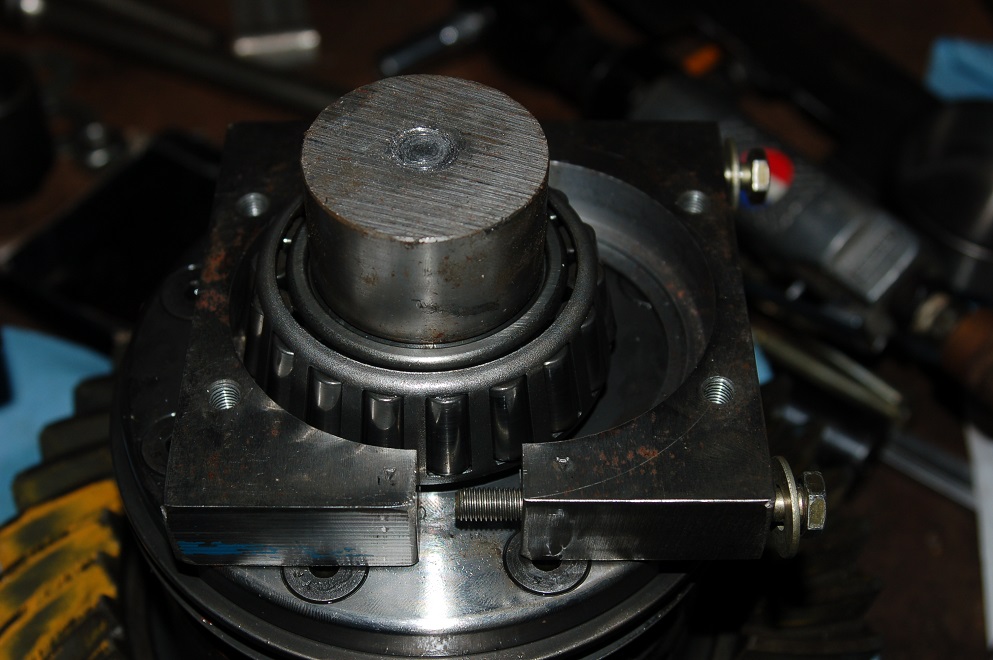 Changing pinion depth is done by changing shims behind the inner pinion race. That means the race needs to be pulled out and pressed back in. Here are a couple pictures of the tools I used to pull it out. The first picture shows a piece I made that pilots in the ID of the race, fits inside the housing and pushes against the face of the race. I also had to cut the sides off so it would go through the pinion nose race to get to the inner side of the inner race. 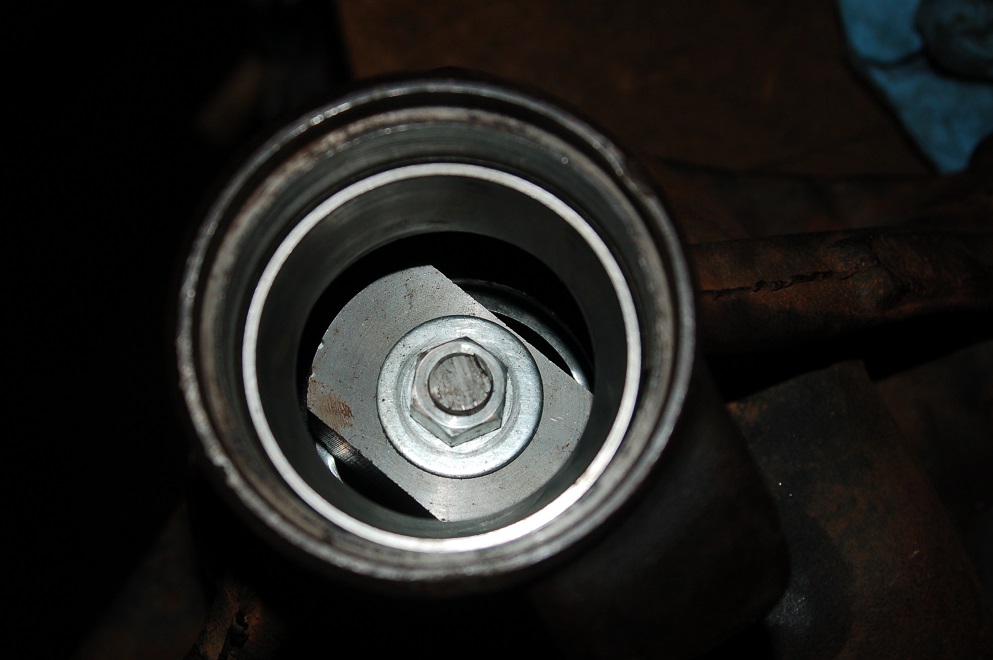 On the other side I just used a bar across the face of the housing. A length of threaded rod goes between them and tightening the nuts pulls the race out. 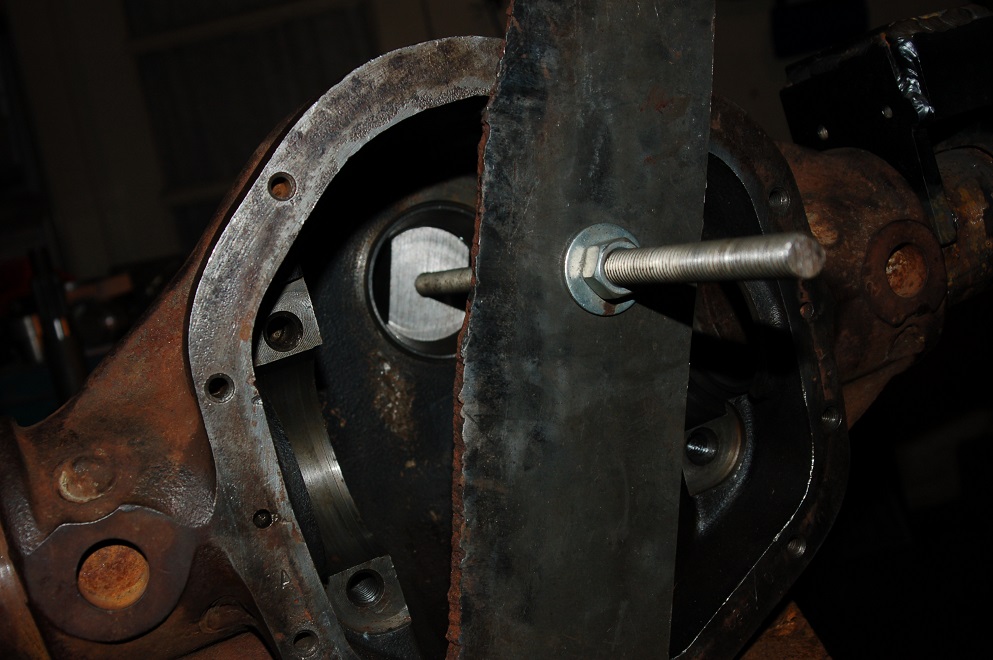 I could have just used a hammer to drive it back in, but it's hard to keep it straight. So I used a threaded rod to pull it back in as well. On the outer end I used a small piece of plate. What doesn't show in the picture is a piece inside the nose that pilots in the nose race to keep the threaded rod centered. That's key to pressing the inner race in straight. 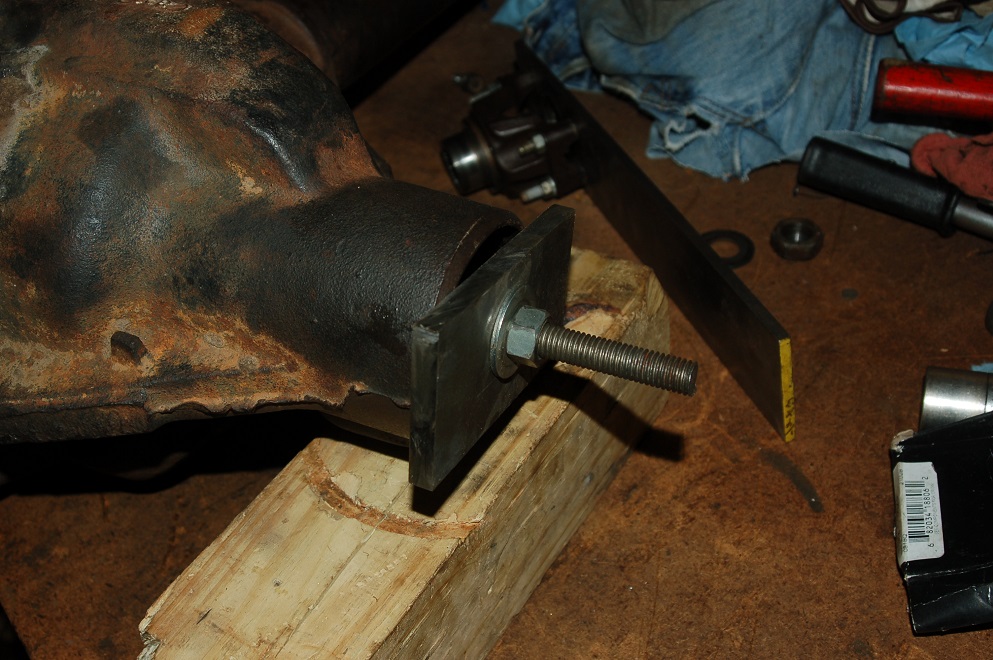 On the inside I have a piece that pilots in the race ID and pushes on the outer face. Again tightening the nuts pulls the race into place. 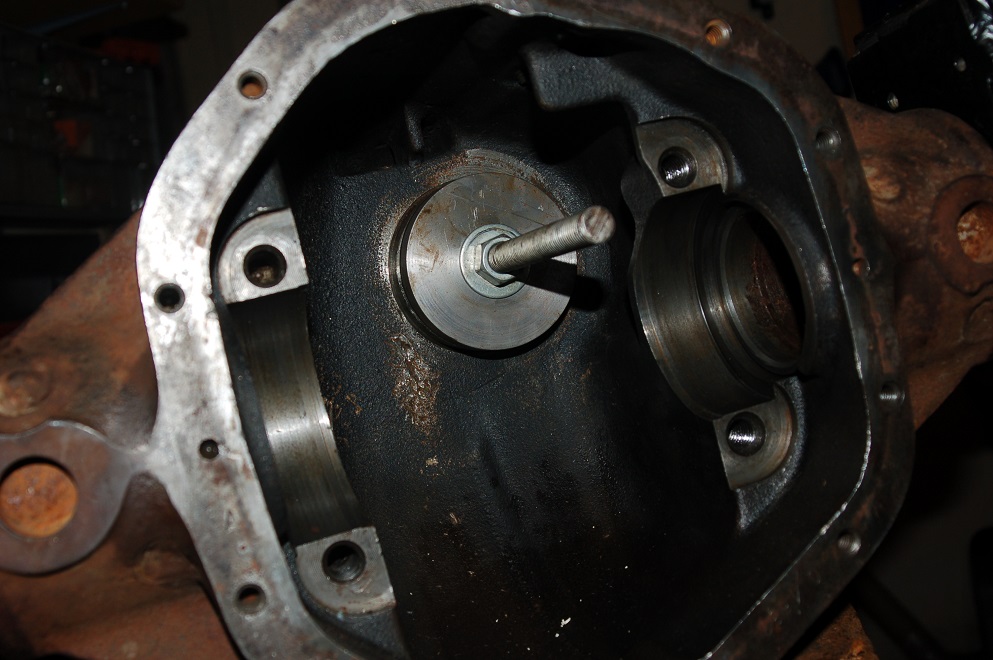
Bob
Sorry, no '80 - '86 Ford trucks "Oswald": 1997 F-250HD crew cab short box, 460, E4OD, 4.10 gears "Pluto": 1971 Bronco, 302, NV3550 5 speed, Atlas 4.3:1 transfer case, 33" tires "the motorhome": 2015 E-450-based 28' class C motorhome, 6.8L V-10 "the Dodge": 2007 Dodge 2500, 6.7L Cummins |
Re: Nothing Special's '71 Bronco
|
In reply to this post by Gary Lewis
I doubt it will be that predictable. It's hard to get an accurate reading of the torque-to-turn, so I'm thinking the two readings together just mean I'm pretty low in the spec. I suppose I could see where it lands after changing the pinion and only change the case shims if necessary. That's probably a better plan.
Bob
Sorry, no '80 - '86 Ford trucks "Oswald": 1997 F-250HD crew cab short box, 460, E4OD, 4.10 gears "Pluto": 1971 Bronco, 302, NV3550 5 speed, Atlas 4.3:1 transfer case, 33" tires "the motorhome": 2015 E-450-based 28' class C motorhome, 6.8L V-10 "the Dodge": 2007 Dodge 2500, 6.7L Cummins |
|
Administrator
|
That's kind of what I was implying. I think I'd do one thing at a time and see where you are at each step.
And those tools are really neat! You've put a lot of thought, and work, into making this happen. 
Gary, AKA "Gary fellow": Profile
Dad's: '81 F150 Ranger XLT 4x4: Down for restomod: Full-roller "stroked 351M" w/Trick Flow heads & intake, EEC-V SEFI/E4OD/3.50 gears w/Kevlar clutches
|
Re: Nothing Special's '71 Bronco
|
In reply to this post by Nothing Special
I finished setting up the gears! I probably only worked about 10 hours on it over 4 nights (not including making the tools) and only put the diff in six times! While those may sound like big numbers, I was expecting at least double all of that.
But I'm getting ahead of the story. And it's a pretty long story. So feel free to skip to the last pictures to see where the pattern ended up if you don't want to read all of this. The last update was on Tuesday night after pushing the pinion deeper and finding that it was too deep. But I figured that I had the pinion depth bracketed well enough that I was ready to put it in for good. That meant adding an oil baffle behind the inner pinion race, which adds quite a bit to the shim pack thickness. So I removed some shims. The result was that I took .009" out, bringing me to .001" more than I had to start with (where I thought the pattern looked pretty good but maybe a bit high). Up to this point I hadn't been putting any shims behind the pinion nose bearing, so I'd been setting pinion preload by torquing the pinion nut to whatever it took to get the right pinion preload. But now I needed to get those shims in too. So I started with the same shims that came out of this high pinion axle. That was .088". I then started torquing the pinion nut to its 200 lb-ft spec, but when I was up to 150 lb-ft the pinion torque-to-turn was up to 20 lb-in (it should be 14-19). So I pulled it out and added .005" to the nose shims. That gave me only 5 lb-in pinion torque-to-turn at 200 lb-in on the pinion nut. So I took out .002" and got 13 lb-in. Yeah, I know, that's not in the 14 - 19 lb-in range, but it what I'm going with. Now I could put the diff back in to check backlash, case preload and pattern with the pinion (hopefully!) in it's forever home. Backlash was perfect at .008" (spec is .006" - .010"), but the case preload was only at 3 lb-in (should be 5 - 15 lb-in). And the pattern looked darn near perfect! Here's the drive side 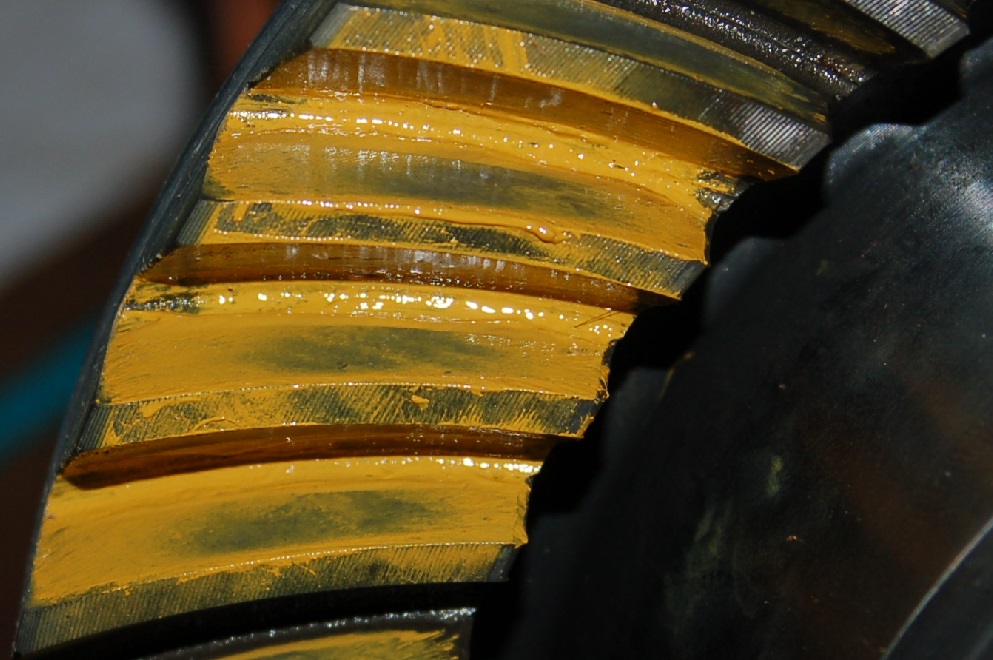 and here's the coast 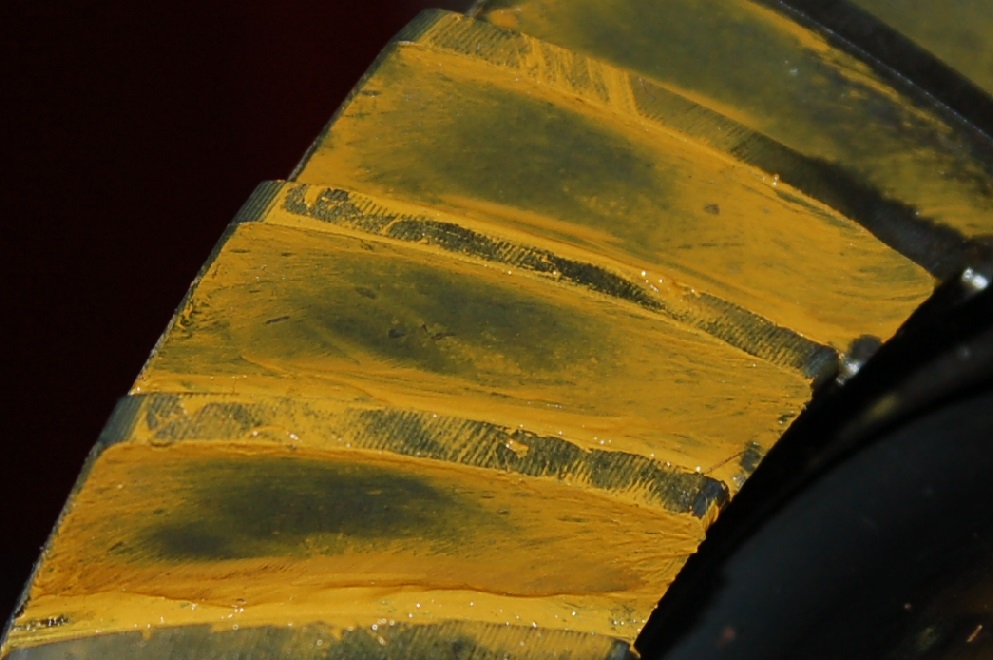 I thought about calling it good at this point, but I decided to add a little more case preload. I'm really glad I did that because when I pulled the diff back out I looked at the races and saw some scoring in the flange-side race  . I was using the bearings and races that had been in the low pinion diff with the OX locker. They were pretty new so I was just going with them and had missed this. I looked at the button side bearing and race and they looked fine. So I decided to take a slightly wild guess and add .005" to the flange-side shims while installing a new flange-side bearing and race. . I was using the bearings and races that had been in the low pinion diff with the OX locker. They were pretty new so I was just going with them and had missed this. I looked at the button side bearing and race and they looked fine. So I decided to take a slightly wild guess and add .005" to the flange-side shims while installing a new flange-side bearing and race.
That put me at .0065" backlash and 9 lb-in on the case preload. I decided that seemed good enough to me. At this point I had it put together without the pinion seal and with the old pinion nut. So in the interest of time I decided not to run the pattern until getting those things taken care of. Installing the pinion seal stopped me for the night. I just couldn't get it to start in straight. So I gave up and went to bed too late. Then today I made a tool to hold the pinion seal straight while pressing it on (see my next post) and was able to get the seal in. I torqued the new pinion nut to 200 lb-ft and got 4 more lb-in of total torque-to-turn, which seemed reasonable since I had added the seal. Backlash was still at .0065" and the pattern still looked great! Drive side 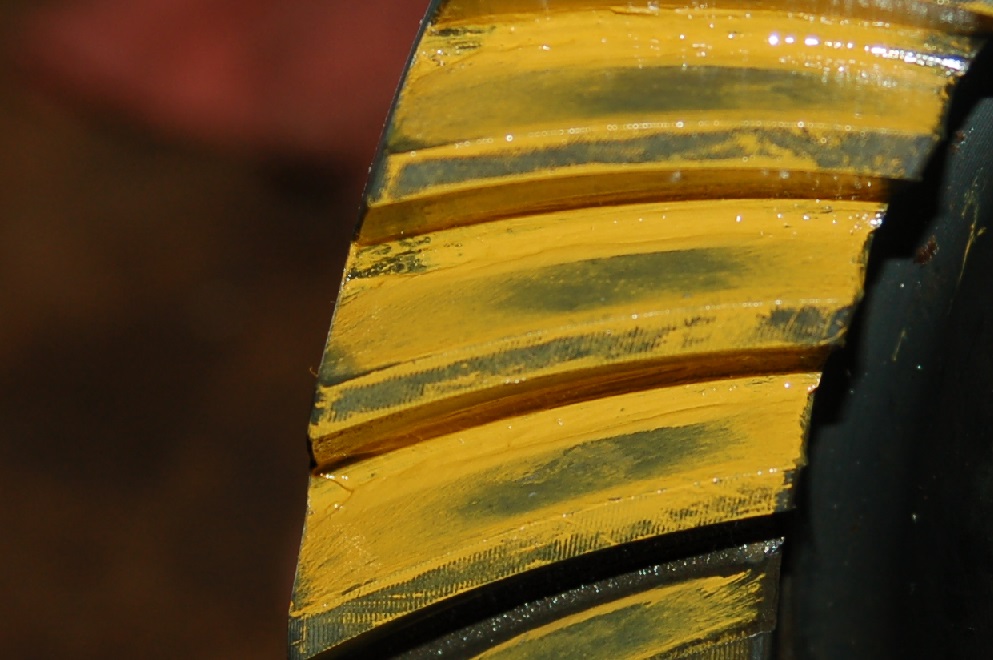 coast side 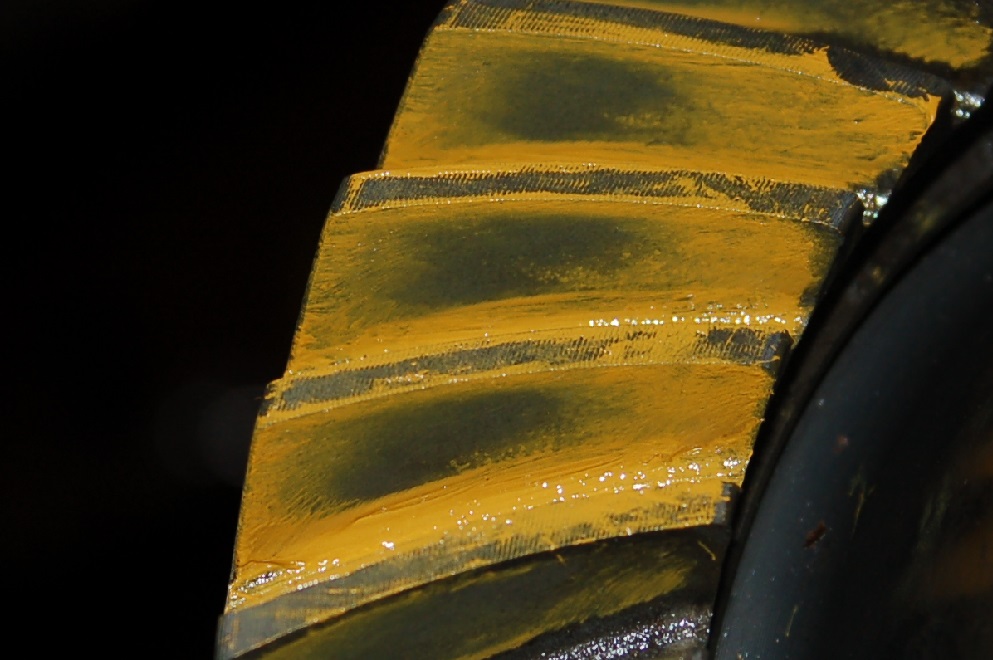 So that's where it sits now. I'm ready to move on to the next step, the ball joints!
Bob
Sorry, no '80 - '86 Ford trucks "Oswald": 1997 F-250HD crew cab short box, 460, E4OD, 4.10 gears "Pluto": 1971 Bronco, 302, NV3550 5 speed, Atlas 4.3:1 transfer case, 33" tires "the motorhome": 2015 E-450-based 28' class C motorhome, 6.8L V-10 "the Dodge": 2007 Dodge 2500, 6.7L Cummins |
Re: Nothing Special's '71 Bronco
|
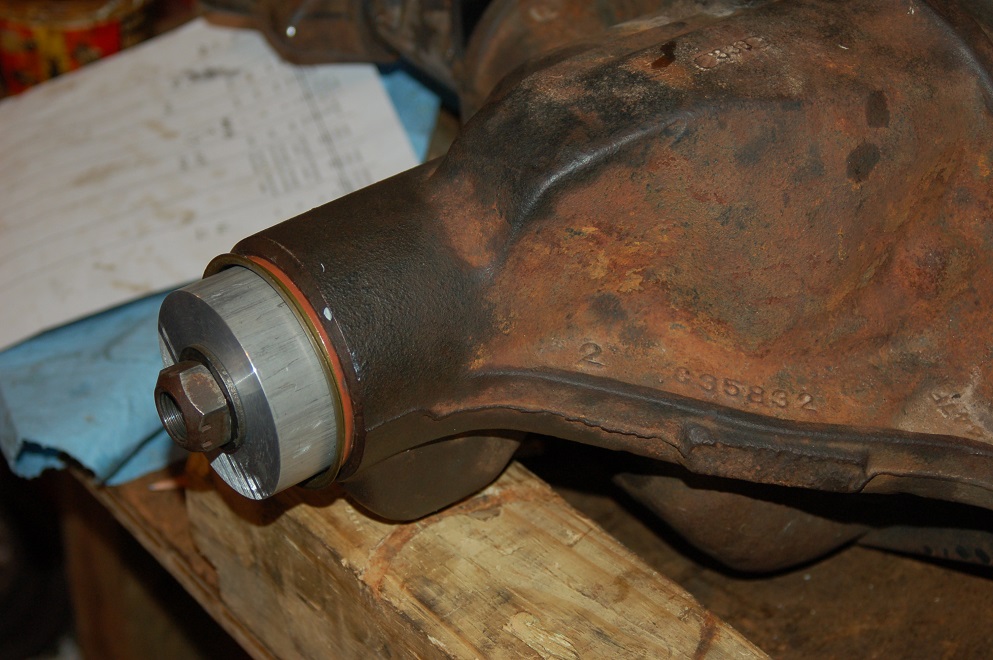
Two more tools to report on. The first is the tool I mentioned to hold the pinion seal straight while pressing it in. You can't see but on the "inside" it's counterbored to be able to press on the metal of the seal while clearing the rubber. I couldn't just press it in with the nut because the ring and pinion would just turn. But I could snug the nut up to hold it straight and then tap a bit with a hammer, snug up the nut again and repeat until it went in.
 Way back on June 14, 2 pages ago, I posted a picture of the 1' long plate I made to hold the yoke from turning as I used an impact wrench to pull the pinion nut off. That worked fine for that, and it was OK to torque the pinion nut just enough to get the right pinion preload without shims. But there's no way it was going to let me torque the pinion nut to 200 lb-in. And for that matter, there's no way my torque wrench was going to work either. Luckily we have a 600 lb-ft torque wrench at work that I could borrow. It's about 4' long, so putting 200 lb-ft on with it only meant having to put about 50 lbs on it. But I needed a similar lever for my plate. So I drilled a couple holes to bolt a piece of 1" square tubing to it. That made 200 lb-ft pretty easy (pardon the disaster scene on my work bench). 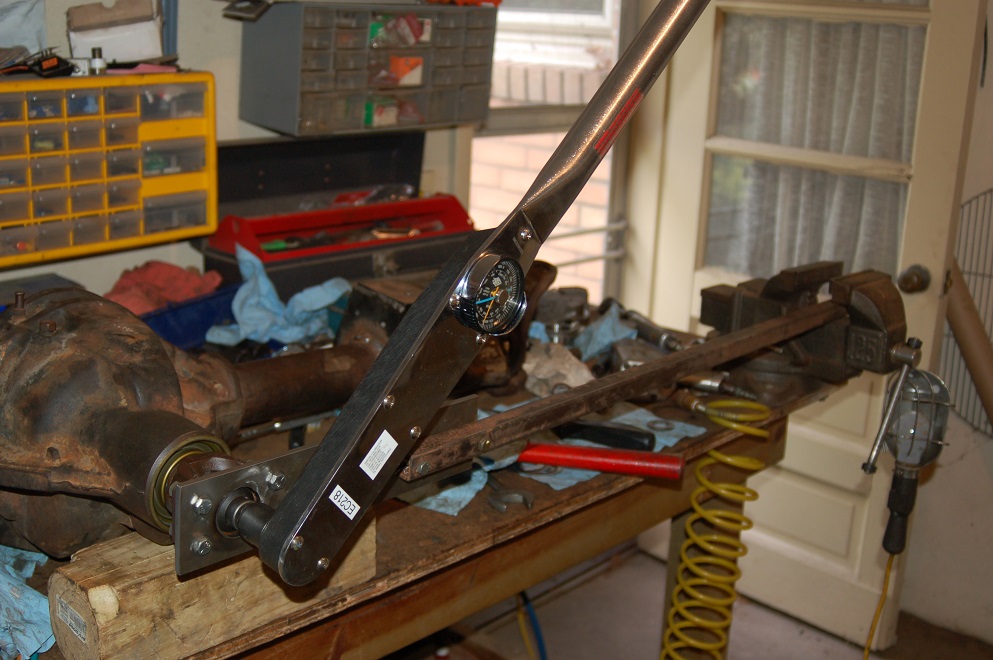
Bob
Sorry, no '80 - '86 Ford trucks "Oswald": 1997 F-250HD crew cab short box, 460, E4OD, 4.10 gears "Pluto": 1971 Bronco, 302, NV3550 5 speed, Atlas 4.3:1 transfer case, 33" tires "the motorhome": 2015 E-450-based 28' class C motorhome, 6.8L V-10 "the Dodge": 2007 Dodge 2500, 6.7L Cummins |
| Edit this page |


