Nothing Special's '71 Bronco
Re: Nothing Special's '71 Bronco
|
I think the work load is going the other direction. I don't have to cut the shaft or bearing, but now I'm going to have to put the axle together now and take it apart later to install the diff and axle shafts. Plus either I need to setup the gears with the axle under the Bronco or else I need to take it out AGAIN to put it up on the work bench where I was going to be doing the gear set up. Of course this does defer a lot of the work (including most of the extra work) until after this vacation. So that's a good thing. But I was REALLY looking forward to this project being DONE, and now that's pushed out at least another couple of weeks.
Bob
Sorry, no '80 - '86 Ford trucks "Oswald": 1997 F-250HD crew cab short box, 460, E4OD, 4.10 gears "Pluto": 1971 Bronco, 302, NV3550 5 speed, Atlas 4.3:1 transfer case, 33" tires "the motorhome": 2015 E-450-based 28' class C motorhome, 6.8L V-10 "the Dodge": 2007 Dodge 2500, 6.7L Cummins |
|
Administrator
|
Yes, poor choice of words on my part. It not only defers the work to later but gives you more work to boot. However, there is less to do right now to get ready for the trip?
Gary, AKA "Gary fellow": Profile
Dad's: '81 F150 Ranger XLT 4x4: Down for restomod: Full-roller "stroked 351M" w/Trick Flow heads & intake, EEC-V SEFI/E4OD/3.50 gears w/Kevlar clutches
|
Re: Nothing Special's '71 Bronco
|
Yes, that's the bright spot
Bob
Sorry, no '80 - '86 Ford trucks "Oswald": 1997 F-250HD crew cab short box, 460, E4OD, 4.10 gears "Pluto": 1971 Bronco, 302, NV3550 5 speed, Atlas 4.3:1 transfer case, 33" tires "the motorhome": 2015 E-450-based 28' class C motorhome, 6.8L V-10 "the Dodge": 2007 Dodge 2500, 6.7L Cummins |
Re: Nothing Special's '71 Bronco
|
Well, "the best laid plans of mice and men...." I'm back to getting everything working in the first go-around. Lesley really didn't like the idea of doing anything to make this whole thing take longer. If it's not done before our trip we just won't bring it. We'll take bikes and just not go that far from camp instead.
Before I found that out I had some back-and-forth with Yukon's tech support. First he said that I can't check the shaft diameter with the black phosphate coating on and get a good read on the fit. Turns out he was right about that. With just a little effort with a scotch-brite pad I got the shaft OD down from 1.1273" to 1.1258". Figuring that the bearing ID is really close to 1.1250" that's still a .0008" press fit, but it's a lot better than the .0023" I thought I had. He assures me that it's supposed to be a light press fit of .0005" - .001" and that I can tap it on with my hand, or maybe I'll need to use the handle end of a hammer. Personally I don't think a .0005" press fit is anywhere near light enough to go on by hand, but I'm going to try with it lubed as he recommended before I tell him again that I'm sure this piece was made wrong. For what it's worth, the old pinion shaft is 1.1248", or a .0002" clearance. He said that poor quality gears will have clearance but industry standard is to have this "light press" to ensure that it stays on center. But I decided to move to something else for a bit. Along with getting the axle buttoned up I also need to get the trans, transfer case and frame finished. So last night I started on that by taking the transfer case out (it had to come out to patch the frame). The first problem I had was that it's now high enough that it won't slide back far enough to come off the trans before it hits a hat channel on the underside of the floor. So I had to remove the trans crossmember and lower the trans before I could get the transfer case off. The second problem was purely self-inflicted. I was getting tired, frustrated and careless and I dropped the transfer case on my face. It's not as bad as it sounds, because it bounced twice before it hit my face, so it didn't hit that hard. My chest and shoulder absorbed most of it on those two bounces. All kidding aside, I'm fine, just a bruised collarbone. But I got really lucky that's all it was. So I called it quits at that point before I did anything even more stupid. So while the trans crossmember was out, tonight I cleaned it up and slopped some paint on it. I was going to pull the trans out next, but realized that it really wasn't in the way (I'm glad I realized that BEFORE it was out!). So instead I finished bolting it to the bellhousing. Then I patched the hole in the frame. I bought some 3/16" sheet metal. Most of it will go into the skid plate, but I got plenty to also patch the frame. It took quite a while, but it's done! 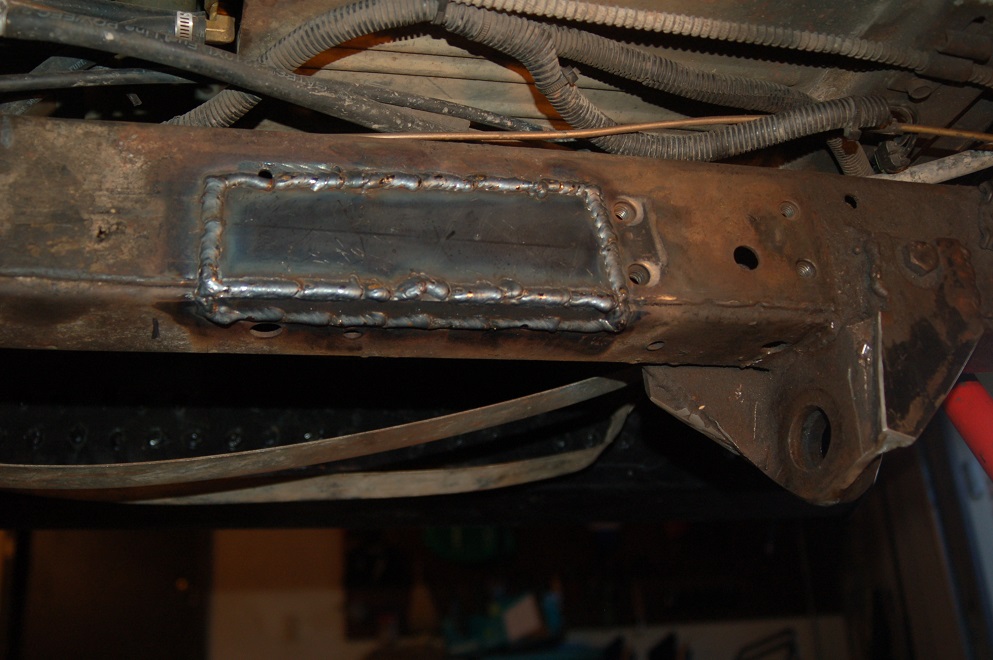 My first thought was to bend it rather than weld two pieces together, but I have no chance of bending 3/16" steel at home. i could heat it with a torch at work to bend it, but rather than wait until I could do that I just pieced it together. Some of the welds look a lot better than others, but I'll blame the worse ones on when I had sparks landing on me as I laid under my welding! I will need to grind some parts of the welds smooth to avaoid interference with the trans crossmember and the transfer case, but this much was enough for tonight.
Bob
Sorry, no '80 - '86 Ford trucks "Oswald": 1997 F-250HD crew cab short box, 460, E4OD, 4.10 gears "Pluto": 1971 Bronco, 302, NV3550 5 speed, Atlas 4.3:1 transfer case, 33" tires "the motorhome": 2015 E-450-based 28' class C motorhome, 6.8L V-10 "the Dodge": 2007 Dodge 2500, 6.7L Cummins |
|
Administrator
|
You had a productive night, in spite of the bouncing transfer case. I'm glad there was no real damage done, 'cause it could have been much much worse.
As for the pinion shaft, I didn't realize there is a coating on it. Taking that off made a big difference. I think .0008" interference will be easy to overcome, and you could chill the shaft or heat the bearing to make it even easier. And even getting it off shouldn't be too bad. The patch looks good, and it shouldn't take much grinding to have it smooth enough. Progress! 
Gary, AKA "Gary fellow": Profile
Dad's: '81 F150 Ranger XLT 4x4: Down for restomod: Full-roller "stroked 351M" w/Trick Flow heads & intake, EEC-V SEFI/E4OD/3.50 gears w/Kevlar clutches
|
Re: Nothing Special's '71 Bronco
|
Chilling the shaft could help with the install. But as I'm putting it in and out trying to get the pinion depth right I don't see any way to chill it while it'a assembled in the axle. And I could play a torch on the bearing to heat it while it's in the axle, but that seems like a risky move too, especially if I need to get very far with it. Honestly this part of the project has me really discouraged.
So yes, it was good to make some visible progress!
Bob
Sorry, no '80 - '86 Ford trucks "Oswald": 1997 F-250HD crew cab short box, 460, E4OD, 4.10 gears "Pluto": 1971 Bronco, 302, NV3550 5 speed, Atlas 4.3:1 transfer case, 33" tires "the motorhome": 2015 E-450-based 28' class C motorhome, 6.8L V-10 "the Dodge": 2007 Dodge 2500, 6.7L Cummins |
|
Administrator
|
I'm hoping that tapping the end of the pinion shaft will get it to come off/out easily enough. But it is kind of scary thinking it might not come out. I guess it is best to put them together at room temp just to see.
Good luck!
Gary, AKA "Gary fellow": Profile
Dad's: '81 F150 Ranger XLT 4x4: Down for restomod: Full-roller "stroked 351M" w/Trick Flow heads & intake, EEC-V SEFI/E4OD/3.50 gears w/Kevlar clutches
|
Re: Nothing Special's '71 Bronco
|
I tried tapping the bearing on the pinion shaft. I guess you could say that it worked, if you consider taking full swings with a 32 oz ball peen hammer "tapping." There's no way I'm putting it together like this, I wouldn't be able to disassemble it without wrecking the bearing. At this point I can't imagine that Yukon is going to be able (or willing) to provide me with anything that will work well, so I think I'm back to the plan of making the parts I have fit. The good thing is now that it's only .0008" of steel to remove instead of .0023" I think I can do it with sandpaper, which will make chucking it in the lathe easier (since I don't need to worry about how a cutting tool will reach in) and give less chance of introducing runout.
As to progress, I did make a little. Last week I made some "weld nuts" by drilling and tapping 3" long pieces of 3/4" round stock. Yesterday I drilled 3/4" holes in both sides of the frame to weld two of these in each frame rail (the round stock is welded to both the inner and outer side of the frame rail). These will be the mounting points for the skid plate. Anyway, today I welded them in and ground down all of the welds that were going to be in the way. Then I put a little paint on the bare spots and called it good for the weekend. Once the paint is dry I'll be ready to put the transfer case back in for the last time and start hooking up shift linkages (or at least seeing how hard it will be to do that with everything up higher!)
Bob
Sorry, no '80 - '86 Ford trucks "Oswald": 1997 F-250HD crew cab short box, 460, E4OD, 4.10 gears "Pluto": 1971 Bronco, 302, NV3550 5 speed, Atlas 4.3:1 transfer case, 33" tires "the motorhome": 2015 E-450-based 28' class C motorhome, 6.8L V-10 "the Dodge": 2007 Dodge 2500, 6.7L Cummins |
|
Administrator
|
I agree, that's too much force to ever get it apart w/o damage. And I agree that you should be able to take enough off with sandpaper to let you get it together easily. But it is a shame you are having to do that with brand new parts.
 But the weld nuts sound cool. Did you drill them on the lathe? That would be my first choice.
Gary, AKA "Gary fellow": Profile
Dad's: '81 F150 Ranger XLT 4x4: Down for restomod: Full-roller "stroked 351M" w/Trick Flow heads & intake, EEC-V SEFI/E4OD/3.50 gears w/Kevlar clutches
|
Re: Nothing Special's '71 Bronco
|
Yep, tapped them there too. And actually I drilled them out to just over 3/8" ID about 2" deep from one end, then drilled and tapped them for 3/8-16 for the remaining 1" from the other end. I don't need a 3" long nut!
Bob
Sorry, no '80 - '86 Ford trucks "Oswald": 1997 F-250HD crew cab short box, 460, E4OD, 4.10 gears "Pluto": 1971 Bronco, 302, NV3550 5 speed, Atlas 4.3:1 transfer case, 33" tires "the motorhome": 2015 E-450-based 28' class C motorhome, 6.8L V-10 "the Dodge": 2007 Dodge 2500, 6.7L Cummins |
|
Administrator
|

Gary, AKA "Gary fellow": Profile
Dad's: '81 F150 Ranger XLT 4x4: Down for restomod: Full-roller "stroked 351M" w/Trick Flow heads & intake, EEC-V SEFI/E4OD/3.50 gears w/Kevlar clutches
|
|
Administrator
|
In reply to this post by Nothing Special
I seem to recall when I was rebuilding a 10.25" Sterling for a friend, in the installation kit was the option for an "assembly bearing" an outer pinion bearing that was clearanced to a slip fit on the pinion shaft to be used while setting the pinion depth and roughing the preload once the gear pattern looked good. Once I had a good pattern and the pinion depth shims were securely in place, I used it once more to get the crush sleeve mostly collapsed.
I then removed the "assembly bearing" and put the new outer pinion bearing on and finished the preload setting using the old nut which I had cut the upset threads out of to get my bearing preload (just a few inch-lbs) then took the yoke back off with a puller, installed the new seal and yoke (old one had a lot of pitting where the U-joint caps go) and the new nut. Got it properly torqued and then set up the ring gear preload. Give me a 9" any day over one of these!
Bill AKA "LOBO" Profile
"Getting old is inevitable, growing up is optional" Darth Vader 1986 F350 460 converted to MAF/SEFI, E4OD 12X3 1/2 rear brakes, traction loc 3:55 gear, 160 amp 3G alternator Wife's 2011 Flex Limited Daily Driver 2009 Flex Limited with factory tow package Project car 1986 Chrysler LeBaron convertible 2.2L Turbo II, modified A413 |
Re: Nothing Special's '71 Bronco
|
I used setup bearings when I installed the OX in my original Dana 44 a few years ago. They were definitely easier to get on and off while figuring out the shims. Then after I had good backlash, a good pattern and good preload I used the same shims and pressed the "real" bearing on. And I wasn't even close. I had no preload and tons of backlash. I didn't even bother to check the pattern.
I had to make a bearing puller to get the bearings off to try again, and that worked so well that I decided that on this go-around I'd just start with my "real" bearings on the carrier. Last time I didn't need to touch the pinion, so I didn't have any experience there. But from what I've seen on the internet and what I saw when I took the pinion out of this axle was that the inner shims are behind the inner race, so that needs to be pressed in and out to iterate shim thickness. So I made tools to carefully and easily press that race in and out. The Dana 44 (or at least this one) doesn't use a crush sleeve, it has preload shims. Those shims go on inside the outer bearing. And to adjust pinion height (which affects gear mesh) you need to take the pinion shaft all the way out to drive out the inner race to change shims there. So the outer bearing needs to come out to change shims in either location. From what (little) I've seen, this bearing just slips on and off, so there's no need for a setup bearing. But mine has a .0008" press. And the only way to get it off is to pound on the threaded end of the pinion shaft, which pounds the inner bearing into its race. That will get the bearing off, but it will wreck the bearing and race, and possibly the pinion shaft.
Bob
Sorry, no '80 - '86 Ford trucks "Oswald": 1997 F-250HD crew cab short box, 460, E4OD, 4.10 gears "Pluto": 1971 Bronco, 302, NV3550 5 speed, Atlas 4.3:1 transfer case, 33" tires "the motorhome": 2015 E-450-based 28' class C motorhome, 6.8L V-10 "the Dodge": 2007 Dodge 2500, 6.7L Cummins |
Re: Nothing Special's '71 Bronco
|
In reply to this post by Nothing Special
Tonight I got the transfer case in for the last time! I didn't get any pictures, but if you look back a couple pages you can see where it was in for the second-to-the-last time. It looks much the same now, but with the trans crossmember painted and all of the bolts in and tight! Seriously, I forgot and put everything away before washing my hands, then didn't want to dig my way back under to get pictures. I'll try to get some the next time I'm working on it.
Next step is the transfer case shift linkage. With the t.case up higher I don't know if I'm going to have any clearance problems there. I'm betting that if there are I'll be able to resolve them without lowering the transfer case again! But I'll find out for sure in a day or two. And removing the pressure of getting this done before our trip next week has made it a lot more fun again!
Bob
Sorry, no '80 - '86 Ford trucks "Oswald": 1997 F-250HD crew cab short box, 460, E4OD, 4.10 gears "Pluto": 1971 Bronco, 302, NV3550 5 speed, Atlas 4.3:1 transfer case, 33" tires "the motorhome": 2015 E-450-based 28' class C motorhome, 6.8L V-10 "the Dodge": 2007 Dodge 2500, 6.7L Cummins |
|
Administrator
|
I'm glad that removing the pressure is making it fun again. That's the whole idea!
And I'm glad you have the t-case in and tightened down. I'll bet the link will be easy. 
Gary, AKA "Gary fellow": Profile
Dad's: '81 F150 Ranger XLT 4x4: Down for restomod: Full-roller "stroked 351M" w/Trick Flow heads & intake, EEC-V SEFI/E4OD/3.50 gears w/Kevlar clutches
|
Re: Nothing Special's '71 Bronco
|
Here are the promised pictures of the installed transfer case.
 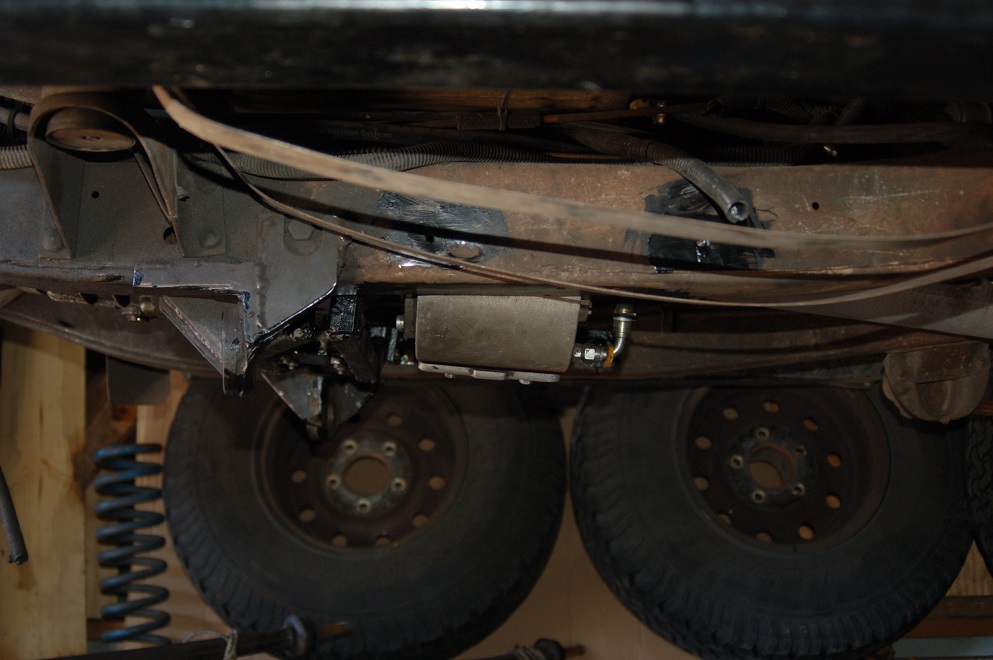 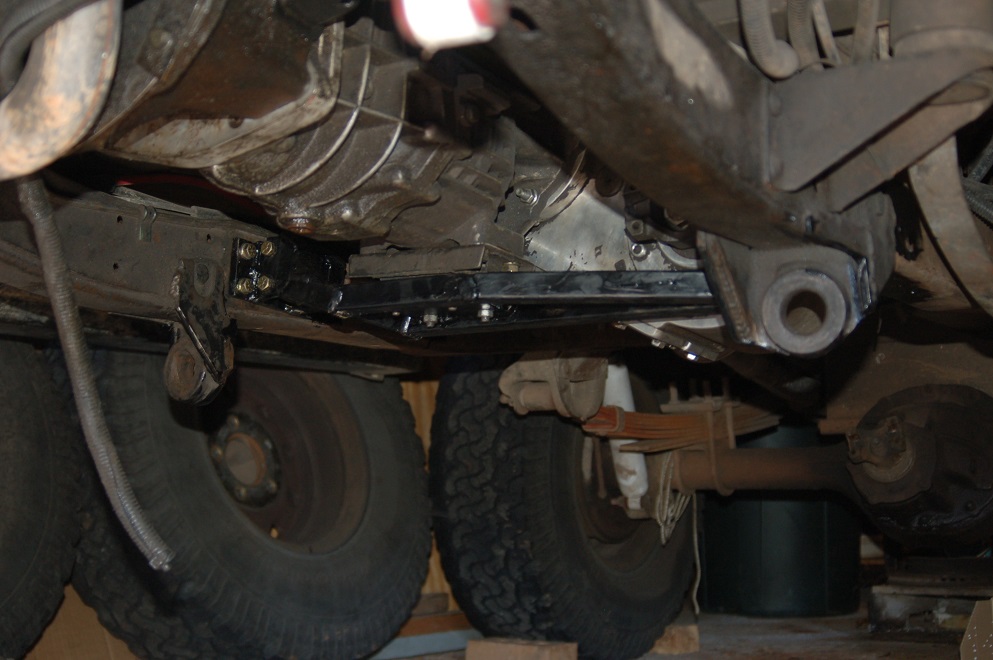 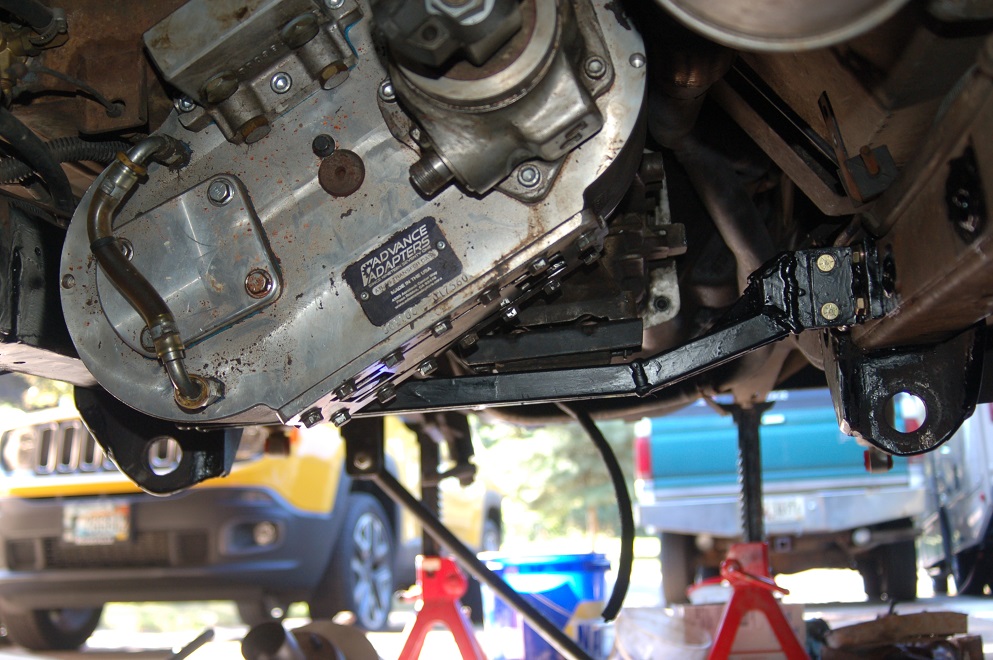 I'm happy with all of that!
Bob
Sorry, no '80 - '86 Ford trucks "Oswald": 1997 F-250HD crew cab short box, 460, E4OD, 4.10 gears "Pluto": 1971 Bronco, 302, NV3550 5 speed, Atlas 4.3:1 transfer case, 33" tires "the motorhome": 2015 E-450-based 28' class C motorhome, 6.8L V-10 "the Dodge": 2007 Dodge 2500, 6.7L Cummins |
Re: Nothing Special's '71 Bronco
|
I'm a little less happy with the top side, where the shifters are. It'll work out OK in the end, but it'll be a little more fussing around.
Here's a picture from the top where you can see how CLOSE the case is to the floor. It's not actually touching, but there's well under 1/8" clearance. 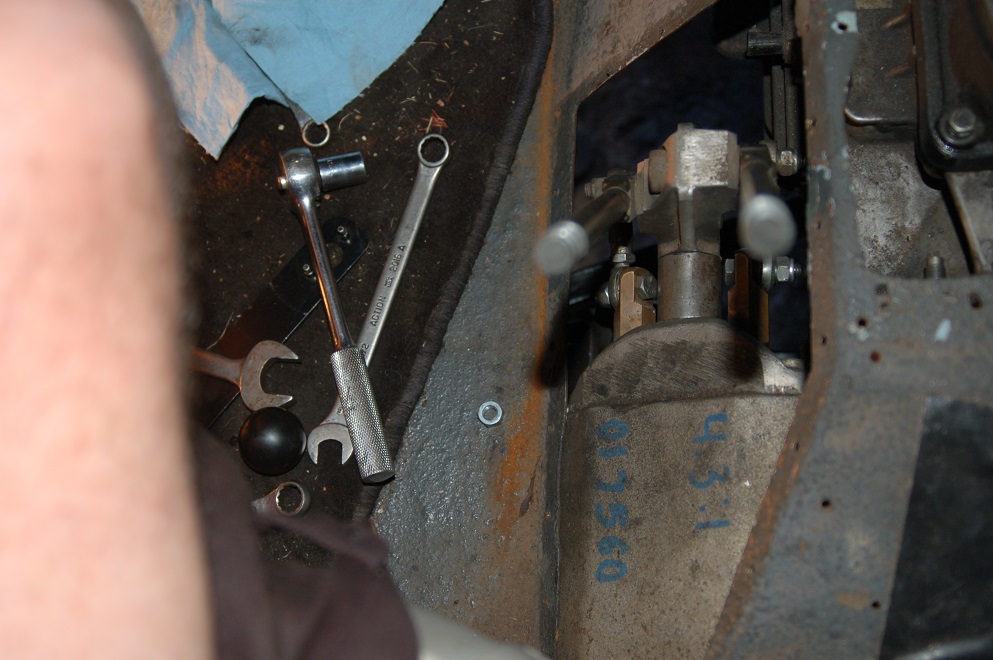 But "close" isn't a problem, "past" is where it gets troublesome. Here's a pic with the cover set in place. I've already cut out the center section so the "tower" can come up through the floor (it used to be below the floor). 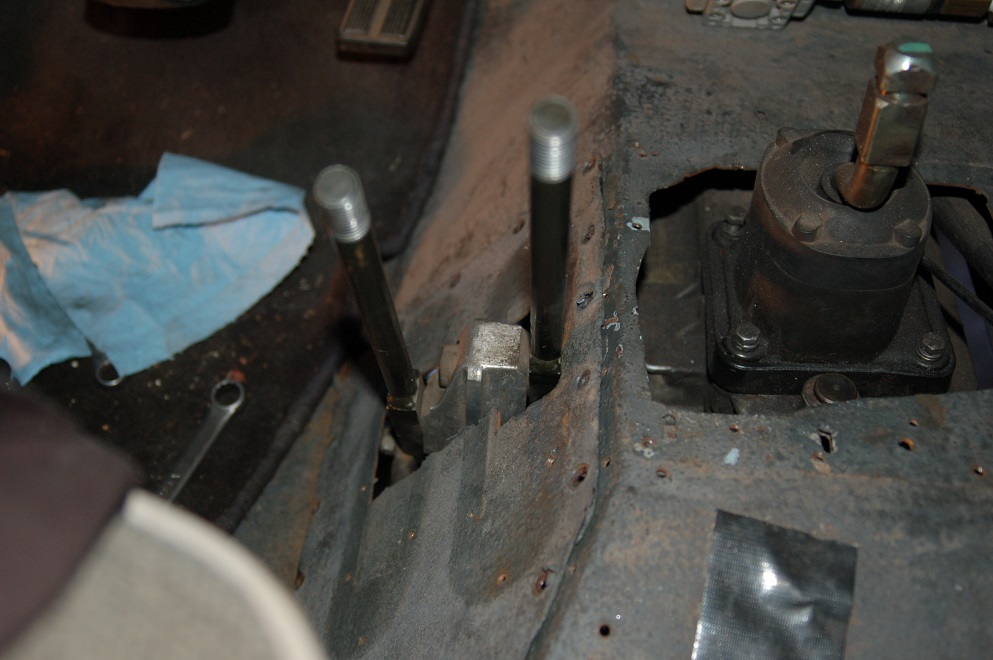 Now I'm "gonna have to get crafty on it" to figure out how to get boots there to stop hot air and road spray from coming through. I think I'll end up making a sheetmetal box to cover it up to the top of the tower and put a boot on top of that. But I'll have to see how that works out.
Bob
Sorry, no '80 - '86 Ford trucks "Oswald": 1997 F-250HD crew cab short box, 460, E4OD, 4.10 gears "Pluto": 1971 Bronco, 302, NV3550 5 speed, Atlas 4.3:1 transfer case, 33" tires "the motorhome": 2015 E-450-based 28' class C motorhome, 6.8L V-10 "the Dodge": 2007 Dodge 2500, 6.7L Cummins |
|
Administrator
|
This post was updated on .
In reply to this post by Nothing Special
Wow Bob, you've done a great job getting that TC up out of the way!
The cross member looks good too.  Do you think you might be better off just creating a new tunnel (or using a repop to extend the existing?) 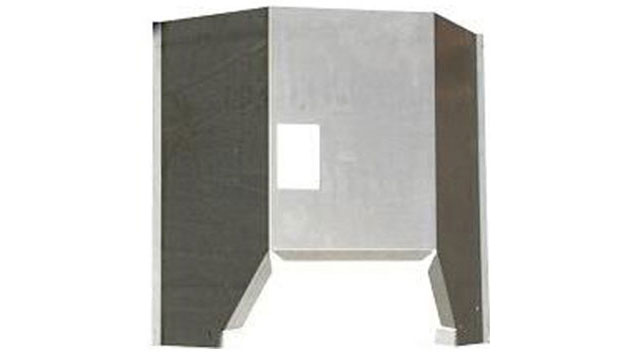 I've seen that Ron (Reamer) built an entire early Bronco from parts, and it looks fantastic. 
Jim,
Lil'Red is a '87 F250 HD, 4.10's, 1356 4x4, Zf-5, 3G, PMGR, Saginaw PS, desmogged with a Holley 80508 and Performer intake. Too much other stuff to mention. |
Re: Nothing Special's '71 Bronco
|
Thanks! I am very pleasantly surprised how high I was able to get it.
Doing something to replace the entire tunnel like you suggest would likely be a cleaner look in the end. But I think it'd be more work. And this Bronco is no showpiece, so I'm good with quicker rater than nicer.
Bob
Sorry, no '80 - '86 Ford trucks "Oswald": 1997 F-250HD crew cab short box, 460, E4OD, 4.10 gears "Pluto": 1971 Bronco, 302, NV3550 5 speed, Atlas 4.3:1 transfer case, 33" tires "the motorhome": 2015 E-450-based 28' class C motorhome, 6.8L V-10 "the Dodge": 2007 Dodge 2500, 6.7L Cummins |
|
Administrator
|
I was just thinking of how to get a bit more clearance for the TC and providing some kind of raised plane so you could attach a shift boot.
Though I don't know about the boot you might need for your twin stick setup.  It seems there are no compound curves, just simple folds. Looking forward to whatever you figure out. Progress is good!!! 
Jim,
Lil'Red is a '87 F250 HD, 4.10's, 1356 4x4, Zf-5, 3G, PMGR, Saginaw PS, desmogged with a Holley 80508 and Performer intake. Too much other stuff to mention. |
| Edit this page |

