Jim's 1982 300 Six Bronco Original Restoration
I should have said I run a Blue Top in my 81 F100 and love it. Dave ----
Dave G.
81 F100 flare side 300 six / AA OD / NP435 / 2.75 gear http://cars.grantskingdom1.com/index.php/1980-Ford-F100?page=1 81 F100 style side 300 six/SROD parts truck -RIP http://cars.grantskingdom1.com/index.php/1981-Ford-F100 |
|
In reply to this post by Gary Lewis
That was the dilemma I dealt with before. Reman 4Runner steering racks had bad seals and no internal work done, new (Chinese) ones would just fail. You had to find a factory one that wasn't leaking which was difficult because they were the first parts picked on junkyard trucks. Same deal with the Ram. When I bought the truck it had a "new" reman steering box and it was already going out. Luckily there's "aftermarket" for that truck, so I got a RedHead and it leaks... 2nd Gen Rams have notorious steering issues so I just blame the design because I read it on a Cummins forum 
1982 Bronco restomod in progress: Built 4.9L, T19 4spd, 9" 3.00 rear w/ Eaton TrueTrac, 31" tires, fuel injection soon
https://www.youtube.com/@jimjamauto |
Re: Jim's 1982 300 Six Bronco Original Restoration
|
Administrator
|
Word on the street is that Red Head's QC has gone away and that Blue Top is the way to go. I don't know that for sure, but if I was buying it would be Blue Top based on what I've read. For instance, John/Machspeed wrote up his experience in the thread called Blue Top Steering Gears.
Gary, AKA "Gary fellow": Profile
Dad's: '81 F150 Ranger XLT 4x4: Down for restomod: Full-roller "stroked 351M" w/Trick Flow heads & intake, EEC-V SEFI/E4OD/3.50 gears w/Kevlar clutches
|
|
Ended up just cleaning up what I already got instead of shelling out hundreds for a RedHead or BlueTop. I call it... GrayFace!
Degreased and cleaned using Purple Power and water in the ol turkey pan. Soaked it down with POR-15 metal treatment while giving the Harbor freight shop crane a workout. Sprayed on Duplicolor self-etching primer for good measure. Top coat is Duplicolor New Ford Gray engine enamel, which is the same color I'll be using on the engine and transmission.      Also cleaned up the power steering pump and polished the pulley a bit. 
1982 Bronco restomod in progress: Built 4.9L, T19 4spd, 9" 3.00 rear w/ Eaton TrueTrac, 31" tires, fuel injection soon
https://www.youtube.com/@jimjamauto |
|
In reply to this post by JimJam300
Felt like this general update needed its own reply in the thread. A few weeks ago I put out another vlog video. Unfortunately the framerate did not jive when I published it and it's extremely choppy, but I added actual production value this time.
As of recently I've hit some financial hardships that have set me back and I'm not really able to purchase anything for the Bronco. I've started doing overtime at work to catch up, but until then I can't really do much other than clean and restore parts. One *zero-cost* sub-project I'm going to start is the wiring diagram. It will be based on the American Autowire kit with the following additions: - 3G Alternator - A/C wiring kit - Bronco tailgate wiring kit - PMGR starter - Holley Sniper EFI - Inline electronic fuel pump - 7-way trailer plug wiring - Brake controller - Halogen fog lights - Amplifier and subwoofers
1982 Bronco restomod in progress: Built 4.9L, T19 4spd, 9" 3.00 rear w/ Eaton TrueTrac, 31" tires, fuel injection soon
https://www.youtube.com/@jimjamauto |
Re: Jim's 1982 300 Six Bronco Original Restoration
|
Administrator
|
GrayFace looks good! And the power steering pump is much improved as well.
Sorry about the financial difficulties. We've all been there so we can understand the need to slow down. And the idea of doing low/no cost projects during that time is a good one. Having the wiring diagram done before you launch into the project itself is the way to go, but be flexible since you may find that you need to make some changes along the way. (At least I did.) The Vlog is good, and you can get so much more in than typing it. We can see the results, and they look really good. 
Gary, AKA "Gary fellow": Profile
Dad's: '81 F150 Ranger XLT 4x4: Down for restomod: Full-roller "stroked 351M" w/Trick Flow heads & intake, EEC-V SEFI/E4OD/3.50 gears w/Kevlar clutches
|
|
In reply to this post by JimJam300
This build keeps getting more complex as time goes on.
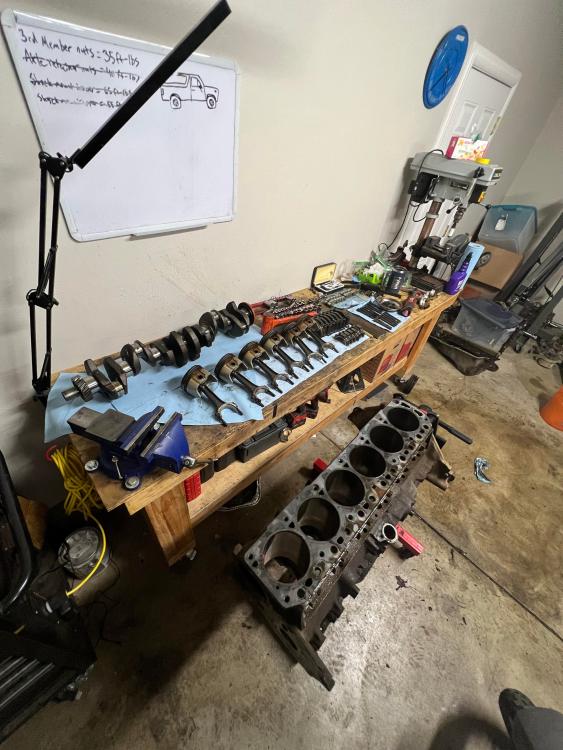 The 300 is completely torn down. I'm sending the block to a shop for inspection and cleaning, and then I'm going to scramble to rebuild and put it back together...with a twist! It's the same price and more work getting my carb'd head decked/ported/fitted for bigger valves as just buying a ProMaxx CNC ported head that's already good to go from the box. And the guy at a shop I talked to made a big deal about the futility of doing this with an inline six, then called some other guys stupid for building 300s, which strengthened my resolve. If I wanted 12mpg I'd get a V8. The other side of the twist is a serpentine belt conversion. Basically I'm just taking drive accessories, pulleys, and brackets off an EFI engine and putting them on my engine. Already got a crankshaft pulley, steering pump pulley, steering pump/AC bracket, and tensioner. Just need the alternator bracket, a 3G alternator, EFI water pump, and later A/C compressor. I will probably try to figure out a way to replace the smog pump with an idler pulley so I can use EFI belts. And I bought a GoPro Hero 9 and filmed the whole engine teardown.
1982 Bronco restomod in progress: Built 4.9L, T19 4spd, 9" 3.00 rear w/ Eaton TrueTrac, 31" tires, fuel injection soon
https://www.youtube.com/@jimjamauto |
Re: Jim's 1982 300 Six Bronco Original Restoration
|
Administrator
|
You can get to 12 MPG with even a 460, so a 300 should get far better when properly built. Like well over 20. And that head should be a good start.
 Why not put the tear-down video on YouTube and post it here?
Gary, AKA "Gary fellow": Profile
Dad's: '81 F150 Ranger XLT 4x4: Down for restomod: Full-roller "stroked 351M" w/Trick Flow heads & intake, EEC-V SEFI/E4OD/3.50 gears w/Kevlar clutches
|
|
I had a weird find at the scrapyard over the weekend. There was a 7.5L swapped into an aero F150. It had a brand new 95A 3G alternator and an aftermarket(?) idler pulley in place of the smog pump. I snagged both and made sure they bolted up to the brackets I got.
That marks pretty much everything for the serpentine belt conversion except AC compressor and water pump. That is the plan once I get around to editing the video.
1982 Bronco restomod in progress: Built 4.9L, T19 4spd, 9" 3.00 rear w/ Eaton TrueTrac, 31" tires, fuel injection soon
https://www.youtube.com/@jimjamauto |
|
Engine block is at the machine shop. Machinist says it's already been bored .030 over, should clean out to .035 about. Whole block prep, pistons, and piston pressing will be $890.
Did a test run of paint on my transmission. Brushed on Rustoleum rusty metal primer and hit it with Duplicolor Ford Engine Gray. 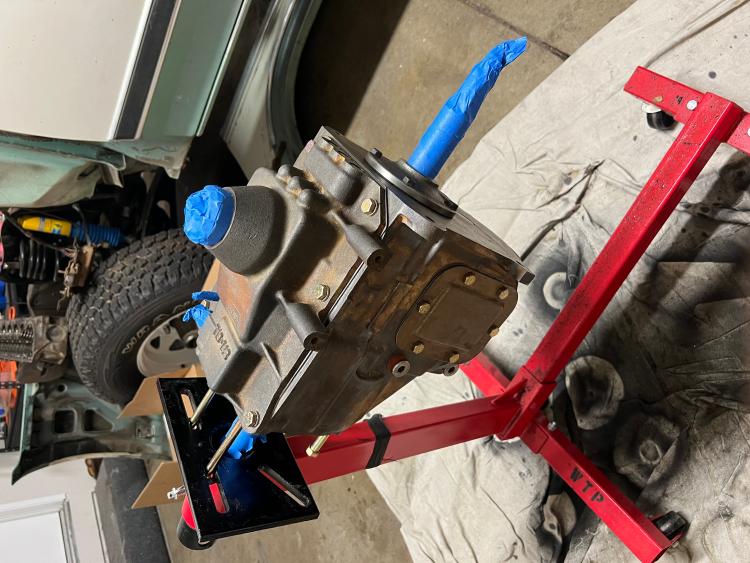 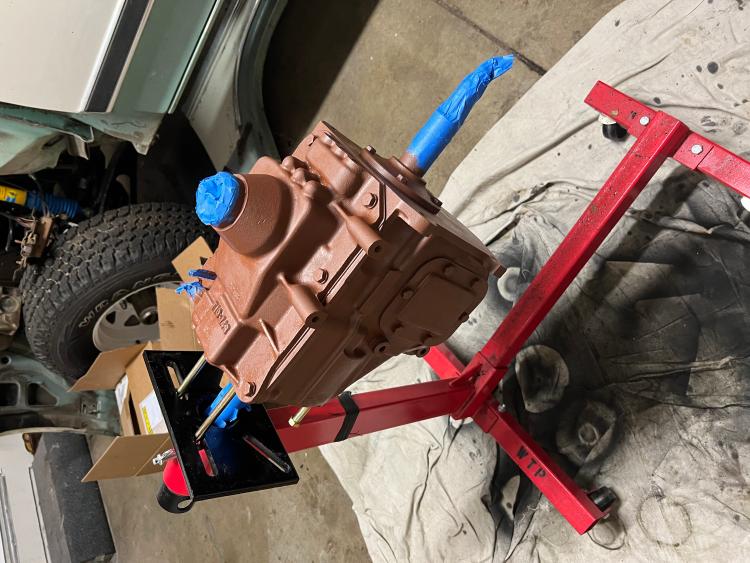 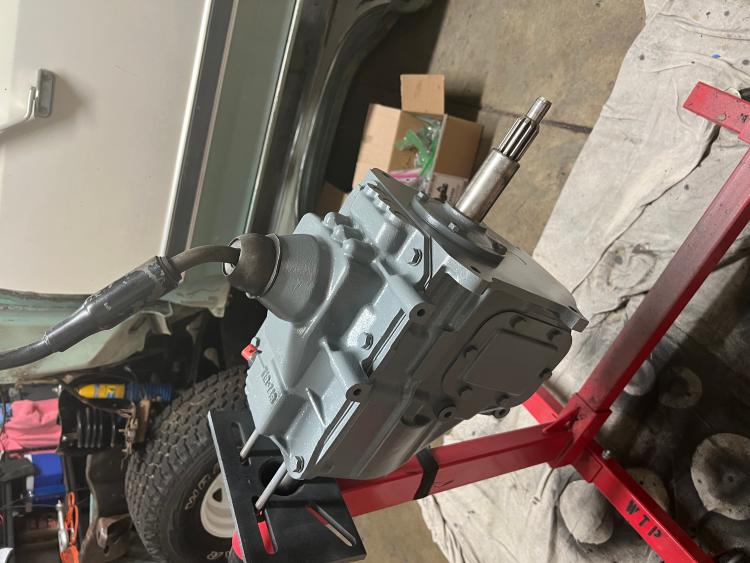 Still got a ton of parts to sandblast and paint. Engine block and head will be the Ford Gray. All pulleys and valve cover will be semi gloss black. Going with the chrome Holley Sniper and a chrome air cleaner but I might change my mind. Not sure what color I want to do the manifolds, but I REALLY like the Eastwood Factory Gray for the exhaust. https://www.eastwood.com/factory-gray-hi-temp-coating.html
1982 Bronco restomod in progress: Built 4.9L, T19 4spd, 9" 3.00 rear w/ Eaton TrueTrac, 31" tires, fuel injection soon
https://www.youtube.com/@jimjamauto |
Re: Jim's 1982 300 Six Bronco Original Restoration
|
Administrator
|
This post was updated on .
That looks really good Jim!
 Sounds like you will be busy prepping all the *tin and front dress before the machine shop delivers your parts. No need for balance with an I-6! 
Jim,
Lil'Red is a '87 F250 HD, 4.10's, 1356 4x4, Zf-5, 3G, PMGR, Saginaw PS, desmogged with a Holley 80508 and Performer intake. Too much other stuff to mention. |
Re: Jim's 1982 300 Six Bronco Original Restoration
|
Administrator
|
Yes, it does look good.
 This is going to be a really NICE truck!
Gary, AKA "Gary fellow": Profile
Dad's: '81 F150 Ranger XLT 4x4: Down for restomod: Full-roller "stroked 351M" w/Trick Flow heads & intake, EEC-V SEFI/E4OD/3.50 gears w/Kevlar clutches
|
|
Thank you, gents. I'm honestly really stressed out about the whole thing. There's a whole lot of stuff I still need to do and my work is pretty scattered. Lots of things I am still trying to figure out with restomodding and the order of work: i.e. what needs to be done before this or that. I've started to limit myself to $500 a month + whatever I make in overtime, so it'll be slow going from here on out.
I know I'll feel better once I start putting things back together again.
1982 Bronco restomod in progress: Built 4.9L, T19 4spd, 9" 3.00 rear w/ Eaton TrueTrac, 31" tires, fuel injection soon
https://www.youtube.com/@jimjamauto |
|
When I was doing my cab off frame rebuild I worked 1 area at a time.
Stripping it was no big deal but going back together was the 1 area at a time. Frame got painted and the painted front suspension back on so I could roll it. Rear axle could not be installed as it had to pass horses holding the cab up. The cab floors, rockers, door posts were replaced sealed and bed lined. Then mounted back on frame. Clean & paint rear axle & springs and mount back on frame. Clean motor and replace gaskets and paint, same for trans. New clutch assy. and mount trans to motor and put in frame. As you can see just do 1 area at a time if you start jumping all over it never feels like you get anything done. You may also start a list of the jobs and break it down as areas also. A white board works great for this and when you get 1 thing done cross it out do not remove it. With it crossed you can see what you have done, if you remove it you really dont see anything was done till you get a lot of them removed. Dave ----
Dave G.
81 F100 flare side 300 six / AA OD / NP435 / 2.75 gear http://cars.grantskingdom1.com/index.php/1980-Ford-F100?page=1 81 F100 style side 300 six/SROD parts truck -RIP http://cars.grantskingdom1.com/index.php/1981-Ford-F100 |
Re: Jim's 1982 300 Six Bronco Original Restoration
I fully agree with Dave. I did the same, keeping everything in the list while striking out the done jobs. It is very rewarding to see all the work that has been accomplished, and not only what's ahead.
Jeff / 1984 F350 Crew Cab 4x4/5.8L w351 4V/ T18/ D50 4.10 front/ 8' bed.
Restored 2019-2022. Nicknamed «Big Brother 1984», due to its soooo-looong shape & nod to George Orwell's 1984 famous novel. |
|
In reply to this post by FuzzFace2
The organizational stuff has been killer early-on working on this project. A few months ago I got diagnosed with ADHD, and the big way it affects me in work and at home is that I have an aversion to writing stuff down and I try to wing everything. I started taking adderal and I'm easing into better organizational habits like keeping a notebook for the truck and an excel spreadsheet for the engine build. I went off it for a few months when I changed insurance and as of Friday I'm back on it and ready to get things straightened out.
With that being said, I'm finally getting around to using the Prothane poly body mounts I bought over a year ago and there are some massive issues with them. 1: All of the bushings do not fit the stock hardware, the inside diameter is too small. 2: On the #3, 4, & 5 position upper bushings, the metal reinforced part that sticks through the frame is twice as long as it should be. Instead of sandwiching the frame between rubber, the lower bushing will not contact the frame at all. 3: The lower bushing for positions 2-5 are too short for the stock hardware. They will not compress at all when tightening the body mount bolt. The way I got around 1 was widening the ID of every bushing using a Dremel rotary tool with a low grit sanding tip. For 2 & 3, I got a bunch of 1 1/4"washers and ground them down to fit on the frame. That way the lower bushing will contact the frame and slightly compress against it. 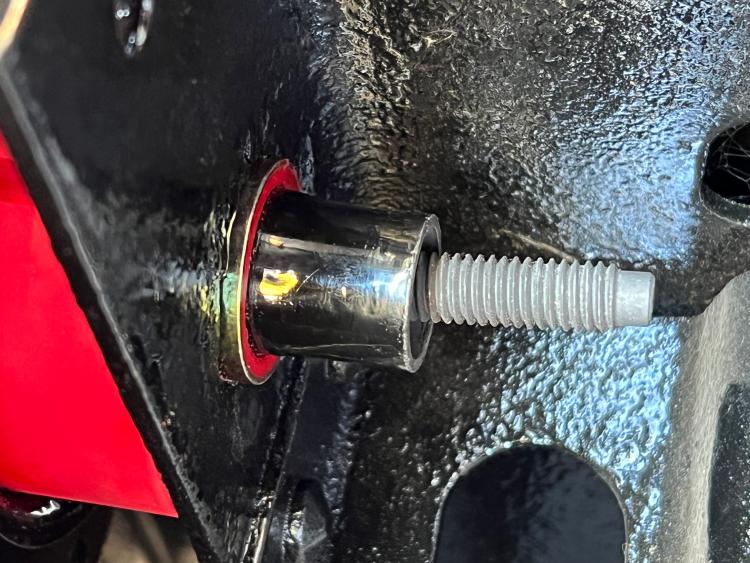 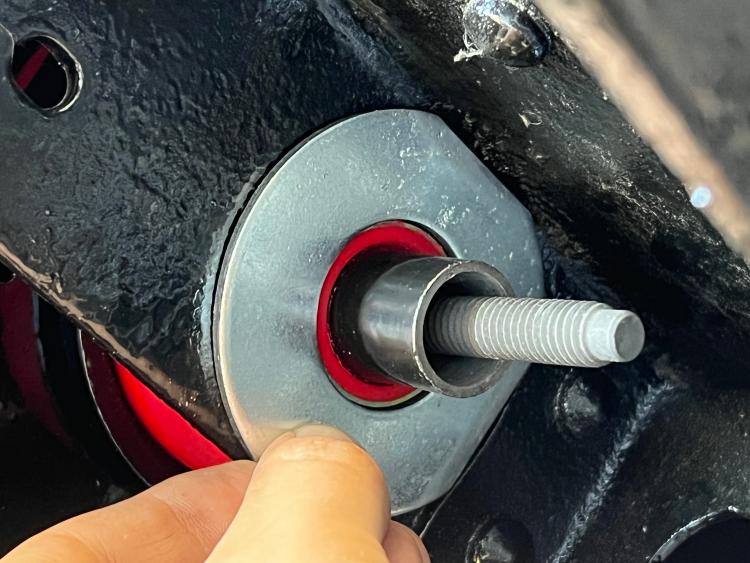 I'm going to use position # 4 and 5 body mount sleeves on position # 3 (rear floorpan) and modify a couple to fit position #2 (front floorpan) by shortening them because I can't find the parts outside of the $370 combo kit on Bronco Graveyard.
1982 Bronco restomod in progress: Built 4.9L, T19 4spd, 9" 3.00 rear w/ Eaton TrueTrac, 31" tires, fuel injection soon
https://www.youtube.com/@jimjamauto |
|
While I'm waiting on the engine block to come back from the shop, I have been working on painting the rest of the underside of the truck and then the floor. The floorpan in the cab has a total of 20 rust pinholes (1/4" diameter and smaller, most are around 1/16") that I'm planning on plug welding.
Caveat is that I don't know how to weld, but I have access equipment. I've been watching videos on how to join sheet metal and fill holes with a MIG welder, but I couldn't find one for what I'm specifically trying to do. The missing link is how to prepare the pinholes for welding. Do I drill them out to expose fresh steel?
1982 Bronco restomod in progress: Built 4.9L, T19 4spd, 9" 3.00 rear w/ Eaton TrueTrac, 31" tires, fuel injection soon
https://www.youtube.com/@jimjamauto |
Re: Jim's 1982 300 Six Bronco Original Restoration
|
Administrator
|
Jim recommended that I braze the pin holes in Big Blue's floor shut, and it worked out well. You can see it in this post. I used a MAPP gas torch, meaning a garden variety "propane" torch but with MAPP gas since it burns a bit hotter.
The issue with welding is that pin holes are really thin spots in the metal, and you are very apt to burn through, meaning you'll have a bigger hole than you started with. But brazing doesn't get the sheet metal floor hot enough to melt.
Gary, AKA "Gary fellow": Profile
Dad's: '81 F150 Ranger XLT 4x4: Down for restomod: Full-roller "stroked 351M" w/Trick Flow heads & intake, EEC-V SEFI/E4OD/3.50 gears w/Kevlar clutches
|
Re: Jim's 1982 300 Six Bronco Original Restoration
|
Administrator
|
Yes, brazing is not hot enough to melt steel which is why I suggested it. 💡
If the metal is rusted thin -long before you get hot enough for fusion- the iron oxides will flare up and burn bigger holes through the panel. The first thing you need to know about welding sheet metal is that it must be clean. Or it will vaporize.... instantly! Second is heat control to minimize distortion. Using an aluminum or copper back-up block as a heat sink can help, but making lots of tacks and cooling the weld area before you start to see it rise are both good things to practice. Floors are good to start on because it doesn't really matter how they look as long as they are strong and water tight. My driver's floor is pieces left over from from other patch panels I didn't need all of. (I did buy a new rocker and cab corner) If you're looking to do cab corners or other difficult to reach areas definitely look into panel bonding epoxy.
Jim,
Lil'Red is a '87 F250 HD, 4.10's, 1356 4x4, Zf-5, 3G, PMGR, Saginaw PS, desmogged with a Holley 80508 and Performer intake. Too much other stuff to mention. |
|
In reply to this post by Gary Lewis
I done did it. Was easier than I thought it would be. I used a MAPP torch and whatever brazing rods they had available at Lowe's, precision wasn't great but it worked. I wanted to borrow a portable oxy/acetylene rig we have at work, but looks like it walked off along with lots of other tools when one of the mechanics recently quit...
1982 Bronco restomod in progress: Built 4.9L, T19 4spd, 9" 3.00 rear w/ Eaton TrueTrac, 31" tires, fuel injection soon
https://www.youtube.com/@jimjamauto |
| Edit this page |

