Search Forum
1984 Bronco build thread
|
|
Classic |
|
List |
|
Threaded |
Assigned: Gary Lewis at priority
3
(Normal)
♦
♦

1234
... 21
1234
... 21
|
Hi everybody, welcome to my build thread for my 1984 Bronco with a 300 straight six engine.
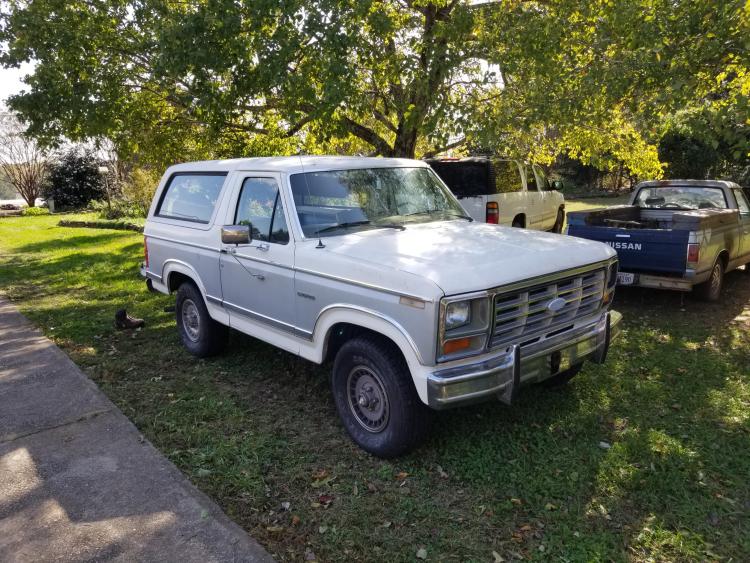 My goal for this vehicle is to be a simple, reliable, capable vehicle for weekend cruising, camping, hunting, and use on rough back roads. I already have a lot of plans in motion for the vehicle. A motrcraft 2150 carberator, offenhauser c intake, efi exhaust manifolds, a 2.5" exhaust system, and a duraspark 2 ignition set are all ready in the garage. In addition, I have an entire 300 engine from a 1982 pickup that I plan to rebuild from the ground up and swap in sometime in the next year or so. I also have some daydreams/doodles for a lot farther down the road. These may include a SAS to a dana 60 front axle, a small lift (just enough for 33 or 34" tires), and throttle body fuel injection. Im sure that Ill have lots of questions over time. Hopefully Ill be able to document my work and your help in a way tgat can help others in the future. Thanks for reading and any advice! -John
1984 Bronco, mild built 300-6, Np435, 3.55 gears, 8.8 rear with Eaton TrueTrac, D44 TTB front, 31" tires, MSD ignition, Offy C, EFI manifolds, Holley 390, No AC, 3G alternator, front receiver
1988 F250 "One Piece at a Time" - 460 ZF5 4x4 work truck project under construction |
|
This post was updated on .
Ill jump right into it.
Please see my previous post about a 1g to 3g alternator upgrade project that snowballed into a general tuning and troubleshooting thread after the alternator was done for some "backstory". Here is a breif synopsis- my mostly stock engine with feedback carb, eec-IV etcetera is idling around 1000 rmp. We beleived it was a result of a vacuum leak casuing a lean burn condition and a high idle speed. I used a combination of spray ether, the "cigar trick" and a copious amount of help from other forum members to find and seal off several large vacuum leaks. However, the engine still idles around 1000 rpm. Since then, I have pulled all of my plugs except for #6 (its hiding under the vacuum solenoid bank and Im terrified of busting all of those old vac lines). Here they are: 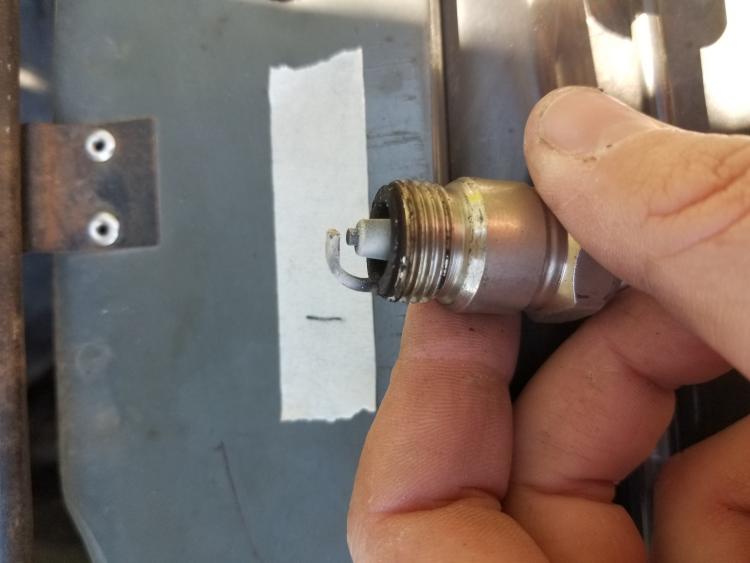 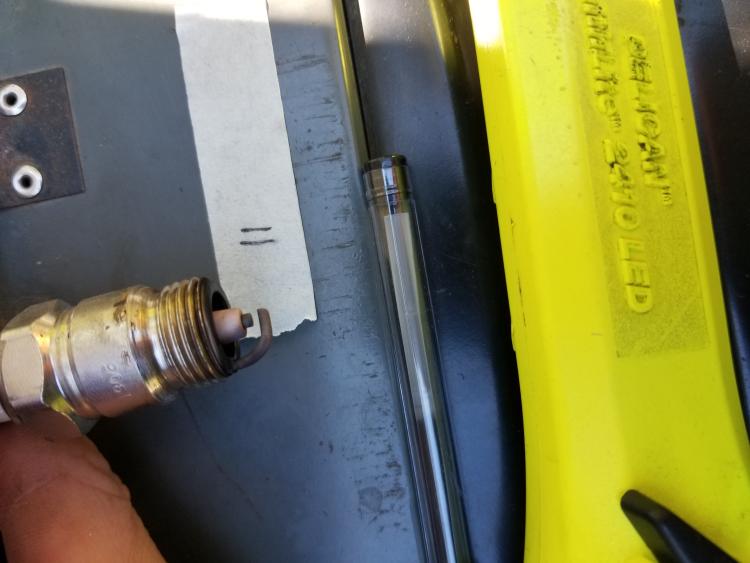 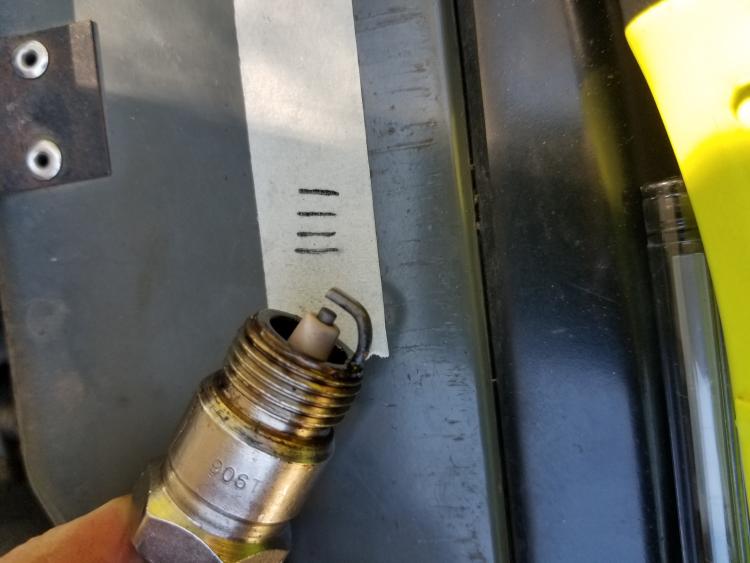  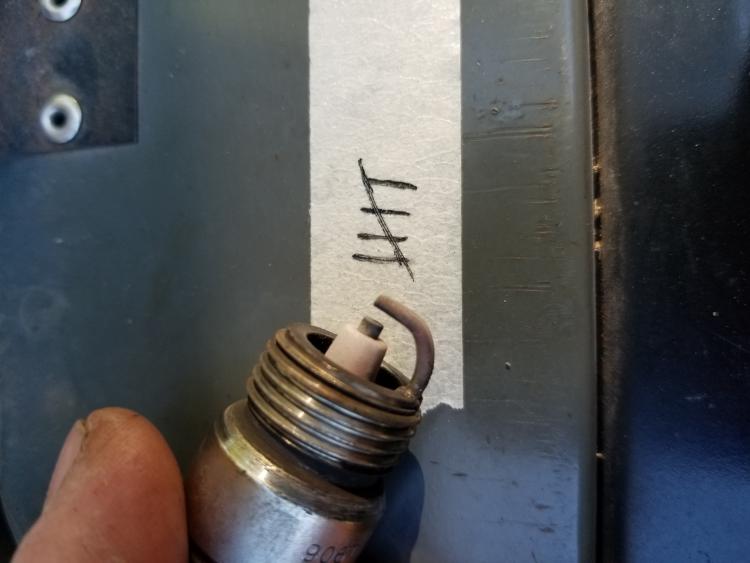 To me (and Im new to reading spark plugs) #1 looks really lean, 3 looks a little rich maybe, and the others all looks good. Next, I bore scoped #1 and #2 through the spark plug holes. Here are the photos for #1. One is a valve, the other is the piston face.  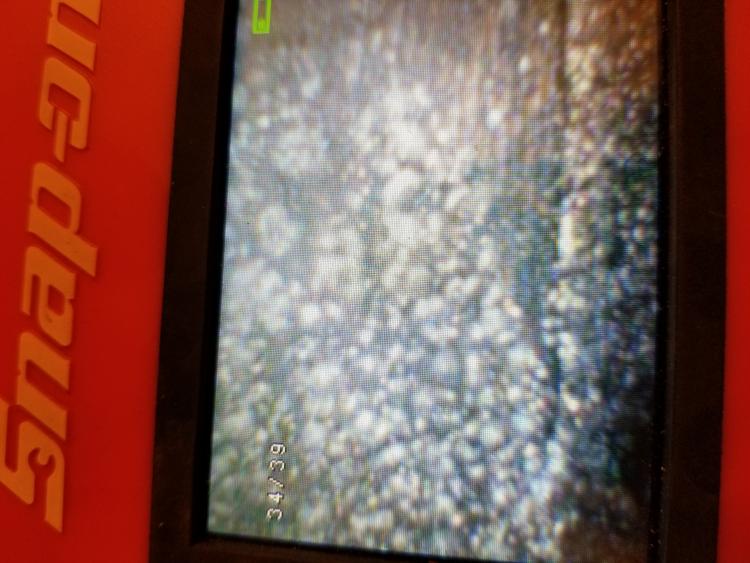 Here is a picture on a valve in #2. Somehow its the only photo I got, but the whole inside looks pretty clean. 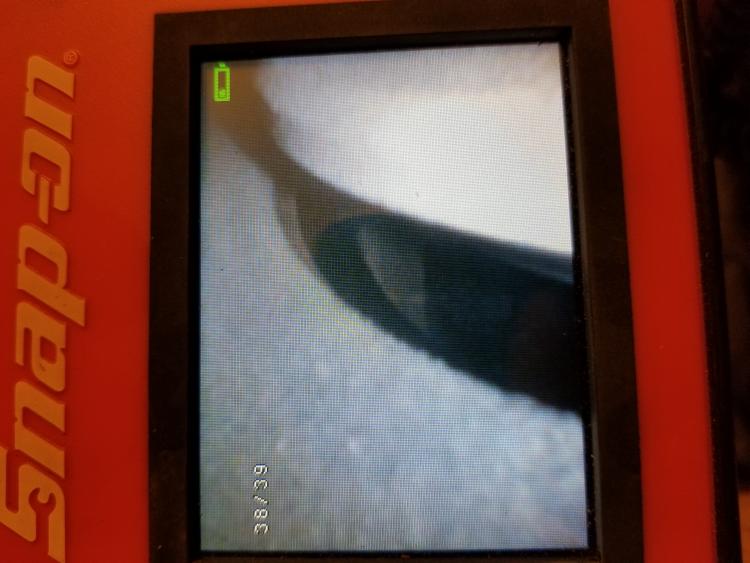 Finally, I found this crack on the #1intake runner. 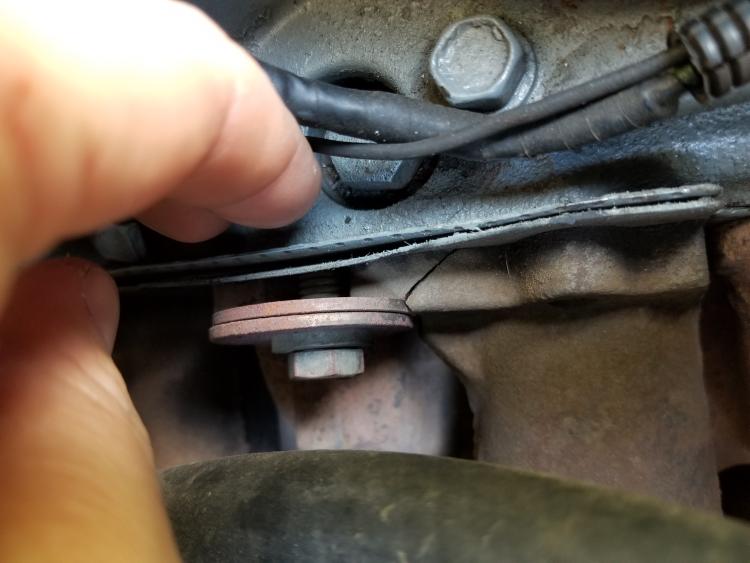 So, here is what I think is happening. I think the crack on the intake is contributing to lean burn on cylinder 1, and possibly to the high idle situation. I would greatly appreciate any advice or 2nd opinions. What I think I need to do about it- I think the factory intake manifold needs to come off ASAP. When that happens I may also pull the head off to inspect the engine because it will be nearly bare at that point. While I do have a spare factory intake manifold and a non feedback carter 1 barrel carberator, I dont think thats what I would put back on. I think I would go ahead and do the duraspark 2, offy intake, efi exh, and all of that. The only problem is that I need it all to run again by the 18th if at all possible. I was plannig on doing all of that work in December anyways, but my suspicions about ut running lean may have pushed my time table forward. What do you guys see? What do you think? If Im going to go the "upgrade" route Ill need to get started soon. Thanks!
1984 Bronco, mild built 300-6, Np435, 3.55 gears, 8.8 rear with Eaton TrueTrac, D44 TTB front, 31" tires, MSD ignition, Offy C, EFI manifolds, Holley 390, No AC, 3G alternator, front receiver
1988 F250 "One Piece at a Time" - 460 ZF5 4x4 work truck project under construction |
|
Administrator
|
You may be right about the intake crack making #1 lean. However, given the length of the intake manifold it isn't unusual for there to be differences between the cylinders.
So, what to do? What I'd do is to fire it up and spray carb cleaner at that crack and see what happens. If it truly is leaking the engine will speed up when you hit it with cleaner, and then you'll know. As for pulling the head, that's a large task. And I doubt you have a way to truly check it out as that would take checking for cracks in the head and leaks in the valves. But, you can check it on the engine by doing a leak-down test. That will determine if you have valve leaks, and if you haven't been losing coolant you probably don't have cracks in the head. I'd do the leak-down test and if the engine passes I'd then put the Offy intake on and also change out to DS-II.
Gary, AKA "Gary fellow": Profile
Dad's: '81 F150 Ranger XLT 4x4: Down for restomod: Full-roller "stroked 351M" w/Trick Flow heads & intake, EEC-V SEFI/E4OD/3.50 gears w/Kevlar clutches
|
|
I am lazy so I would check if there is a leak there as per Gary using spray.
If it is leaking and the motor runs good other wise, the pictures from the plug holes looked good, I would do the Ofy intake / carb / DSII and just enjoy the truck. Dave ----
Dave G.
81 F100 flare side 300 six / AA OD / NP435 / 2.75 gear http://cars.grantskingdom1.com/index.php/1980-Ford-F100?page=1 81 F100 style side 300 six/SROD parts truck -RIP http://cars.grantskingdom1.com/index.php/1981-Ford-F100 |
|
Gary,
You and I are thinking a lot alike. Im out of carb cleaner spray, but Ill pick some up tomorrow. I cant leak check a valve (which stinks, I do it at work all the time but dont have the tools at the house). If it came down to it my dad has a friend who could do a dye penetration test to find cracks and I think he accepts payment in beer occasionally. He just did my dads subaru heads. Im hoping it wont come to that though. Im fairly confident that its lean, not coolant. My friend is bringing over a compression checker and a timing light tomorrow. The plan is to perform a compression test then attempt the ds2 upgrade. If the compression test fails terribly I may consider pulling the head off and taking it to a local machine shop. My friend had his whole block put together there and hes pretty pleased. He seems confident that the shop could turn around a valve job/cleanup/just make it seal type of deal pretty quickly. If I go that route, Ill test fit my new efi exh manifolds first and fit/tack all of the peices of my new exhaust so that it will be ready when the head comes back. Im hoping I can leave the head on though. Dave, Im pretty close to doing just what you said. If only I hadn't been too hard headed to take that advice this time last week! I guess since this is all starting to come together fast Ill have a steady stream of questions. Here go a few. Any idea on what economizer valve I need for a 78 2150 thats going on a mild 300-6? Ive hears the 300 draws more vacuum than most v8s and may need a different economizer valve. This is my water heat carb spacer 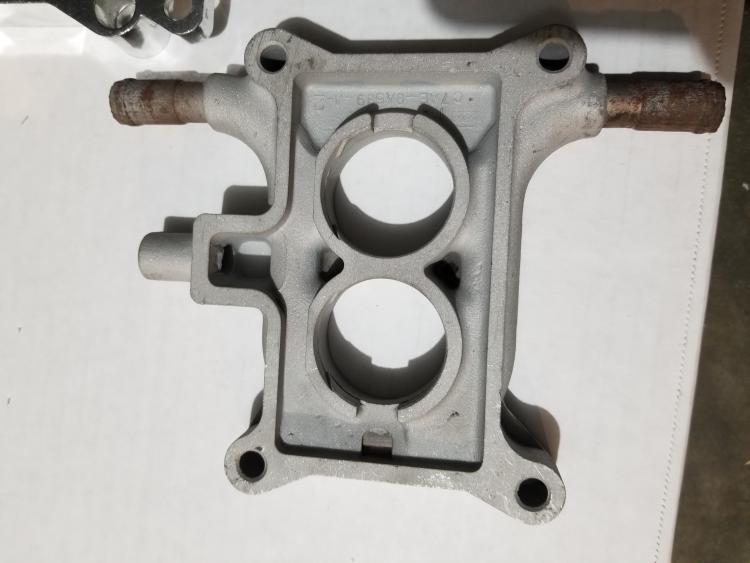 Its great and I hope it will do a great job of helping to regulate temps in the carb and intake. There is only one issue. This is roughly how it will line up with the adapter underneath it 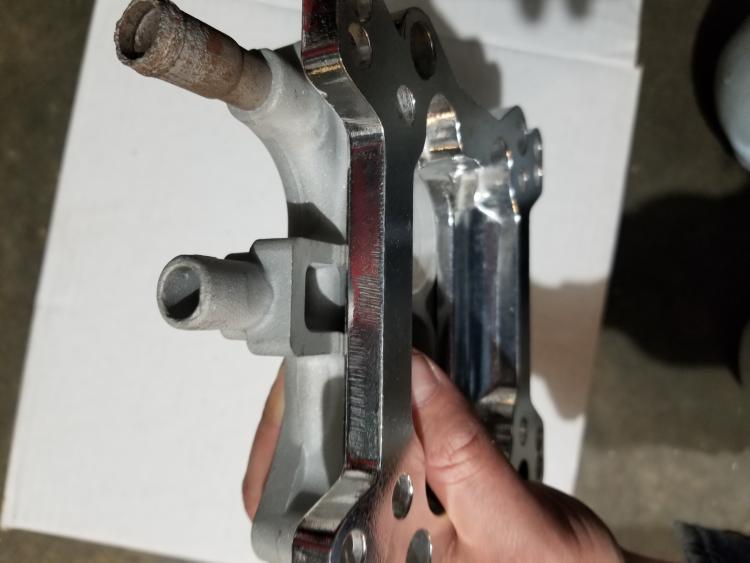 That would make for a pretty substantial vac leak. Im hoping that I can make the spacer work by using something like 2-part epoxy to fill in the part of the water heat spacer that would contribute to the leak. What do you guys think? As always, thanks for reading and thanks for the help and advice!
1984 Bronco, mild built 300-6, Np435, 3.55 gears, 8.8 rear with Eaton TrueTrac, D44 TTB front, 31" tires, MSD ignition, Offy C, EFI manifolds, Holley 390, No AC, 3G alternator, front receiver
1988 F250 "One Piece at a Time" - 460 ZF5 4x4 work truck project under construction |
|
On the economizer valve do you know where you can get different size ones?
If not then there is no need to worry about it. I also have not seen where others that have done this ever changed the economizer valve. On the heat plate: I also guess your doing this because of the EFI exh. manifolds and no heat for the intake? I don't know were you live but you may not need it if it is some what warm but only trying it will tell. Have you seen the plate with nipples you can bolt to the bottom of the intake and pipe hot water to it? 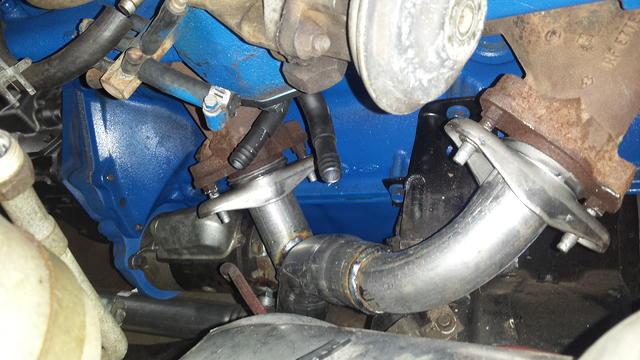 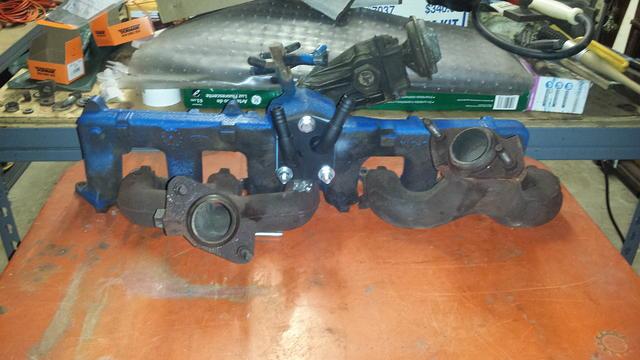 I got mine off Ebay but I know of others that have made them. Using the gasket as a pattern cut out a steel or Alum. plate, drill & tap to screw in pipe fittings (street elbo)and hose fittings and you are go to go. Also between the adaptor and the heat plate will the carb be to high to hook up the throttle linkage> Dave ----
Dave G.
81 F100 flare side 300 six / AA OD / NP435 / 2.75 gear http://cars.grantskingdom1.com/index.php/1980-Ford-F100?page=1 81 F100 style side 300 six/SROD parts truck -RIP http://cars.grantskingdom1.com/index.php/1981-Ford-F100 |
|
Dave,
I am fairly certain that Ive seen a table (maybe even in the 2150 tab of the garagmahal??) showing part numbers for all of the different economizer valves. However, Ive not actually tried to locate or purchase one based on those part numbers. Who know, you may not be able to, and it might not matter. Youre right on the money about the reasoning behind wanting water heat for my intake manifold. Im in central Ga, but make my way up as far north as northern North Carolina pretty frequently and in so doing go from about 1000ft elevation at home to 4500ft or more in the mountains. The bronco will see sub-freezing mornings and evenings very often (maybe 2-3 months a year?) and we get a sub 20 cold snap every now and again. Im not sure if that’s cold enough to justify water heat for the manifold or not. I did see that plates like yours that people attach to the bottom of the offy intakes and considered making one for myself. Then I happened upon this water heat spacer on ebay and decided that it sounded like $25 well spent. Im not strongly convicted one way or the other between the carb spacer or the plate on the bottom of the manifold. Is there a strong functional benefit to one approach or the other? You may be right about the throttle. I suspect Ill have to do some work to get the throttle working properly. Its sorta unavoidable though. My 4 barrel to 2 barrel adapter wont seal the bottom of my 2150. I bought a mr gasket carb spacer, and that part will allow you to seal the carburetor base to the 2X4 adapter. That mr gasket spacer is about 5/8” thick and the water heat spacer is about 1”. You don’t need both, only one or the other. You could get away with using the mr gasket spacer and then having a water heat setup on the bottom of the manifold like yours. At this point Im leaning towards using the water heat spacer and putting the mr gasket away for a rainy day. Ill be sure to include part numbers for all of the spacers and adapters Im using since it was a bit of a bear to figure those out. Ill put them in the thread when I actually get it all installed to the engine. Thanks for your advice and input! I bet your F100 really flies between the AA overdrive and the 2.75 gears. What was your goal? Good cruising speeds? Fuel economy? At first I was a little dissapointed by my self imposed 65 mph/2600rpm speed limit in the bronco but Ive come to peace with it and dreams of overdrive units and ZF5 transmissions have faded away. General updates I went by the hardware store and found the vast majority of the small hardware I need to put everything from the air cleaner to the head together. I still need some kind of plug for a vacuum port on the back of my electric choke on the 2150. It looks kind of like an AN style fitting. If I use the water heat carb spacer, I still need to identify a good choice in epoxy to seal it up. Most of the stuff at the parts store either didn’t specify a max working temperature or the temperature was listed as 200F. Id like to find studs to replace the bolts that hold the intake and exhaust manifolds on mainly because it seems like it will make installation much easier. I also need to plug the O2 sensor holes and EGR hole in my new exhaust manifolds. My friend and I ran the compression test last night. Cylinder 1 make about 135PSI and all of the other cylinders fell between 120PSI and 130PSI. So it looks like Im good to go head wise? Next we sprayed carb cleaner on the crack in the intake runner. BINGO! It caused the engine to stumble and slow down a good bit. When we pulled the plugs after the fact, #1 plug looked different, instead of being mostly white and ashy it was wet and dark. #2 was a little darker, all of the other plugs seemed to be unaffected. I guess it’s a moot issue at this point, but I wonder if that leak was responsible for my high idle situation? Finally, we started in on the duraspark 2 conversion. The duraspark 2 distributor and coil are installed on the engine and the new harness is connected to the oil pressure and water temp senders. The new module is sitting on the wheel well, Ill probably wait to mount it until I see how the wiring rounds out. At this point, the harness is connected to the oil pressure and water temp senders, the distributor, the coil, and the 4 prong plug on the module. This is where the confusion starts. 1) I don’t seem to have anything approximating the 2 prong plug from the duraspark module. Ive seen the diagrams posted on the duraspark section of the forum and have some idea of what those wires from the 2 prong plug need to go to, Im just not sure if I need to pull new wires for that or if what I need is supposed to be floating around somewhere nearby. 2)I have a 3 conductor connector on the donor duraspark harness that I don’t see an analog to in my trucks harness and haven’t heard anything about it my reading on line. We stripped the harness of its electrical tape wraps before we started working. The 3 prongs on the connector are the water temp and oil pressure sending units and the “BAT” wire to the coil. Perhaps I need to pull wire and manually wire this in as well? Or there may be a connector Ive missed, or maybe it’s a different style of plug that changed across the 2 year gap between my bronco and the donor. 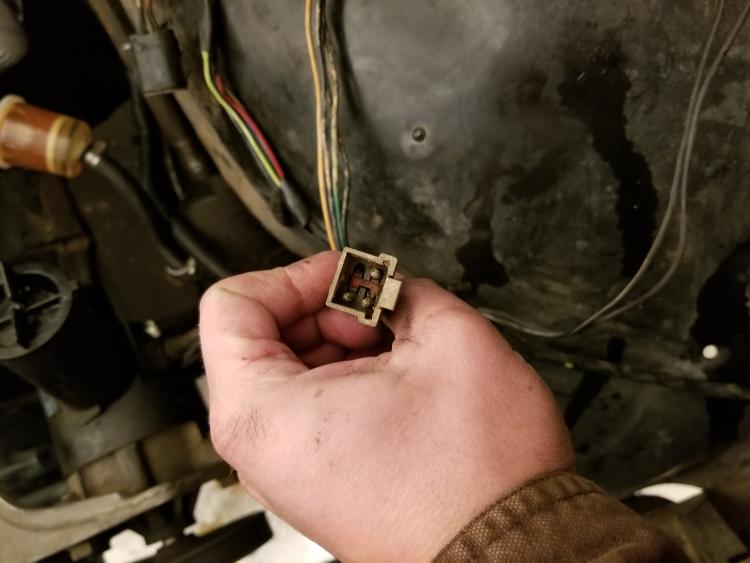 3)In my attempt to remove the TFI harness, I was under the impression that no wires would need to be cut, that I would just disconnect the connectors necessary to lift the TFI harness out, and that eventually that would cause it to come free. I ran into two problems with this. I had to disconnect 3 connectors that Im not totally sure need to go. They are all positioned on the driver side wheel well and the come out of the cab in the same location as the headlight and horn wires. One is a 2 into 1 with two conductors coming out of one side and only one on the other, another is either a 2 into 3 or a 3 into 4 (sorry I didnt take a picture and now my memory is fuzzy), and the last is a 4 into 4 connector with 4 conductors on each side. My guess is that these are power for something in the engine bay since the come out of the cab with the headlights. The other end seems to follow the ignition harness back to the big bundle of wires that goes through the firewall to the EEC-IV. I need to do some reading and try to figure out what these are and if I need them. 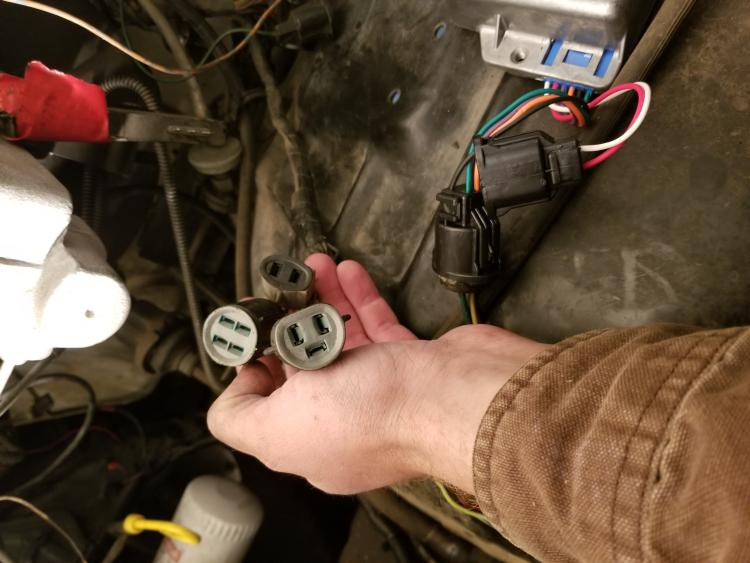 4)Finally, it doesnt look like the TFI harness is going to "lift out" it seems like it goes through that rubber bulkhead into the cab. How does one "get it out"? I guess it could just stay seeing as I will jump right into a total EEC-IV delete as soon as the duraspark 2 fires up and runs. My current goal from this point is to get the engine to run, even if it runs poorly or in limp mode, with the duraspark 2 and the remnants of the EEC-IV and the feedback carb. As soon as I get it to fire up in this condition and verify that the duraspark 2 is working Ill jump right in to the full EEC-IV/feedback carb/egr/factory exhaust/smog pump/etc delete and start working towards getting the new intake and exhaust manifolds and the 2150 running. It wont ever need to be “road worthy” with the duraspark 2 + EEC-IV + feedback carb combo since Ill only be leaving it in that condition long enough to verify that the ignition is working. Id appreciate any pointers on the duraspark 2 wiring. Maybe there is a technical resource Ive missed on the site somewhere? I know you guys probably have to walk a new person through this about once a week. Thanks for reading, and thanks for all of the help! – John
1984 Bronco, mild built 300-6, Np435, 3.55 gears, 8.8 rear with Eaton TrueTrac, D44 TTB front, 31" tires, MSD ignition, Offy C, EFI manifolds, Holley 390, No AC, 3G alternator, front receiver
1988 F250 "One Piece at a Time" - 460 ZF5 4x4 work truck project under construction |
|
I now believe that the "2 into 1" connector is for my tachometer. One mystery solved.
1984 Bronco, mild built 300-6, Np435, 3.55 gears, 8.8 rear with Eaton TrueTrac, D44 TTB front, 31" tires, MSD ignition, Offy C, EFI manifolds, Holley 390, No AC, 3G alternator, front receiver
1988 F250 "One Piece at a Time" - 460 ZF5 4x4 work truck project under construction |
|
After a considerable amount on mental Gymnastics I think I may be a little closer to figuring this out.
First off- I think the two blad plug goes to my tachometer. I dont have a corresponding plug in my donor harness. I assume this is because my donor truck didnt have a tachometer? I never saw the truck so thats only a guess. That leaves me with two more "mystery plugs".  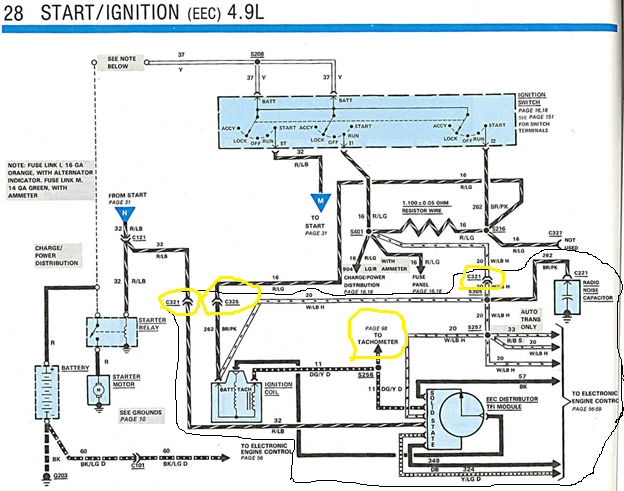 These are the ignition diagrams for the eec and the duraspark 2. On the duraspark 2 diagram Ive placed green check marks on what I believe is already done. On both diagrams Ive circled a section that can be removed from the diagram by disconnecting two conectors, C321 and C325. And ofcourse, both diagrams have arrows going off into space for the tachometer but neither includes a connector callout for that connection. Could C321, C325 and the tachometer connection be my 3 mystery plugs? Assuming that this is the case and that my donor harness is missing the tach plug because the donor truck didnt have a tach, I still have some problems. One ofcourse is how to wire in the tachometer. The ds2 diagram shows the tachometer signal coming from two places. The next one- Is the "two wire" connector on my new ignition box supposed to be C321? It seems like it should be, but the diagram for the ds2 shows 3 conductors coming out of the duraspark box to C321 and I only have 2.. Finally, is the gray square shaped plug with 3 wires from my donor harness C325? The diagrams only show one conductor on that plug but I already know that the other two are for the sending units and ford may not have included the sending units in the ignition system diagram. Honestly, its a little odd that those senders are lumped up with the ignition harness anyways. If that conector is C325, it doesnt look like anything in the truck. Maybe ford changed connector styles? I could rob the old male plug from the old ignition harness and splice into that so that id be able to plug it in. It seems like other folks have ended up installong new ballast resisters and running wires to the starter solenoid for the red and white wires from the ignition module. From what I can tell, all of that very well may be present in those 3 mystery plugs. Any advice would be greatly appreciated.
1984 Bronco, mild built 300-6, Np435, 3.55 gears, 8.8 rear with Eaton TrueTrac, D44 TTB front, 31" tires, MSD ignition, Offy C, EFI manifolds, Holley 390, No AC, 3G alternator, front receiver
1988 F250 "One Piece at a Time" - 460 ZF5 4x4 work truck project under construction |
|
The square plug with 3 wires from my donor harness doesnt seem to exist in the connectors catalog under the documentation tab. Im beggining to think that its an aftermarket replacement that an owner of the donor truck added in the past when the original motorcraft plug got damaged somehow? If so I may be getting close. I can test this theory by seeing if the bat wire and the sending unit wires are both supposed to land on the plug in my trucks harness when I get home. And Im beggining to suspect that C321 IS the 2 wire plug off of my duraspark module and that one of the 3 mystery plugs will plug right in. If both of those assumptions are true, Im a connector and a few butt splices away from trying to start the engine.
1984 Bronco, mild built 300-6, Np435, 3.55 gears, 8.8 rear with Eaton TrueTrac, D44 TTB front, 31" tires, MSD ignition, Offy C, EFI manifolds, Holley 390, No AC, 3G alternator, front receiver
1988 F250 "One Piece at a Time" - 460 ZF5 4x4 work truck project under construction |
|
Administrator
|
In reply to this post by StraightSix
Have you unwrapped your ignition harness, back towards the firewall?
Usually the DSII plugs are doubled back and wrapped over. There is no tachometer ground with a six cylinder engine. You only need one green/yellow wire. Do you want me to take some pictures of the harness in my 460 truck?
Jim,
Lil'Red is a '87 F250 HD, 4.10's, 1356 4x4, Zf-5, 3G, PMGR, Saginaw PS, desmogged with a Holley 80508 and Performer intake. Too much other stuff to mention. |
|
Jim,
If it wouldnt be too much of a hassle, that would be awesome. Thanks! Have you ever heard of a ds2 harness not having a tach wire? This one seems not to. I unwrapped a good bit of it, but there may be more back there somewhere. Ill have to look when I get home. The only plugs that arent plugged in to something from the engine side are the 2 wire plug on the module and the 3 wire square plug. Thanks for your help!
1984 Bronco, mild built 300-6, Np435, 3.55 gears, 8.8 rear with Eaton TrueTrac, D44 TTB front, 31" tires, MSD ignition, Offy C, EFI manifolds, Holley 390, No AC, 3G alternator, front receiver
1988 F250 "One Piece at a Time" - 460 ZF5 4x4 work truck project under construction |
|
Administrator
|
This post was updated on .
At the very least you will see what all the plugs look like.
 Obviously the six has its *coil and distributor down on the side of the engine and the sender goes around the back of the block. I'll be done in an hour, then I'll try to catch as much detail as possible
Jim,
Lil'Red is a '87 F250 HD, 4.10's, 1356 4x4, Zf-5, 3G, PMGR, Saginaw PS, desmogged with a Holley 80508 and Performer intake. Too much other stuff to mention. |
|
Administrator
|
In reply to this post by StraightSix
Look for a green wire which connects to the negative post of the coil. |
|
Administrator
|
Okay, I grabbed a few pictures.
If you want something closer or in another direction, LMK. First is the connector for square (EFI coils) this is unused. 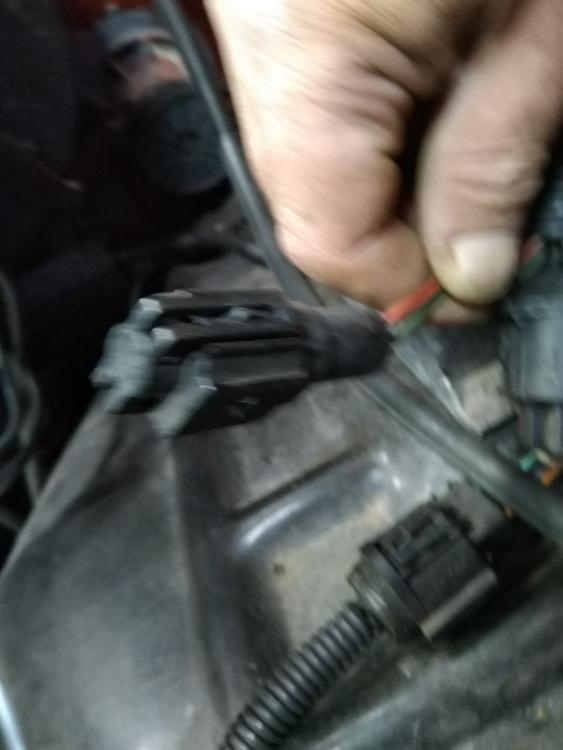 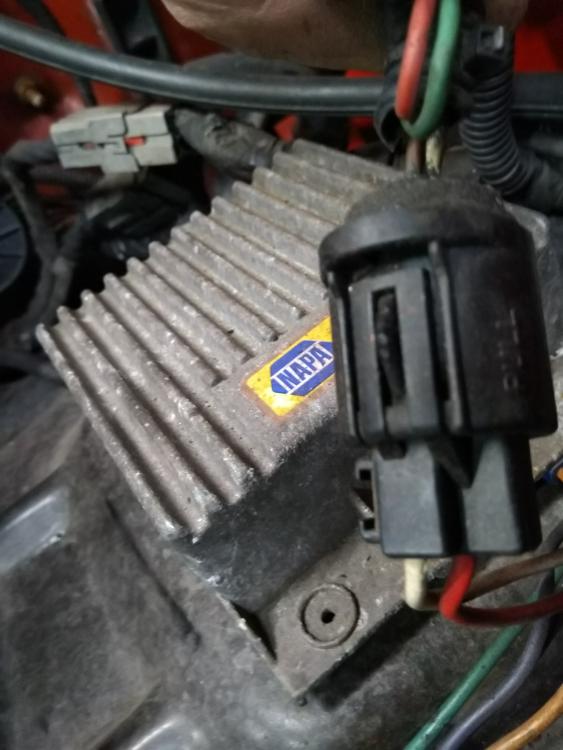 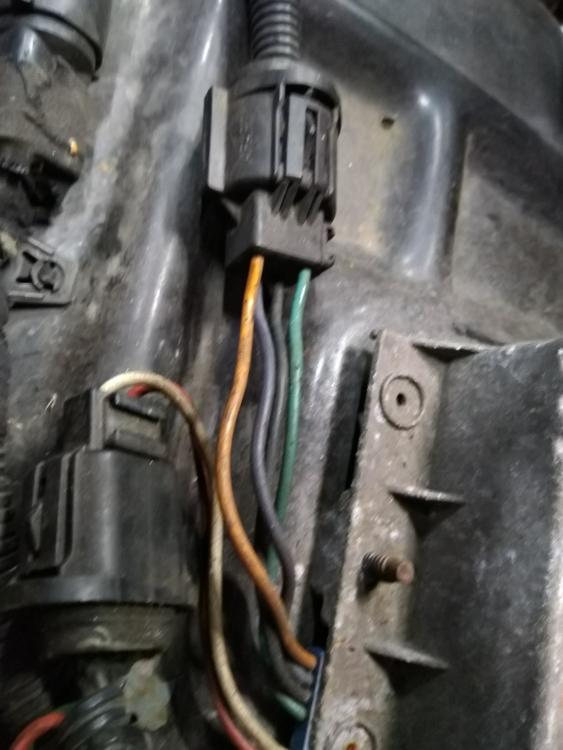 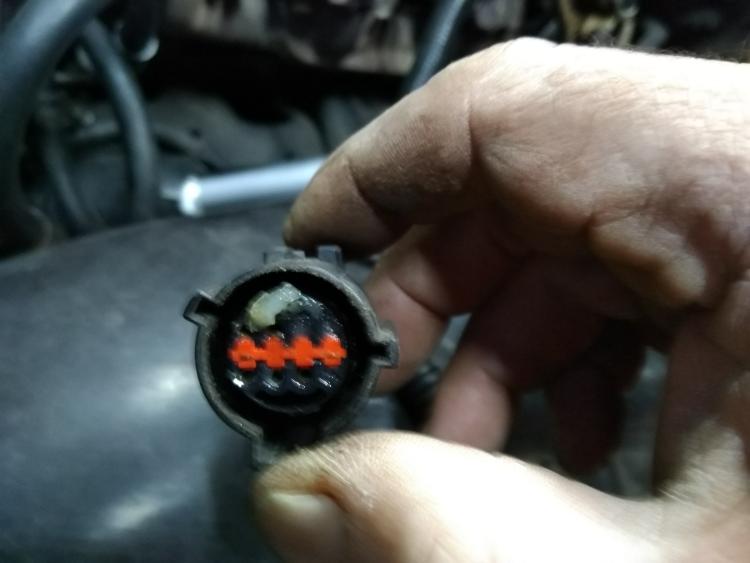 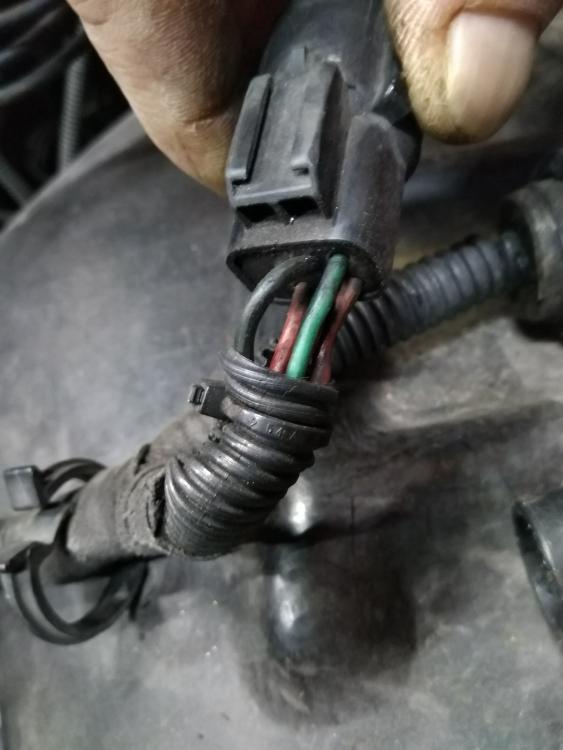 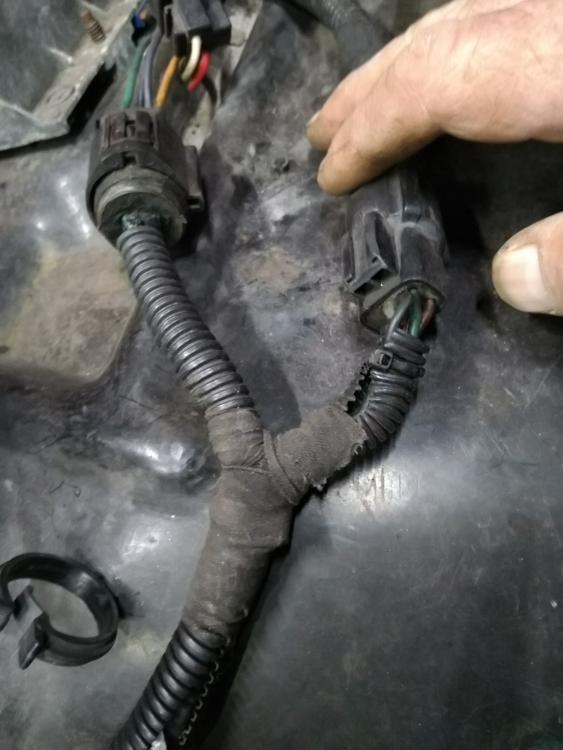 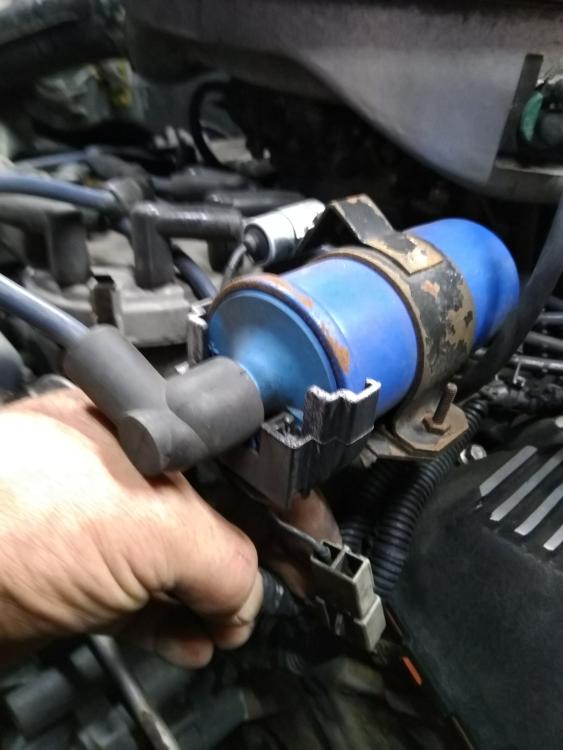 So, we have the two module connectors. Note: the red and white wires reverse at the plug! This is normal. The connector to the distributor also has one leg of coil ground, so the module can trigger it. We have the coil power and water+oil senders. This carries the green/yellow tach wire into the cab. If you have a radio suppression condenser at the coil it has its own two place grey rectangle connector, but only one wire is present.
Jim,
Lil'Red is a '87 F250 HD, 4.10's, 1356 4x4, Zf-5, 3G, PMGR, Saginaw PS, desmogged with a Holley 80508 and Performer intake. Too much other stuff to mention. |
|
She runs!!! More info shortly
1984 Bronco, mild built 300-6, Np435, 3.55 gears, 8.8 rear with Eaton TrueTrac, D44 TTB front, 31" tires, MSD ignition, Offy C, EFI manifolds, Holley 390, No AC, 3G alternator, front receiver
1988 F250 "One Piece at a Time" - 460 ZF5 4x4 work truck project under construction |
|
Jim and 1896F150Six,
Thanks for all of the help! Jim, especially thank you for going and taking pictures of your harness. Im really glad to have that documented here because there don’t seem to be any ds2 conversion writeups left on the internet that still have their photos attached. Gary mentioned that photos on this forum are very secure and wont be going anywhere any time soon. What I found last night was strange to me. I spent a lot of time yesterday looking at the ignition wiring diagrams and after getting familiar with those I was able to figure out what was going on. Basically, the 3 “mystery plugs” sitting on my driver side inner fender were the plugs I needed but they didn’t match up with my donor harness very well. First and foremost, my donor harness really didn’t have a tach wire. I cut the tach wire out of my original 1984 harness, clipped the tachometer plug back in, and then spliced the wire into the green wire going from the module to the coil. I have no answer for why my donor harness didn’t have a tach wire. Next, I realized that one of my remaining two “mystery plugs” had 3 wires coming to it from the cab, but matched the shape of the 2 wire plug on my new module. I found the “engine side” of that connector in my old harness and realized that the old harness only had pins for two of the three wires in the plug. So the old harness, and the new module would only use the same two wires out of that 3 wire plug from the cab. This all seemed like quite the coincidence so I plugged it in. Finally, we are down to the last “mystery plug” from the cab and the square gray plug from my donor harness. Im now 99% sure that the gray square plug was an aftermarket plug that the owner of the donor truck installed for some reason. The last mystery plug had 4 conductors coming through the cab. I found that connectors mate in the 1984 harness and tracked it back to the oil pressure sender, water temp sender and the bat+ terminal on the coil. The 4rth conductor went to an unused clip, so I ignored it. The I retraced my square gray connector in my donor harness back and found that it went to oil pressure, water temp, and the bat+ terminal on the coil. I cut the old connector out of the 1984 harness, cut the gray connector off of my donor harness, spliced the 1984 connector into my donor harness, plugged it up, and after a little fiddling with the distributor it fired up! Im confident that this is normally an upgrade that doesn’t involve this much fanfare but it really threw me off that I didn’t have as many plugs as I was supposed to and that some of those plugs didn’t match anything in the truck… Im glad it runs now though! And I have a really good understanding of the harness so that can only help down the road. For anyone who is reading my biggest recommendation is to get the actual wiring diagrams (Ill post them here) and look at them until you understand where all of your wires are supposed to go. Its not my strong suit and I needed a few cups of coffee to get it done but in the end it worked! Here is some information on the parts I used to make it all work- Coil, distributor, harness out of and 82 pickup with a 300-6 Brand new motorcraft ignition module from summit – PN 1U2Z12A199AA New plugs, but the old ones looked the same MOF-SP549 New spark plug wires – will update with PN when I get home, but I just bought the motorcraft wires for an 82 f150 with a 300-6   Now I need to lock down my distributor, and then I can start working on the induction system. With any luck, Ill have the air pump, intake and exhaust manifolds, carburetor, and the majority of the vacuum system off tonight. Im waiting on new studs to arrive in the mail to install my intake and exhaust manifolds, and I have a short list of nuts, bolts and hoses to find. That’s alright though, I can start welding up the exhaust in the mean time if I run out of things to do. I think Im going to try out the JB weld original 2 part epoxy for sealing up the water heat intake spacer. It claims a max working temp of over 500F, and the water should keep it well below 200f if I had to guess. As always, thanks for reading and thanks for all of the help!
1984 Bronco, mild built 300-6, Np435, 3.55 gears, 8.8 rear with Eaton TrueTrac, D44 TTB front, 31" tires, MSD ignition, Offy C, EFI manifolds, Holley 390, No AC, 3G alternator, front receiver
1988 F250 "One Piece at a Time" - 460 ZF5 4x4 work truck project under construction |
|
Administrator
|
Congrat's!!! Glad you got it running. Keep on truckin!
Gary, AKA "Gary fellow": Profile
Dad's: '81 F150 Ranger XLT 4x4: Down for restomod: Full-roller "stroked 351M" w/Trick Flow heads & intake, EEC-V SEFI/E4OD/3.50 gears w/Kevlar clutches
|
|
Thanks Gary! Your site, the awesome members on it, and the collection of technical resources that it offers are the only reason that the Bronco is running right now. So thank you!
Now on to the rest.
1984 Bronco, mild built 300-6, Np435, 3.55 gears, 8.8 rear with Eaton TrueTrac, D44 TTB front, 31" tires, MSD ignition, Offy C, EFI manifolds, Holley 390, No AC, 3G alternator, front receiver
1988 F250 "One Piece at a Time" - 460 ZF5 4x4 work truck project under construction |
|
Administrator
|
In reply to this post by StraightSix
I'm glad I was able to help, if only a little bit.
No daylight and pressed for time. I can update these photos, maybe this weekend. Or maybe Gary's harness is cleaner? There used to be a nice color coded diagram on a page 'My '60's Falcon' or something. He was upgrading from points instead of "downgrading" from a feedback system, so he had start full voltage and timing retard coming from (I) on the starter relay, but the verbiage is good and all the wires are in colour on a black background.
Jim,
Lil'Red is a '87 F250 HD, 4.10's, 1356 4x4, Zf-5, 3G, PMGR, Saginaw PS, desmogged with a Holley 80508 and Performer intake. Too much other stuff to mention. |
Bullnose Enthusiasts Forum
›
Projects
|
1 view|%1 views
| Edit this page |
