1984 Bronco build thread
|
|
Classic |
|
List |
|
Threaded |

|
Administrator
|
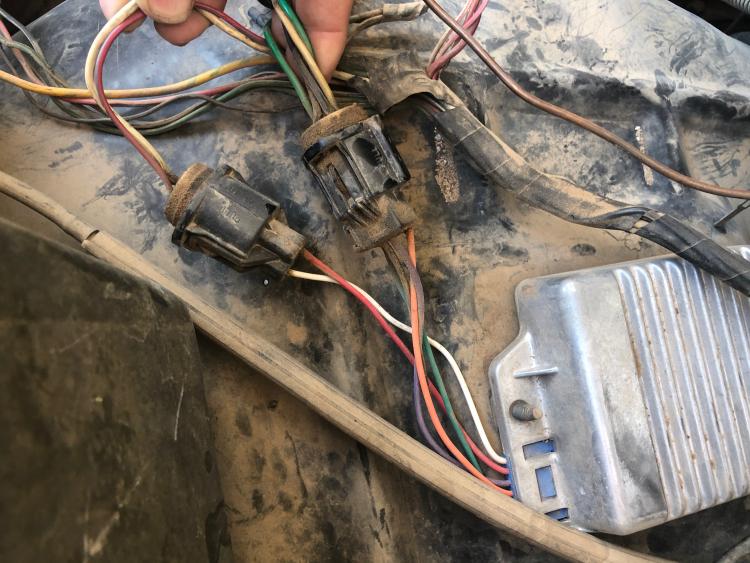
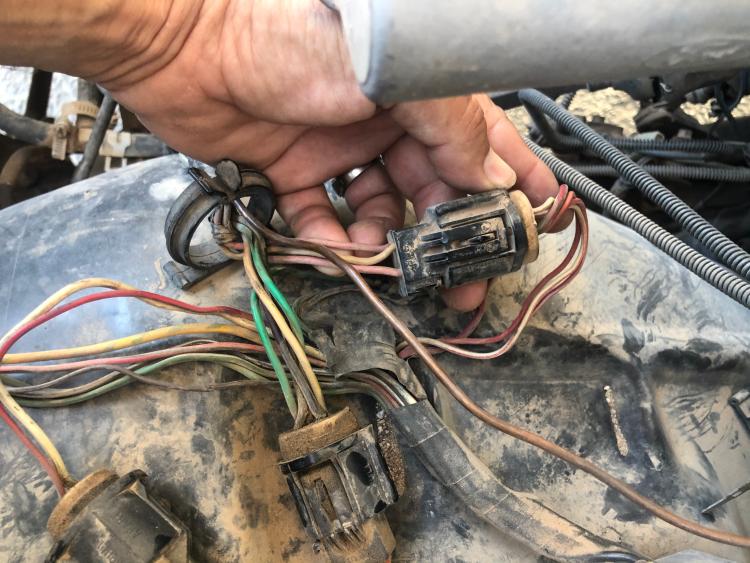
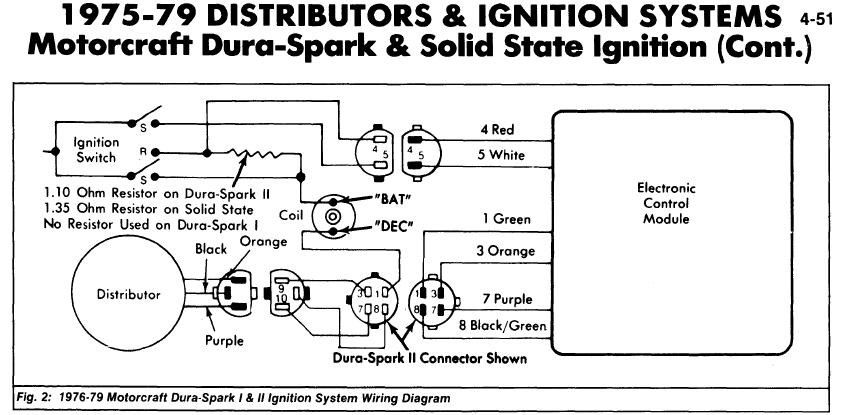
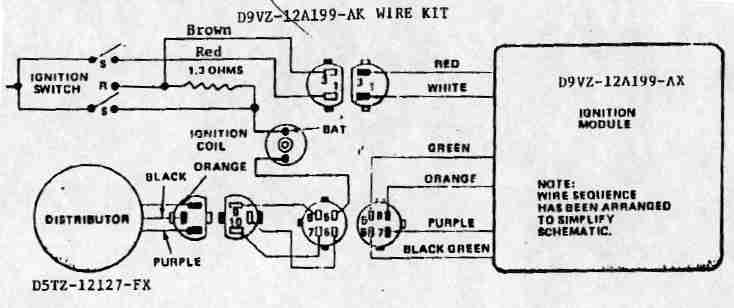
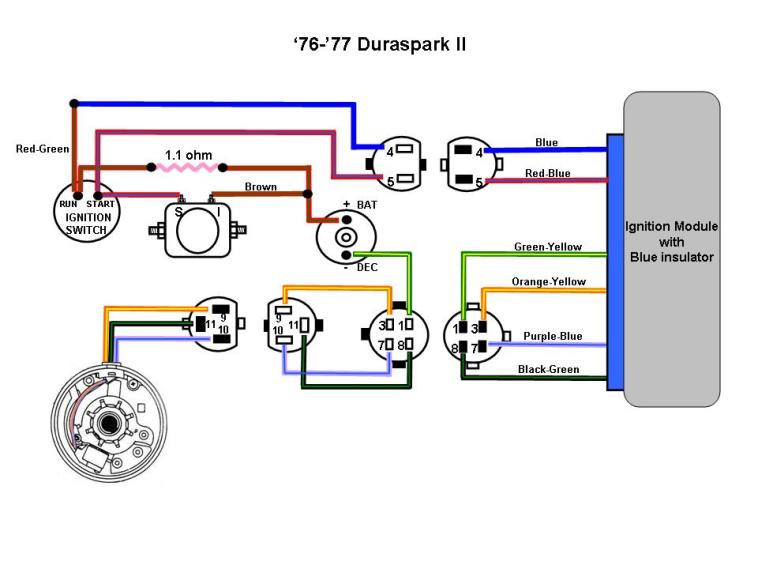
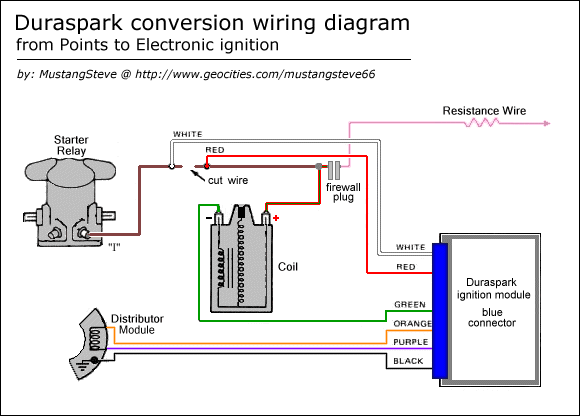
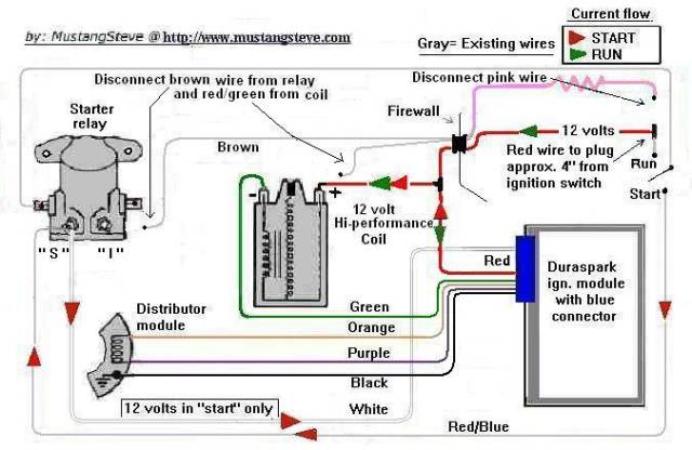
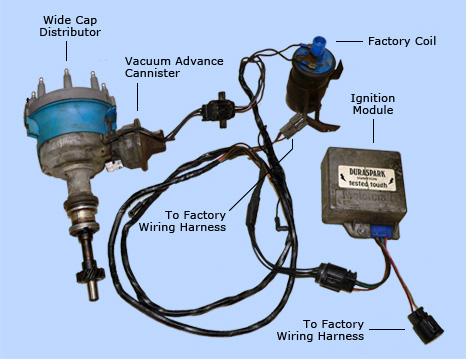
I realize the party is over and everyone has gone home, but I am attaching a couple photos that might help someone else. These are the plugs on my ‘81 straight six that is DSII from the factory, with tach option. I am also including the images I saved and used to convert the breaker points ignition on my old 240 straight six to duraspark. Nothing new or different than what has already been discussed here, just more images that might click with someone...
SHORT BED 4-DOOR DIESEL: 1986 F350 4x4 under construction-- 7.3 IDIT ZF5+GVOD
STRAIGHT SIX 4X4: 1981 F150 2wd to 4x4-- 300 I6 close ratio diesel T19, hydroboost brakes, Saginaw steering BIG F: 1995 F-Superduty under construction— converting to 6.9L IDI diesel ZF5+DNE2 |
|
Administrator
|
That is good, Jonathan!
|
|
This post was updated on .
FordF843 and Jim,
Thanks for contributing pictures of your vehicles to the thread. Hopefully all of this will help someone else do their Duraspark 2 upgrade. Its alarming how many posts on the duraspark upgrade have been written but don’t seem to have their pictures intact. Here is a picture of mine after completing the upgrade – 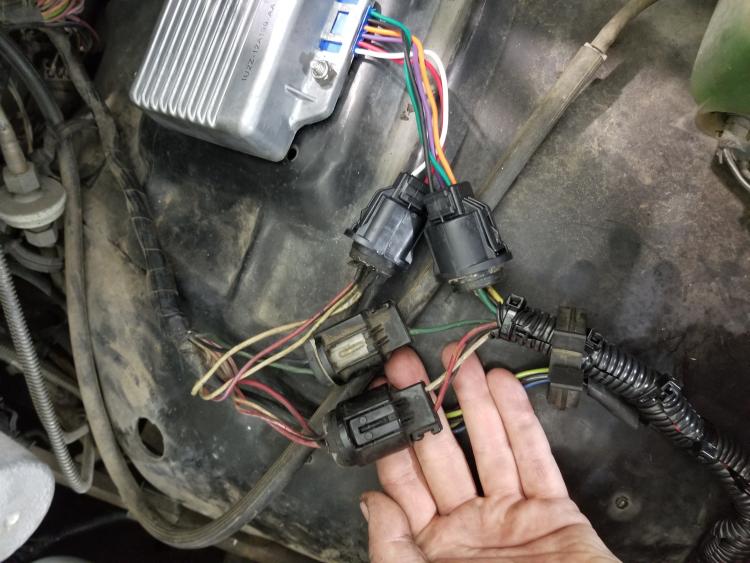 The bottom plug (that Im holding in the picture) has 4 conductors coming from the cab. In my original TFI harness, the 4rth conductor went to a blank plug and thus didn't do anything. The other 3 wires are bat + to the coil, the water temp sender, and the oil pressure sender. This is one of the ones that gave me fits, because my donor harness didn't have this plug, it had that bizarre gray square plug. I cut the “engine side” of that connector out of my TFI harness and butt spliced it in to the duraspark harness. The center plug that my middle finger is touching is the plug for the tachometer. There are 2 wires coming from the cab an one from the harness side. My understanding is that a V8 engine would have had 2 wires coming into this plug from the harness side, but since mine is an I6 I only have one wire. In my case, my donor harness didn’t have a tach wire/plug. I still don’t know why. I cut the “engine side” plug out of my TFI harness, plugged it back in, the I spliced the green wire coming out of it into the green wire right next to it coming out of the 4 wire plug at bottom right. Tach works. The top left connector is the “two wire plug” into my module. It plugged right up. For some reason, there are 3 wires coming into it from the cab. The duraspark only uses 2 of them, and my TFI harness only used the same two wires. I don’t understand what that 3rd conductor is for. If anyone knows, Im curious for sure. Finally, the top right connector is the 4 wire connector to the module. This one just plugged up with no funny business, other than needing to splice in the tach wire as mentioned above. All of the other wires for your duraspark harness should go to your engine. Unless youre doing a points -> DS2 upgrade, then it might be different. Maybe someone with more experience can chime in on that one.
1984 Bronco, mild built 300-6, Np435, 3.55 gears, 8.8 rear with Eaton TrueTrac, D44 TTB front, 31" tires, MSD ignition, Offy C, EFI manifolds, Holley 390, No AC, 3G alternator, front receiver
1988 F250 "One Piece at a Time" - 460 ZF5 4x4 work truck project under construction |
|
Udpates! The factory intake, exhaust, carburetor, and the EEC-IV harness have been removed along with other associated equipment like the EGR.
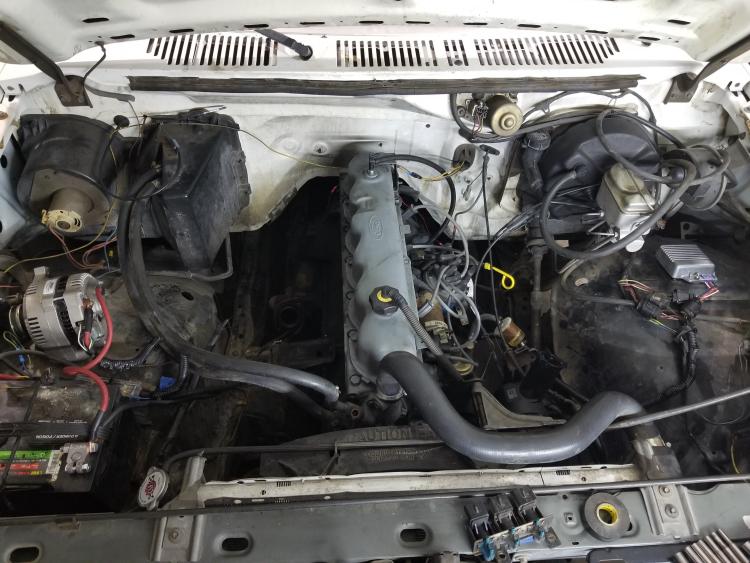 At this point Im waiting on my new manifold studs to arrive (3/8-16 grade b7 2” studs from mcmaster carr), and I need to plug the holes in my efi manifolds. I have ordered M18-1.5 plugs for the O2 sensor holes because that’s what the internet seems to think I need. They should arrive today. There was much more uncertainty about the right plug for the EGR port. My manifold still has that bushing/adapter in it that looks like it takes an 1”+ plug. Ive read that if you get that out a ¾” pipe plug will plug it. Can anyone confirm or deny this? Anyways, plug the exhaust manifold holes, weld up the new exhaust ( part numbers for the collector pipe, muffler and tail pipe coming soon), fill in the hole in my water heat spacer, figure out my carburetor, figure out the throttle cable and cruise control throttle, and I think Ill be close to a running truck again! As a matter of interest, I sprayed all of the manifold bolts down with Kroil a few minutes before attempting to remove them. When we got the manifolds off #1 intake port on the head had Kroil in it that must have gone through that crack in the runner. Ok.. I sorta hate to do it, but here is my “monster sized list of carburetor questions”. For now, Im not too concerned about jets or anything like that. They are 47F jets if anybody is interested, and it’s a 1.08 venturi carb. That seems close enough to correct that Im going to roll with it, atleast initially. 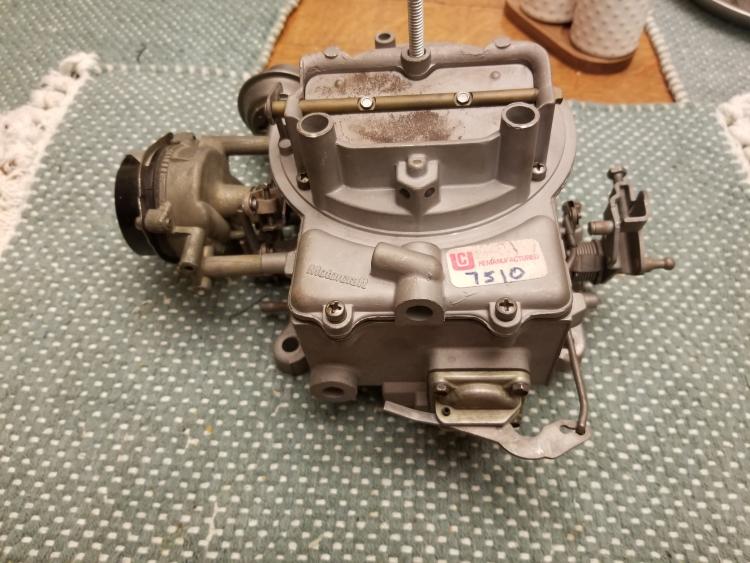 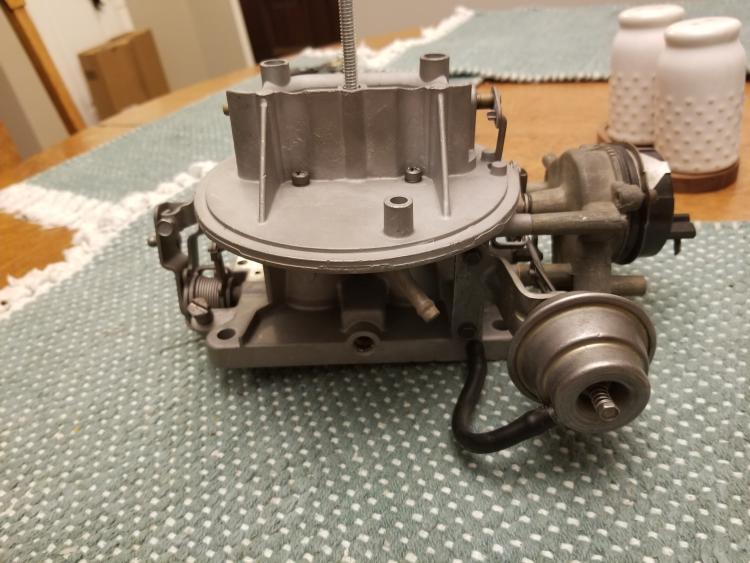 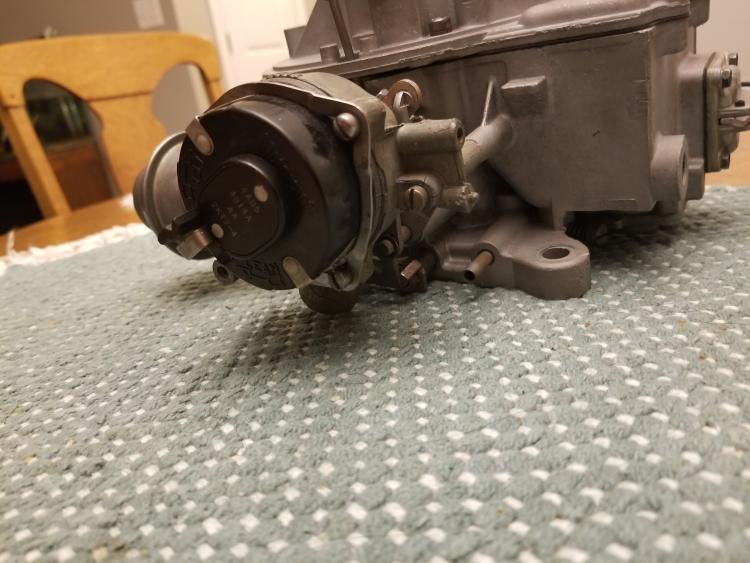 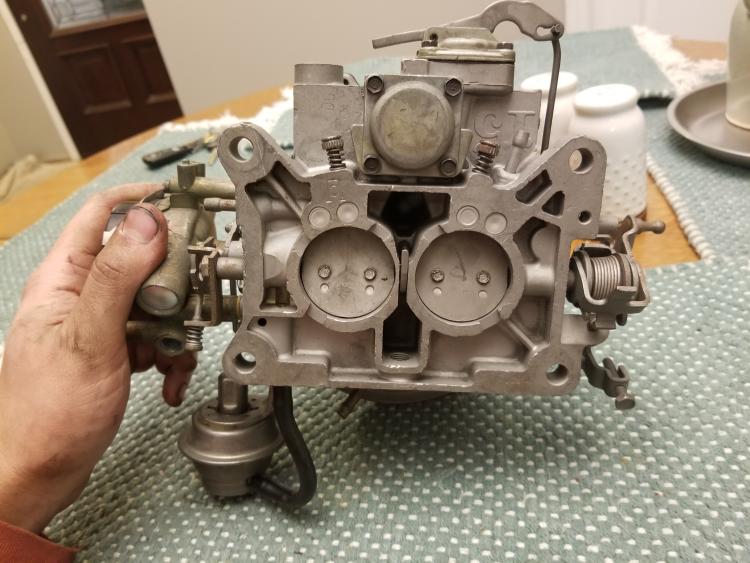 I have a few questions. First off, can anyone definitively Identify the carb? I assume that it’s a 2150 because its got motorcraft cast into it and not autolite, but its missing a lot of the features that the 2150s picked up over the years. perhaps an early model? There is also the issue of the choke. I now understand that I have a combo electric + hot air choke. I don’t think there is any reasonable way for me to supply the choke mechanism with hot air. Will the “electric component” of the choke be enough to operate it in a desirable way, or does it really need the hot air to work right? If it needs the hot air, Im probably going to have convert the choke to a full electric choke or to a manual choke. Between the two, I don’t have a super strong preference. Could I just plug the hot air holes in the choke body and put the E-choke off of my carter carburetor on the 2150? That seems like a really convenient option and it preserves the function of an electric choke. Alternately, In not really opposed to installing a mechanical choke. It doesn’t seem that difficult, and Ive already got a big hole in the firewall where I pulled out all of the wires from the EEC-IV. Finally, I have some vacuum hose questions. Ill have 4 hoses. Brake booster, timing advance, cruise control, and PCV. I know the brake booster needs to go to manifold vacuum. Should I find a pipe plug with a hose barb on it and thread it directly into the Offenhauser intake manifold? There are two pipe thread holes on the side of the manifold that seem like they would be good for this but I dont know that I can recall seeing anyone use them. Im pretty sure that the timing advance hose needs to go to the vacuum barb that is under and slightly forward of the choke mechanism (right next to the passenger side forward mounting bolt hole). I blew air into that hole and operated the throttle plates, the sound seemed to change. Thoughts? I have no idea where to land the cruise control hose. On my carter carb it landed in a really bizarre place near the choke. Im at a loss on this one, any advice will be greatly appreciated. Finally, the PCV. My plan is to get a combo breather/oil cap and let the engine “breathe in” through there. Where does the line coming out of the PCV need to land? On the air cleaner? As always, thanks for reading, and thanks for all of the advice!
1984 Bronco, mild built 300-6, Np435, 3.55 gears, 8.8 rear with Eaton TrueTrac, D44 TTB front, 31" tires, MSD ignition, Offy C, EFI manifolds, Holley 390, No AC, 3G alternator, front receiver
1988 F250 "One Piece at a Time" - 460 ZF5 4x4 work truck project under construction |
|
Administrator
|
Positive crankcase ventilation has to go to full manifold vacuum.
If your 2150 doesn't have a big port in the base flange perhaps you ought to look for a carb spacer with that port sticking out of it. Motorcraft and Holley carbs have interchangeable choke coils. I believe the YF's are wound the opposite way. So a Motorcraft choke will have a single bullet connector for (black/white) 7V stator power. A Holley electric choke element will have 12V+ and ground spade terminals.
Jim,
Lil'Red is a '87 F250 HD, 4.10's, 1356 4x4, Zf-5, 3G, PMGR, Saginaw PS, desmogged with a Holley 80508 and Performer intake. Too much other stuff to mention. |
|
Thanks Jim!
Ill put the pvc valve to full manifold vacuum then. There is a pretty good size thread port on the back face of the base flange on the carb (2nd carb picture). I have a brass fitting with a hose barb to match that hole, so it seems like that would be a good spot for the PCV. Id rather use a 7v electric choke so that I can just plug it in to the existing 7v line from the alternator stator. So I should be looking for a motorcraft electric choke for a 2100/2150? I take it that the one thats already on there is presumed insufficient? And Ill need to plug the hole for the hot air line on the choke, but where is the "other end" or that port? I guess it probably doesnt have to be plugged.. Thanks for the help!
1984 Bronco, mild built 300-6, Np435, 3.55 gears, 8.8 rear with Eaton TrueTrac, D44 TTB front, 31" tires, MSD ignition, Offy C, EFI manifolds, Holley 390, No AC, 3G alternator, front receiver
1988 F250 "One Piece at a Time" - 460 ZF5 4x4 work truck project under construction |
|
Administrator
|
In reply to this post by ArdWrknTrk
Jim, would this be what is needed? https://www.ebay.com/itm/1983-1984-Ford-Motorcraft-2Bbl-2150-Carburetor-Electric-Choke-Thermostat/254024586984?hash=item3b250b96e8:g:4ToAAOSw~5ZcWIbr |
|
Administrator
|
I believe so!
I don't think there's really any difference with the one found on 4V's like the 4180, but that listing seems priced right. 
Jim,
Lil'Red is a '87 F250 HD, 4.10's, 1356 4x4, Zf-5, 3G, PMGR, Saginaw PS, desmogged with a Holley 80508 and Performer intake. Too much other stuff to mention. |
|
Thanks guys! So it really is just as simple as putting a "real electric choke" in place of the electric choke from my electric+hot air choke? And probably plugging that hot air intake hole? Thanks a bunch, I just assumed there would be more to it than that
1984 Bronco, mild built 300-6, Np435, 3.55 gears, 8.8 rear with Eaton TrueTrac, D44 TTB front, 31" tires, MSD ignition, Offy C, EFI manifolds, Holley 390, No AC, 3G alternator, front receiver
1988 F250 "One Piece at a Time" - 460 ZF5 4x4 work truck project under construction |
|
Administrator
|
There is a tiny amount of vacuum present to draw air through the choke stove.
The carb will be tuned to run with this 'leak' just like it's tuned to run with the PCV. But you don't want cold air drawn into the choke coil, so you should cap/plug it.
Jim,
Lil'Red is a '87 F250 HD, 4.10's, 1356 4x4, Zf-5, 3G, PMGR, Saginaw PS, desmogged with a Holley 80508 and Performer intake. Too much other stuff to mention. |
|
If anyone ever wondered, this part number will plug the o2 holes in the efi exhaust manifolds
- 4936K929, mcmaster carr And a 3/4 pipe plug from the plumbing section (sorry, no pn) will plug the EGR hole after you remove the bung. The threaded bolt holes on the manifold flanges are 7/16-14, which ACE doesnt carry. Hopefully I can find some today. Hoping to get the better part of the exhaust welded up today, and maybe even do some of the installation work inside the engine bay.
1984 Bronco, mild built 300-6, Np435, 3.55 gears, 8.8 rear with Eaton TrueTrac, D44 TTB front, 31" tires, MSD ignition, Offy C, EFI manifolds, Holley 390, No AC, 3G alternator, front receiver
1988 F250 "One Piece at a Time" - 460 ZF5 4x4 work truck project under construction |
|
Administrator
|
Good info. The McMaster Carr catalog says that 4936K929 is a "Compact Extreme-Pressure Steel Pipe Fitting, Plug with Hex Drive, M18 x 1.5 mm Male Thread".
Thanks!
Gary, AKA "Gary fellow": Profile
Dad's: '81 F150 Ranger XLT 4x4: Down for restomod: Full-roller "stroked 351M" w/Trick Flow heads & intake, EEC-V SEFI/E4OD/3.50 gears w/Kevlar clutches
|
|
Hey everyone, I haven’t posted in a few days because most of the stuff Ive done has felt pretty mundane. mostly hoses, band clamps, cleaning stuff up here and there, etc. however there may be some useful part numbers or notes for anyone following along in the future. I tapped all of the manifold bolt holes in my head (3/8-16), applied never seize, and installed my studs. I attempted to weld the exhaust system with a walker WLK-21910. It’s a rectangular muffler with offset inlet and outlet. It does fit (tightly) between the driveshaft and the frame rail, but I couldn’t get the collector pipe to line up and bolt up with the exhaust manifolds because of the offset in the muffler. Someone with much more welding skill could have probably done it, maybe with some additional fittings. I elected to order a round muffler that is more similar in form to the stock muffler. I ordered a walker 21151. It should be here today. As a matter of interest, Walker also makes extensions with a female end that has a 2.5” ID and a male end with a 2.5” OD. These have been handy for sure. That PN is Walker 53539. With any luck the exhaust will finally be finished up tonight. I decided to run new wires for the battery->block ground (on my truck the ground lands on one of the bolts that holds the starter into the bell housing) as well as the starter wire. Both were severely fouled by the new collector pipe (which is the walker 45166). I ran both as size 4 with copper crimp on terminals. The block ground needs a 3/8 diameter hole in the ring terminal while the starter wire needs a smaller one (1/4” maybe??). I am getting rid of the stock steel fuel line that comes up from the pump, over the valve cover and then threads into the carb. Im replacing it with 5/16 fuel hose. The fitting for the fuel pump discharge needs to be a ½-20 inverted flare to a 5/16 hose barb. I ordered this part – edelmann 821550. Summit says this part has 5/16 thread, but that is incorrect. This part does have ½-20 thread. After a lot of thought (and some work unfortunately) Ive decided to prematurely dump my water heat spacer in favor of a plate under the intake like everyone else uses. I don’t feel confident that the spacer will accomplish the goal of heating the bottom of the intake. With that being said, these are the part numbers Im using to adapt my Offenhauser C to my 2150. These parts fit correctly and seal everything up including the bottom of the carburetor. Fel-Pro 60529, transdapt 2065. The transdapt will not seal the bottom of a 2150, an additional spacer is required. Ill also be using this air cleaner – SUM-G30010B. it’s a 14”x3” air filter. I selected it based on cost, I cant imagine all the chrome would have made it “go faster”. The rod and wing nut it came with are complete garbage though. I went to ace, bought a 6” ¼-20 rod and new wing nut, cur rod to length and that is what Ill be using instead. This whole assembly fits handily under the hood, might have even gotten away with more air filter height. After reading about others having problems getting the efi exhaust and offy intake to fit together I decided to lay mine on the concrete in my garage and see if interference seemed likely. It did. The front runner on the rear exh manifold seemed to be about a hairs width away from contacting the intake. Keep in mind this is all approximate because I was laying on the floor trying to line everything up until it looked right. I ended up doing some grinding on that exh runner to improve clearance. 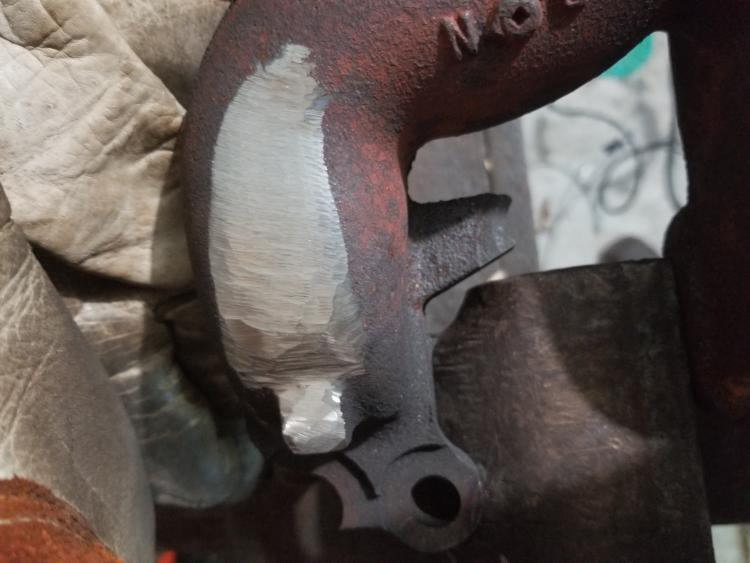 ! !
Finally, the throttle bracket. I mocked up the intake and carb last night to see what I needed to do for a throttle bracket. I didn’t take pictures, but I will take some when I get a chance. Basically, my plan is to butcher the factor throttle bracket and then make an addition bracket that will hold it in place and provide a location for a throttle return spring. My plan is to attach the throttle bracket to the intake manifold using the two thru holes for the water heat plate. From there, it will run forwards to the radiator before bending 90 deg up for an attachment point for a throttle return spring. From the mounting holes, it will run a few inches back and provide a location to bolt in the butchered original throttle bracket. 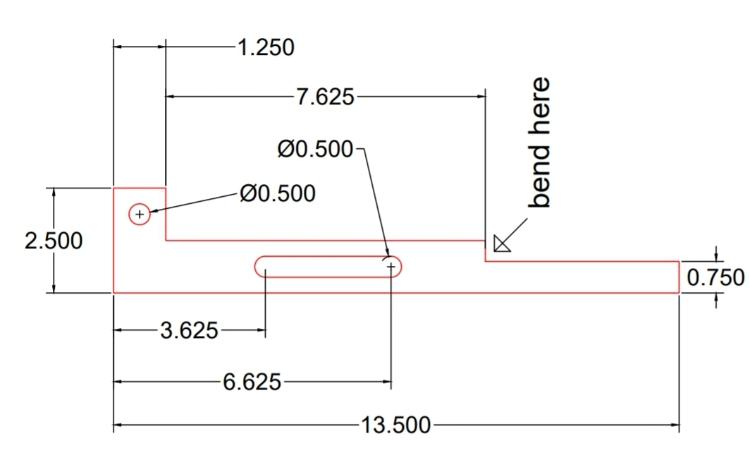 Im optimistic that it will idle in the drive way by tomorrow night, and may be road worthy early next week. Ill keep you all posted.
1984 Bronco, mild built 300-6, Np435, 3.55 gears, 8.8 rear with Eaton TrueTrac, D44 TTB front, 31" tires, MSD ignition, Offy C, EFI manifolds, Holley 390, No AC, 3G alternator, front receiver
1988 F250 "One Piece at a Time" - 460 ZF5 4x4 work truck project under construction |
|
Administrator
|
You've got a fantastic amount accomplished!
 Congratulations. I'm sure you're excited to hear it run.
Jim,
Lil'Red is a '87 F250 HD, 4.10's, 1356 4x4, Zf-5, 3G, PMGR, Saginaw PS, desmogged with a Holley 80508 and Performer intake. Too much other stuff to mention. |
|
Administrator
|
Wow! That's a lot of work. Well done!
 Here's hoping that it is purring in the driveway tomorrow night. 
Gary, AKA "Gary fellow": Profile
Dad's: '81 F150 Ranger XLT 4x4: Down for restomod: Full-roller "stroked 351M" w/Trick Flow heads & intake, EEC-V SEFI/E4OD/3.50 gears w/Kevlar clutches
|
|
Gary and Jim,
Thanks! I cant wait! This whole time Ive been worried about getting done in time for my trip and Ive only recently stopped to consider that this thing is going to drive like a different truck when I get done! Im looking forward to it for sure! Ive owned other ford trucks in the past (put 150k on a 95 f150 w/ the 302 in high school and college, briefly owned a 1990 bronco w/351 Windsor) and have a fair deal of home auto repair experience just keeping those on the road. However this is really the beginning of me making proactive improvements, upgrades, or generally putting things back together in non-stock configuration. Its been an awesome learning experience. Im really looking forward to having a simple, reliable “no nonsense” drive train with better torque, power, and fuel economy to boot. Im eager to see how the fuel economy works out in the end. I know others with similar set ups have achieved 15-16 mpg on the highway or better on occasion. Fingers crossed! Im sure my 3.55 gears and lack of an OD gear wont help. Buyer beware! Ive lead you astray! The walker 21151 muffler has a 2.5” OD outlet, while the walker tail pipe has a 2.25” OD inlet. And so Mr. Bezos makes another buck. The reducer will be here Saturday. Otherwise the muffler looks like its going to fit great and not cause any heartache. I went over to my uncles house and did some work last night 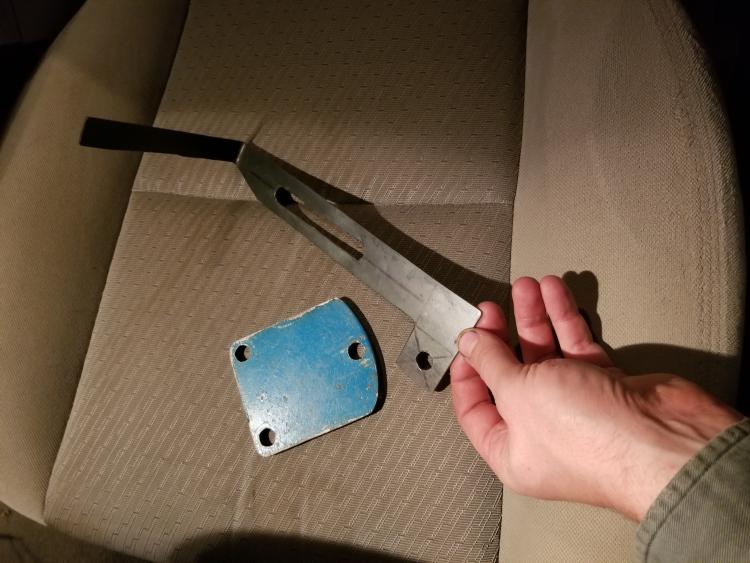 Im not sure if the throttle bracket “makes sense” to all of you yet, but Ill be sure to post pictures once it is fully installed. The blue plate is for my intake manifold water heat spacer. I should be able to get the plate drilled and tapped to ½ npt and install my 1/2npt -> 5/8 hosed barb fittings tonight. With any luck, Ill have everything completely ready for the installation of the manifolds and carb tonight. The welds may not even be cool on the exhaust by the time its running!
1984 Bronco, mild built 300-6, Np435, 3.55 gears, 8.8 rear with Eaton TrueTrac, D44 TTB front, 31" tires, MSD ignition, Offy C, EFI manifolds, Holley 390, No AC, 3G alternator, front receiver
1988 F250 "One Piece at a Time" - 460 ZF5 4x4 work truck project under construction |
|
Administrator
|
You are right, I've not "twigged", as the Brit's say, to how the throttle bracket works, but I'll wait on the later pics. You keep on keeping on and soon you'll be truckin'!
Gary, AKA "Gary fellow": Profile
Dad's: '81 F150 Ranger XLT 4x4: Down for restomod: Full-roller "stroked 351M" w/Trick Flow heads & intake, EEC-V SEFI/E4OD/3.50 gears w/Kevlar clutches
|
|
Administrator
|
In reply to this post by StraightSix
I understand how it will fit over the studs coming through the carb flange and provide an anchor for the return spring.
Nice to have a relative you can go over and fabricate something like that bracket. I can't wait to see it all in place! 
Jim,
Lil'Red is a '87 F250 HD, 4.10's, 1356 4x4, Zf-5, 3G, PMGR, Saginaw PS, desmogged with a Holley 80508 and Performer intake. Too much other stuff to mention. |
|
Hey guys!
Sorry for the hiatus, I finally had some luck in the deer stand so I have spent a few days getting the animal cleaned up, butchered and in the freezer. I was finally able to get back to the bronco today. The exhaust is now fully welded and the water heat plate is finished and installed to the intake. Im going to knock off for the night then wake up bright and early to install the manifolds and try to get it all hooked up. Not positive it will run tomorrow, but Im feeling good about the progress for sure. 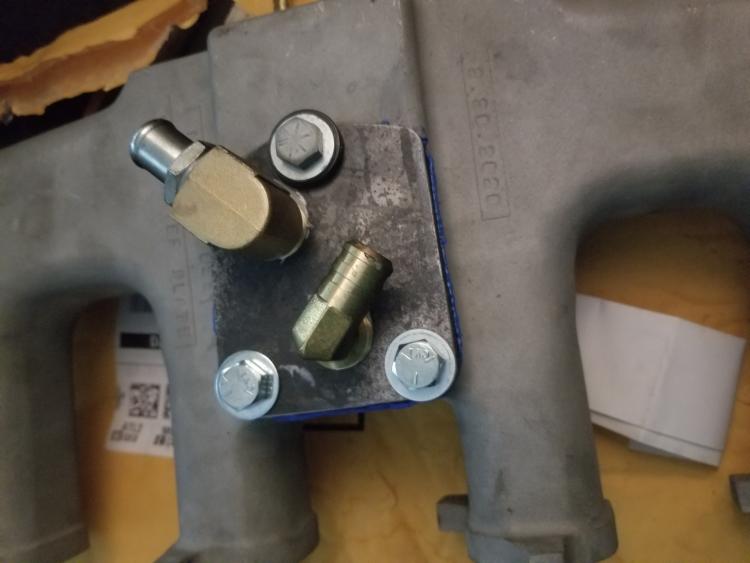
1984 Bronco, mild built 300-6, Np435, 3.55 gears, 8.8 rear with Eaton TrueTrac, D44 TTB front, 31" tires, MSD ignition, Offy C, EFI manifolds, Holley 390, No AC, 3G alternator, front receiver
1988 F250 "One Piece at a Time" - 460 ZF5 4x4 work truck project under construction |
|
Administrator
|
Well, it's bright and early!
 Congratulations on a successful hunt! A freezer full of venison is money in the bank, and food on the table. The water plate looks good, but I'm sure you're going to be looking for a third arm to juggle the manifolds and a ratchet. So, I hope today goes smoothly for you! Yes, yes, Progress is GOOD! 
Jim,
Lil'Red is a '87 F250 HD, 4.10's, 1356 4x4, Zf-5, 3G, PMGR, Saginaw PS, desmogged with a Holley 80508 and Performer intake. Too much other stuff to mention. |
| Edit this page |
