The Truck of Doom: An Occasional Build Thread
|
Your update looks great...although I think you meant C305A instead of C305?
But the more I look at the drawings Jeff shared, the more I question things. From the positioning of C305A in that drawing, I don't see how it could connect to the bracket. I'm going back under the dash today after work, so I will try to figure things out then. I'll let you know what I find. |
Re: The Truck of Doom: An Occasional Build Thread
|
Administrator
|
Thanks. I’ll update it once you report.
By the way, I’ve never seen one of those and have taken lots of these trucks apart. I’m thinking that they were discontinued early on.
Gary, AKA "Gary fellow": Profile
Dad's: '81 F150 Ranger XLT 4x4: Down for restomod: Full-roller "stroked 351M" w/Trick Flow heads & intake, EEC-V SEFI/E4OD/3.50 gears w/Kevlar clutches
|
Re: The Truck of Doom: An Occasional Build Thread
|
Administrator
|
I found it in the Illustration section of the MPC, as shown below.
The only problem is that when I looked 14A163 up in the Text section of the MPC to get a part number I realized that generic part number is a RETAINER (WIRE HARNESS), and there are dozens of wire harness retainers all over these trucks. And here's the only one that appears to be the right one. Note that the same part is used in two other applications on our trucks - as indicated by the "1" in the right column, which is titled "QTY" and shows how many are needed for each usage. And again, I've never seen one of those despite having worked on many of these trucks. So while the MPC says they where used from 1980 through the end of the catalog in '89, I doubt that or surely I'd have seen one, somewhere. I can see that mechanics may well have left them off when replacing an ignition switch, but I doubt all the trucks I've worked on had all their ignition switches replaced.  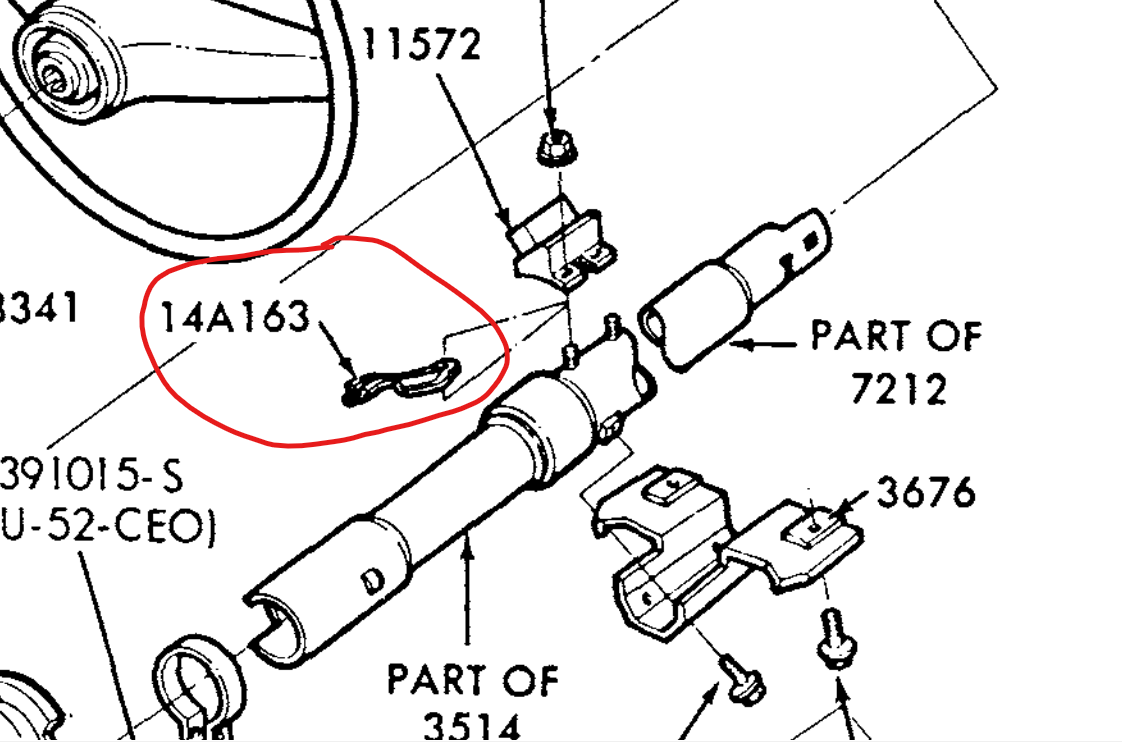
Gary, AKA "Gary fellow": Profile
Dad's: '81 F150 Ranger XLT 4x4: Down for restomod: Full-roller "stroked 351M" w/Trick Flow heads & intake, EEC-V SEFI/E4OD/3.50 gears w/Kevlar clutches
|
Re: The Truck of Doom: An Occasional Build Thread
|
In reply to this post by Gary Lewis

Jeff / 1984 F350 Crew Cab 4x4/5.8L w351 4V/ T18/ D50 4.10 front/ 8' bed.
Restored 2019-2022. Nicknamed «Big Brother 1984», due to its soooo-looong shape & nod to George Orwell's 1984 famous novel. |
|
In reply to this post by Gary Lewis
Ah, excellent sleuthing!
Is there maybe a clue in the second column of the table? What do (81,85) in the first row and (80,86) in the third row indicate? |
Re: The Truck of Doom: An Occasional Build Thread
|
Administrator
|
That's an excellent question. I can't figure it out, but my first thought was that those numbers meant something like Chassis & Cab, but that didn't work.

Gary, AKA "Gary fellow": Profile
Dad's: '81 F150 Ranger XLT 4x4: Down for restomod: Full-roller "stroked 351M" w/Trick Flow heads & intake, EEC-V SEFI/E4OD/3.50 gears w/Kevlar clutches
|
|
Administrator
|
In reply to this post by Dorsai
The diagram isn't great for sure. In the connector there is a slot and it slides over the narrow end of this bracket. Due to the way everything is being forced/twisted, I've seen a number of the connectors where one lip of the slot has been snapped off (plastic losing to metal).
Scott
'Camano' 1986 F250 Supercab XLT Lariat 460/C6 'Chanute' 1980 F350 C&C 400/NP 435 - Gin Pole But there ain't nothin' wrong with the radio |
Winner, winner, chicken dinner! Behold my C305A: 
That bit of broken plastic is exactly where it would have clipped on to the mystery bracket. I'm sure it's been broken for years and the truck runs fine, so I left the bracket off and finished bolting down the ignition switch. Testing showed that the windshield wipers, washer, fuel gauge and temperature gauge are all back to normal, so this one is mission accomplished. As an added bonus, the spring pressure returning the key to 'run' from 'start' is much better - previously it felt very weak, and in cold weather wouldn't always return the key to position without a little assistance. It's much more authoritative now. Took care of some other things today as well...one thing I noticed while working on the ignition switch was this: 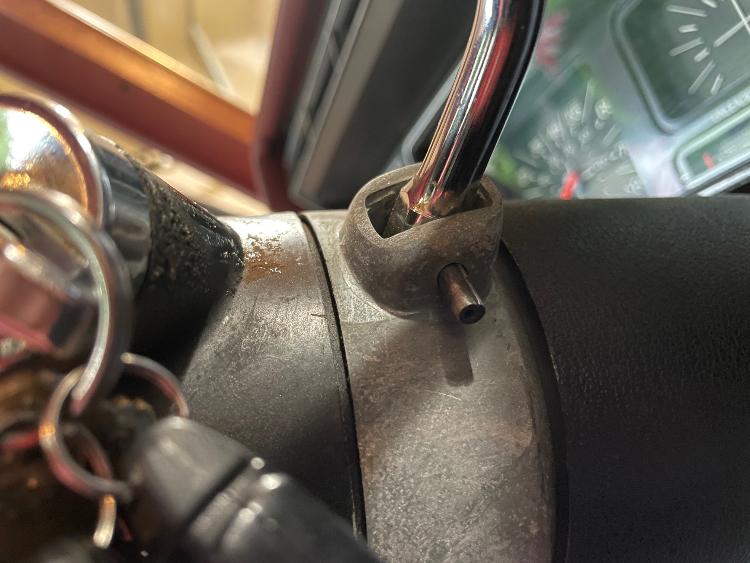
That's the roll pin holding the gear selector to the column, and apparently it's been backing out. This happened once before about 10 years ago, and I didn't notice until the selector fell into the floor while I was driving. I'll need to keep an eye on this. I also cleaned up my Duraspark modules - at one point I had three in there, although recently it's been down to two. But now it's just one shiny new Motorcraft replacement, and I added a few washers under it to hopefully provide a little better airflow underneath. Driving all day to Skiatook in the summer heat is what killed my original module, hopefully this one will fare better. And while I was working on that I discovered this: 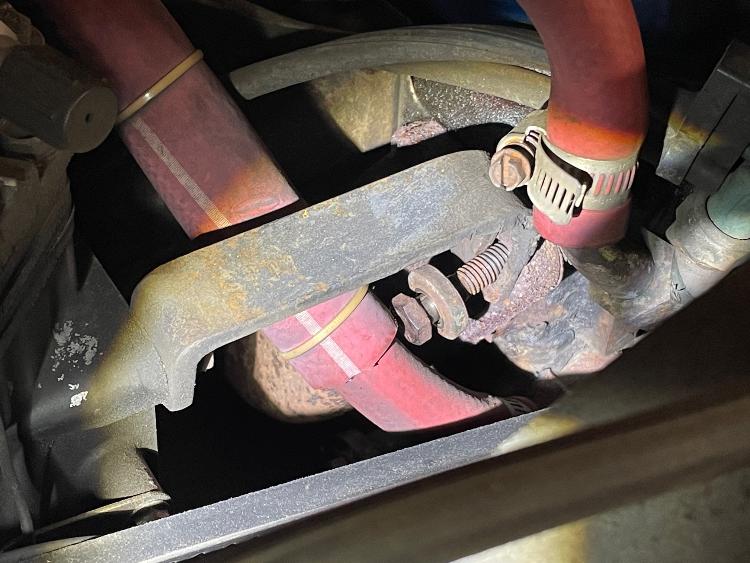
Those of you with good memories will recall this is the manifold bolt that was loose that caused the weird rattling noise from my A/C compressor to propagate through the exhaust system. I tightened it back down this evening, although now that I think about it that thick washer is probably the problem - the added thickness of the compressor bracket is probably reducing my thread engagement. I'll remove it if I get around to it, otherwise I'll just do a better job of keeping it tightened down. Finally, new windshield wiper blades went on. And with that, the to-do list looks like this:
|
Re: The Truck of Doom: An Occasional Build Thread
|
Administrator
|
Well, you win the chicken dinner and I updated the webpage to say C305A. Obviously the bracket isn't required, but it is good to know where it goes.
As for the roll pin, I think I'd put it back with a drop of Loctite blue on one end. Ditto the bolt. That should keep them in place. On the ignition module, it wouldn't hurt to have one of those spares under the seat. Anyway, you are making good progress and the truck should be in fine fettle for the trip. 
Gary, AKA "Gary fellow": Profile
Dad's: '81 F150 Ranger XLT 4x4: Down for restomod: Full-roller "stroked 351M" w/Trick Flow heads & intake, EEC-V SEFI/E4OD/3.50 gears w/Kevlar clutches
|
|
In reply to this post by Gary Lewis
So what's up with that vacuum leak bit? I'm glad you asked.
One of the items on my to-do list is carburetor adjustment...I put this in there because my truck has been idling rough lately, and it's been a while since I've tuned the carb. It made sense at the time, but today I noticed this:
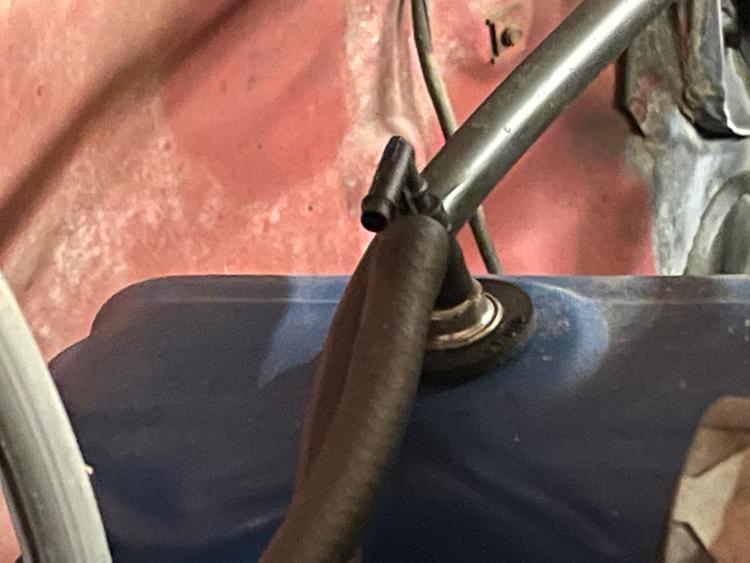
That's my PCV valve, obviously, and there's supposed to be something on that upper port. I know this because I have a photo from three years ago: 
But...what connects there? I know, I know...you're thinking "Duh, just look for a disconnected vacuum line!" Except...I did, and I can't find anything. Maybe something fell down underneath where I can't see it, but a more-than-cursory search turned up nothing. I checked the vacuum routing diagram on the radiator support, and that shows only one line going to my PCV valve to begin with. And to top it all off, I can hear a hissing when the engine is running that I am pretty sure wasn't there before. What am I missing? |
Re: The Truck of Doom: An Occasional Build Thread
|
Administrator
|
Several of the vacuum diagrams show a line from the purge control valve to the PCV valve, so you might look there. But most of the PCV valves I've seen have the upper port blanked out, so you might make sure it is open.
Or you could do David's smoke test and see where the smoke comes out.
Gary, AKA "Gary fellow": Profile
Dad's: '81 F150 Ranger XLT 4x4: Down for restomod: Full-roller "stroked 351M" w/Trick Flow heads & intake, EEC-V SEFI/E4OD/3.50 gears w/Kevlar clutches
|
|
In reply to this post by Dorsai
The pin in my gear selector kept working it’s way out too.
This last time I tapped it back in place and used safety wire to hold it in place.
Dane
1986 F250HD SC XLT Lariat 4x4 460 C6-Sold 1992 Bronco XLT 4x4 351W E4OD 1998 GMC Sierra SLE K1500 350 4L60E Arizona |
|
Safety wire is a good idea - I'm probably going to try loctite first, but if it starts backing out again then the wire is what I will do.
That aside, now that it is light again I did some more troubleshooting. The good news is that the vacuum leak was in fact the open PCV valve port, so I capped that off and now my idle problems are fixed. Even with the A/C running I can idle at a stoplight now without either putting it into neutral or occasionally giving it some gas. The bad news is, I still don't know where that port is supposed to be connected. The vacuum diagram shows the PCV valve as being connected to the purge control valve, but I don't know what that is and can't find a reference to it either in my Haynes manual or at some of the online parts warehouses. The diagram suggests it's in the front corner of the truck near the battery, but the only thing there I can find is the charcoal canister. Is it hidden down below such that I need to be working under the truck to find it? And while I'm thinking about the vacuum diagram, what is the significance of the dashed lines connecting some components as opposed to the solid lines? The PCV is connected to the purge valve with a dashed line. 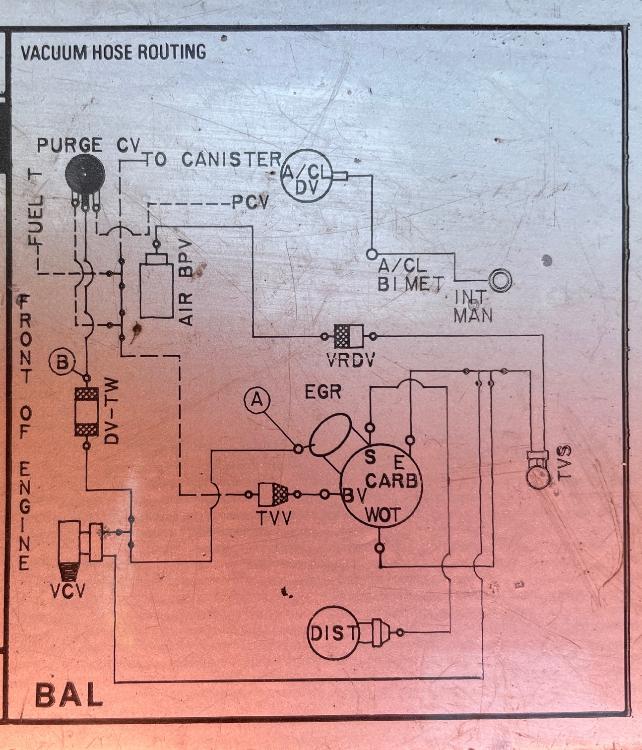 |
|
I think they look like this, but my truck didn’t have it on there when I got it.
https://www.summitracing.com/parts/smp-cp107?seid=srese1&gclid=EAIaIQobChMIwayfpMC3-AIVZw6tBh17GA0ZEAQYAiABEgI5NfD_BwE
Dane
1986 F250HD SC XLT Lariat 4x4 460 C6-Sold 1992 Bronco XLT 4x4 351W E4OD 1998 GMC Sierra SLE K1500 350 4L60E Arizona |
Re: The Truck of Doom: An Occasional Build Thread
|
Administrator
|
In reply to this post by Dorsai
Glad that was the only problem.
 I think the dashed lines are hoses that go to things that don't show on the diagram. For instance the fuel tank isn't on the diagram but a vent line comes from it to things that are on the diagram. As for the purge control valve, I don't know where it is on your truck, but you should be able to find it by following the hose from the vapor canister up.
Gary, AKA "Gary fellow": Profile
Dad's: '81 F150 Ranger XLT 4x4: Down for restomod: Full-roller "stroked 351M" w/Trick Flow heads & intake, EEC-V SEFI/E4OD/3.50 gears w/Kevlar clutches
|
Same. The truck runs fine, so figuring out exactly where that port should be connected has fallen way down the priority list. I thought about that possibility, but both the PCV valve and the purge valve are on the diagram and they are connected by a dashed line. Is it possible that the dashed line represents vacuum that is modulated in some manner? I'm going to change the coolant soon, and when I do I'll be under the truck looking at that lower radiator hose. That'll be a good time to do a close search for that valve. |
|
Found this old picture of my CA-spec 1980 300. That vacuum hose on my truck went from the PCV port, to some green little valve right by the PCV valve, and then from there it seems to go around the intake and towards the front of the motor. I crudely outlined it's path with a red line. Unfortunately the snorkel blocks the view there, but the only two places I could see it going are to the port off of the thermostat housing (not likely from the picture), or down to the charcoal cannister (my guess).
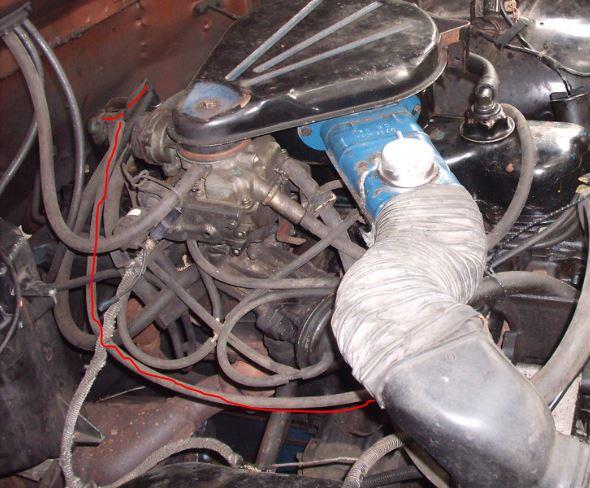
|
|
If I squint, that little green valve looks like it could be similar to the valve that Dane posted. I don't *think* I have anything like that in my truck, but I need to look again to be sure. Thanks for the clue!
|
|
It looks like it's in the photo you posted where the line was still attached to the PCV port.
Anyways, I found another photo that confirms it does intersect with the big line that goes from the carburetor to the charcoal cannister. 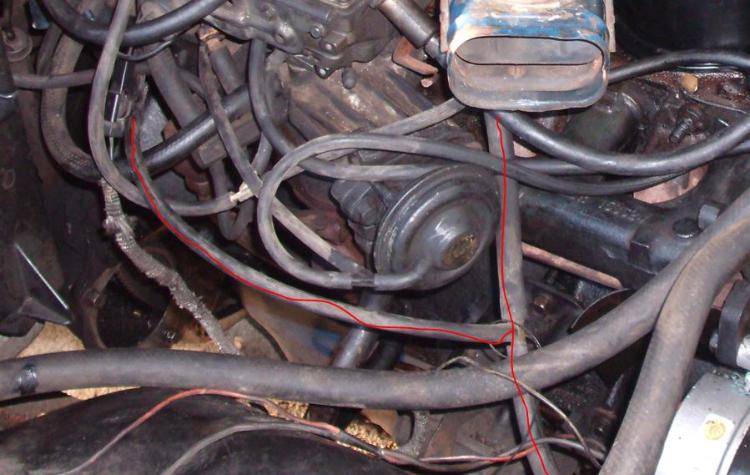
|
|
And the GGM brain trust comes through again!
Shaun, you were spot on. After you posted your first photo I went out there and sure enough, I had that exact valve. It had disconnected from the PCV valve and fallen down behind the carburetor onto the exhaust manifold, which is why I didn't see it. It was easy enough to see why it happened...the little bit of tubing connecting the valves was slightly too large, and the bit of oil coming out of the PCV valve had lubricated it enough that it slipped right off. I don't recall having put that tube on there, but shame on me if I did. I found some fuel-resistant tubing of a slightly smaller diameter and put that on, now it's nice and secure. For good measure I zip tied it to the other line coming out of the PCV valve, just to provide a little additional support. 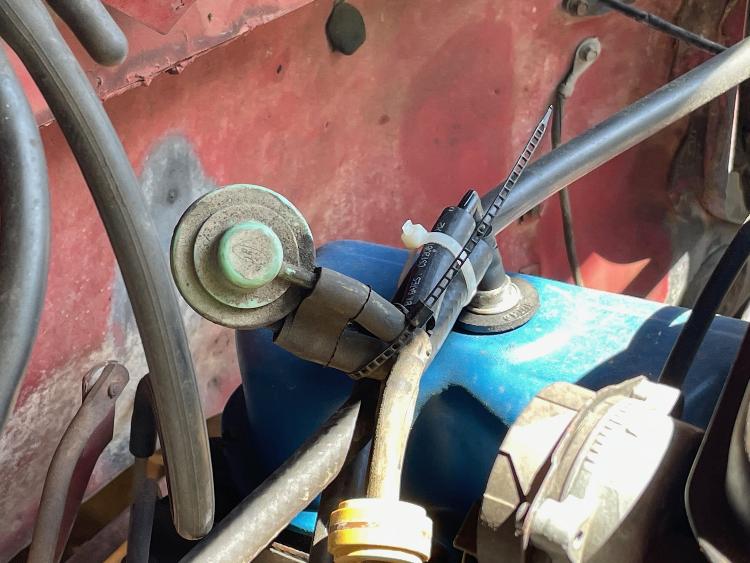
A quick test drive showed that everything is still good. With that, the to-do list now looks like this:
|
| Edit this page |

