The Camano Experience
|
Administrator
|
Decided to upgrade my Atoto head unit to the latest model. Thinking it would be a direct swap, as the provided measurements were the same, was too much to ask. I was a bit too exact in how I modified the radio bezel for the first unit so with this new one being thicker beneath the bezel caused it to want to be a couple millimeters too high.
So I decided to do something I don't like doing and that is mounting the radio solely to the bezel. The only reason I even considered this is because the new model is no longer full depth so it won't have near the leverage acting on the bezel. This also means I don't need the double din cage so I unclipped it and set it aside. Then got to work with measuring and lots of 3D prototypes Here is the side profile of the new radio. Crazy how much they slimmed it down. This will actually allow anyone to add a double din without having to worry about modifying the ductwork or dash framework. 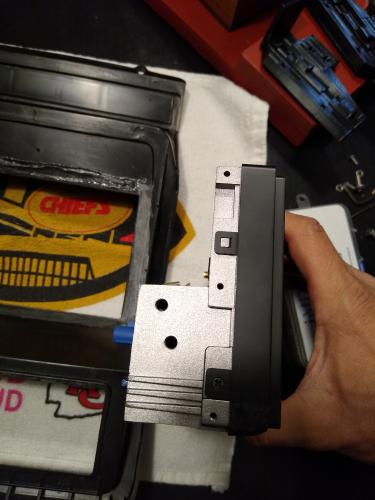 Brackets I printed: 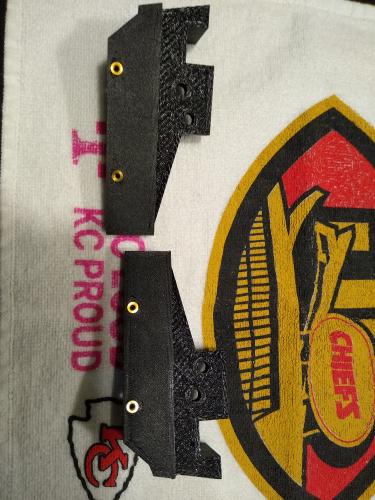 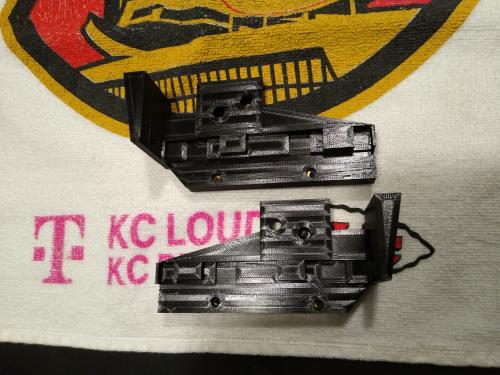 Didn't worry about going with a high def print or sanding them smooth since they won't be seen Fitment: 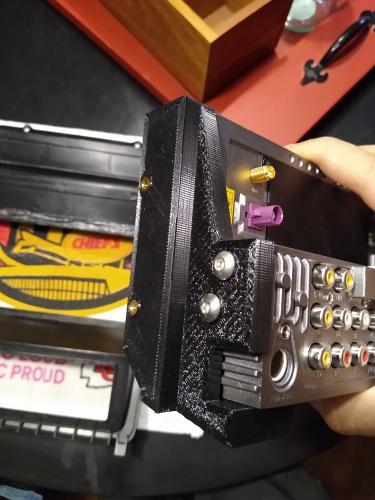 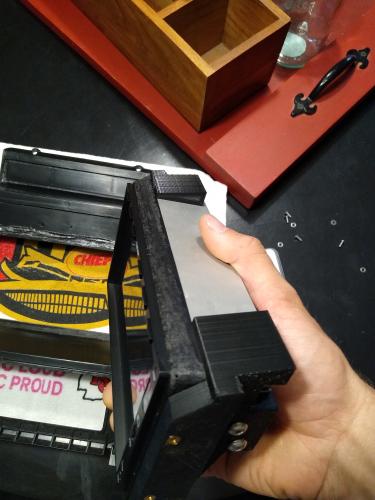 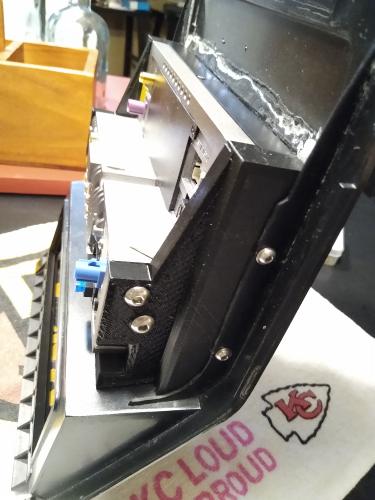 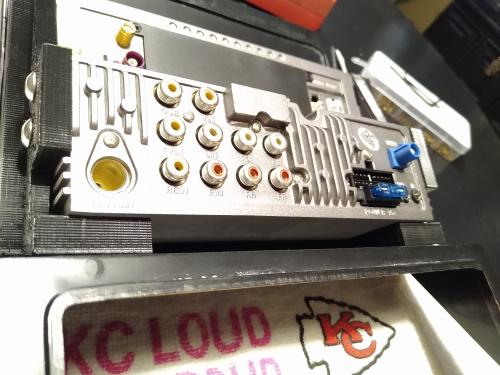 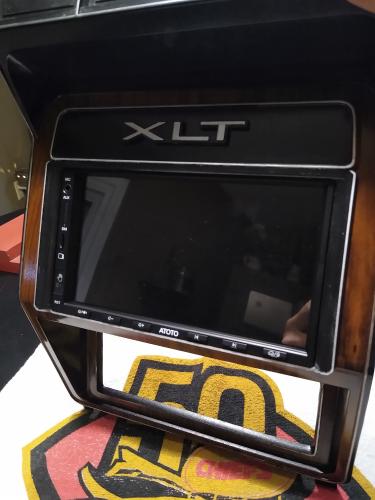 Even though the head unit doesn't extend very far out the back I added those wedge pieces underneath to rest on the flat part of the bezel to alleviate any stress on the vertical face. You'll also notice I did have to shave part the bottom of the head unit bezel at an angle to make it fit well into the radio bezel face. This part isn't ever seen but still something I'd recommend avoiding by making sure the enlarged opening in the radio bezel is high enough.
Scott
'Camano' 1986 F250 Supercab XLT Lariat 460/C6 'Chanute' 1980 F350 C&C 400/NP 435 - Gin Pole But there ain't nothin' wrong with the radio |
|
Administrator
|
Wow! That is REALLY slimmed down! And if I didn't have Mission Control on Big Blue I'd be tempted to go that way - assuming that it takes video input for the cameras.
Anyway, that is really cool! And you could use it to get readings from a Bluetooth-enabled OBD-II reader, right?  Love the printed brackets. You do good work! 
Gary, AKA "Gary fellow": Profile
Dad's: '81 F150 Ranger XLT 4x4: Down for restomod: Full-roller "stroked 351M" w/Trick Flow heads & intake, EEC-V SEFI/E4OD/3.50 gears w/Kevlar clutches
|
|
Administrator
|
Thanks Gary.
Yes, via Torque (and maybe other apps), it can read from a Bluetooth OBDII dongle.  I have a front and rear camera and I believe it can take video from another source as well as it mentioned input from a game console. While not perfect (Support is a bit tough to get ahold of), they make a really good Android head unit and this new slim design opens up a lot of possibility for easier installs.
Scott
'Camano' 1986 F250 Supercab XLT Lariat 460/C6 'Chanute' 1980 F350 C&C 400/NP 435 - Gin Pole But there ain't nothin' wrong with the radio |
|
Administrator
|
Nice work, Scott! That 3D print technology is very intriquing to me. Curious how long it took to print those parts?
John
"Blackie" - 1986 F150 4x4 - Mildly warmed over 351W HO - Original owner |
|
Administrator
|
Thanks John. It really is fascinating to watch. The final print for each side took a little over 5 hours. On something like this with all the notches on the side I do sections at a time and then once all the pieces are sized right I print them together. Someone with more meticulous measuring skills would be more efficient but since there isn't a rush on these it's not a big deal.
For example I printed a thin strip where I dialed in the notches a few times and those were around a 30 min print. Then I added on another section and another. The nice thing about the software is you can temporarily hide anything you want. So I could just keep one notch as a reference point and then add on some other piece meaning I don't have to print the entire notched section. Then when done, I just unhide it. Saves a lot of time and filament. There are huge libraries of objects out there that can just be downloaded and printed. The articulating objects (like these little octopi) are really fun.
Scott
'Camano' 1986 F250 Supercab XLT Lariat 460/C6 'Chanute' 1980 F350 C&C 400/NP 435 - Gin Pole But there ain't nothin' wrong with the radio |
|
Administrator
|
Let me see if I understand. You draw the whole thing up and turn off all but a small part of it and print that to get it right and to print faster. Then when you have all of the pieces or layers right you turn them all on together in the software and print them all in one go. Right?
Gary, AKA "Gary fellow": Profile
Dad's: '81 F150 Ranger XLT 4x4: Down for restomod: Full-roller "stroked 351M" w/Trick Flow heads & intake, EEC-V SEFI/E4OD/3.50 gears w/Kevlar clutches
|
|
Administrator
|
Pretty much. I wasn't sure if I explained that very well
 . The only difference is that I draw up one part and then add on to it once I get that first part nailed down. This works best if there is some locking reference point like a notch in this case. . The only difference is that I draw up one part and then add on to it once I get that first part nailed down. This works best if there is some locking reference point like a notch in this case.
I still user Tinkercad - it's very simple in its usage but can do a lot. Plus I find it easy for the kids to play around with and understand the concept. This example is working backwards but should show it well enough. Here is the final set (we only care about the orange one for this). Notice the see-through box. This is a 'hidden' box that makes anything it encapsulates hidden.  Here I've added a second hidden box and covered parts that are known to be good but let's say I want to adjust the two holes so they line up better in the section that isn't covered in a box. There is still 'something' that I can use to give it reference on the actual head unit and that is one of the notches it can lock into.  Merging all 3 objects together hides the boxes (and their contents), allowing me to just print the one section. Good for the Trial and Error approach.  There is much more complex CAD software out there and even in Tinkercad there's likely a handful of ways to do this but this works for me. Though always glad to learn new tricks from any other Tinkercad users reading this.
Scott
'Camano' 1986 F250 Supercab XLT Lariat 460/C6 'Chanute' 1980 F350 C&C 400/NP 435 - Gin Pole But there ain't nothin' wrong with the radio |
|
In reply to this post by kramttocs
That's a clean install. Very cool job on the mounting brackets. This stuff is way over my head...when I read and look at it, my clunky old brain literally does not have room for this technology...lol. I'm still working with claw hammers and angle grinders lol. Nice job though. Well done.
1994 F150 4x2 Flareside. 5.0 w/MAF, 4R70W, stock.
1984 F150 4X2 Flareside. Mild 302 w/ 5spd. Sold. 1980 F150 4X4 Flareside. 300i6 w/ 5spd. Sold in 2021. 1980 F100 4X2 Flareside. 351w/2bbl w/NP435. Sold in 1995 |
|
Administrator
|
In reply to this post by kramttocs
Now I see, said the blind man! (One of my father’s frequent statements.)
I could do something like that in TurboCAD by placing things on different layers and turning the layers off that I don’t want to print. They are still part of the drawing and don’t go away, but just aren’t shown or printed. Does TinkerCAD directly drive the printer, or do you output a file from it that drives the printer?
Gary, AKA "Gary fellow": Profile
Dad's: '81 F150 Ranger XLT 4x4: Down for restomod: Full-roller "stroked 351M" w/Trick Flow heads & intake, EEC-V SEFI/E4OD/3.50 gears w/Kevlar clutches
|
|
Administrator
|
This post was updated on .
It's not quite as seamless as that Gary.
Your CAD program outputs (usually) an STL file that then is interpreted/modified by a slicer program which sets printer parameters and generates the Gcode that drives the printer. This is often written to an SD card that is physically inserted in the printer. For a brief overview https://www.xometry.com/resources/3d-printing/what-is-a-slicer-in-3d-printing/
Jim,
Lil'Red is a '87 F250 HD, 4.10's, 1356 4x4, Zf-5, 3G, PMGR, Saginaw PS, desmogged with a Holley 80508 and Performer intake. Too much other stuff to mention. |
|
Administrator
|
That’s a good read, and a good explanation. Thanks, Jim.

Gary, AKA "Gary fellow": Profile
Dad's: '81 F150 Ranger XLT 4x4: Down for restomod: Full-roller "stroked 351M" w/Trick Flow heads & intake, EEC-V SEFI/E4OD/3.50 gears w/Kevlar clutches
|
|
Administrator
|
Gary, my brother has 3 different printers (a Prusa, an Ender and one idk.. )
I'll say that I've been welcome to 'play' with them and I find that each has its own personality and needs the slicer tailored to the specific machine. He has a much better handle on them and I often request some guidance.  I came across that writeup while trying to better understand what I was doing. Xometry has a good library of articles on 3D in various forms. https://www.xometry.com/resources/3d-printing/ This is a very cool company. They offer all kinds of advanced manufacturing and are not just a print farm like Shapeways. They are more a broker that will bid your project and then send it to one of their contractors for fulfillment. So, they offer all the various 3D printing they also do waterjet and laser cutting and engraving, CNC lathe and machine work, injection moulding, casting, sheet metal forming, extrusion and offer materials cut to size. I think I spoke to you about having some 2 1/2" sheaves turned in Delrin....  Sorry for the hijack Scott.
Jim,
Lil'Red is a '87 F250 HD, 4.10's, 1356 4x4, Zf-5, 3G, PMGR, Saginaw PS, desmogged with a Holley 80508 and Performer intake. Too much other stuff to mention. |
|
Administrator
|
Good to know, Jim. If I’d remembered I might have checked out the price of Delrin spacers to replace the wood ones on the Hi-Lift Jack mount. But I think the wood ones will work well and making them is so easy it isn’t worth having someone else do it. Just get the material and go.
Speaking of that, I did have a guy quiz me at the show no end about how I made the mount. He seemed quite impressed and is planning to replicate it - on the passenger’s side. 
Gary, AKA "Gary fellow": Profile
Dad's: '81 F150 Ranger XLT 4x4: Down for restomod: Full-roller "stroked 351M" w/Trick Flow heads & intake, EEC-V SEFI/E4OD/3.50 gears w/Kevlar clutches
|
|
Administrator
|
I had asked you about turning three new rollers for the articulating arm of my sliding table saw.
But I was able to use my brother's computer to model them (because he has CAD software) Attach file, click submit. Easy peasy. 
Jim,
Lil'Red is a '87 F250 HD, 4.10's, 1356 4x4, Zf-5, 3G, PMGR, Saginaw PS, desmogged with a Holley 80508 and Performer intake. Too much other stuff to mention. |
|
Administrator
|
In reply to this post by ArdWrknTrk
I am glad you did! This is all very interesting. I couldn't imagine trying to tell 10yr old me that 3D printers are a thing and something one can have in their living room.
Scott
'Camano' 1986 F250 Supercab XLT Lariat 460/C6 'Chanute' 1980 F350 C&C 400/NP 435 - Gin Pole But there ain't nothin' wrong with the radio |
|
Very nice!
Not at all familiar with the ATOTO range. I see they have different sizes, which model/size did you go for? I am interested in doing something similar to my F350 as that seems to be used for my longer drives and having googly maps and car play would be really nice. Then I can move the blaupunkt to the F150.
1985.5 F-150 XL Explorer standard cab 5.0 EFI AOD 4x4
Daily Driver. We call her Eunice the Ute. 1982 Bronco XLT Lariat 351W AOD 4x4 Code name Esperanza, or Espy to her friends. Please see my Project thread for the blow by blow. 1984 F-350 XL Centurion crew cab 460 T19 4x4 "Eylza Dual-little" |
|
Administrator
|
I've had their A6Y Pro, S8 Gen 1 Pro, A6PF, and this is the S8 Gen 2 Ultra. All in the 7" double din size. The gps is really nice to have and I love having Spotify being natively on there.
I am actually selling the A6PF (brand new) and the S8 Gen 1 (used-like new). I really like their units and the smaller depth is a huge improvement. If you have any questions, let me know and I might have ran into it before.
Scott
'Camano' 1986 F250 Supercab XLT Lariat 460/C6 'Chanute' 1980 F350 C&C 400/NP 435 - Gin Pole But there ain't nothin' wrong with the radio |
|
Cheers, it is a little down the list, but I will definitely reach out to you before I do anything. I like the idea of having car play, front and rear cameras and GPS.. So it ticks a lot of boxes.
When my friend was in the F350 with me a while a go, his kid (6 years old) was in the back and just said "This car is old, it doesn't even have the map screen" I was dying laughing!!!
1985.5 F-150 XL Explorer standard cab 5.0 EFI AOD 4x4
Daily Driver. We call her Eunice the Ute. 1982 Bronco XLT Lariat 351W AOD 4x4 Code name Esperanza, or Espy to her friends. Please see my Project thread for the blow by blow. 1984 F-350 XL Centurion crew cab 460 T19 4x4 "Eylza Dual-little" |
|
Cheeky question: Would you be willing to share the stl files of the brackets?
1985.5 F-150 XL Explorer standard cab 5.0 EFI AOD 4x4
Daily Driver. We call her Eunice the Ute. 1982 Bronco XLT Lariat 351W AOD 4x4 Code name Esperanza, or Espy to her friends. Please see my Project thread for the blow by blow. 1984 F-350 XL Centurion crew cab 460 T19 4x4 "Eylza Dual-little" |
|
Administrator
|
Sure - here you go.
But I will say that these were designed to fit an already customized radio bezel with a 3D printed trim ring to look factory-ish. So they won't really be useable as is. Overall the design is there but depending on how the hole gets cut in the bezel there will need to be some changes regarding moving the radio up/down, left/right, in/out. All of this would be easy to modify but again, would require modification  S8_Gen_2_Ultra_Radio_Bezel_Brackets.stl
Scott
'Camano' 1986 F250 Supercab XLT Lariat 460/C6 'Chanute' 1980 F350 C&C 400/NP 435 - Gin Pole But there ain't nothin' wrong with the radio |
| Edit this page |


