Rear disc brake conversion
|
Hi all, I have been eyeballing options for rear discs. One option is the SSBC A118 kit, which is supposed to be a bolt-on for the late big-bearing (Torino) 9 inch flanges, I'm pretty sure that's what an 81 would have.
I don't have access to the detailed instructions, they don't give you that til you pony up the money. But I would assume that switching to rear discs would make deleting the residual pressure valve necessary. So where is that thing on the 81 braking system? I found some threads about the later plastic masters, and it hangs off the side of those. But the early masters don't seem to have that. Is the residual pressure valve part of the "multi-function" valve on the lines under the master? Or is it somewhere else? On that subject, I read that part of the function of the multi-function was to send some pressure to the rear to make sure the shoes engage, before it starts to send it to the front. Is that a necessary function of a disc/drum system and should not be used in a disc/disc system? Or is that just a function of vehicle dynamics and you always want a bit of back brakes before the front? In other words, should that valve be deleted/gutted if using discs in the rear? I am wondering if a kit like this has you gutting any stock valves, and just running straight tubing to the back, maybe with an adjustable proportioning valve on the rear line. Or, does it work with most of the stock stuff. Anybody got experience in this area? Thanks!
81 F150 Flareside, Edelbrock Pro Flow4 FI, hydraulic roller 351W, E4OD, 4x4, BW1356
92 F150 RCLB 351W E40D BW1356 mostly stock |
|
Administrator
|
I did a rear disc conversion on my friend's 1995 F350 DRW truck which is a Sterling 10.25" full floating model. They do not have the residual pressure/proportioning valve as they have ABS. On Darth it was attached to the frame on a bracket directly under the master cylinder. I eliminated it when I went to the later booster and master cylinder.
Bill AKA "LOBO" Profile
"Getting old is inevitable, growing up is optional" Darth Vader 1986 F350 460 converted to MAF/SEFI, E4OD 12X3 1/2 rear brakes, traction loc 3:55 gear, 160 amp 3G alternator Wife's 2011 Flex Limited Daily Driver 2009 Flex Limited with factory tow package Project car 1986 Chrysler LeBaron convertible 2.2L Turbo II, modified A413 |
|
I did the exact system you are asking about. ssbc rear disc conversion, aluminum master, rpv with pintle valve seat removed, adjustable proportioning valve. the system worked very well. however, for me it was not exactly a bolt on.
the first part that I need to address is that not all axles are the same from one source to another. the manufacturing specs are as the original manufacturer required and that's where my first issue showed up. the axle flange on the new shafts were perfectly spec'd for the drums they are made for, yet the outer diameter was about 3/16 larger than the inside of the new rotor. so yes, I had them milled. the next issue is the rotors are obviously made for something with larger than 1/2-20 studs, so they come with filler rings to center on the studs. the next point was the bracket spacers that came with were not the correct thickness to center the caliper on the rotor so yes, I made them also. after that it was just the normal finicky job of making good brake lines that seal. buy a GOOD brake line flare tool and a good coiling tool. cheap equals leaks! |
Re: Rear disc brake conversion
Resurrecting this thread as I am moving along with this conversion. Still mostly in the planning and parts gathering stages. But for the rotors I am using, I am facing the same problem as you, the holes for the studs in the rotor are larger than the studs on the 9" axle. Did you buy the "filler rings" you refer to above, or fabricate them? The hole in the center of these rotors is too big for the nub on the 9" axle end. I was considering fabbing a ring to take up the distance, to make the brake rotor hub-centric. How to fix it in place I have not figured out yet. But filler rings on the studs is something I had not considered and might be the path of least resistance. My plan is to switch to the later (early 90s) plastic master cylinder, delete whatever proportioning valve is on it, install a manually adjustable proportioning valve near the MC, and delete or gut the stock residual pressure valve on the frame under the MC. Any gotcha's or need-to-knows with all that?
81 F150 Flareside, Edelbrock Pro Flow4 FI, hydraulic roller 351W, E4OD, 4x4, BW1356
92 F150 RCLB 351W E40D BW1356 mostly stock |
Re: Rear disc brake conversion
|
Decided to forge my own trail rather than buy a kit. I'm just a glutton for punishment that way most times. I sourced an entire Dodge Ram 1500 rear axle of 2013 vintage off FB marketplace for cheap, then set about adapting the Dodge stuff to the 9 inch. It actually turned out to be not that difficult, but it did require some machining so I can't really recommend it as an easy solution. Specifically, the 4 Dodge mounting holes had to be welded up so the 9 inch pattern could be drilled partially on top of the Dodge holes. Then the center hole where the axle passes through had to be bored out about .400 larger. Then the caliper mounting brackets had to be sawed in half so they could be welded onto the other side of the 9 inch flange.
Some photos to clarify. 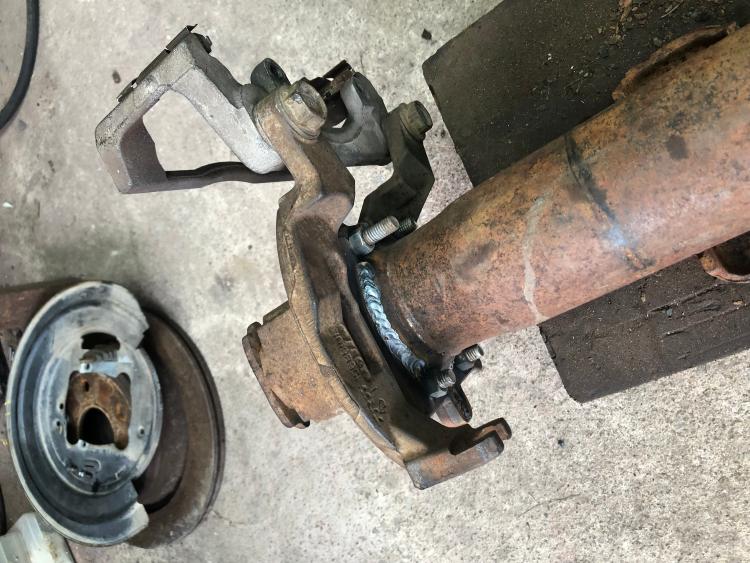 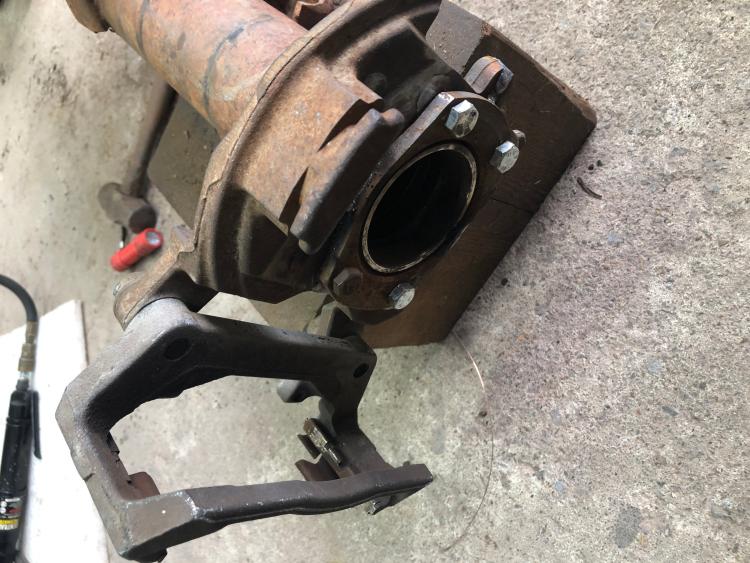 This will allow not only the conversion to discs, but also retain the parking brake function with some shoes that fit inside the rotor hat. Minor fiddly things yet to work out are how to interface the parking brake cables at the Ford end, how to make the Dodge rotors hubcentric, and so on, but that stuff should be pretty simple. The rotor dictates a larger wheel size than 15", that's one downside. But I have a set of 17" wheels (which, coincidentally are Dodge as well) that I run on the truck sometimes. That will have to become full time. More to come as the conversion progresses.
81 F150 Flareside, Edelbrock Pro Flow4 FI, hydraulic roller 351W, E4OD, 4x4, BW1356
92 F150 RCLB 351W E40D BW1356 mostly stock |
|
Administrator
|
That's an interesting approach. Keep us apprised as someone else may want to follow in your steps.

Gary, AKA "Gary fellow": Profile
Dad's: '81 F150 Ranger XLT 4x4: Down for restomod: Full-roller "stroked 351M" w/Trick Flow heads & intake, EEC-V SEFI/E4OD/3.50 gears w/Kevlar clutches
|
|
Administrator
|
On the bigger stuff, I believe the E-series 350 with dual rear wheels might be a good source. The kit my friend bought was from EGR brakes and it was real nightmare, nothing fit, it uses GM calipers with the discs being used for the E-brake and parking. I have lots of pictures and a write up I sent to EGR brakes.
The bad things for me were (a) for a DRW truck, you need the E350 DRW rotors which are quite deep (b) these are designed to have a drum E-brake and parking brake inside the rotor (like my Lebaron has). Mine main objection to the combined hydraulic and mechanical caliper I just went through on my 2009 Flex, the seal around the parking brake screw started leaking on the left rear caliper, and it would sit there and drip without the brake being applied and would pretty well drain the R front/L rear circuit overnight. It is just a leak waiting to happen.
Bill AKA "LOBO" Profile
"Getting old is inevitable, growing up is optional" Darth Vader 1986 F350 460 converted to MAF/SEFI, E4OD 12X3 1/2 rear brakes, traction loc 3:55 gear, 160 amp 3G alternator Wife's 2011 Flex Limited Daily Driver 2009 Flex Limited with factory tow package Project car 1986 Chrysler LeBaron convertible 2.2L Turbo II, modified A413 |
Re: Rear disc brake conversion
I think the Dodge setup is different than what you are imagining. I don't know what part would be a "parking brake screw". The Dodge setup is just a levered wedge of sorts, completely divorced from the hydraulic system. I don't see how anything on it would have the capability to cause a leak on the hydraulic side.
81 F150 Flareside, Edelbrock Pro Flow4 FI, hydraulic roller 351W, E4OD, 4x4, BW1356
92 F150 RCLB 351W E40D BW1356 mostly stock |
|
Administrator
|
This post was updated on .
That would be my choice, Jaguar had a similar system, except the rotors, calipers and E-brake were all inboard right at the output shafts on the differential housing.
Here is a shot of the caliper with the parking brake screw: 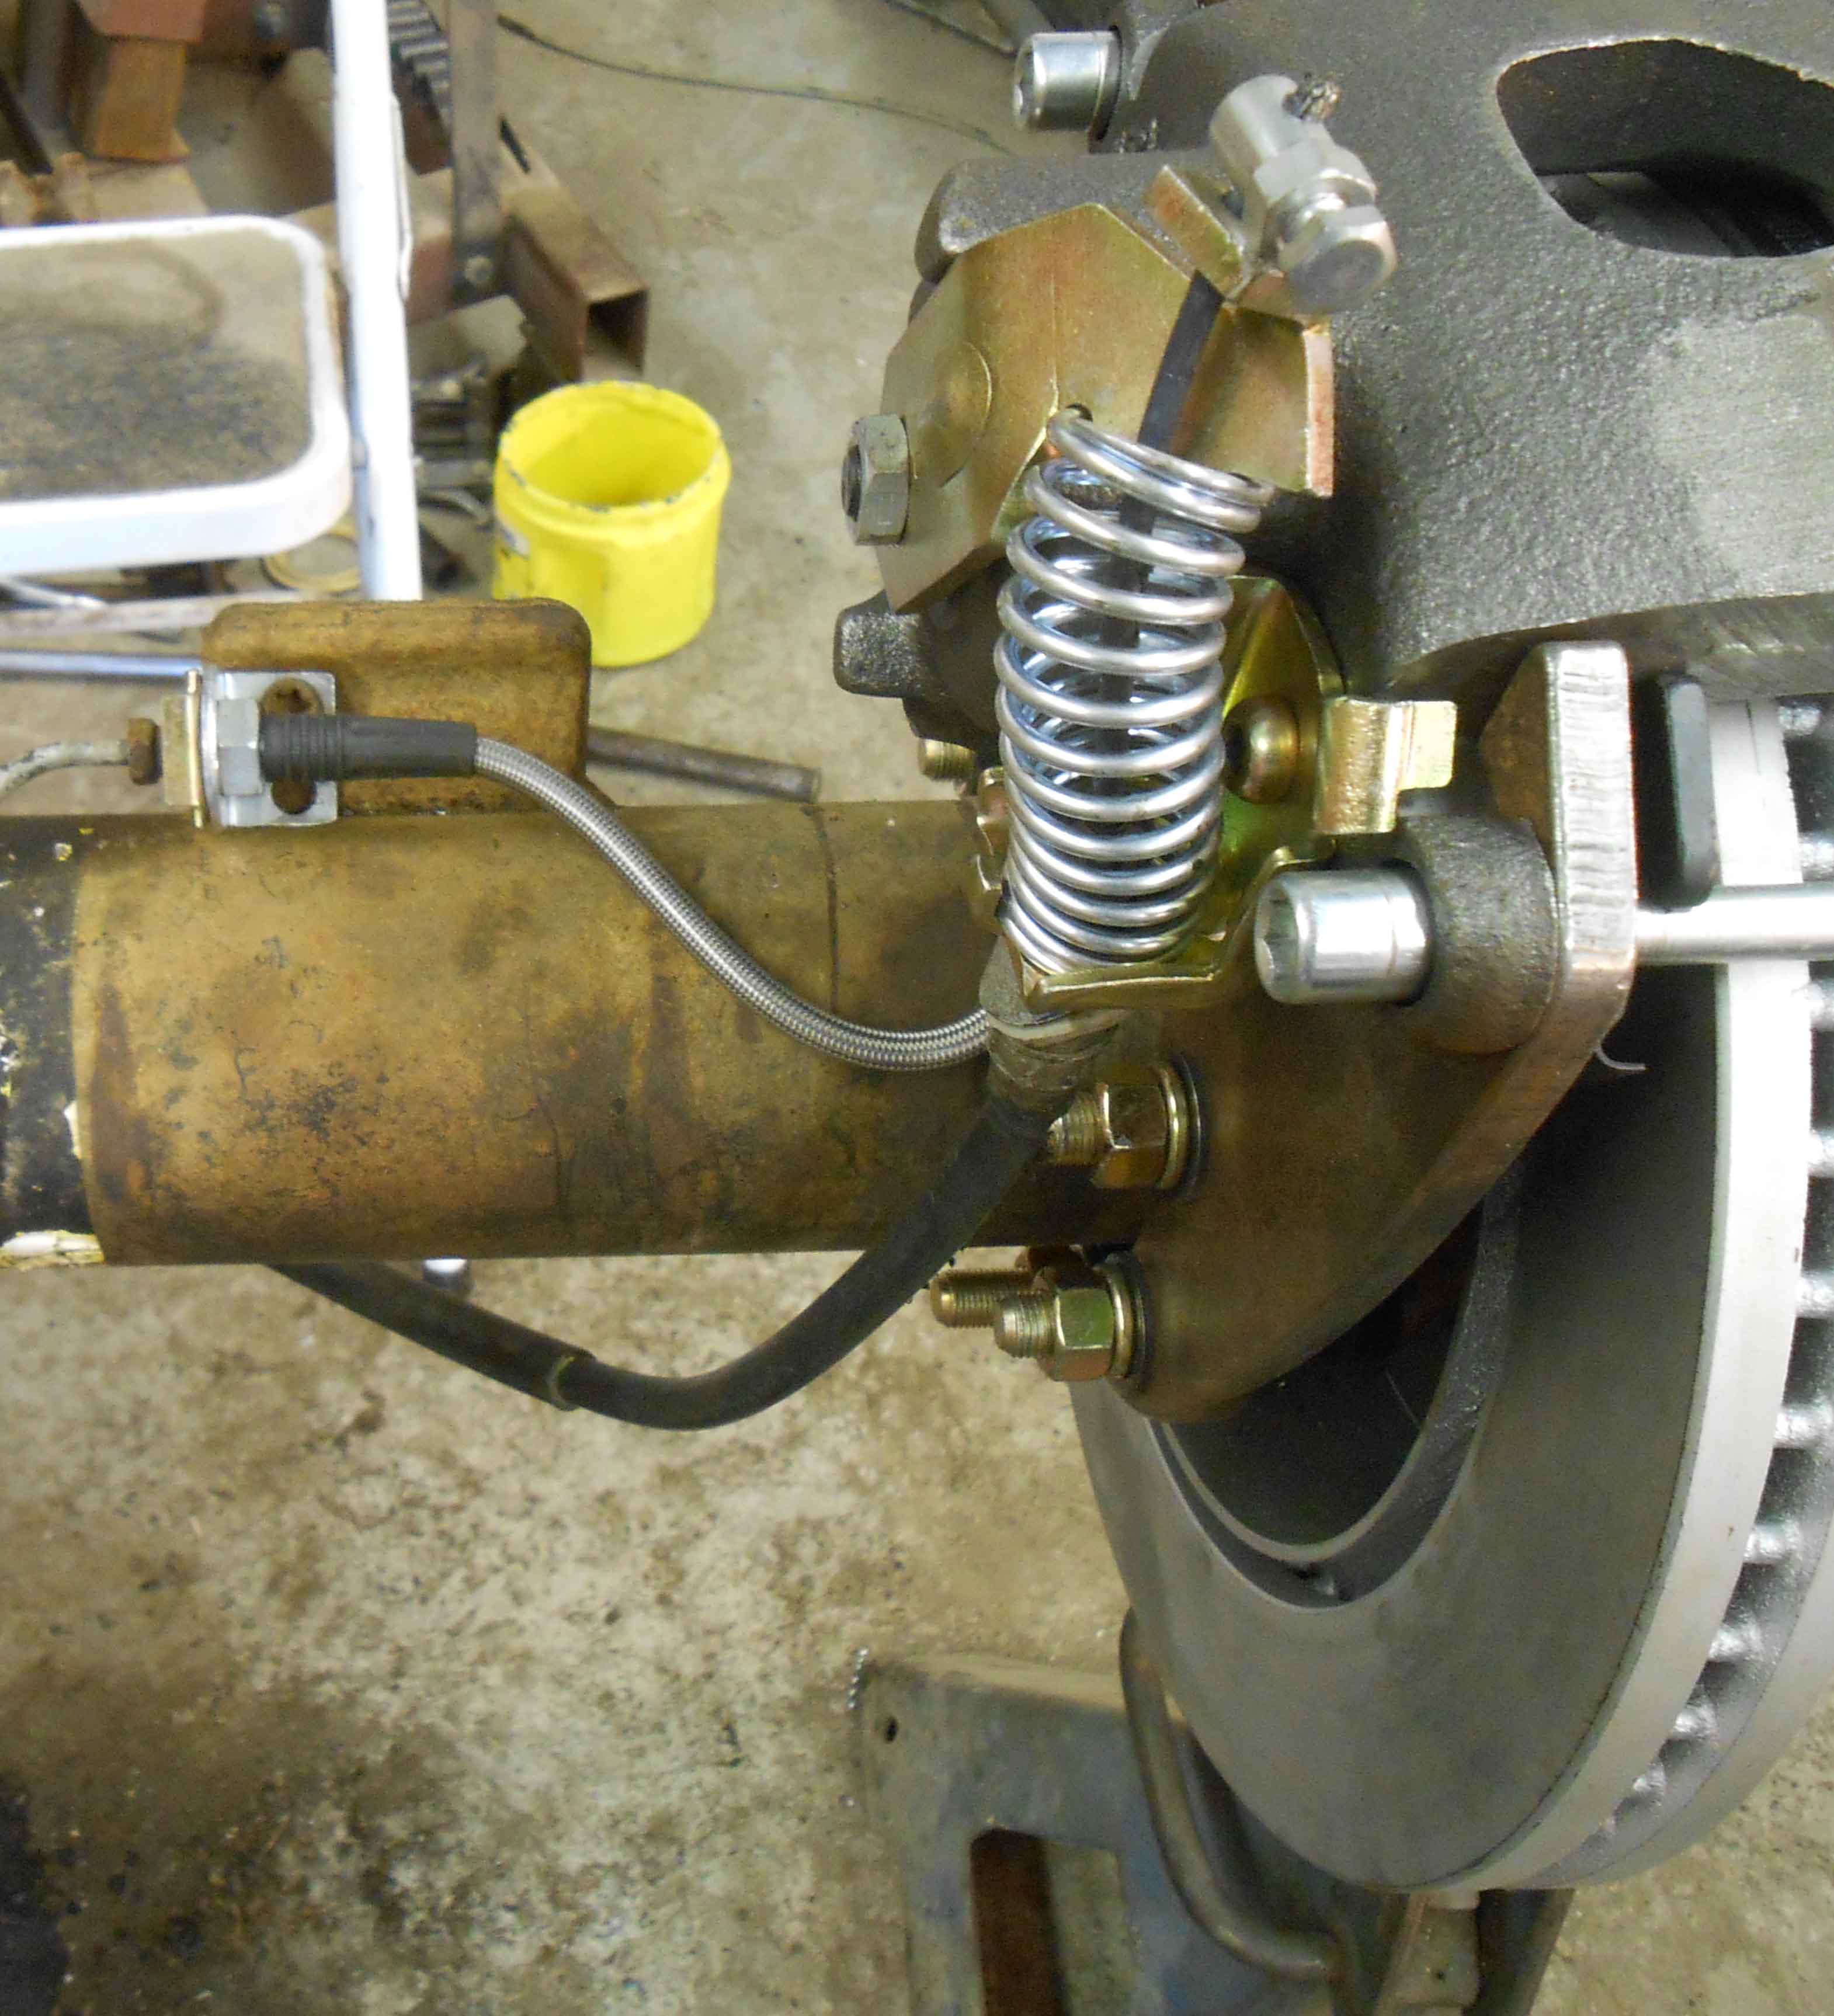
Bill AKA "LOBO" Profile
"Getting old is inevitable, growing up is optional" Darth Vader 1986 F350 460 converted to MAF/SEFI, E4OD 12X3 1/2 rear brakes, traction loc 3:55 gear, 160 amp 3G alternator Wife's 2011 Flex Limited Daily Driver 2009 Flex Limited with factory tow package Project car 1986 Chrysler LeBaron convertible 2.2L Turbo II, modified A413 |
|
Administrator
|
In reply to this post by Pete Whitstone
Really interesting, Pete!
 Subscribed so i can follow along.
Jim,
Lil'Red is a '87 F250 HD, 4.10's, 1356 4x4, Zf-5, 3G, PMGR, Saginaw PS, desmogged with a Holley 80508 and Performer intake. Too much other stuff to mention. |
Re: Rear disc brake conversion
|
In reply to this post by Pete Whitstone
Slowly getting more stuff done on this. I got the caliper bracket machined and welded to the other side. I had some confusion with that because the caliper brackets are the same, side to side, rather than being mirror image of each other. It's been a while since I took them off the Dodge rear axle. It turns out that Dodge was clever with their economy and used the same part on both sides for almost all this stuff. So that has the emergency brake cable attachment pointing towards the front of the truck on one side, and pointing to the rear of the truck on the other side - how would that work????
I looked at some diagrams and figured out that they rotate the caliper brackets 180 degrees on the axle. This points the cable attachment point back towards the front of the truck, but puts it on the TOP of the axle, where on the other side it puts it on the BOTTOM. Genius or evil, you decide, but that's the way they did it. With the caliper brackets welded on both sides, I could move on to the next part, which was the brake backing plate. This mounts the mechanical parking brake stuff. In the dodge application, it gets sandwiched between the caliper mounting bracket and the nuts that hold the whole thing together. In this application, I could have sandwiched it similarly between the caliper mount and the Ford flange. But that would mean a couple things. First, I would have to cut it in half to make it fit over the Ford flange, and second, the caliper bracket is welded to the Ford flange, so once it was in there, it could never be replaced. So instead it made more sense to just cut the hole bigger to make it fit over the Ford flange. Here is one that has been cut out (left) and an uncut one. 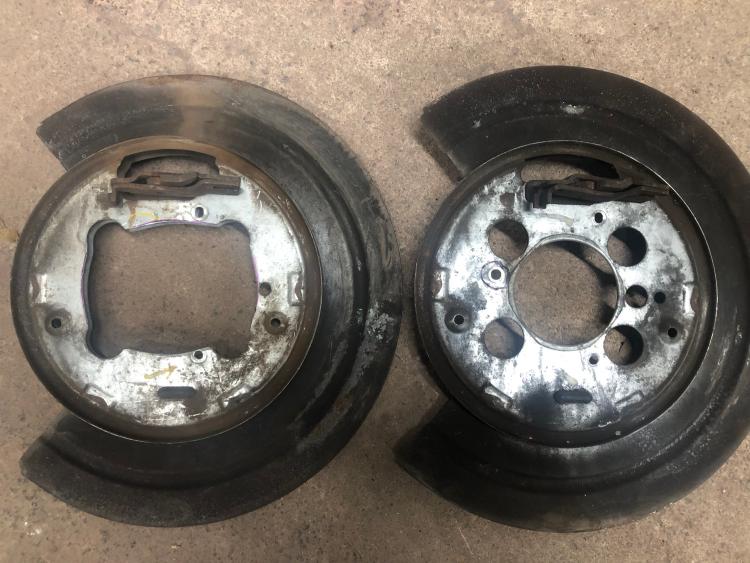 And how it fits over the Ford flange. 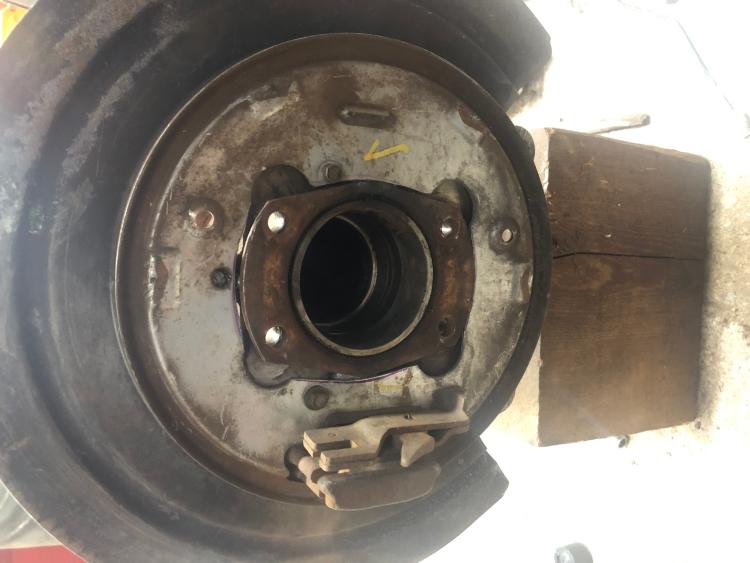 Originally 3 bolts held the backing plate to the caliper bracket. Cutting out the center like that eliminated one of those bolts. That bolt hole is circled here. As you can see, it is within the portion to be cut out. 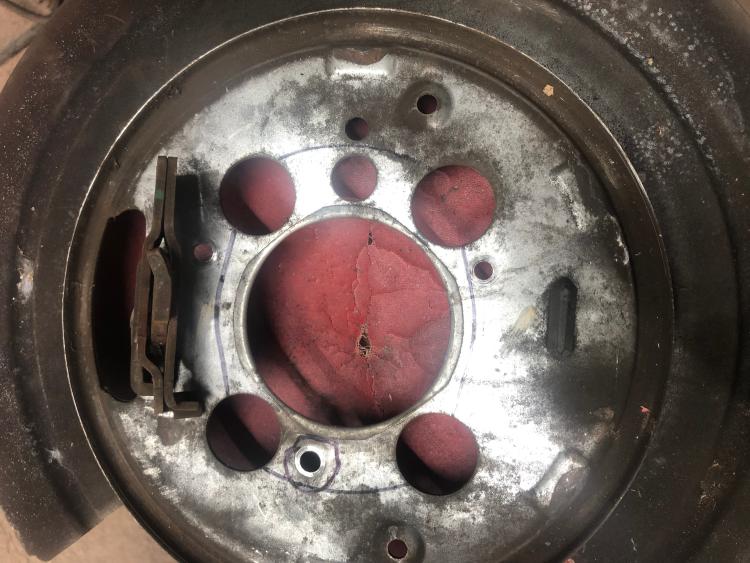 To restore that strength, I added a 3rd bolt back bu drilling and tapping the caliper bracket in an area that would not affect anything. That is the bolt with the gold colored head shown here, in about the 5 o'clock position, near the brake shoe expander. 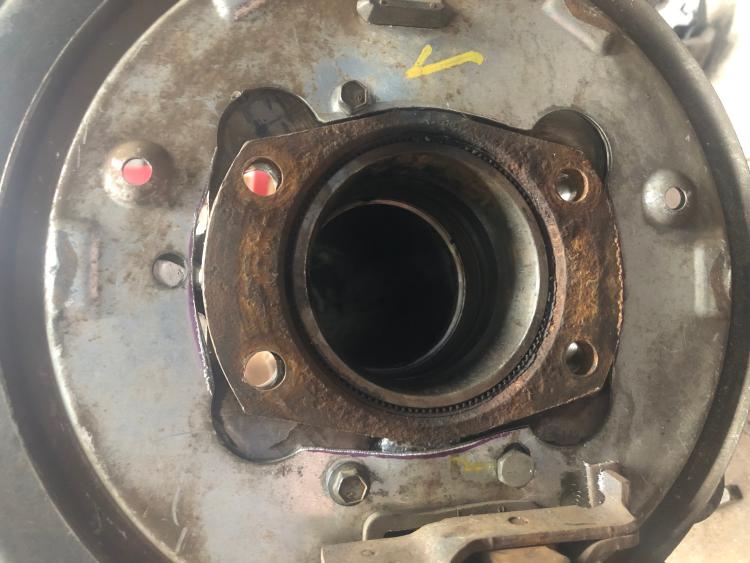 I need to get the other side this far along, then I can look at actually getting this installed in the vehicle.
81 F150 Flareside, Edelbrock Pro Flow4 FI, hydraulic roller 351W, E4OD, 4x4, BW1356
92 F150 RCLB 351W E40D BW1356 mostly stock |
|
Administrator
|
Man, that's some hardcore fabricobbling to make it work with your 9" v/s working with a later disc brake rear that might need the lug pattern modified.
Glad you're close to getting it back under the truck! 
Jim,
Lil'Red is a '87 F250 HD, 4.10's, 1356 4x4, Zf-5, 3G, PMGR, Saginaw PS, desmogged with a Holley 80508 and Performer intake. Too much other stuff to mention. |
Re: Rear disc brake conversion
|
In reply to this post by Pete Whitstone
This conversion is almost complete. No testing on it yes as I am currently building a new engine for the truck. Basically the only things left were getting everything assembled and the items below:
1. Fabbing up rings to keep the rotor centered on the Ford hub. This could have been done with a central ring around the axle hub protrusion, or with 5 small rings around each of the axle studs. I went with the 5 smaller rings because I found some tube/pipe that was the right OD and ID. It just needed a half inch drill run thru it to get rid of the seam on the inside. 2. The parking brake cables were compatible with the Ford setup, for the most part. The Dodge setup has a long side and a short side, then an intermediate cable connects both of those to the pull mechanism. I ordered 2 long (passenger side) cables, and they worked fine at each end. Obviously they fit at the brake end, but to my surprise they also fit at the Ford end. The adjuster had to be tightened quite a bit, but still within its limits, there is a small amount of thread left on the Ford adjuster. 3. I have a disc/disc combo valve that I need to swap in, along with the new MC. I will also install a manual proportioning valve on the rear brake outlet after the combo valve. Then bleed the system. I will have more updates after the truck is back on the road in a couple weeks.
81 F150 Flareside, Edelbrock Pro Flow4 FI, hydraulic roller 351W, E4OD, 4x4, BW1356
92 F150 RCLB 351W E40D BW1356 mostly stock |
|
Administrator
|
You're making great strides!
 I just blew up the rear end in my truck and had considered a disc brake D60 axle from an E-series as an alternative, im happy with my drums for now. Adapters and stud bushings might be okay for a 150. I don't think id travel this path with the abuse my 250 sees. Please detail the manual brake bias valve you're using. This might be handy for > 8600 users who don't want to deal with the hinged load valve, but it wouldn't self adjust.
Jim,
Lil'Red is a '87 F250 HD, 4.10's, 1356 4x4, Zf-5, 3G, PMGR, Saginaw PS, desmogged with a Holley 80508 and Performer intake. Too much other stuff to mention. |
| Edit this page |

