Notes on James Duff Monster SAS install INSTRUCTIONS
Notes on James Duff Monster SAS install INSTRUCTIONS
|
I've been working on my SAS with the DuffTuff Monster kit for a few weekends. I'll start by saying there is a significant lack of instructions in what is provided with the kit. I have had many exchanges with them to try to clarify information in the process and thought I would share my learnings here for those who come after. I put "instructions" in the title because I want that to be the purpose, but I don't plan on posting the {woefully incomplete} paper instructions that come with the parts as I assume that is copyrighted.
Also, I'm not an expert and I don't claim to know anything. I'm just a DIYer who is learning as I go. I've gotten this far on other's knowledge, not my own. And doesn't hurt that my friend who is helping me is an automotive wizard. If I call something the wrong name, or confuse terms, I apologize in advance. For background, I'm installing it on an 84 Bronco XLT with a D44 TTB and a 9" rear. The front axle I'm using is a 78 D44 reverse rotation (or HP) with cast axle wedges off an F150. I've set it up with disc brakes and I've drilled out the knuckles to install the tie rod above them. I'm installing their trac bar with the adjustable end and their heim steering system. I opted for the 4 shock system instead of the 6 shock system. Also, I am using their 11 leaf springs in the rear that came with the Monster package. I also bought the D44 HP radius arm spacer kit that they sell (if you are using a D44 HP axle, definitely buy this kit so you can properly mount the radius arms).
LittleBeefy aka Chad
“Dot Doitall”: 1984 Bronco XLT 460 (C8VE), Edelbrock Pro-Flo 4, ZF5, NP205, D44HP solid axle, 4.56 urban assault vehicle "Bebe": 2022 Bronco Badlands 2dr 2.7l, Sasquatch, Iconic Silver, Black Marine-grade interior, hard-top "Celeste": 1979 Porsche 928 4.5l K-jet, 5-sp, S4/GTS brakes, LSD, Pasha interior |
Re: Notes on James Duff Monster SAS install INSTRUCTIONS
|
We started with the rear springs, so that is where I'll start (it was also the most straight-forward).
Obviously we removed the stock springs and shackles and used the ones provided. All hardware was provided and the instructions were somewhat clear. This one is pretty obvious. 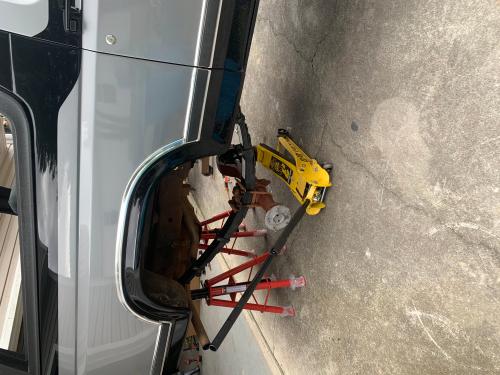 A couple of notes: 1. The springs provided had a Deaver label. I assume that they are the manufacturer. 2. While Duff did provide the hardware, they did not provide a torque spec (a recurring theme). When I have those numbers I will post them here. The big issue is ride height. See below for pics. After it was said and done, the rear sits almost 7 inches higher. I knew those old springs were saggy, but I didn't know they were that saggy... 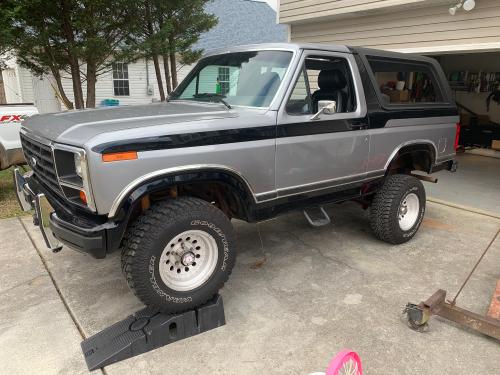 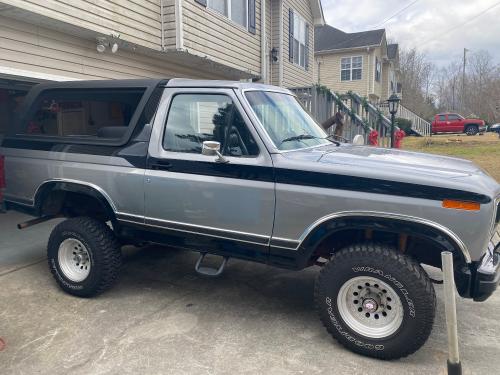
LittleBeefy aka Chad
“Dot Doitall”: 1984 Bronco XLT 460 (C8VE), Edelbrock Pro-Flo 4, ZF5, NP205, D44HP solid axle, 4.56 urban assault vehicle "Bebe": 2022 Bronco Badlands 2dr 2.7l, Sasquatch, Iconic Silver, Black Marine-grade interior, hard-top "Celeste": 1979 Porsche 928 4.5l K-jet, 5-sp, S4/GTS brakes, LSD, Pasha interior |
Re: Notes on James Duff Monster SAS install INSTRUCTIONS
|
We mounted the radius arms on the axle using the supplied directions. The directions here are fairly clear although could be better. You will want to use pictures from their website to see the directions of bolts:
https://dufftuff.com/product/extended-long-travel-radius-arms-full-size-bronco-and-f-series/ A couple of notes on install: This process was made much easier by virtue of the fact that my axle had cast wedges. I know they offer a set of weld on wedges, but knowing what I know now I'd never go down that route personally. The plastic bushings/spacers are very specific front/back and top/bottom. The angle is critical so look closely at them and make sure they go in correctly. These additional metal rectangular spacers go in between the c-caps and the radius arms to ensure they are square; I highly recommend you get this part if you are doing a D44 HP pr D60: https://dufftuff.com/product/free-shipping-dana-60-radius-arm-spacers-bolts/ The arms are on right when the "DuffTuff" decal is right side up and facing out (so the arms angle inward). It seems like there are way too many bolts with this kit. They give you extra bolts to use as the starting procedure for bolting on the C-caps, but they give you a hole extra set with the spacers and I think I even had a third set in my kit. Makes sure to lubricate the plastic spacers before you install them. At the end of the assembly instructions it will tell you to tighten it to torque (no spec provided) while keeping it straight to avoid lean. That's all fine and great, but when you do, you won't be able to get the radius arms on the outside of both frame rails without Hulk-like strength. Consequently, you will want to wait until you have done all other preinstallation mock-ups and measurements and are ready to permanently and finally attach the front axle before you torque the c-caps on fully, IMHO. Here's some pics with the radius arms, coil buckets, coils and tie rod installed: 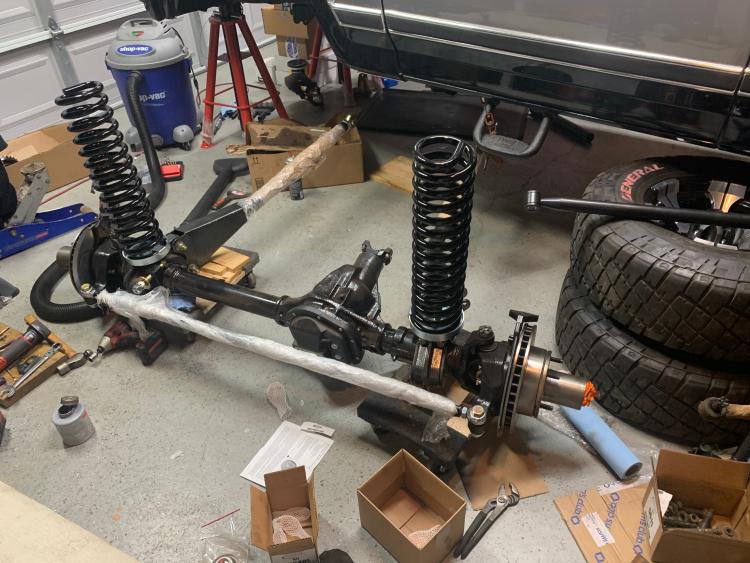
LittleBeefy aka Chad
“Dot Doitall”: 1984 Bronco XLT 460 (C8VE), Edelbrock Pro-Flo 4, ZF5, NP205, D44HP solid axle, 4.56 urban assault vehicle "Bebe": 2022 Bronco Badlands 2dr 2.7l, Sasquatch, Iconic Silver, Black Marine-grade interior, hard-top "Celeste": 1979 Porsche 928 4.5l K-jet, 5-sp, S4/GTS brakes, LSD, Pasha interior |
Re: Notes on James Duff Monster SAS install INSTRUCTIONS
|
Administrator
|
Chad - Those notes are going to help others, for sure.
But wow, those front springs are looooooong! And 11 leaves for the rear springs? I hope they are very thin leaves as I had 6 leaves on Big Blue and those spring were way too stiff. I took 2 leaves out and it helped the ride significantly.
Gary, AKA "Gary fellow": Profile
Dad's: '81 F150 Ranger XLT 4x4: Down for restomod: Full-roller "stroked 351M" w/Trick Flow heads & intake, EEC-V SEFI/E4OD/3.50 gears w/Kevlar clutches
|
Re: Notes on James Duff Monster SAS install INSTRUCTIONS
|
Ya, front and rear springs are beefy, Gary. I decided to install everything as is and give it some miles before I make any serious changes.
Which reminds me, the James Duff stuff is beyond tough. I may give them a hard time for the instructions, but I have to give them serious props for making quality parts. Everything they provided is incredibly robust. I'd rather have good products with poor instructions than good instructions with poor products.
LittleBeefy aka Chad
“Dot Doitall”: 1984 Bronco XLT 460 (C8VE), Edelbrock Pro-Flo 4, ZF5, NP205, D44HP solid axle, 4.56 urban assault vehicle "Bebe": 2022 Bronco Badlands 2dr 2.7l, Sasquatch, Iconic Silver, Black Marine-grade interior, hard-top "Celeste": 1979 Porsche 928 4.5l K-jet, 5-sp, S4/GTS brakes, LSD, Pasha interior |
Re: Notes on James Duff Monster SAS install INSTRUCTIONS
|
Administrator
|
Good plan. Drive it and see what you think.
And, I agree that good parts with poor instructions is much better than poor parts with good instructions. So it appears you've chosen wisely. 
Gary, AKA "Gary fellow": Profile
Dad's: '81 F150 Ranger XLT 4x4: Down for restomod: Full-roller "stroked 351M" w/Trick Flow heads & intake, EEC-V SEFI/E4OD/3.50 gears w/Kevlar clutches
|
Re: Notes on James Duff Monster SAS install INSTRUCTIONS
|
In reply to this post by Littlebeefy
So far the most difficult install has been the trac bar bracket (https://dufftuff.com/product/sas-track-bar-bracket-1980-96-bronco/)on the drivers frame rail. just to give you a frame of reference, here is a picture of the drivers front wheel well with the trac bar mount installed for reference:
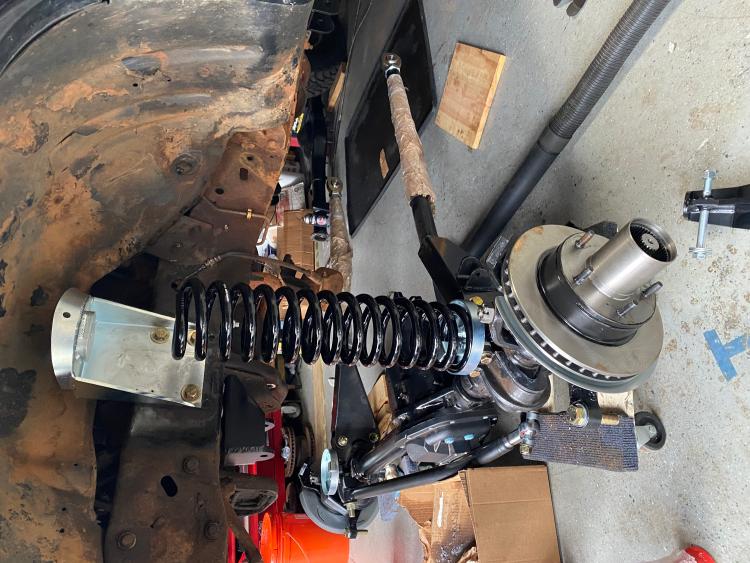 You can see the bracket lines up with the front portion of the engine crossmember. The part actually bolts into 2 holes you drill into the back of the front section of the crossmember. Also, it will require you to drill two additional holes on the underside of the frame rail for two more bolts. There don't seem to be instructions on this but it appears that is the correct way to install it and I confirmed with Duff. Sounds simple, right? Maybe. Here's some of the notes. The trac bar bracket actually has 5 holes to affix it to the frame rail. The 5th hole is under the frame rail and is hidden just above the trac bar end when installed. This is the most important hole because it is the point of alignment to make sure you install the bracket in the right place. This hole MAY also be the most problematic. The hole has a rivet in it and it's holding on the front portion of the engine crossmember to the frame rail. In order to properly align and mount the bracket, you need to drill out this rivet and replace it with a 1/2" bolt. If you have a frame that came from the factory with a hole in the side to access the top of that hole, great. No problem for you. Here is a picture Duff sent me of the bracket installed on a later MY Bronco and you can clearly see the squarish hole I'm referring to: 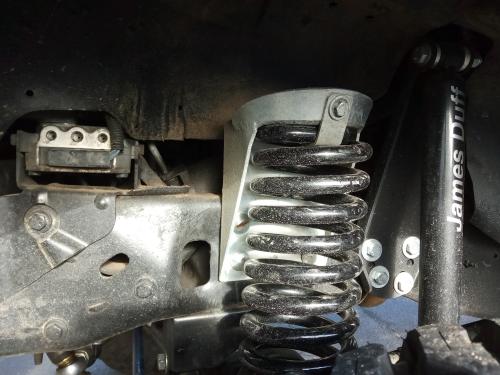 Unfortunately I do not have a hole in the side of my frame like that (as you can see from the first picture) and the back of that spot of the frame rail is accessible by only a very small hole about the size of your index finger: 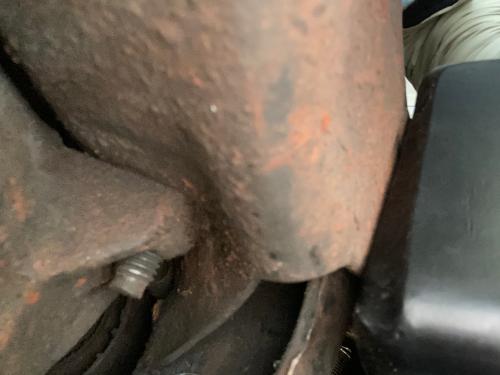 As a result I am left with a perfectly aligned hole in my engine crossmember, frame rail and trac bar and no way of affixing a nut to it: 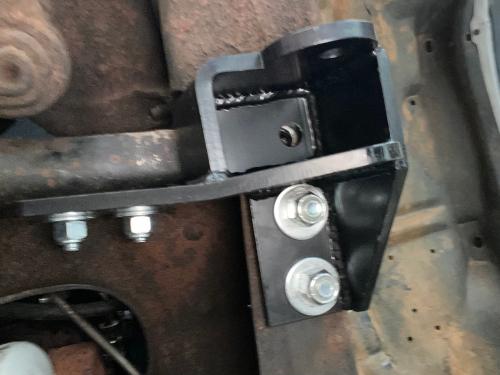 Its not that big of a deal because I now have the frame rail and engine crossmember held together by 4 bolts and a thick chunk of steel, but I am likely going to weld a half inch screw in from the underside to use as a dowel. Alternatively, I could have ground off the head of the rivet on the underside of the frame rail or clearanced the hole in the trac bar bracket so the rivet could stay in. Consider your options before proceeding. One other very important note. This is the first time I've mentioned drilling holes. You will be drilling A LOT of holes and almost all of them will be 1/2". Get yourself a set of M42 bits and some cutting oil (a drill with two handles won't hurt either). Also, you should use a precision punch when marking your holes because the tolerances on these parts are basicaly EXACT. If you do not mark and drill your holes precisely you will have problems. BTW, some people have had to clearance the engine crossmember to fit the track bar (the bar itself, not the bracket). Until I get the front axle installed and the suspension compressed I won't comment on that.
LittleBeefy aka Chad
“Dot Doitall”: 1984 Bronco XLT 460 (C8VE), Edelbrock Pro-Flo 4, ZF5, NP205, D44HP solid axle, 4.56 urban assault vehicle "Bebe": 2022 Bronco Badlands 2dr 2.7l, Sasquatch, Iconic Silver, Black Marine-grade interior, hard-top "Celeste": 1979 Porsche 928 4.5l K-jet, 5-sp, S4/GTS brakes, LSD, Pasha interior |
Re: Notes on James Duff Monster SAS install INSTRUCTIONS
|
Additional note on the trac bar:
They do not supply you with a bolt, washer and nut for affixing the trac bar to the axle (at least there wasn't one in my kit). We used a 4" long 3/4 fine thread with a castle nut and it fit perfectly: 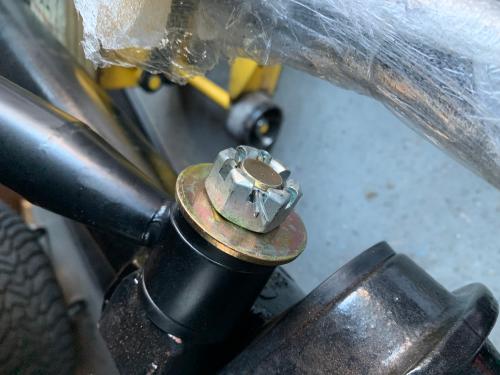
LittleBeefy aka Chad
“Dot Doitall”: 1984 Bronco XLT 460 (C8VE), Edelbrock Pro-Flo 4, ZF5, NP205, D44HP solid axle, 4.56 urban assault vehicle "Bebe": 2022 Bronco Badlands 2dr 2.7l, Sasquatch, Iconic Silver, Black Marine-grade interior, hard-top "Celeste": 1979 Porsche 928 4.5l K-jet, 5-sp, S4/GTS brakes, LSD, Pasha interior |
Re: Notes on James Duff Monster SAS install INSTRUCTIONS
|
You mentioned in your first post about Deaver springs. These are supposed to be some of the best springs out there these days. They are the go to for a lot of custom projects people do as they are usually made to order for each vehicle.
If thats an indication of the rest of the kit, maybe they are sourcing everything else right too. Hopefully they just need some more feedback to make the kit more user friendly. Nice Bronc! 
Sam
1984 F250. 460. C6. 4x4. MSD Ignition. Airbag rear suspension Whole buncha problems |
Re: Notes on James Duff Monster SAS install INSTRUCTIONS
|
Administrator
|
In reply to this post by Littlebeefy
Chad - Could you tap the frame and engine crossmember and use them as the nut? At least you'd have something in there holding those two in alignment.
Gary, AKA "Gary fellow": Profile
Dad's: '81 F150 Ranger XLT 4x4: Down for restomod: Full-roller "stroked 351M" w/Trick Flow heads & intake, EEC-V SEFI/E4OD/3.50 gears w/Kevlar clutches
|
Re: Notes on James Duff Monster SAS install INSTRUCTIONS
|
Gary,
I think you're right. Without the ability to get a nut on the top, tapping the aligned holes may be the best option. There is plenty of room for threads on the bracket itself, so there really isn't any risk of it falling out, even if the frame and crossmember don't have much cross-section to thread.
LittleBeefy aka Chad
“Dot Doitall”: 1984 Bronco XLT 460 (C8VE), Edelbrock Pro-Flo 4, ZF5, NP205, D44HP solid axle, 4.56 urban assault vehicle "Bebe": 2022 Bronco Badlands 2dr 2.7l, Sasquatch, Iconic Silver, Black Marine-grade interior, hard-top "Celeste": 1979 Porsche 928 4.5l K-jet, 5-sp, S4/GTS brakes, LSD, Pasha interior |
Re: Notes on James Duff Monster SAS install INSTRUCTIONS
|
I just got it back from alignment. Here it is on 35” tires (which are fairly well worn FYI):
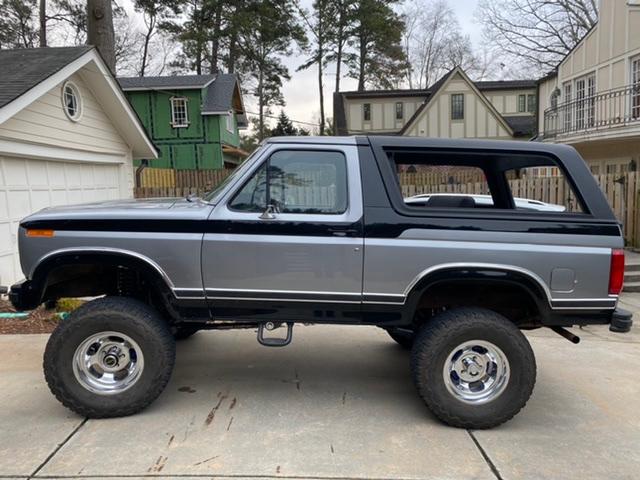 A note on ride height: This is a picture of the rear ride height: 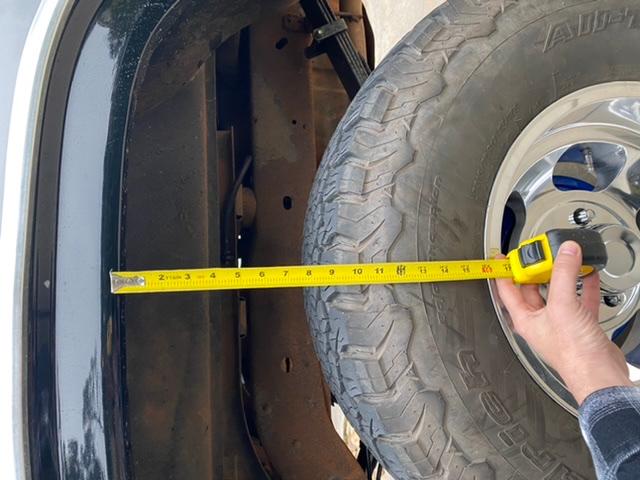 This is a picture of the front ride height: 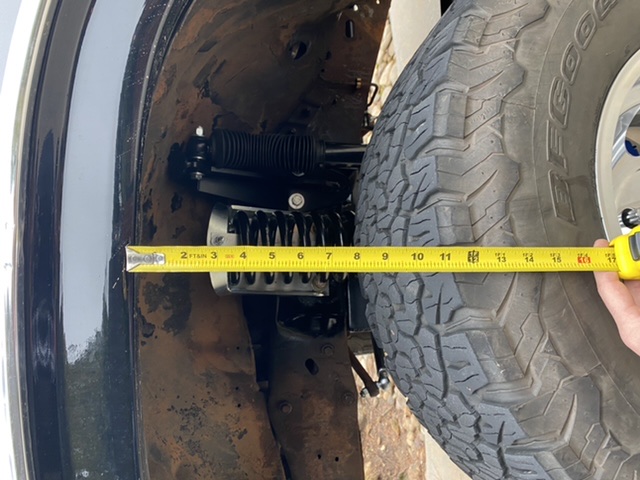 The front is currently sitting a little higher than the rear but it hasn’t been sitting long enough to know how much the front will settle. I’m going to be dropping in a 460 with iron heads so I’m going to see where it rests before making any changes. The front height is determined by the placement of the coil towers. To get this height, here is a picture of the coil tower where we installed it. I will go into much more detail on this in another reply because there are no instructions provided for that and it’s complicated: 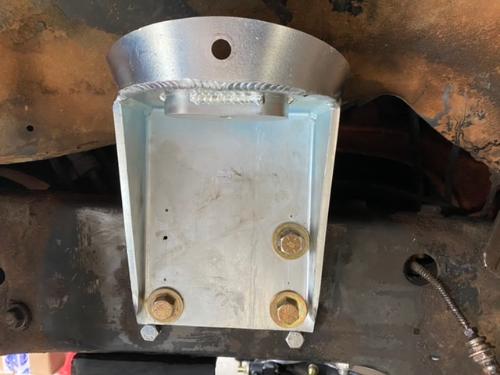
LittleBeefy aka Chad
“Dot Doitall”: 1984 Bronco XLT 460 (C8VE), Edelbrock Pro-Flo 4, ZF5, NP205, D44HP solid axle, 4.56 urban assault vehicle "Bebe": 2022 Bronco Badlands 2dr 2.7l, Sasquatch, Iconic Silver, Black Marine-grade interior, hard-top "Celeste": 1979 Porsche 928 4.5l K-jet, 5-sp, S4/GTS brakes, LSD, Pasha interior |
Re: Notes on James Duff Monster SAS install INSTRUCTIONS
|
Notes on tire size and rubbing:
I am currently running 35x12.5s on a 17x9 wheel with a 3.5 inch backspace and they don't rub, or even come close to rubbing. I'm going to drive around on these for a while before I try out some 37X13.5s that I've got sitting around and I'll update here with the results (probably months from now). The Duff radius arms have a significant inward angle and it really gives you excellent clearance. Likely you'll rub somewhere else before you hit the radius arms.
LittleBeefy aka Chad
“Dot Doitall”: 1984 Bronco XLT 460 (C8VE), Edelbrock Pro-Flo 4, ZF5, NP205, D44HP solid axle, 4.56 urban assault vehicle "Bebe": 2022 Bronco Badlands 2dr 2.7l, Sasquatch, Iconic Silver, Black Marine-grade interior, hard-top "Celeste": 1979 Porsche 928 4.5l K-jet, 5-sp, S4/GTS brakes, LSD, Pasha interior |
|
Interesting! That Bronco is up there!
I think I would need a lift to get in. That’s cool that there’s no rubbing. Surprising.
Dane
1986 F250HD SC XLT Lariat 4x4 460 C6-Sold 1992 Bronco XLT 4x4 351W E4OD 1998 GMC Sierra SLE K1500 350 4L60E Arizona |
Re: Notes on James Duff Monster SAS install INSTRUCTIONS
|
Note on driveshafts after SAS: I was surprised to find that after the lift my front driveshaft needed to be the same length but my rear drive shaft was way to short. I had to have my rear shaft lengthened. FWIW I have the SMOD transmission so my front and rear shafts were pretty close to the same length, but they are now exactly the same length.
@Dane - ya, it's up there. The paint job with the black on the bottom makes it visually seem like it's a little higher than it is, but I do literally have to "climb" into the truck now, and I'm 6 feet tall. Without the step I wouldn't be able to get in!
LittleBeefy aka Chad
“Dot Doitall”: 1984 Bronco XLT 460 (C8VE), Edelbrock Pro-Flo 4, ZF5, NP205, D44HP solid axle, 4.56 urban assault vehicle "Bebe": 2022 Bronco Badlands 2dr 2.7l, Sasquatch, Iconic Silver, Black Marine-grade interior, hard-top "Celeste": 1979 Porsche 928 4.5l K-jet, 5-sp, S4/GTS brakes, LSD, Pasha interior |
|
I bet! I need a step for my stock ride height Bronco.
Curious about the windows in the back. Are they out? Or is it the pictures?
Dane
1986 F250HD SC XLT Lariat 4x4 460 C6-Sold 1992 Bronco XLT 4x4 351W E4OD 1998 GMC Sierra SLE K1500 350 4L60E Arizona |
Re: Notes on James Duff Monster SAS install INSTRUCTIONS
|
There are no windows in the rear. I also took out the tailgate upper window seal, cut a huge square hole in the top of it and had it covered in Line-X. Wanted to make the Bronco more "open air" but needed to keep the top for its integrated roll bar.
LittleBeefy aka Chad
“Dot Doitall”: 1984 Bronco XLT 460 (C8VE), Edelbrock Pro-Flo 4, ZF5, NP205, D44HP solid axle, 4.56 urban assault vehicle "Bebe": 2022 Bronco Badlands 2dr 2.7l, Sasquatch, Iconic Silver, Black Marine-grade interior, hard-top "Celeste": 1979 Porsche 928 4.5l K-jet, 5-sp, S4/GTS brakes, LSD, Pasha interior |
|
Cool! I like the paint and the wheels. My Bronco is silver and black, but needs new paint.
Dane
1986 F250HD SC XLT Lariat 4x4 460 C6-Sold 1992 Bronco XLT 4x4 351W E4OD 1998 GMC Sierra SLE K1500 350 4L60E Arizona |
Re: Notes on James Duff Monster SAS install INSTRUCTIONS
|
In reply to this post by Littlebeefy
Notes on coil tower mounts:
BEWARE: this is by far the most "speculative" portion of the install. At the time of this writing, there are no written instructions for this portion provided, so I am going to tell you the way the we did it. I don't know if this is correct, but I am happy with the results. First off, the installation of the tower is complicated by the fact that the tower is not predrilled and correct installation will not reuse any of your existing holes in the frame. Second, the height of the tower will determine the height of your front lift, but there is no clear specification for how high it should be placed to achieve any particular height lift. So installation involves placing the tower on the frame where you believe it should go and drilling holes through it as well as your frame. It is not enough to just make sure they are identical installations on both sides. You also have to consider all three axes of installation (front/back, up/down, and tilt forward/tilt back). So your best bet is to find a frame of reference that is mirrored on both sides that you can use to measure all three axes on both sides equivalently. What my buddy did to solve the problem was genius in my opinion. When you remove the stock coil tower there will be two holes in the side of the frame that had rivets holding the tower on. These two holes are barely too wide to use to mount the coil tower, but they are great for aligning the tower. We put two bolts in these holes and used the hex head to align and mirror the placement on all three axes. Here is a picture to illustrate: 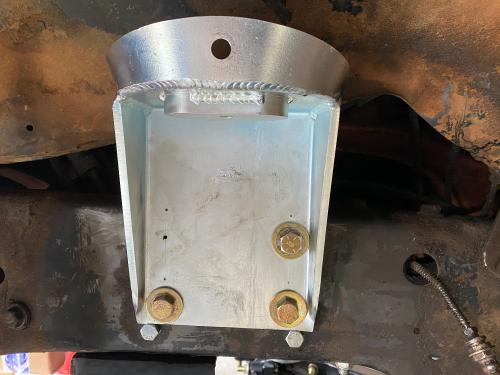 Duff had told me to align the bottom of the frame with the bottom of the coil tower. If I had done that, I think I would have ended up about 1.25 inches lower in the front than I did, so I'm guessing that would've been a 6 inch lift. I'm going to end up putting a lot more weight up front, so I think I'm happy where I landed, but I have to wait and see hoe much the front settles.
LittleBeefy aka Chad
“Dot Doitall”: 1984 Bronco XLT 460 (C8VE), Edelbrock Pro-Flo 4, ZF5, NP205, D44HP solid axle, 4.56 urban assault vehicle "Bebe": 2022 Bronco Badlands 2dr 2.7l, Sasquatch, Iconic Silver, Black Marine-grade interior, hard-top "Celeste": 1979 Porsche 928 4.5l K-jet, 5-sp, S4/GTS brakes, LSD, Pasha interior |
| Edit this page |

