Search Forum
New 3-D Printer
12
12
|
Administrator
|
If it has a texture, it sounds like the one mine came with. I actually used it for quite awhile and had mixed results on flat pieces but if you are having good luck with it, I'd stick with it. It seems like each machine, even the same model, behave differently in some aspects. Environmental factors like humidity and ambient temp may play into it a lot. Overnight my magnetic bed just wouldn't get good adhesion. Since the 'kit' came with the glass bed I installed it rather than troubleshooting/cleaning and so far so good.
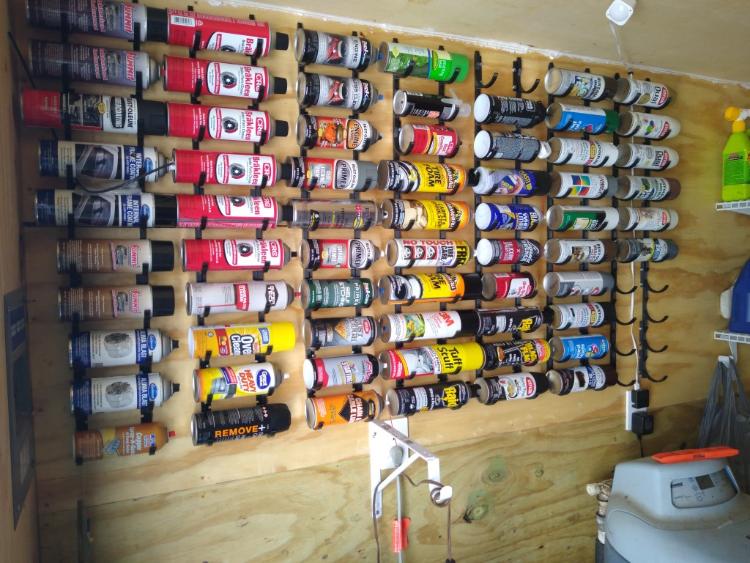
It looks like you already have the good tubing and feeder.  I don't know how much others normally use either but this usage is definitely abnormal for me. I just happened to stumble across a design on thingiverse at the same time I was cleaning out our wellhouse and it snowballed from there. Been printing out these chainable aerosol can hooks nonstop 
 Really looking forward to what you guys make with yours. I was thinking on your case - would panel mount connectors (like molex) work for the wiring penetrations?
Scott
'Camano' 1986 F250 Supercab XLT Lariat 460/C6 'Chanute' 1980 F350 C&C 400/NP 435 - Gin Pole But there ain't nothin' wrong with the radio |
It probably is the same - it looks like what I see online with many of the Ender series printers, but I'm not familiar with the term 'magnetic' for it. But I can see where the name comes from, everything REALLY sticks to mine. That's great for tall narrow items, but for things with a large base (like this box), it's a pain. One of our robotics kids who's into 3D printing (he has five Enders of one flavor or another) prints parts for the team, and I've been impressed with how neatly they come out - partly attributable to the glass bed. I may look into getting one once I'm back working. Quite possibly. Honestly, we haven't gotten that far along yet...and since this is my brother's truck, I'm going to let him make the call on connectors. I'll definitely suggest them to him, I just looked at a couple and I'm sure they'd do the trick. P.S. Those can holders are pretty cool! I have a cabinet here in the basement that all my cans are in, but once my stock outgrows it I may look into those. |
|
So update time on the transmission controller case project...
Here's the second evolution of the test case (containing just the relay board, the real thing will have an Arduino as well):
Changes from previous:
Unfortunately, warping is becoming a problem. I took no precautions when I printed the new lower half the first time, and it's visibly bowed. For the re-print I was more careful about how I removed it from the bed, then put weights in the case while the bed was still heated, then let the bed cool. It's still slightly warped, but probably usable. The top half is also warped...so, I'm going to be reducing the fill percentage from 50% to 20% for the top (which supposedly helps), and I went ahead and ordered a glass bed. Between the two I should be able to get less warping, low enough that screwing the top to the bottom will pull everything into alignment. |
|
Administrator
|
Very nice Matthew! Updates look great.
I know some people recommended enclosures to help with consistent temps. I didn't buy or make one but I did put mine inside an armoire/entertainment center. Can't really say it made a difference printing but you can feel the heat when opening the door. YMMV but I've had good luck with the 8mm brim.
Scott
'Camano' 1986 F250 Supercab XLT Lariat 460/C6 'Chanute' 1980 F350 C&C 400/NP 435 - Gin Pole But there ain't nothin' wrong with the radio |
|
This post was updated on .
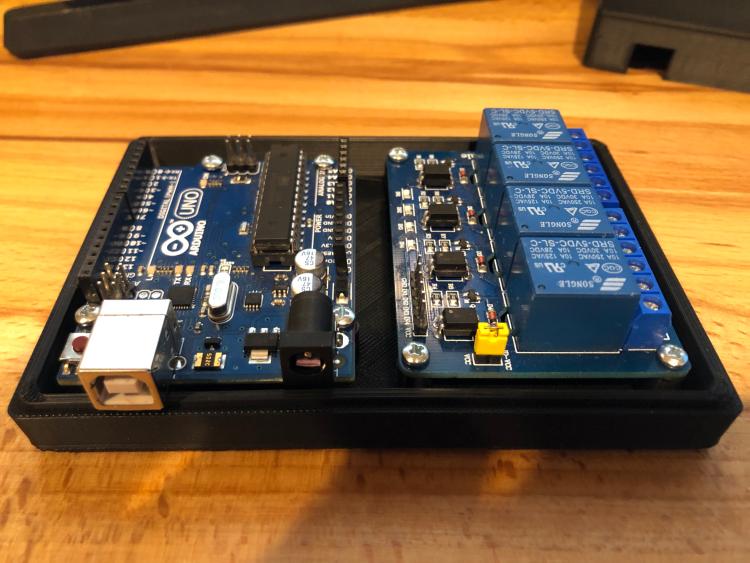
Everywhere I go I keep hearing about enclosures, so I am going to make one for myself...I just picked up some foil-backed foam board from Lowe's, and I'm going to tape it into shape. I even have a piece of Lexan for a window. It'll look totally ghetto, but it should do the trick.  In other news, my CAD skills seem to be improving - I decided to step up to the full-size case for this last iteration, and I got all the standoffs in the correct place the first time as well as the hole to expose the USB port. All that's left is to design some standoffs into the case halves to allow them to be screwed together, and decide on what connector to use. Oh, and add some tabs to allow mounting the case to the firewall.   |
Bullnose Enthusiasts Forum
›
Projects
|
1 view|%1 views
| Edit this page |


