AC Heater HVAC Climate Control Panel Assembly
Re: AC Heater HVAC Climate Control Panel Assembly
|
Administrator
|
I would think they'd all be the same size since the hole in the dash is the same. But I have some of them and will measure them in a bit - after more coffee.
Gary, AKA "Gary fellow": Profile
Dad's: '81 F150 Ranger XLT 4x4: Down for restomod: Full-roller "stroked 351M" w/Trick Flow heads & intake, EEC-V SEFI/E4OD/3.50 gears w/Kevlar clutches
|
Re: AC Heater HVAC Climate Control Panel Assembly
|
Administrator
|
In reply to this post by taskswap
I only found one, but know I have others.
 Anyway, this factory A/C panel measures 7 9/16 x 2 1/16. And the inset plastic piece is 7 1/4 x 2".
Gary, AKA "Gary fellow": Profile
Dad's: '81 F150 Ranger XLT 4x4: Down for restomod: Full-roller "stroked 351M" w/Trick Flow heads & intake, EEC-V SEFI/E4OD/3.50 gears w/Kevlar clutches
|
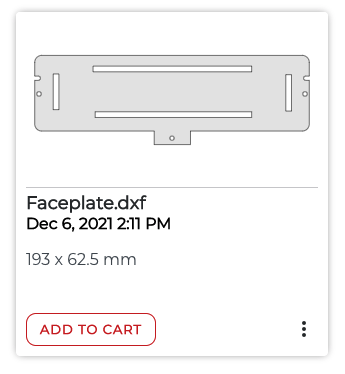 here's what I came up with. Here's a PDF of it if anybody wants to try printing it and comparing it to their panel. This matches mine within a half-millimeter so I think it will work for me but there's no telling if there were slight differences especially in the placements of the holes. Faceplate.pdf I found a laser cutting shop with reasonable rates and ordered a batch of 5. I may as well, it was $2-$3 apiece but a minimum of $19 for an order. Free shipping. So the unit cost would only be a few dollars but that assumes a batch got made. I'm going to use a drawing tool to design up a "rear design" and just print it on my laser printer. If I can get good enough quality I'll print it on a transparency sheet. if I can't get a good enough quality print, Staples offers the same thing for $1.71. If the black isn't "black enough" I can just print two layers I think. Anything is better than what I have now. And if this works out it could be a cool option for folks repurposing some switches like the tank selector. I'll post pics when I have something to show. Expect it to take a week or two before I get the parts back from the laser cutter...
--
1981 F-250 Custom. 6.6L V8, 4 barrel Holley carb, ARA aftermarket A/C. |
|
Administrator
|
Very excited to see what you come up with

Scott
'Camano' 1986 F250 Supercab XLT Lariat 460/C6 'Chanute' 1980 F350 C&C 400/NP 435 - Gin Pole But there ain't nothin' wrong with the radio |
Re: AC Heater HVAC Climate Control Panel Assembly
|
Administrator
|
In reply to this post by taskswap
This is cool!

Gary, AKA "Gary fellow": Profile
Dad's: '81 F150 Ranger XLT 4x4: Down for restomod: Full-roller "stroked 351M" w/Trick Flow heads & intake, EEC-V SEFI/E4OD/3.50 gears w/Kevlar clutches
|
|
Thanks!
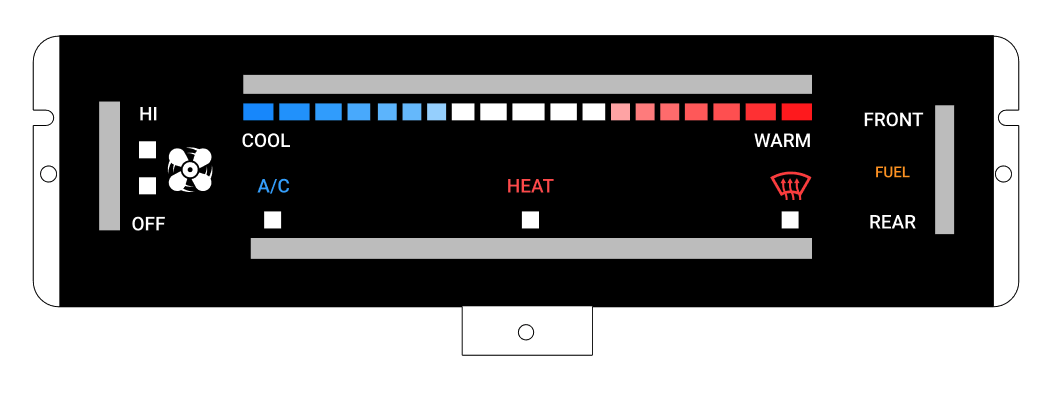 One more pic before I pause on this (and wait for stuff to arrive). I got a little eager and went ahead and designed the background. I made a few changes over the factory. My original panel had "warm/defrost logo/defrost" all packed in one small area and I wanted to clean that up so I just put the defrost symbol in red. I also made FUEL smaller and orange just for fun, and changed the fan icon to be a little smaller so it wasn't so imbalanced. I've noticed a lot of the more modern temp sliders have blue/red triangles in a sort of scarf joint merging together. But mine had rectangles that got narrower from cold to neutral to hot. I kinda liked the look of mine, and this has to print on a laserjet on acetate sheets which don't always pick up tiny details like the ends of those triangles. So I went with the rectangles. I think they look neat. I have a Figma design for all this and would be happy to share it. It's an easy tool to learn especially if you're just shoving around rectangles to get a layout you like, so it would be easy to modify for folks with different layouts. But I want to wait until I get a few test prints on actual acetate first. One thing I've learned is that even if it looks amazing on paper, sometimes you have to adjust things when it goes onto a transparency. And it has to be printed there because mine is backlit and I've learned that printing on transparency sheets isn't always perfect even on a good laserjet. It seems from photos I've seen that not all of these are backlit? Some units seem to have solid colors painted right on. I think that's how this style works? 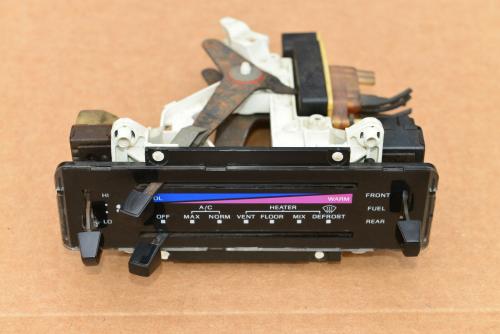
If that's the case, folks with that style could just print a design on any heavy weight paper, like 80lb card stock, and probably get amazing results.
--
1981 F-250 Custom. 6.6L V8, 4 barrel Holley carb, ARA aftermarket A/C. |
Re: AC Heater HVAC Climate Control Panel Assembly
|
Administrator
|
I think all of the factory ones are backlit.
Anyway, that looks amazing!  But to my eye it doesn't quite look balanced with an icon for the fan and a word for fuel. Why not a fuel icon? Still, it looks wonderful!
Gary, AKA "Gary fellow": Profile
Dad's: '81 F150 Ranger XLT 4x4: Down for restomod: Full-roller "stroked 351M" w/Trick Flow heads & intake, EEC-V SEFI/E4OD/3.50 gears w/Kevlar clutches
|
|
Administrator
|
The dealer installed a/c version that goes in the cubby to the right of the steering wheel is the only one I know of that isn't backlit.
That does look really good! I second liking the rectangles vs the gradient and would prefer that style on my 86. I might be tempted to put a little arrow next to the F of FUEL pointing to the left 
Scott
'Camano' 1986 F250 Supercab XLT Lariat 460/C6 'Chanute' 1980 F350 C&C 400/NP 435 - Gin Pole But there ain't nothin' wrong with the radio |
|
Now see, this is why being able to hack on your own car is so fun...
 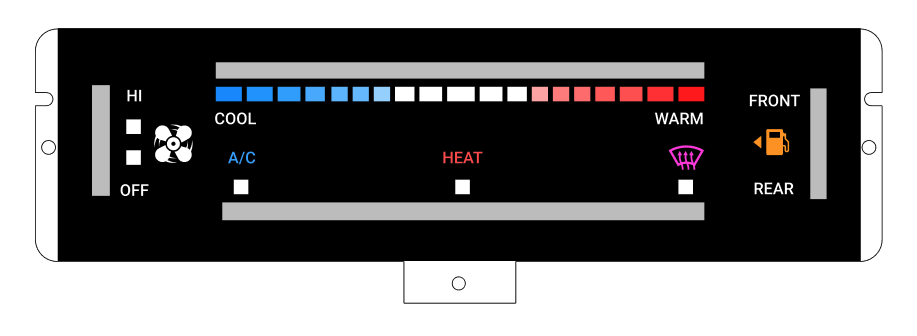 Probably need to move it down a pixel but...
--
1981 F-250 Custom. 6.6L V8, 4 barrel Holley carb, ARA aftermarket A/C. |
|
Administrator
|
Well done!
Scott
'Camano' 1986 F250 Supercab XLT Lariat 460/C6 'Chanute' 1980 F350 C&C 400/NP 435 - Gin Pole But there ain't nothin' wrong with the radio |
|
very nice. im anxious to see it in reality. nothing like factory but the truth is these are getting harder and harder to get and that just runs the prices up. anyone notice the price of an original dodge charger lately??
|
Re: AC Heater HVAC Climate Control Panel Assembly
|
Administrator
|
I like it!
(And I have a '69 Dodge Super Bee.)
Gary, AKA "Gary fellow": Profile
Dad's: '81 F150 Ranger XLT 4x4: Down for restomod: Full-roller "stroked 351M" w/Trick Flow heads & intake, EEC-V SEFI/E4OD/3.50 gears w/Kevlar clutches
|
|
back when cars had soul! that's why we love these trucks.
|
 The photo does not do it justice, but then again maybe that's the point. I got the new laser-cut acrylic front plates back today. I used SendCutSend.com and couldn't be happier. It came out exactly as I hoped. The next step... not so much. I printed my design on both paper and transparency and wasn't happy with either. On paper, it looks really good, but there's no good way to adhere it to the back of the acrylic. An adhesive would be noticeable, and not using anything would let the paper warp over time. And using paper means no backlight. A backlight would shine through but not very well. The stock climate control only has one bulb in the middle, with a crude (1980s era) diffusion sheet behind the face plate itself. My main idea was to use a transparency sheet. I always knew this would be a challenge but wanted to give it a go anyway. The idea is, laser printers are very good at doing "opacity". You can print colored red/blue/orange/etc boxes partially transparent, and make nice "shine through" backlight areas. This turns out to work very well in general. And there's no worry about adhesives because a transparency sheet will just sit there behind the acrylic. It won't warp, and if there's an air bubble or two you'd never know because it's pretty stiff. But I was never sure how "black" my laser would manage on these sheets. It turns out... not very black. It LOOKS black, but you can see through it easily. With any kind of back light behind it, it would look shabby. So now I'm on to Option C. I'm working on getting a version uploaded (with the correct final print size) to VistaPrint as a "clear, reverse-print, self-adhesive decal". I adjusted the design so ONLY the black is what gets printed. If this turns out nice, I can adhere the decal to the back of the faceplate, and then to get the desired colors in some of the feature/label areas, I can just glue on small pieces of transparency or cellophane behind that. Sorry if this all sounds long-winded but hopefully this brain dump is valuable to somebody. If I get the VistaPrint working, I'll post back here with the results. My hope is still that despite the high fees of these various things, the economies of scale (you get 3-5 "things" from each vendor for your $20-$30 or whatever) and the fact that many of these face plates are either unobtainable (my design is custom to ARA) or crappy (used parts are faded, scratched or cracked) and priced high (I've seen $80 on eBay for typical climate control head units) will make it worth it...
--
1981 F-250 Custom. 6.6L V8, 4 barrel Holley carb, ARA aftermarket A/C. |
Re: AC Heater HVAC Climate Control Panel Assembly
|
Administrator
|
Just to let you know, I'm following along. But to "glue on small pieces of transparency or cellophane behind" the panel sure seems fiddly. You are doing things so precisely that it seems a shame to resort to that. However, I do not have any ideas, much less better ones. So I'm just along for the ride.
Gary, AKA "Gary fellow": Profile
Dad's: '81 F150 Ranger XLT 4x4: Down for restomod: Full-roller "stroked 351M" w/Trick Flow heads & intake, EEC-V SEFI/E4OD/3.50 gears w/Kevlar clutches
|
I don't have the dexterity (or eyesight) anymore for something that fiddly, not to worry! All it means is giving up the gradient on the temperature side. Instead of blue -> white -> red with a gradual fade left to right, it would be just blue/white/red (the boxes will still change in size). Don't be off-put by this picture, what's shown is a kid's art kit. But it would be like this. If I can get the black part printed professionally for a reasonable price, there will be empty "windows" in what's printed. I would just glue some rectangles of cellophane behind them with a small amount of adhesive like these kits do. You'd only have 4-5 rectangles to apply, it should be easy. 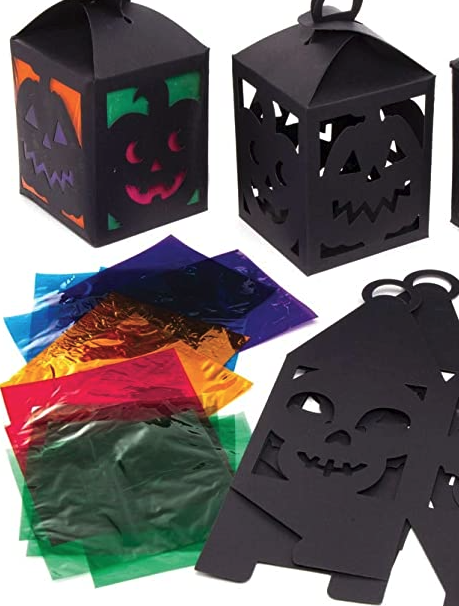 I haven't tried it yet because I'm still searching for a printed that can print a decal with an opaque black field and transparent colored windows. I feel there must be one. But this is definitely Plan B if needed.
--
1981 F-250 Custom. 6.6L V8, 4 barrel Holley carb, ARA aftermarket A/C. |
Re: AC Heater HVAC Climate Control Panel Assembly
|
Administrator
|
Oh! Now I see what you are talking about. Getting the colored panels on exactly right won't matter since the cutout shows the light through.

Gary, AKA "Gary fellow": Profile
Dad's: '81 F150 Ranger XLT 4x4: Down for restomod: Full-roller "stroked 351M" w/Trick Flow heads & intake, EEC-V SEFI/E4OD/3.50 gears w/Kevlar clutches
|
|
If it works...
I'm going to try both routes. For simplicity I just ordered a self-adhesive vinyl "sticker" (minimum order 10 LOL) print from carstickers.com (the name is a little ironic, their specialty is front-adhesive stickers for windows, but hey...). For this one I went with solid fill colors so all those blues/oranges/etc should be in there, just not (very well) backlit. But I had a thought that I might arrange a few LEDs to top-light the controls in the bezel overhang above the climate control unit. I can try this out temporarily by slapping a short LED ribbon light up there with some command strips. If I hate it, I'll get another one printed Just for reference, here's the file I'm using for this print, and also the DXF of the outline I used to get the SendCutSend.com acrylic front plates cut. If folks want special designs for their own units I'd be happy to produce a few more layouts, but I figure it's better to wait to take any requests until after the whole thing is done and we know it's going to work out. The stickers come 12/30 - I'll report back then. faceplate-template-sticker.pdf Faceplate.dxf
--
1981 F-250 Custom. 6.6L V8, 4 barrel Holley carb, ARA aftermarket A/C. |
Re: AC Heater HVAC Climate Control Panel Assembly
|
Administrator
|
Sounds like a workable plan. I'll hide and watch.

Gary, AKA "Gary fellow": Profile
Dad's: '81 F150 Ranger XLT 4x4: Down for restomod: Full-roller "stroked 351M" w/Trick Flow heads & intake, EEC-V SEFI/E4OD/3.50 gears w/Kevlar clutches
|
|
Hopefully this is still a good thread to post this to. Here's the "before and after" so far. Personally I think this came out amazing, with some caveats below. Sorry I forgot to dust the faceplates before taking the photo.
 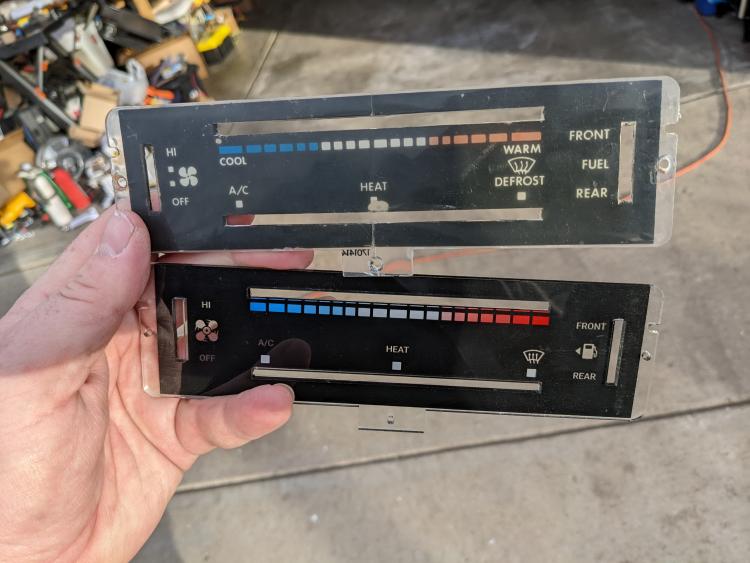 FYI, I am re-ordering new stickers for mine. I had originally wanted to make transparent colored indicator sections for the backlighting but they just didn't look good. Half is because the backlight is colored in most trucks (mine is blue) and half because the backlight is too weak to begin with. It's just like all the other lights - too dim! It wasn't worth the hassle. At this point here is the exact process for anybody that wants to replicate this. First, if you know how to use Figma or are willing to learn, here's my design file. You can clone it and make any adjustments you want for your panel: https://www.figma.com/file/ma4VRRqGzCNRFK1aKTsf7L/Ford-Bullnose-Climate-Control-Stickers If anybody has basic modifications they'd like made, I'd consider doing it for you if the request is clear and not too involved. Once you have a faceplate you want, you can click on the "frame" around it and you'll see an export option. You export it to PDF. Then you go to https://www.carstickers.com/ and start an order for a "Custom Stickers" -> "Create a Custom Clear Sticker" -> "Clear Vinyl - Front Facing Adhesive" -> Rectangle. Request dimensions 7.25" x 2.1". As you'll see, it makes no sense to order just one, so do the first price break of $29 / 10. This way you'll have a few extras if you make a mistake applying the sticker, have two trucks, or have a really good friend who wants one too.  In the order notes I've been requesting "Please ensure final dimensions of 7.25" x 2.1". I don't know if it's needed. Then go to https://sendcutsend.com/ and order this: Faceplate.dxf Have it cut from Acrylic, Clear, 0.118". I ordered 5 units, again their first price break, so it was $13.10. That means my panel was technically $5.52 although I spent almost fifty bucks to get there! When you get the face plate, I have a slight/fixable "mistake" in my design. There are two "sides". On the right, where the fuel selector switch slider goes, that rectangle is a slightly different height than the left-side climate control fan speed selector rectangle. The difference is only 1mm or so but it's noticeable if you pay close attention. I suggest removing the protective paper from both sides of the faceplate and laying it over the sticker to see which way fits better. Worst case if you choose wrong you can just adjust for it with a little bit of x-acto knife work. You'll see immediately what I mean if you do it backwards. One side will need a tiny bit of trimming to look right. To apply the sticker I suggest spritzing the faceplate with a light mist of water, the way you'd apply window tinting. Make a slit across the center of each control-slider rectangle to allow water to escape as you squeegee, but do not cut those sections out yet. Apply the sticker from the center out, squeegeeing firmly to eliminate all air bubbles. Then use a sharp/fresh x-acto knife and slice carefully along the control-slider rectangles to cut those out. My understanding is all of the faceplates have the same physical dimensions, just slightly different visual/UI layouts. If we can get some folks together who'd like to upgrade their climate control faceplates, maybe a group buy would make sense, especially for the acrylic panels...
--
1981 F-250 Custom. 6.6L V8, 4 barrel Holley carb, ARA aftermarket A/C. |
| Edit this page |

