84 Bronco 3g alternator upgrade problem
84 Bronco 3g alternator upgrade problem
|
Hi everybody. Im working on a 3G alternator upgrade for my 300 – 6 1984 bronco. So far, I have purchased the alternator, removed the stock 1G and have completed most of the wiring. I ran into something that I haven’t seen mentioned in any of the documentation on this site or elsewhere. When I removed the old alternator harness the wires were removed from the back of the original alternator, the external regulator was removed from the engine bay wall near the battery, and then I had to unhook a 4 blade electrical connector that goes into the trucks harness. I didn’t know about that 4 blade connector. One of the 4 wires in/out of that connector seems to be the “red/green” wire that goes to the “I” terminal of my 3G alternator. After reading around on this forum and some others, I now believe that two of the three remaining wires go to my ammeter and the fourth (the big yellow one) supplies power to the headlights and some other stuff too though Im not crystal clear on what. Here is a picture of the onnector in question.
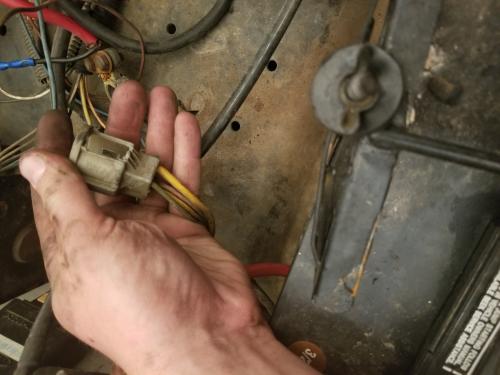 Here are some diagrams that I took from another post on the bullnose forum. This drawing omits the alternator regulator wiring. This one seems to show my trucks wiring in more or less factory configuration. I Assume that the 4 prong connector is shown in this diagram as “C610”.  Assuming that Im correct about C610, this picture shows what I currently have with the charge wire in red and the other wires in black. This is the current state of my Bronco 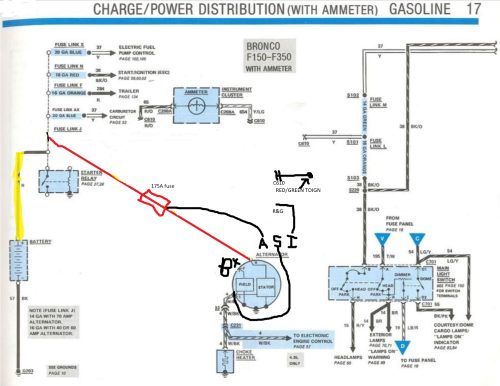 Finally, If I understand correctly, this is what I think I need to do to get my bronco running. This would leave the ammeter nonfunctional. I have already ordered the voltmeter from rocketman. 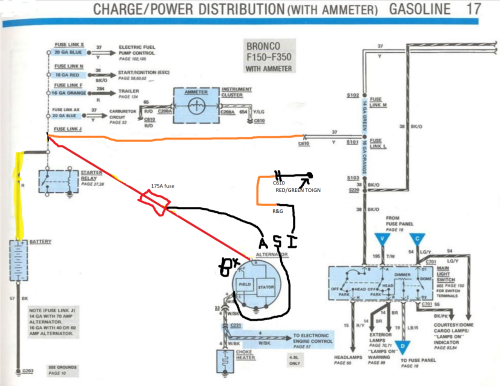 Do I have it all right? Am I missing anything? Do I need a resistor in line with the red and green wire? If I have it all right, my plan would be to cut the male end of that connector out of the old regulator harness, clip it back into the female end, splice my red/green wire from the alternator to the red green wire on the male end of the plug, and then crim on a ring terminal to the big yellow wire and put that on the battery terminal of my starter solenoid to provide power to the headlights. Probably wire nut the two wires from the ammeter together, as they shouldnt be hot anymore, right? Any help would be greatly appreciated. Please let me know if my question is unclear or if I have left out any important information. Thanks!
1984 Bronco, mild built 300-6, Np435, 3.55 gears, 8.8 rear with Eaton TrueTrac, D44 TTB front, 31" tires, MSD ignition, Offy C, EFI manifolds, Holley 390, No AC, 3G alternator, front receiver
1988 F250 "One Piece at a Time" - 460 ZF5 4x4 work truck project under construction |
Re: 84 Bronco 3g alternator upgrade problem
|
Administrator
|
Yes, that's surely C610. And, you've asked some good questions. Unfortunately our page at Documentation/Electrical/3G Conversion needs some upgrades as we don't have one schematic that answers all the questions.
So, instead of answering your questions and then having to suggest other alternatives, let's go straight to the diagram below from that page and then the Ammeter & Voltmeter tab. This shows how I suggest you wire the output from the alternator. And what it says is: Take the output to the starter relay, but I really recommend that you put a megafuse in that circuit, probably w/a 150 amp fuse in it.Leave C610 and the shunt in place. Yes, you'll have a tiny voltage drop across the shunt, but it won't be enough to notice.Cut the yellow/light green wire on the cab side of C610, not on the engine side as shown below, and take that to ground via a relay closed by a key-on signal. Otherwise your voltmeter will be registering 24x7 and you'll slowly drain your battery.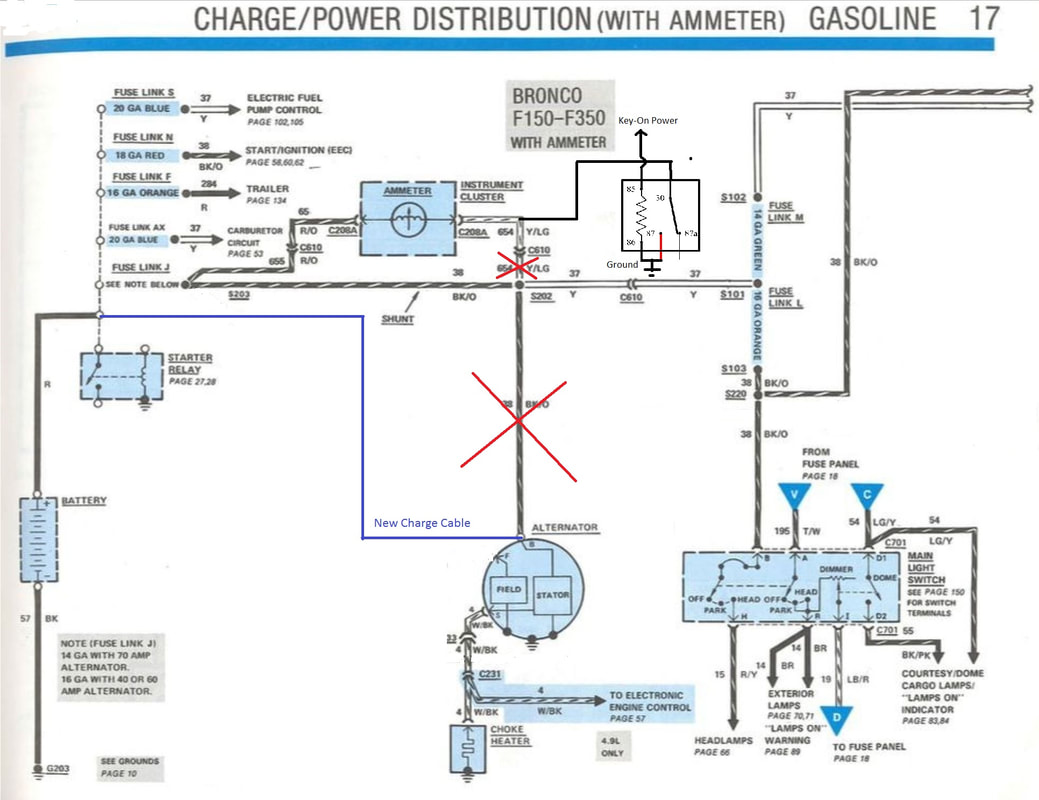 Then this drawing shows how to wire the rest, which you seem to have figured out. But you must have some switched power on the red/light green wire to bootstrap the alternator. However, you don't need a resistor nor bulb, just tie the existing red/light green wire to the alternator's "I" input. Does that answer all of the questions? 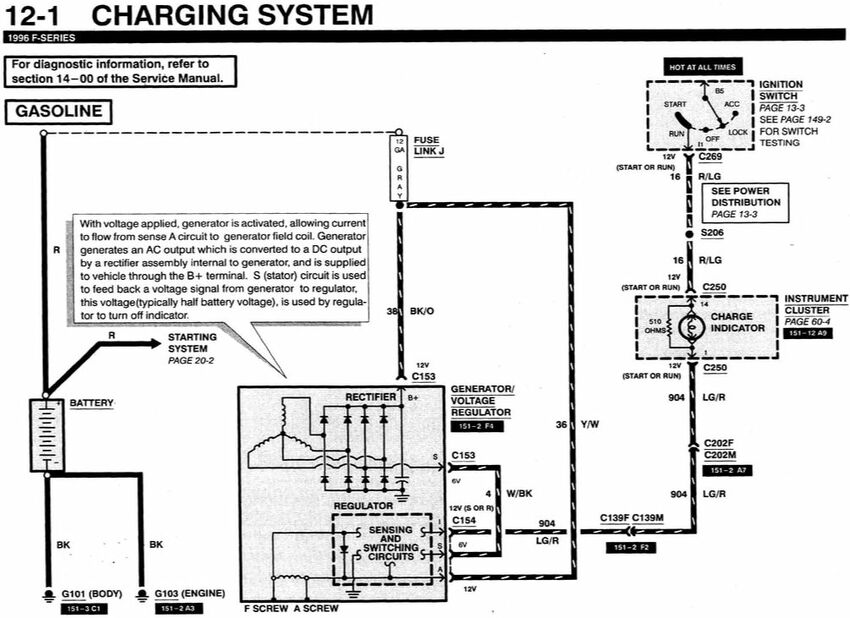
Gary, AKA "Gary fellow": Profile
Dad's: '81 F150 Ranger XLT 4x4: Down for restomod: Full-roller "stroked 351M" w/Trick Flow heads & intake, EEC-V SEFI/E4OD/3.50 gears w/Kevlar clutches
|
Re: 84 Bronco 3g alternator upgrade problem
|
This post was updated on .
Gary,
Thanks again for another extremely helpful post. My charging wire is a size 4 with an inline 175A fuse, and it lands on the battery terminal of the starter solenoid. My A wire is terminated on the alternator side of the 175A fuse instead of dirrectly onto the alternators output terminal simply because I had the right ring terminals to do that cleanly. As I understand it, I should plug C610 back in. The red and green wire needs to be joined with the red and green wire from my alternator on the engine side of C610. The yellow/green ammeter wire needs to be grounded so it can serve as the ground of my new volt meter, but this needs to be accomplished through a key on relay so it doesnt drain the battery. Where do I need to cut/dissasemble the old alternator harness? This is what it looks like now. My finger is pointing to the male end of C610. 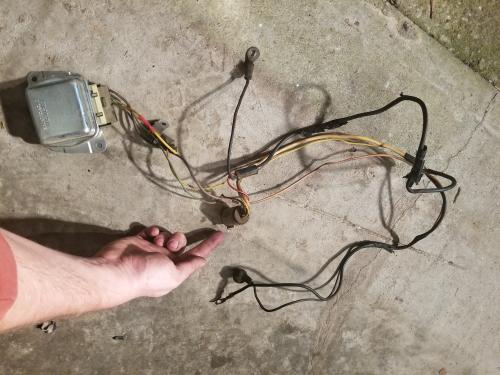 What happens to the red ammeter wire? Im just unsure of how to incorporate the parts of the old harness that I still need. Thanks again! Ps- the voltmeter wont arrive for a good little while. Can I drive the vehicle without it, so long as I dont have loose 12V wires hanging around grounding out on stuff? I was considering getting one of the cigarette lighter volt meters so I have something to look at until the real gauge arrives. Would that be a mistake?
1984 Bronco, mild built 300-6, Np435, 3.55 gears, 8.8 rear with Eaton TrueTrac, D44 TTB front, 31" tires, MSD ignition, Offy C, EFI manifolds, Holley 390, No AC, 3G alternator, front receiver
1988 F250 "One Piece at a Time" - 460 ZF5 4x4 work truck project under construction |
Re: 84 Bronco 3g alternator upgrade problem
|
Now I see that the red wire, through the harness, still ends up landing on the starter solenoid battery lug, thus acting as my volt meter hot wire.
1984 Bronco, mild built 300-6, Np435, 3.55 gears, 8.8 rear with Eaton TrueTrac, D44 TTB front, 31" tires, MSD ignition, Offy C, EFI manifolds, Holley 390, No AC, 3G alternator, front receiver
1988 F250 "One Piece at a Time" - 460 ZF5 4x4 work truck project under construction |
Re: 84 Bronco 3g alternator upgrade problem
|
Administrator
|
In reply to this post by StraightSix
Yes on C610 and the red/light green wire. And probably yes on the yellow/green wire, but you want to ground the wire coming from the cab, meaning the one coming from the voltmeter. It'll be the one in the harness still on your truck.
On the harness you are pointing to, here's what you should do with the wires from C610: Red/Orange: This is the wire that goes to Splice 203 and then through Fuse link J to the starter relay. You need to keep it.Yellow: This is the large wire that connects to Splice 202 and you need it.Yellow/Light Green: As said, you won't use this so can cut it and put a piece of heat shrink on it.Light Green/Red: As discussed, this goes to the alternator's LG/R wireBeyond that, you don't need the rest of the regulator's wiring harness. More specifically: Yellow/White Dots: Cut this wire off at Splice 203Black/Orange: Cut this wire off at Splice 202Does that answer the questions?
Gary, AKA "Gary fellow": Profile
Dad's: '81 F150 Ranger XLT 4x4: Down for restomod: Full-roller "stroked 351M" w/Trick Flow heads & intake, EEC-V SEFI/E4OD/3.50 gears w/Kevlar clutches
|
Re: 84 Bronco 3g alternator upgrade problem
|
Administrator
|
In reply to this post by StraightSix
Yep.
Gary, AKA "Gary fellow": Profile
Dad's: '81 F150 Ranger XLT 4x4: Down for restomod: Full-roller "stroked 351M" w/Trick Flow heads & intake, EEC-V SEFI/E4OD/3.50 gears w/Kevlar clutches
|
Re: 84 Bronco 3g alternator upgrade problem
|
I think that answers most of my questions, Ill have to get the harness into my hands and look it over. Ill just need to carefully label all of the splices wires and links before I start cutting. Ill do my best to take detailed photos so that others can use it to follow along in the future. Thanks again! I should have a follow up post tonight.
As a matter of interest, I am using a duralast alternator part number DL7734-6-11 which is a reman motorcraft with a lifetime warranty. The thichness of the ears seems to be a perfect match to my 1g alternator, no bracket modifications seem to be necessary. Also, for the shim between the alternator and the v belt pulley you might get away with using an M18 ring shim from mcmaster carr in 1.0mm thickness (.039") or a 1.5mm thickness (.059"). They are inexpensive and would be an easy way for someone who doesnt have access to machining tools to get the shim they need. I am not positive that the inside diameter would be suitable though. Ill be using a shim that a buddy with a lathe is going to turn for me
1984 Bronco, mild built 300-6, Np435, 3.55 gears, 8.8 rear with Eaton TrueTrac, D44 TTB front, 31" tires, MSD ignition, Offy C, EFI manifolds, Holley 390, No AC, 3G alternator, front receiver
1988 F250 "One Piece at a Time" - 460 ZF5 4x4 work truck project under construction |
Re: 84 Bronco 3g alternator upgrade problem
|
Gary,
I followed your directions and it was quick and easy. Thanks again! Here is what I started with 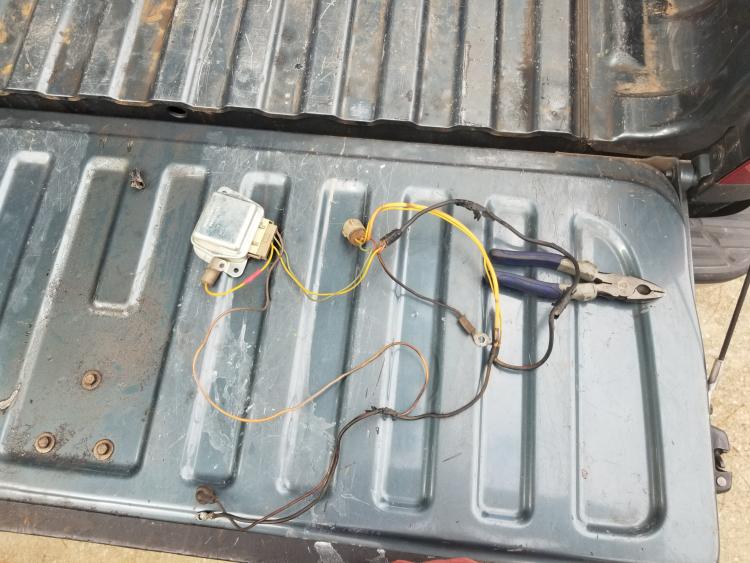 I cut the red and green wire as close to the old external voltage regulator as possible. I then cut the small yellow wire running from the old voltage regulator to fusible link 203 as close as I could to fusible link 203. Then, I cut the old charging cable away from the 4 way intersection S202 as close as possible, as well as the small diameter yellow wire. Now it looks like this. 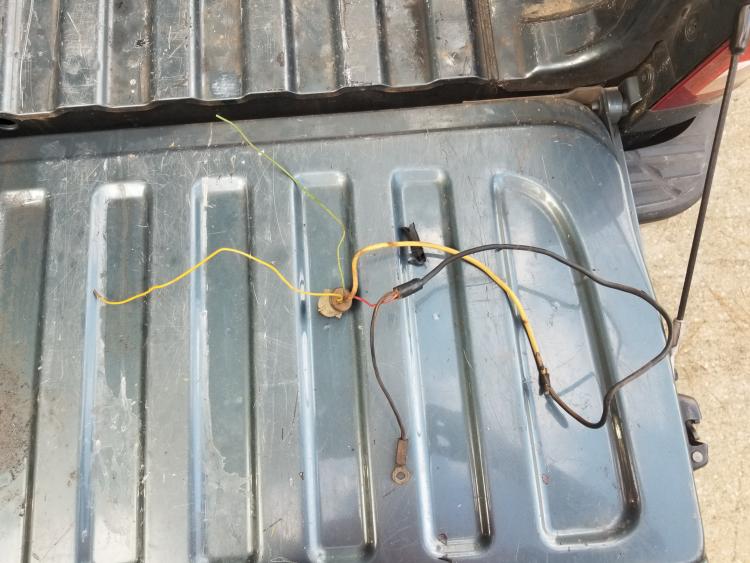 From here, I electrical tape wrapped the exposed conductors then slid the excess length of the heavy back and yellow wires down into a peice of 3/4 shrink tube to encase those wires, keep everything tidy, and reduce the chances of a short. The small green and red wire goes to the alternator and the small yellow and green gets grounded through a relay and becomes the ground for the volt meter. The ring terminal goes to the starter solenoid hot terminal. Does that all sound right? Thanks again Gary!
1984 Bronco, mild built 300-6, Np435, 3.55 gears, 8.8 rear with Eaton TrueTrac, D44 TTB front, 31" tires, MSD ignition, Offy C, EFI manifolds, Holley 390, No AC, 3G alternator, front receiver
1988 F250 "One Piece at a Time" - 460 ZF5 4x4 work truck project under construction |
Re: 84 Bronco 3g alternator upgrade problem
|
Administrator
|
Yes, I think you are right. Well done!

Gary, AKA "Gary fellow": Profile
Dad's: '81 F150 Ranger XLT 4x4: Down for restomod: Full-roller "stroked 351M" w/Trick Flow heads & intake, EEC-V SEFI/E4OD/3.50 gears w/Kevlar clutches
|
Re: 84 Bronco 3g alternator upgrade problem
|
Thanks a ton Gary! Ill be sure to update you when I actually get it running which will probably be Monday or Tuesday. Now Im working on figuring out how I want to wire the winch in. Its more an issue of routing those big cables than anything else. There arent a lot of convenient spots to put them, and I want it all to be pretty easy to remove since the winch will only be on the vehicle when Im going somewhere it could be useful.
1984 Bronco, mild built 300-6, Np435, 3.55 gears, 8.8 rear with Eaton TrueTrac, D44 TTB front, 31" tires, MSD ignition, Offy C, EFI manifolds, Holley 390, No AC, 3G alternator, front receiver
1988 F250 "One Piece at a Time" - 460 ZF5 4x4 work truck project under construction |
Re: 84 Bronco 3g alternator upgrade problem
|
Administrator
|
Welcome. Hope it goes well.
As for the winch, you should consider these connectors. I'm using a set, which allows me to leave the wiring to the battery attached but take the winch off and put it on the trailer. Then I have a 10' jumper that connects back up to the truck.
Gary, AKA "Gary fellow": Profile
Dad's: '81 F150 Ranger XLT 4x4: Down for restomod: Full-roller "stroked 351M" w/Trick Flow heads & intake, EEC-V SEFI/E4OD/3.50 gears w/Kevlar clutches
|
Re: 84 Bronco 3g alternator upgrade problem
|
Beleive it or not, I have that exact same plug set sitting on my work bench. I picked it up for this project, then talked myself out of it. I was sceptical about the plugs holding the current (I'm a mechanical guy, not electrical if that wasnt already apparent, so what do I know). Also, when I started looking around trying to decide where to locate the plug it turned into a bit of a geometric challenge. Where is your battery side plug located/mounted? It would be really convenient to have the plugs so that I could more easily slide the winch into the rear receiver and pull myself out backwards if need be.
Do you have an inline fuse? I was planning to place a 500A anl fuse on the + wire as close to the battery as possible. Warn claims that the max amp draw on my winch is 453A, but that seems mind bogglingly high. Thanks again!
1984 Bronco, mild built 300-6, Np435, 3.55 gears, 8.8 rear with Eaton TrueTrac, D44 TTB front, 31" tires, MSD ignition, Offy C, EFI manifolds, Holley 390, No AC, 3G alternator, front receiver
1988 F250 "One Piece at a Time" - 460 ZF5 4x4 work truck project under construction |
Re: 84 Bronco 3g alternator upgrade problem
|
Administrator
|
Yipes! What winch do you have? I have a Smittybilt 12K and it doesn't pull that kind of current, although I don't remember exactly how much it does pull.
I have a Warn winch bumper on the front, and a hitch receiver mounted right below the winch using the same bolts that hold the winch to the bumper. And my battery-side connector is strapped to the back end of that receiver. But, there's no fuse to the battery, although there really should be give the size of the wire as it could really melt down with a direct short. I have an aux battery on the driver's side, and the winch wires wend their way up from the receiver to that battery. The winch plugs into that cable when mounted in the bumper, or if the winch is mounted on the trailer and the trailer is hitched to the front of the truck I put the 10' welding cable jumper between the connector on the receiver and the winch. It would be nice to be able to put the winch on the rear. But that would mean creating a receiver mount for it and then carry it everywhere. Perhaps if I didn't have the Warn bumper I would mount the winch in front of a standard bumper on a receiver and then I could easily move it to the rear.
Gary, AKA "Gary fellow": Profile
Dad's: '81 F150 Ranger XLT 4x4: Down for restomod: Full-roller "stroked 351M" w/Trick Flow heads & intake, EEC-V SEFI/E4OD/3.50 gears w/Kevlar clutches
|
Re: 84 Bronco 3g alternator upgrade problem
|
Gary,
I think those warn winch bumpers look great, especially on our trucks. They blend really well into the lines at the fron of the wheel wells. Here is what Ive done 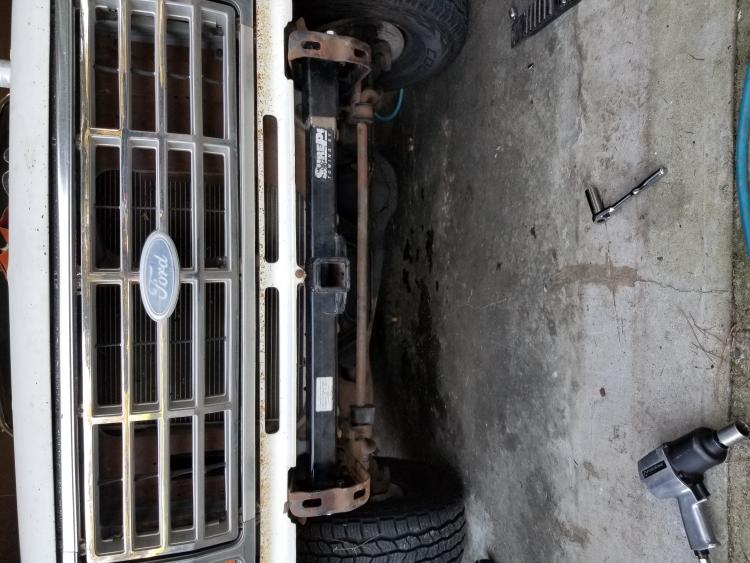 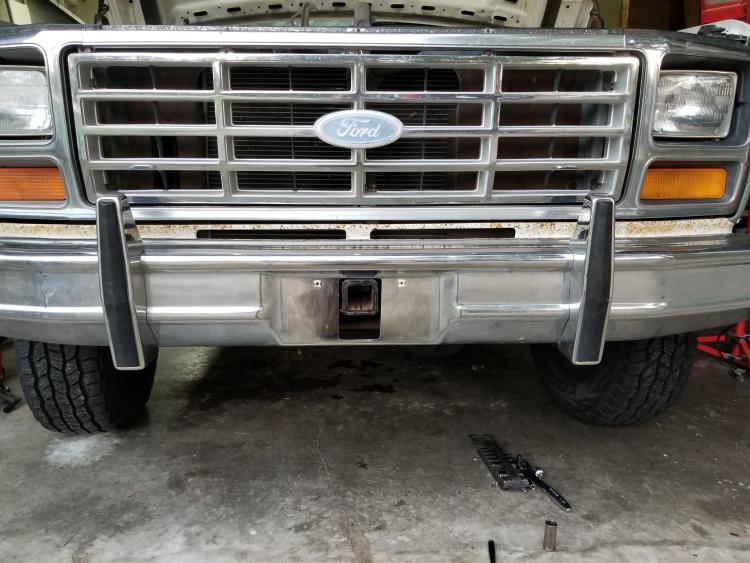 I still need to build the insert to hold the winch and finalize the wiring. And ofcourse, this is all the main reason for the alternator. Im going on a trip in November that Id like to have the winch for. One neat thing is that the receiver only sticks out of the front of the bumper by about 1/4", so I can put a vanity plate over the front receiver when its not in use and you would never know. Its an 8000lb warn winch. The name plate is indecipherable but I am assuming it is a M8000 because its looks identical and has the same weight rating. That is how I found the 453A max draw.. even if it hits that amperage Im sure it cant stay there for very long. I dont "offroad" but I do spend a good bit of time on old national forest and forest service roads and the like. They arent always well maintained and Ive been stuck before. Since Im almost always alone the winch is great help.
1984 Bronco, mild built 300-6, Np435, 3.55 gears, 8.8 rear with Eaton TrueTrac, D44 TTB front, 31" tires, MSD ignition, Offy C, EFI manifolds, Holley 390, No AC, 3G alternator, front receiver
1988 F250 "One Piece at a Time" - 460 ZF5 4x4 work truck project under construction |
Re: 84 Bronco 3g alternator upgrade problem
|
Administrator
|
I've thought about doing what you've done. Fortunately my truck came to me with the Warn bumper as the Sky Offroad RSK obviates placing the receiver where you put it - which looks to be a very solid place by the way.
So you have the best of both worlds - stock looking when you want it and a winch on either end when you need it. I like that!  As for "offroading", I'm not likely to do much of that, but do want to do forest service roads and the trails in Colorado. And I can see how a winch would be very helpful on them. Just last week when taking one of the trails in Colorado I saw aspen trees that had fallen across the trail and someone had pulled off, probably with a winch.
Gary, AKA "Gary fellow": Profile
Dad's: '81 F150 Ranger XLT 4x4: Down for restomod: Full-roller "stroked 351M" w/Trick Flow heads & intake, EEC-V SEFI/E4OD/3.50 gears w/Kevlar clutches
|
Re: 84 Bronco 3g alternator upgrade problem
|
Thanks! Im really pleased with how the front receiver turned out. I like the idea of being able to leave things looking mostly stock when I can, though the warn bumpers have a great look to them.
I thought cutting the front bumper without scarring, burning or blueing the plating would be hard, but it really wasnt too bad. I drilled the corners with a 1/2 drill bit then used a cutoff wheel to cut most of the length. I did try not to work for too long in any one area with the cuttoff wheel. I cleaned it up with a flapper wheel and a hand file. The last time I got stuck I was in a 2wd with no winch. I spent about 12 hours split across 2 days digging myself out. And I was way outside of cell service range. I dont want to do that again!
1984 Bronco, mild built 300-6, Np435, 3.55 gears, 8.8 rear with Eaton TrueTrac, D44 TTB front, 31" tires, MSD ignition, Offy C, EFI manifolds, Holley 390, No AC, 3G alternator, front receiver
1988 F250 "One Piece at a Time" - 460 ZF5 4x4 work truck project under construction |
Re: 84 Bronco 3g alternator upgrade problem
|
Administrator
|
In reply to this post by StraightSix
I'm late to the party but I want to say that the 3G (and most alternators, across domestic brands) has a 17mm shaft. While 18mm is probably just fine, I'm trying to catch up with the forum and wanted to answer your question. Also 1mm (0.040 in my book) seems plenty. I've used a 0.025 machine shim and there was no rubbing, but I'm not sure that all pulleys are exactly the same.
Jim,
Lil'Red is a '87 F250 HD, 4.10's, 1356 4x4, Zf-5, 3G, PMGR, Saginaw PS, desmogged with a Holley 80508 and Performer intake. Too much other stuff to mention. |
Re: 84 Bronco 3g alternator upgrade problem
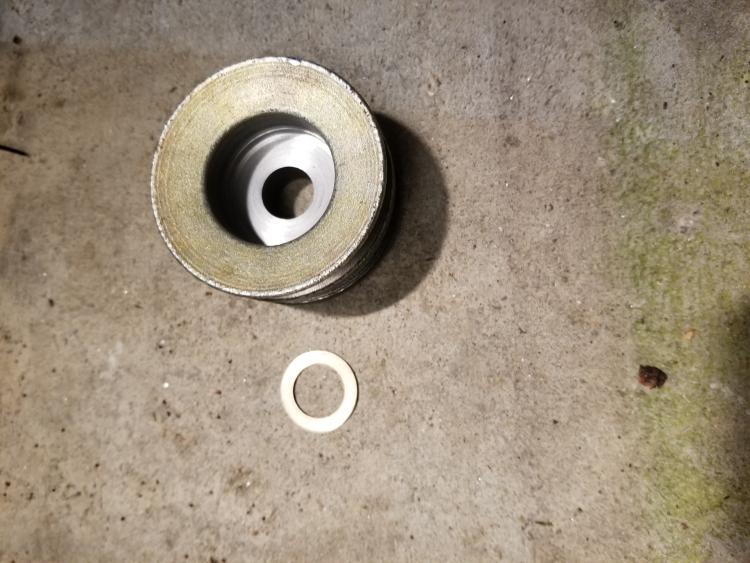 I just got my shim and pulley back from my friend with the lathe. He made me .030, .040, .050, and .070 shims. I ended up using the .040". He also machined out the pocket on my pulley .180" deeper to allow for more thread engagment between the nut and the shaft. I suspect this may be necessary for double v belt pulleys. I finally have all the parts ready to go but Ill be out of town until Monday. It should be running monday night. How should I tighten the nut that holds the pulley onto the alternator shaft? Putting an impact on it seems like a really bad idea. Maybe try to wrap a strap wrench around the pulley and use a breaker bar for the nut? Thanks Guys!
1984 Bronco, mild built 300-6, Np435, 3.55 gears, 8.8 rear with Eaton TrueTrac, D44 TTB front, 31" tires, MSD ignition, Offy C, EFI manifolds, Holley 390, No AC, 3G alternator, front receiver
1988 F250 "One Piece at a Time" - 460 ZF5 4x4 work truck project under construction |
Re: 84 Bronco 3g alternator upgrade problem
|
Administrator
|
There are impacts and then there are IMPACTS. My 3/8" Ridgid generates ~40 lb-ft with a fully-charged battery, and that's what I use on an alternator's bolt for tightening. I put on a leather glove and hold the pulley and hit the nut with the impact.
But sometimes to remove the nut I need to use the 1/2" Ridgid, which supposedly can generate up to 300 lb-ft. It doesn't take that much, but a quick hit with it brings the nut right off.
Gary, AKA "Gary fellow": Profile
Dad's: '81 F150 Ranger XLT 4x4: Down for restomod: Full-roller "stroked 351M" w/Trick Flow heads & intake, EEC-V SEFI/E4OD/3.50 gears w/Kevlar clutches
|
Re: 84 Bronco 3g alternator upgrade problem
|
There is certainly a big difference between a rigid 3/8 and a 1/2 drive pneumatic which is what took the alternator pulley nuts off. Ill probably do just as youve said and use my rigid for installation. Thanks!
1984 Bronco, mild built 300-6, Np435, 3.55 gears, 8.8 rear with Eaton TrueTrac, D44 TTB front, 31" tires, MSD ignition, Offy C, EFI manifolds, Holley 390, No AC, 3G alternator, front receiver
1988 F250 "One Piece at a Time" - 460 ZF5 4x4 work truck project under construction |
| Edit this page |

