81 F100 flare side custom with 300 six & T18
Go ahead rub it in  I been meaning to check with the banker (wife) to see when retirement can happen but hope in 7 to 8 years or when my Home Land security has to be renewed and I think that is 5 years. If I need to work them last 2 or 3 years then not do LP gas in the winter or go to the ports for cement pick up, we will see when the time comes. Dave ----
Dave G.
81 F100 flare side 300 six / AA OD / NP435 / 2.75 gear http://cars.grantskingdom1.com/index.php/1980-Ford-F100?page=1 81 F100 style side 300 six/SROD parts truck -RIP http://cars.grantskingdom1.com/index.php/1981-Ford-F100 |
|
I got out of work early so I stopped and ordered 2 cans of the SEM textured paint. Should be in sometime tomorrow they say.
I have the 4 kick panels and when I finish the repair to the dash pad I want to put texture on it before painting it. I also asked if there was something to repair / fill the cracks on the dash pad then add the texture and paint. His answer was NO or he would have used it to fix a few of his dash pads. At this point I need to look over the pad I started to fix and hope I can remember what I used up to that point because I can remember off the top of my had at this time.. Dave ----
Dave G.
81 F100 flare side 300 six / AA OD / NP435 / 2.75 gear http://cars.grantskingdom1.com/index.php/1980-Ford-F100?page=1 81 F100 style side 300 six/SROD parts truck -RIP http://cars.grantskingdom1.com/index.php/1981-Ford-F100 |
|
I got to looking and found this on the SEM site
https://www.semproducts.com/products/repair/interior-repair I am going to go with the texture spray and paint over it. The other product I will have to look into more for the dash pad fix. Dave ---- edit: just saw the video and it needs heat to make it work so if you don't have a heat gun you might not be able to use this.
Dave G.
81 F100 flare side 300 six / AA OD / NP435 / 2.75 gear http://cars.grantskingdom1.com/index.php/1980-Ford-F100?page=1 81 F100 style side 300 six/SROD parts truck -RIP http://cars.grantskingdom1.com/index.php/1981-Ford-F100 |
Re: 81 F100 flare side custom with 300 six & T18
|
Administrator
|
Dave - My worry about the repair product is that much of the vinyl on our dashes has been damaged by the UV from the sun. So just fixing what's cracked now may not be the end of the cracking.
Anyway, glad you got the texture and can't wait to see how it works. 
Gary, AKA "Gary fellow": Profile
Dad's: '81 F150 Ranger XLT 4x4: Down for restomod: Full-roller "stroked 351M" w/Trick Flow heads & intake, EEC-V SEFI/E4OD/3.50 gears w/Kevlar clutches
|
Well we never know till we try right? LOL I just don't like using a heat gun to et the SEM repair putty to set. I have to look over the pad I started to repair to see if I can remember what I used so far. I want to say I used seam sealer but I had a big hole where the speaker and don't remember what the "filler" was. I may use this one to install the cover on and the other pad that is in better shape so thinking if I can fill the cracks use the SEM textured paint and then paint to see how it turns out. I will post what I do and the out come. Dave ----
Dave G.
81 F100 flare side 300 six / AA OD / NP435 / 2.75 gear http://cars.grantskingdom1.com/index.php/1980-Ford-F100?page=1 81 F100 style side 300 six/SROD parts truck -RIP http://cars.grantskingdom1.com/index.php/1981-Ford-F100 |
|
During the week I ordered and picked up the SEM textured spray. I should have ask how much before asking for 2 cans, $75 and change it better work!
I used JB Weld on the bumpers last week so I sanded it down so I can either get them wrapped or I can paint them when the time comes. Being I have the textured paint I took a look at the dash I started the repair on a wile back. After looking it over I saw that I did use expanding foam to fill the speaker hole, and latex in the cracks and covered it all with seam sealer. Well I was not happy on how it turned out. The foam expanded more and was to high and the cracks opened up. I sanded the high spot on the speaker area and at the cracks so I could see what I was working with, that is how I saw how I tried to fix it before. I dug out the cracks and made them deeper as I felt the filler I used before did not go deep enough to bite and keep from cracking, the latex I also think was the wrong product to use. I also think the flexing of the dash also had something to do with it cracking so when working on it I made the center a little higher this way when level it would push the cracks closed after they were filled. I used brushable seam sealer and a putty knife and forced it into the cracks. I did see later that the sealer sunk into the cracks more so I will need to take down any high spots and add more sealer to bring them up level, more to come. I finished cleaning the old paint off the radio bezel with the old brake fluid. It worked pretty good, washed off with water and when dry looks like it will need to be painted black again to look good. I also found it was broken in a few places but think I can glue it and not show up. With that turning out good I then started on the gauge bezel with the old brake fluid. I was worried about the light covers across the top but they seam to be ok with the brake fluid I hope it will remove the paint on them. I did see the wiper / light windows don't have the pictures in them but they are still covered in some paint still. So it is soaking in brake fluid till I get back to it in a few days. I then did what I hope will be the last of the body work. I was able to work the dent out of the fender to the point where I hope the primer and spot putty will make it smooth. I also used the spot putty on the hood to take care of a spot I did not like. When I get back on it I will wet sand the 2 spots and if not good will make them good before paint. Dave ----
Dave G.
81 F100 flare side 300 six / AA OD / NP435 / 2.75 gear http://cars.grantskingdom1.com/index.php/1980-Ford-F100?page=1 81 F100 style side 300 six/SROD parts truck -RIP http://cars.grantskingdom1.com/index.php/1981-Ford-F100 |
Re: 81 F100 flare side custom with 300 six & T18
|
Administrator
|
Wow, you had a long day!
So the texture is like $38/can? Yipes! I hope one can will do a lot. On the dash, when you say "latex" do you mean a latex caulk? And you think you should have used seam sealer instead? Is your seam sealer sandable? You'll sand it smooth, re-apply, sand, etc until it is level? Then the texture goes on? And the brake fluid doesn't appear to hurt the plastic on the bezels, just takes the wood grain finish off?
Gary, AKA "Gary fellow": Profile
Dad's: '81 F150 Ranger XLT 4x4: Down for restomod: Full-roller "stroked 351M" w/Trick Flow heads & intake, EEC-V SEFI/E4OD/3.50 gears w/Kevlar clutches
|
Yep about $38 a can. As for 1 can I have the dash to do and the 4 kick panels, maybe some other trim parts and maybe the storage tray that goes at the top of the windshield because it is alum. right now. Latex - yes in caulk as I thought it would have worked and it may have if the cracks were deeper. When I dug it out it was not vary thick, was sitting on top of the foam. I removed some of the foam to make the filler thicker thinking it may help. I was able to use a DA air sander on the seam sealer that was on it and I used the same stuff this time but that sealer has been on guessing a year or better so it has time to setup LOL. Yes sand build up and sand some more till level then texture and then SEM color coat. All this was after hour and a half of weed whacking today. I cut the grass yesterday for 3 hours and that was after a full day at work. Dave ----
Dave G.
81 F100 flare side 300 six / AA OD / NP435 / 2.75 gear http://cars.grantskingdom1.com/index.php/1980-Ford-F100?page=1 81 F100 style side 300 six/SROD parts truck -RIP http://cars.grantskingdom1.com/index.php/1981-Ford-F100 |
Re: 81 F100 flare side custom with 300 six & T18
|
Administrator
|
LOL! Night before last Janey and I were awakened by a loud brushing sound, but we couldn't find it. Yesterday morning it was obvious - a LARGE limb had fallen out of the tree behind the house, missing everything. So I spent quite some time with my sawzall cutting it up and taking it out back to the burn pile.
Then it was a lot of weed whacking in areas of the yard I can't get the mower into, and whacking tall grass is SLOOOOOW work. Then finish the mowing that I'd started on Wednesday, before getting the mower stuck. And after that I was TOAST! So I applaud you being able to get all the truck work done after all the weed whacking, mowing, and WORK! (My impression of Maynard G. Krebs.) Anyway, I guess the jury is still out on whether seam sealer is the thing to use. I/we await your assessment.
Gary, AKA "Gary fellow": Profile
Dad's: '81 F150 Ranger XLT 4x4: Down for restomod: Full-roller "stroked 351M" w/Trick Flow heads & intake, EEC-V SEFI/E4OD/3.50 gears w/Kevlar clutches
|
|
This post was updated on .
Customers equipment broke yesterday wile I had a load (26 tons of powdered cement) on my work truck and they could not get it fixed for today so I had it off.
Not wanting to waste a day off I hit the garage at 6am and it is to be the hottest day of the year so far. I gave the gauge bezel another coat of brake fluid as it still has some paint stuck to it and hit it thru out the day. Found a bucket added water a little dish soap and some wet/dry 320 & 400 grit sand paper to sand the spot putty spots on the front fender and hood I did last time working on it. Front fender came out great hood not so great. After wet sanding half the hood I did not like what I was seeing. Broke out the DA air sander with 220 grit paper to get the whole hood where I wanted and then hit it with spot putty. Hit the bezel with fluid again and took a little break for food. Putty was dry so I wet sanded it and am happy the way it turned out and is ready for primer as is the front fender and a spot on 1 rear fender. When checking the rear fender I see marks that need to be fixed before primer again. I wet sanded the running boards, they had been treated for the rust a wile back and are now ready for primer. I rinsed the gauge bezel off with water and I see it is also broken like the radio one is. Think both can be glued back together, then a light coat of black satin paint and should be good for a driver but I want to use the wood bezels to match the wheel. I wanted to get primer on the hood, fenders and running boards but it was 100*f by 12pm and I had enough of the heat. Maybe I can get out tomorrow to get everything in primer? Dave ----
Dave G.
81 F100 flare side 300 six / AA OD / NP435 / 2.75 gear http://cars.grantskingdom1.com/index.php/1980-Ford-F100?page=1 81 F100 style side 300 six/SROD parts truck -RIP http://cars.grantskingdom1.com/index.php/1981-Ford-F100 |
Re: 81 F100 flare side custom with 300 six & T18
|
Administrator
|
Looks like it was a productive day anyway. Well done!

Gary, AKA "Gary fellow": Profile
Dad's: '81 F150 Ranger XLT 4x4: Down for restomod: Full-roller "stroked 351M" w/Trick Flow heads & intake, EEC-V SEFI/E4OD/3.50 gears w/Kevlar clutches
|
Yes it was. I did not get primer on the panels like I wanted but the panels were not finished as nice as I thought they were and needed more work to pass before primer. If not for that I think primer would have been sprayed. Also walking pass the dash pad I used the seam sealer on I see it did sink into the cracks but has a much better base to work with. I also wanted to do some work to it but the temperature was just to hot to stay in the garage longer. Have to see what mama has planed but I may get there before it gets hot and get primer on the panels so they will not rust and do a little more work to the dash pad. Dave ----
Dave G.
81 F100 flare side 300 six / AA OD / NP435 / 2.75 gear http://cars.grantskingdom1.com/index.php/1980-Ford-F100?page=1 81 F100 style side 300 six/SROD parts truck -RIP http://cars.grantskingdom1.com/index.php/1981-Ford-F100 |
|
Did some more body work / paint prep on the truck.
Got it outside to run a little and to blow the dust & leaves off it and the sanding dust is better outside than in where I plan to paint the truck. Got the rear fenders ready for primer, most of this was hand work. moved the hood out to the middle of the garage so could prim it got everything setup and my primer gun was giving me fits! Got primer on the hood and I plan to paint the bumpers now so primed them but they did not come out too good because of the gun. When the top side of hood was drying I did the fenders, 1 at a time as that is all I had room for inside out of the hot sun. I flipped the hood over and prepped it for primer and you guessed it got primer on it also. I got primer on the 2 running boards in between all this too. I then went looking to see if I had enough paint for the under side of the hood and I did not. I have gone thru 2 qts doing the inside of the cab, door jambs and the inside & edges of the front fenders. Looking to get maybe 1 gal this way I should have enough to paint the bed too but thinking might need more for the cab when the time comes but will see. Waiting for paint I meant primer to dry I worked on the dash pad I did last time with seam sealer. I sanded it down but when it got hot it became rubbery so had to take my time and let it cool some. I did get another coat of seam sealer on it as some sunk into the cracks. This got me to thinking, I know thinking for me is bad LOL, but what is you were to open the cracks a little bit and forced hot glue into the cracks? You would make it come up above level then use a flat iron like used on welding plastic and make it level. The hot glue I used on the back side is holding up great so far. I may give this a try on my other pad as long as I have 1 that I can put the dash topper on for my truck I am good to go. I did not get any pictures of the hood or running boards but did take some of the truck as I have not since last year on the 4th. A walk around 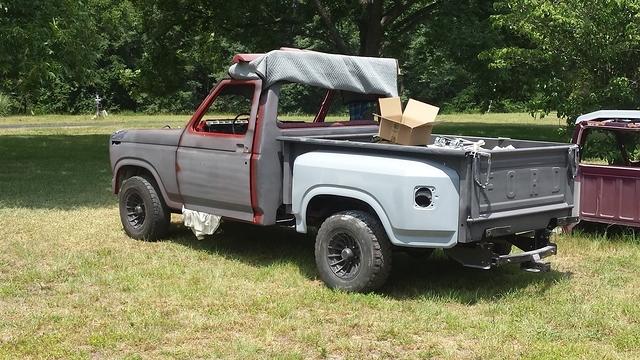 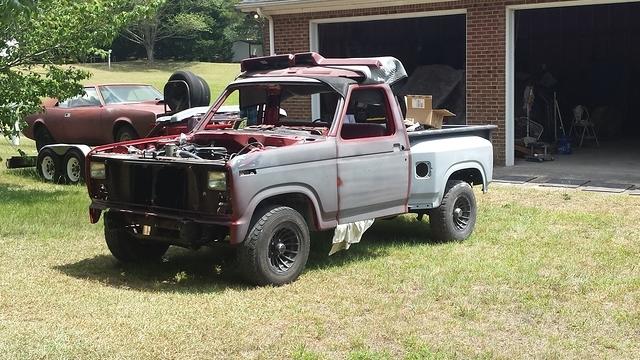 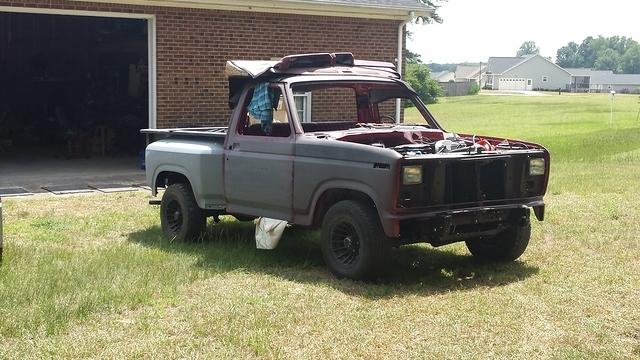 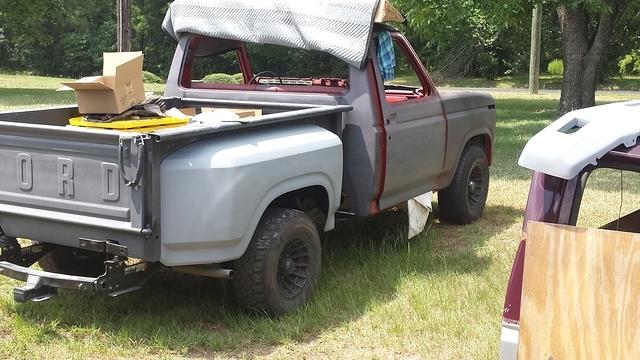 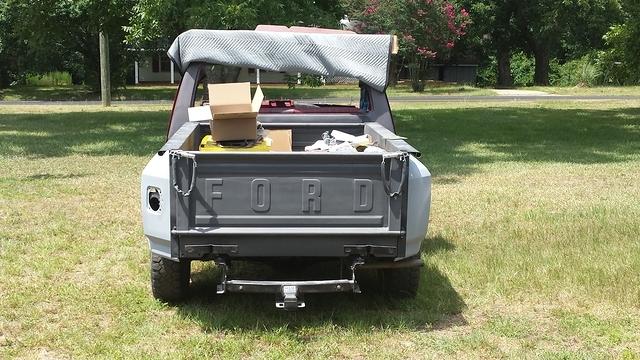 Also had the FTE NC chapter president stop by to say hi and to pick up the chrome rear step bumper being he had his truck. Dave ----
Dave G.
81 F100 flare side 300 six / AA OD / NP435 / 2.75 gear http://cars.grantskingdom1.com/index.php/1980-Ford-F100?page=1 81 F100 style side 300 six/SROD parts truck -RIP http://cars.grantskingdom1.com/index.php/1981-Ford-F100 |
Re: 81 F100 flare side custom with 300 six & T18
|
Administrator
|
That was quite a day, Dave! Glad you persevered in in spite of the recalcitrant primer gun.
 Has it really been a year since you took pics? Wow! That's a loooong time. Good to see the truck out in the sunlight. On the dash pad, wouldn't a hot iron stick to the hot-melt glue? Or vice versa? Or do you put a piece of something over it to prevent sticking? If so, hot-melt might work.
Gary, AKA "Gary fellow": Profile
Dad's: '81 F150 Ranger XLT 4x4: Down for restomod: Full-roller "stroked 351M" w/Trick Flow heads & intake, EEC-V SEFI/E4OD/3.50 gears w/Kevlar clutches
|
It was a year on the 4th that I took a full picture of the truck and the rear fenders were all different colors just wished the primer was the same color as the rest of the truck. Last year 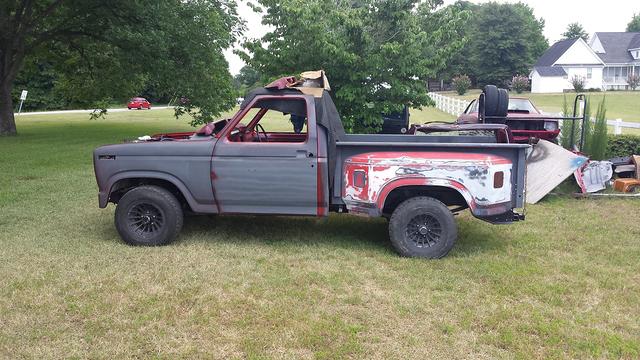 Today  On the hot glue I never gave that a thought. Wonder if wax paper or parchment paper would work between the iron & glue? Or maybe something like butter they use when leading a seam on a car / truck you melt the lead in the seam then use a wood paddle with this butter on it to keep the lead from sticking to it and smooth the lead out then use a lead file to get it to the final shape. In my travels I will have to see if I can find an "iron" that I think will work and give it a try with the paper. Dave ----
Dave G.
81 F100 flare side 300 six / AA OD / NP435 / 2.75 gear http://cars.grantskingdom1.com/index.php/1980-Ford-F100?page=1 81 F100 style side 300 six/SROD parts truck -RIP http://cars.grantskingdom1.com/index.php/1981-Ford-F100 |
|
Well I got out of work early so I hit the paint store and bought 1 gal of red and at $217 just for the paint then add the reducer & hardener.
I also needed more primer & thinner so the total was $405 and I still need to buy the white! I hope to move things around in the garage to get more room for painting. Already told the wife she may need to park her car in the drive and not in the hose garage as I will need to park the truck in there wile I paint the bed. Dave ----
Dave G.
81 F100 flare side 300 six / AA OD / NP435 / 2.75 gear http://cars.grantskingdom1.com/index.php/1980-Ford-F100?page=1 81 F100 style side 300 six/SROD parts truck -RIP http://cars.grantskingdom1.com/index.php/1981-Ford-F100 |
|
Well that's something Dave! Seeing shiny coats of paint this past couple weeks has given me all kinds of inspiration and enthusiasm that I had been otherwise struggling to find...

1994 F150 4x2 Flareside. 5.0 w/MAF, 4R70W, stock.
1984 F150 4X2 Flareside. Mild 302 w/ 5spd. Sold. 1980 F150 4X4 Flareside. 300i6 w/ 5spd. Sold in 2021. 1980 F100 4X2 Flareside. 351w/2bbl w/NP435. Sold in 1995 |
Me too and if I break it down to doing just the bed like you and look at the truck as half painted then the cab should not be that hard right?  As I told the wife tonight once painted I can start to put things back on like door locks, latches & handles, wiper assy., etc to make it look even more like a truck. cant wait  Dave ----
Dave G.
81 F100 flare side 300 six / AA OD / NP435 / 2.75 gear http://cars.grantskingdom1.com/index.php/1980-Ford-F100?page=1 81 F100 style side 300 six/SROD parts truck -RIP http://cars.grantskingdom1.com/index.php/1981-Ford-F100 |
Re: 81 F100 flare side custom with 300 six & T18
|
Administrator
|
That is a MAJOR turning point! And it feels sooooooo good! Hope you get there soon.
Gary, AKA "Gary fellow": Profile
Dad's: '81 F150 Ranger XLT 4x4: Down for restomod: Full-roller "stroked 351M" w/Trick Flow heads & intake, EEC-V SEFI/E4OD/3.50 gears w/Kevlar clutches
|
Re: 81 F100 flare side custom with 300 six & T18
|
In reply to this post by FuzzFace2
Here's a product that I came by chance the other day. They have repair videos showing them fixing a Datsun 280Z dash as well as bumper and other plastic part repairs. http://www.polyvance.com/Airless-Welders-1/5210/
Here's their dash repair video :<nabble_embed>www.youtube.com/watch?v=_x8qtvG-Y8U</nabble_embed>
1981 F 150 Custom 300 ci with a fully rebuilt 1968 240 head Carter YFA T-18 3.25 9" rear 2WD
dual gas tanks 1990 Lincoln Town Car 5.0 AOD Home town Mc Kenzie, TN |
| Edit this page |

