Search Forum
300 valve adjustment
|
I’ve actually done my homework and read the directions (novel idea) but I’ve been modified to the point none of them seem to be working for me so I’m at the well of knowledge again.
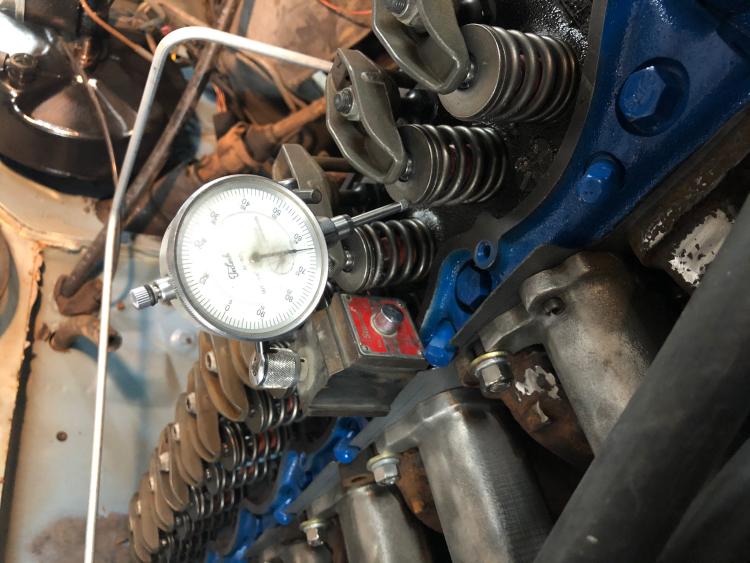
I have a 1981 300 With a 240 head that has been milled at least once in its life. The block was decked even with the pistons. Stock pistons and rods with a Melling RV cam in it. The press in studs were replaced with threaded rocker arm studs. Rocker arms are stock. I have everything assembled to the point I’m trying to adjust the valves. I can adjust the lash to zero without any problem but as soon as I try to add the 1 full turn the valve begins to open. I’m using a dial test indicator with mag base to measure the valve movement. I’m working on number one cylinder with the harmonic balancer Mark setting at TDC. After writing all this out it sounds like my pushrods are too long after all that milling.  What is your take on this please?
John in Odessa, Tx
1981 F150, Custom base model Holley 390 w/Offenhauser intake EFI exhaust T170 SROD transmission |
|
Are you sure you are on TDC on number 1 and not on number 6?
Steve
86 Bronco, XLT, 5.0 EFI, EEC IV, AOD, IFS, limited slip front and rear, 3.08 gears, Tilt steering, factory AC |
|
Spark plugs are out of it so I could turn it over without compression and I can see the top of the number one piston
John in Odessa, Tx
1981 F150, Custom base model Holley 390 w/Offenhauser intake EFI exhaust T170 SROD transmission |
|
In a 4 stroke engine, the strokes are intake( valve open, piston down), compression ( both valves closed, piston up), power,(both valves closed, spark plug fired and the expanding gasses pushing the piston down), then exhaust( piston up, exhaust valve open and piston coming up to TDC)
The firing order in an inline 6 is 1 5 3 6 2 4. That being said you may be on TDC on one, but on the exhaust stroke, meaning that number 6 is on TDC also but both valves are closed so you might be 180 deg out. Rotate the engine one full turn back to TDC and try to adjust the valves on number 1.
Steve
86 Bronco, XLT, 5.0 EFI, EEC IV, AOD, IFS, limited slip front and rear, 3.08 gears, Tilt steering, factory AC |
|
Okay I’ll do as you suggest
Thanks for the information
John in Odessa, Tx
1981 F150, Custom base model Holley 390 w/Offenhauser intake EFI exhaust T170 SROD transmission |
|
Administrator
|
Copied from another forum:
THE FRENCHTOWN FLYER » Sat Sep 01, 2018 9:40 pm From the forum FAQ: Q: Can somone tell me the proper procedure for adjusting the valves on a 300 with it not running? A: Adjusting the valves on a 300 is EASY. For beginners I recommend writing down the firing order, 153624, thusly: 1 5 3 6 2 4 With a breaker bar or long handled ratchet and a 15/16 socket rotate the engine damper until the timing mark comes up to top dead center. Watch #6 cyls and #1 cyls rocker arms as you do this. On one of these two cylinders the exhaust will just be closing and the intake will start to open as you approach top dead center. If that happens on #6 then adjust #1. If it happens on #1 then adjust #6, because these two pairs are matched, as in the diagram above (5 & 2 and 3 & 4 are the other two matched pairs). So lets say you just adjusted #6. The next cylinder to adjust in the firing order is #2. Rotate the crank about a third of a rev, watching #2's buddy, #5. The exhaust rocker for #5 will be closing and the intake starting to open as you get to TDC. Adjust #2 when the two #5 rockers are in alignment, one closing and one opening. Continue this process until you go through all six, then go through it again, to double check. With this method you can adjust all six cylinders with only two revolutions of the crank. To speed things up you could mark your damper in three places spaced 120 deg apart. But any more I dont even look at the damper. With practice you can run through your valves in five minutes. It will take you longer to remove the valve cover than to run the valves. Whats more you wont even have to look at the damper, just find the cylinder in the overlap cycle and start from there, adjusting the buddy cyl. Good luck. THE FRENCHTOWN FLYER The only thing I can add is it helps to mark your damper in three places so you can easily see when you are approaching TDC on every cylinder. |
Bullnose Enthusiasts Forum
|
1 view|%1 views
| Edit this page |

