1985F20 SuperCab "REDRUM"
|
Administrator
|
Chris - You are doing an excellent job. But that ignition harness looked UGLY! I don't know that I've seen one in such bad shape. But it looks much better now.

Gary, AKA "Gary fellow": Profile
Dad's: '81 F150 Ranger XLT 4x4: Down for restomod: Full-roller "stroked 351M" w/Trick Flow heads & intake, EEC-V SEFI/E4OD/3.50 gears w/Kevlar clutches
|
|
Hi Chris,
Really nice journey, you're taking us along with. I recognise the snapping isolation of the old wiring. If you bend a wire on a short radius, it will just crack. I suppose new wiring is the only right solution 
Jeep Grand Wagoneer AMC 5.9L (LPG injection, DIS ignition fully electronic EFI DIY design & build)
1982 F250 4x4 351W super cab, long bed |
|
Thanks!
Chris
1985 Ford F250 XLT SuperCab ZF5-42 swapped 460 hot fuel, factory AC. Part way through 4WD swap. 1988 Suzuki Samurai -- Daily Driver 1968 Dodge Dart -- Project car 1957 Chevy 4400 Flat Bed -- Collector Project 1955 Buick Century -- Collector Cruiser |
|
This post was updated on .
In reply to this post by CRittaler
Finished up the trailer brake wiring in the cab but forgot too take pictures. I don't have the connector wired at the bumper yet, but when I use the lever on the controller the brake lights on the truck light so something is right.
Moved on to working on the rest of the gauges. I used a spare bezel that I had that was from a diesel and removed the glow plug panel to let wires through.
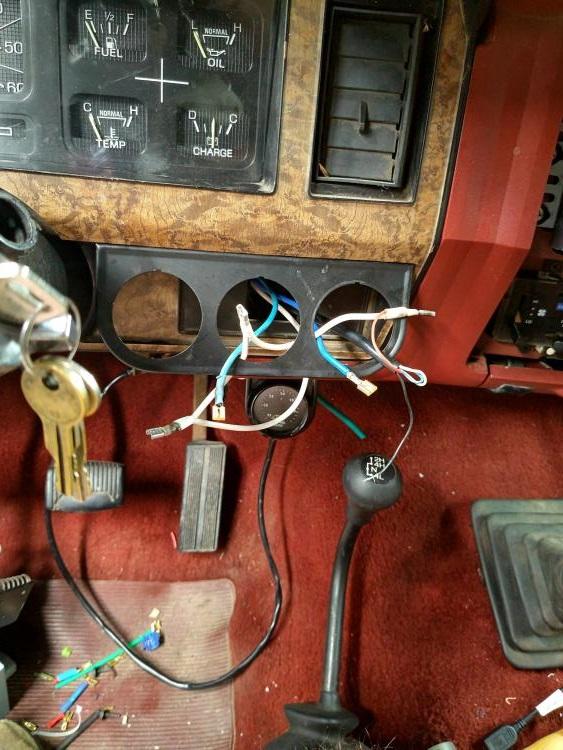
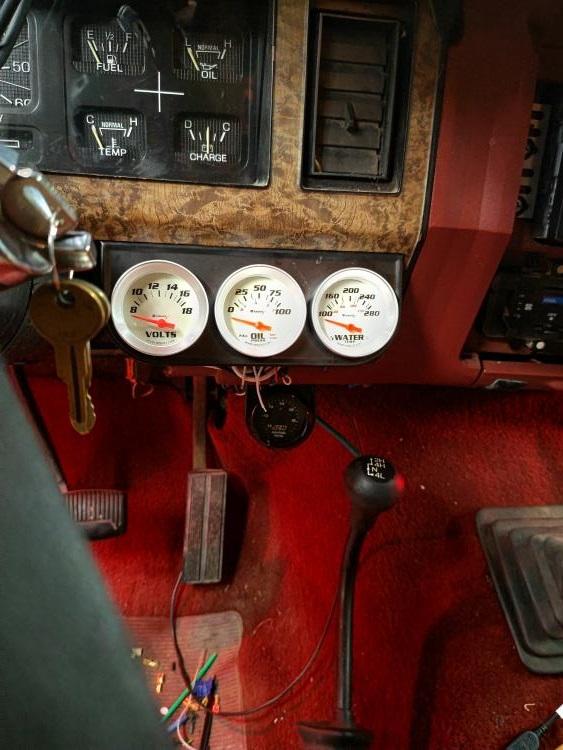
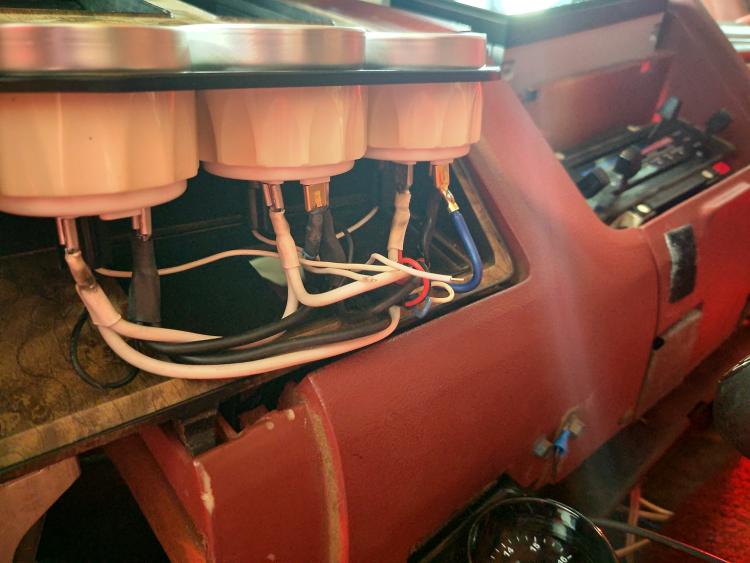
I don't have the vacuum gauge mounted yet, but it will be down by the AFR gauge. I still have to wire the lights into the dash, but this part is almost done.
Chris
1985 Ford F250 XLT SuperCab ZF5-42 swapped 460 hot fuel, factory AC. Part way through 4WD swap. 1988 Suzuki Samurai -- Daily Driver 1968 Dodge Dart -- Project car 1957 Chevy 4400 Flat Bed -- Collector Project 1955 Buick Century -- Collector Cruiser |
|
Administrator
|
Looking very good, Chris.
I mounted my gauges in the same spot and really like it, save for two problems. First, my steering wheel was really in the way. So I went to a later model wheel that has the "arms" coming down at a sharper angle, and that really helped. But it doesn't look factory. Second, my oil and temp gauges are the kind with tubes coming to them and that makes it really difficult to take the gauge bezel off if the tubes just go through a hole in the bezel. So I cut a slot in the bezel. You can't see the slot unless you are on the floor looking up, but now I can get the bezel off.
Gary, AKA "Gary fellow": Profile
Dad's: '81 F150 Ranger XLT 4x4: Down for restomod: Full-roller "stroked 351M" w/Trick Flow heads & intake, EEC-V SEFI/E4OD/3.50 gears w/Kevlar clutches
|
I'll have to see what these look like going down the road. I can see them pretty well through the hole in the wheel. I specifically went out and bought gauges with electric sending units so that I wouldn't have to deal with the oil line or the coolant probe. I've been taking my time getting it all wired up. Won't be able to work on it again until around Monday, unless I'm feeling adventurous and scarf my lunch so I can work on it during my break. Working from home with an office in the garage has its downsides. The truck is sitting there waiting to be worked on.
Chris
1985 Ford F250 XLT SuperCab ZF5-42 swapped 460 hot fuel, factory AC. Part way through 4WD swap. 1988 Suzuki Samurai -- Daily Driver 1968 Dodge Dart -- Project car 1957 Chevy 4400 Flat Bed -- Collector Project 1955 Buick Century -- Collector Cruiser |
|
Administrator
|
I like the mechanical gauges because they usually have a 270 degree sweep, which makes them easier to read. But they sure are a pain to connect, move, etc.
Anyway, working at home with your project that close must be a pain! Very tempting. 
Gary, AKA "Gary fellow": Profile
Dad's: '81 F150 Ranger XLT 4x4: Down for restomod: Full-roller "stroked 351M" w/Trick Flow heads & intake, EEC-V SEFI/E4OD/3.50 gears w/Kevlar clutches
|
|
This post was updated on .
In reply to this post by CRittaler
Found a brake booster in stock at my local Napa so I grabbed it since mine would hiss when pressing the pedal.
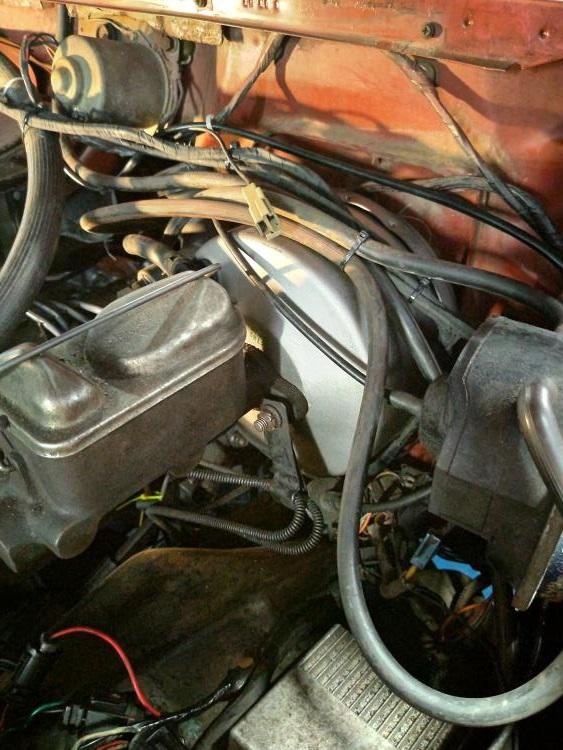
That was the easiest swap I think I've done. No more hissing work pedal pressure! I also took this time to run the truck for a while and check for fuel leaks, coolant leaks, etc. Snapped some pictures of the gauges during the process. 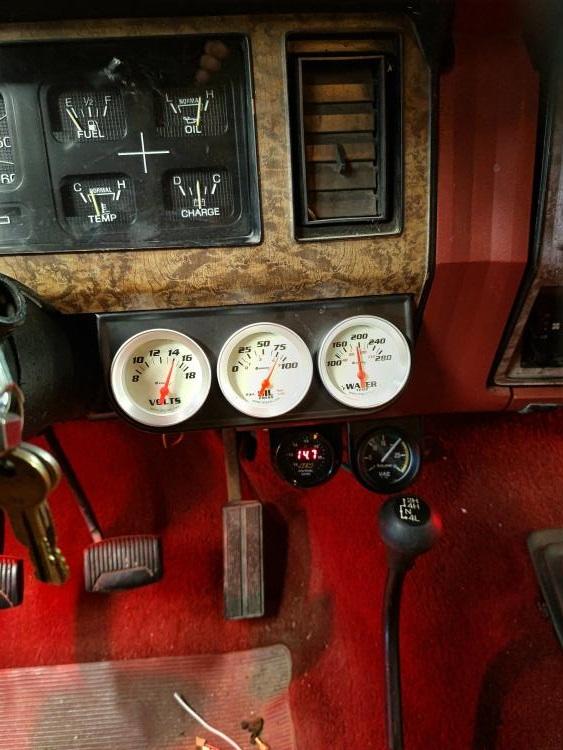
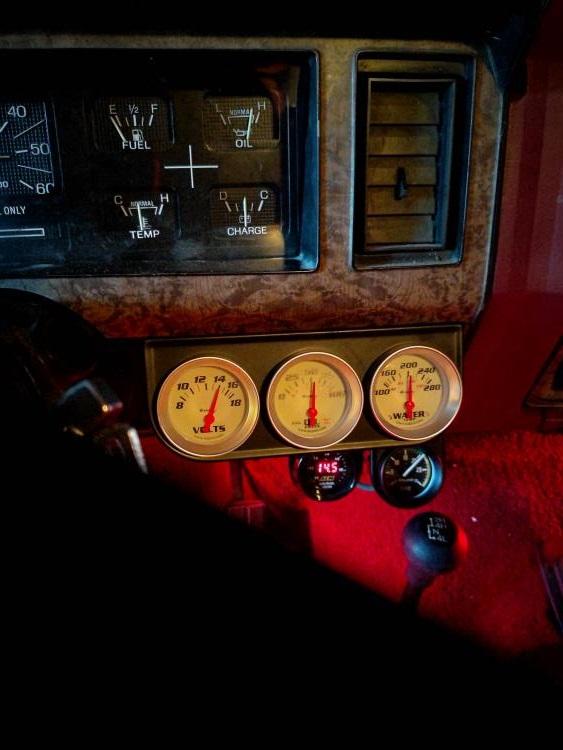
I know that the oil pressure is high. Last year I changed the oil with 15W40 Rotella since that's what I run in all my vehicles. The truck has a recent rebuild unlike my other vehicles so I need to change it back out to 10W30 and see how that looks. Its never been under load with this oil, only idling.
Chris
1985 Ford F250 XLT SuperCab ZF5-42 swapped 460 hot fuel, factory AC. Part way through 4WD swap. 1988 Suzuki Samurai -- Daily Driver 1968 Dodge Dart -- Project car 1957 Chevy 4400 Flat Bed -- Collector Project 1955 Buick Century -- Collector Cruiser |
|
Administrator
|
Glad you got the brake booster sorted. It is comforting when the hiss goes away.
But did you notice any brake fluid in the old booster? If so it is likely that the master cylinder is leaking, and that can take out the booster. And the gauges look great. But I wouldn’t change the oil too soon. I’d drive the truck some and see if the pressure doesn’t come down after that. As for rotating pics, each phone has its own position for “normal” and if you find that and take the pics in that position you shouldn’t have to rotate them.
Gary, AKA "Gary fellow": Profile
Dad's: '81 F150 Ranger XLT 4x4: Down for restomod: Full-roller "stroked 351M" w/Trick Flow heads & intake, EEC-V SEFI/E4OD/3.50 gears w/Kevlar clutches
|
|
AFR at 14.5. Nice :)
1985.5 F-150 XL Explorer standard cab 5.0 EFI AOD 4x4
Daily Driver. We call her Eunice the Ute. 1982 Bronco XLT Lariat 351W AOD 4x4 Code name Esperanza, or Espy to her friends. Please see my Project thread for the blow by blow. 1984 F-350 XL Centurion crew cab 460 T19 4x4 "Eylza Dual-little" |
|
In reply to this post by Gary Lewis
The old booster was dry thankfully. I've got a ways to go still before the truck is road worthy so the oil can stay for now.
Chris
1985 Ford F250 XLT SuperCab ZF5-42 swapped 460 hot fuel, factory AC. Part way through 4WD swap. 1988 Suzuki Samurai -- Daily Driver 1968 Dodge Dart -- Project car 1957 Chevy 4400 Flat Bed -- Collector Project 1955 Buick Century -- Collector Cruiser |
|
In reply to this post by Gsmblue
Thanks! I've done zero tuning on the AVS2, but at least I know the idle is good.
Chris
1985 Ford F250 XLT SuperCab ZF5-42 swapped 460 hot fuel, factory AC. Part way through 4WD swap. 1988 Suzuki Samurai -- Daily Driver 1968 Dodge Dart -- Project car 1957 Chevy 4400 Flat Bed -- Collector Project 1955 Buick Century -- Collector Cruiser |
|
Administrator
|
The AVS2 is one of the easiest carbs to tune. Loosen the screw and swivel the plates out of the way and you can change the rods and springs, which lets you richen or lean the mix at cruise and determine when the enrichment happens for power. And if you really need to change jets just pull the cover w/o spilling a drop of gas.
Gary, AKA "Gary fellow": Profile
Dad's: '81 F150 Ranger XLT 4x4: Down for restomod: Full-roller "stroked 351M" w/Trick Flow heads & intake, EEC-V SEFI/E4OD/3.50 gears w/Kevlar clutches
|
|
In reply to this post by CRittaler
No pictures this time but I fished the trailer brake wire and my backup camera wires down the frame rail. Thankfully there is enough wire for the backup camera and I don't have to extend the harness.
While I was under there I discovered more balls of electrical tape.... and more dang scotchloks this time on the tail light harness. I know the truck had a 7 pin trailer connector at some point because I removed the hacked up wiring when I bought it. I think these are a remnant of that. It looks like they're connected to the signals and reverse light wires. The "spare" bumper that came with the truck has a smashed up 7 pin connected which leads me to believe it's the original bumper and PO swapped it for some reason. For the 4 pin harness there is a plug adaptor that sits between 2 factory connectors and breaks out the necessary signals for the 4 pin harness. The trailer plug that I bought is a 4 pin/7pin combo that uses a standard 4 pin to connect its 4 pin connector so at least I don't have to solder that part. I'll only need to connect up the power/brake signal/aux backup/ground. Not too bad. EDIT: Also, just realized that I didn't provision for running that aux backup signal :( I'll leave it off for now I guess. Now I have to fix that wiring :/
Chris
1985 Ford F250 XLT SuperCab ZF5-42 swapped 460 hot fuel, factory AC. Part way through 4WD swap. 1988 Suzuki Samurai -- Daily Driver 1968 Dodge Dart -- Project car 1957 Chevy 4400 Flat Bed -- Collector Project 1955 Buick Century -- Collector Cruiser |
|
Administrator
|
May not be what you are wanting but after years of troubleshooting trailer lights not working in out flatbed farm trucks, I've started installing those junction boxes they use on trailer tongues in the frame behind the last cross member. That way it's easier to troubleshoot as well as replace the trailer connector if needed.
Just mentioning it if the scotchloks have split the factory wiring and if it would make sense to remove the T adapter and terminate the factory wiring (after the factory connector) into the junction box.
Scott
'Camano' 1986 F250 Supercab XLT Lariat 460/C6 'Chanute' 1980 F350 C&C 400/NP 435 - Gin Pole But there ain't nothin' wrong with the radio |
That's a good idea! I'll look at ordering a waterproof junction box.
Chris
1985 Ford F250 XLT SuperCab ZF5-42 swapped 460 hot fuel, factory AC. Part way through 4WD swap. 1988 Suzuki Samurai -- Daily Driver 1968 Dodge Dart -- Project car 1957 Chevy 4400 Flat Bed -- Collector Project 1955 Buick Century -- Collector Cruiser |
|
On the back up light wire I would not worry about it.
In all the trailers dad & I have pulled only 1 (travel trailer) had back up lights and they were not connected to the puller. If you wanted them on there was a switch in the storage box out back they were mounted to. Yes they were useless for seeing when backing up as they were not vary bright. My pickup is the first to use a after market Tee that plugs in between the rail harness & tail light harness and I cant remember if it has the back up wire in it now? I did have to run the trailer brake & power wire (10 ga for both) from up front to the 7 pin out back. If I need to run a flat 4 plug I have adapter behind the seat that will plug into the 7 pin and make it flat 4. My 02 Dodge came from the factory with the adapter and in the 20 years I have had the truck I have never needed to use it. One day I should hook the pick up to my car trailer to make sure the wiring is right before I need to use it LOL Dave ----
Dave G.
81 F100 flare side 300 six / AA OD / NP435 / 2.75 gear http://cars.grantskingdom1.com/index.php/1980-Ford-F100?page=1 81 F100 style side 300 six/SROD parts truck -RIP http://cars.grantskingdom1.com/index.php/1981-Ford-F100 |
|
This is what I bought:
https://www.reesetowpower.com/product/85343_trailer-connector-adapter-7-to-4-flat I plan on heat shrinking over the reverse light connection for the time being. I think the 4 pin is Left turn/stop, right turn/stop, tail/marker, and ground. I've got the same trailer brake (12ga) and power (10ga) running along the frame rail.
Chris
1985 Ford F250 XLT SuperCab ZF5-42 swapped 460 hot fuel, factory AC. Part way through 4WD swap. 1988 Suzuki Samurai -- Daily Driver 1968 Dodge Dart -- Project car 1957 Chevy 4400 Flat Bed -- Collector Project 1955 Buick Century -- Collector Cruiser |
So that setup you have to have a flat 4 wired in to the truck for most of the wiring from the looks of it. My Tee came on 1 of my trucks and fits between the frame rail harness and the tail light harness. You unplug the 2 and plug the Tee into the rail harness and then the tail light harness into the Tee. https://www.etrailer.com/Custom-Fit-Vehicle-Wiring/Ford/F-100,+F-150,+F-250,+F-350/1981/118313.html?VehicleID=19811171986 I cut the flat 4 off and wired it into the 7 pin along with the brake & power wires. Both the brake & power are 10 ga wire as I did not want to have a power drop on either system before it got to the trailer. A few days after I ran the wires for brake & power I did not see my fuel gauge move? Having duel tanks I flipped the switch and see the other tank (rear) that should be full at half tank? When I ran the 2 wires to the rear the wire for the tank switch valve hit the frame at a bad splice I made and blew the fuse and by default goes to the rear tank. I fixed the splice, replaced the fuse and been all good since. So if something is not working after pulling the wires look over the frame rail harness really good. Dave ----
Dave G.
81 F100 flare side 300 six / AA OD / NP435 / 2.75 gear http://cars.grantskingdom1.com/index.php/1980-Ford-F100?page=1 81 F100 style side 300 six/SROD parts truck -RIP http://cars.grantskingdom1.com/index.php/1981-Ford-F100 |
|
My truck has the same T connector to break out a 4 pin. The PO added additional wires (poorly) to wire in a separate 7 pin connector that is no longer present.
I'm undoing his terrible wiring and redoing it with the Resse connector I bought. It will be: aftermarket T to 4 flat --> plug into the Resse harness to give me a panel mount 4 flat. This way I only need to wire in the heavy gauge wires to the 7 pin. I have to repair the factory harness where the PO used the scotchloks to spice for their non existent 7 pin.
Chris
1985 Ford F250 XLT SuperCab ZF5-42 swapped 460 hot fuel, factory AC. Part way through 4WD swap. 1988 Suzuki Samurai -- Daily Driver 1968 Dodge Dart -- Project car 1957 Chevy 4400 Flat Bed -- Collector Project 1955 Buick Century -- Collector Cruiser |
| Edit this page |

