Search Forum
1980 F150 Shortbox 4x4
1234
1234
|
Hey guys,
Been working on my truck since 2012. Cleaned up in a buddy's barn at his shop, first drive 4000 km across the country, loaded to the gills with a cat.. been rolling ever since 1980 Ford f150 351M short box 4x4 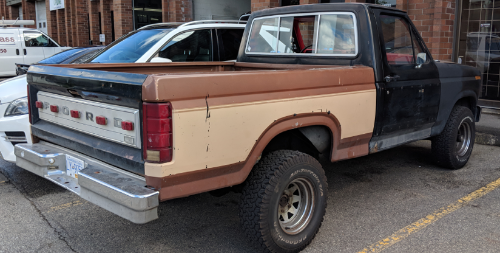 Had an eaton true trac diff 3.50 ratios & rear disc brakes installed about 3000 km ago. and just bought some of those oem looking round chrome wheels and grille and bezels. My goals are to have a reliably good lookin, soundin, capable 4x4 that can turn heads gurgling down main st on the way into the bush and mountains. Always followed the forums on ford trucks, and now here.  Of course any recommendations, commentary, thoughts... I’d love to hear these and figure out things I didn't know before  Project Gastank: -- Truck has single side gas tank 60L. The truck "new" southern truck box on there now w/ minimal surface rust, and the box has the opening for a second gas tank. -- i have a 2nd interior module piece from a donor truck that includes the switch to change tanks on the fly 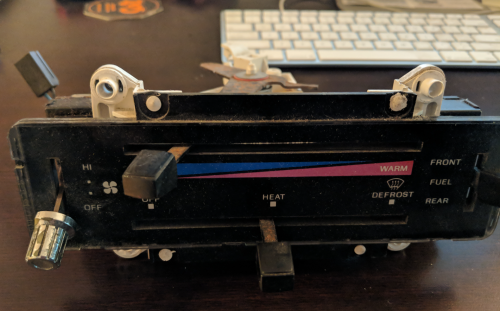 -- i'd like to get an additional gastank installed in the rear 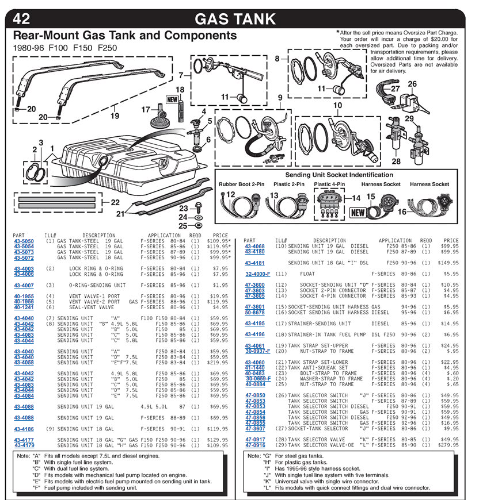 with the donor dash module and get the electronics and both sending units working properly. with the donor dash module and get the electronics and both sending units working properly.
-- hoping to get this work done as soon as convenient Project Exhaust: -- I currently have a passenger side dump exhaust that is pretty much completely rusted out and muffler is damaged 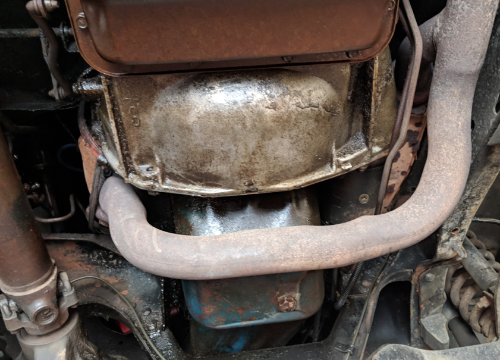 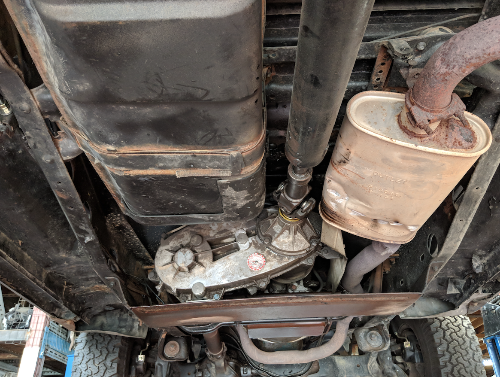 -- I'd like to get a custom exhaust fitted that does a single pipe side dump on both the driver and passenger side. Don’t want to wake up the neighbours every time, but something that sounds good and efficient off the block  - I believe with a little welding, there is enough space to go straight back off the driver side headers past the transfer case …maybe a half circle piece welded into the bracket under the transfer case? Not entirely sure, and would like to figure out the best way…being able to eventually drop in a custom 351 clevor -- hoping to get this work done as soon as convenient Project Headliner: -- I did all the interior myself 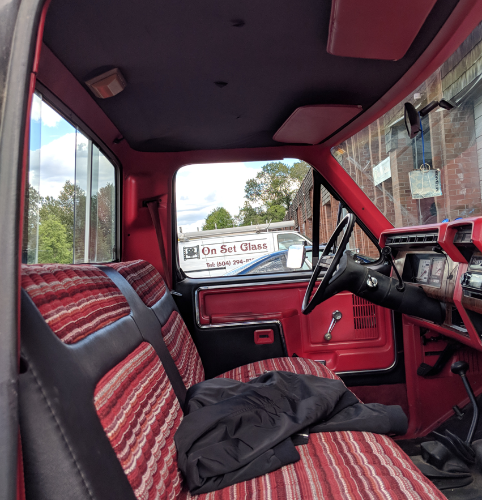 and matched the vinyl on the seats, doors panels, and original headliner and matched the vinyl on the seats, doors panels, and original headliner 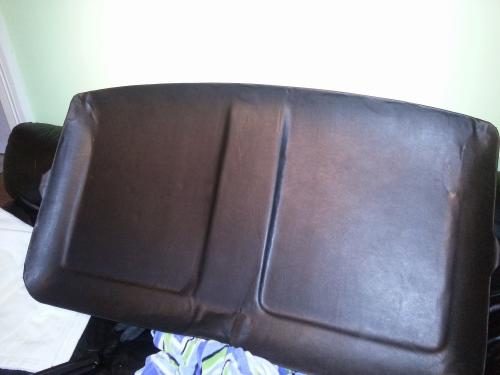 … well I unfortunately left the completed vinyl headliner in the sun and it broke in half just before I was going to install it. There is a ‘regular’ foam one in there now. The roof of the cab is the same contour as the original headliner, and I’d like to keep that contour in the truck, and match the vinyl, but haven’t been able to find a donor headliner with the same contour (1980). … well I unfortunately left the completed vinyl headliner in the sun and it broke in half just before I was going to install it. There is a ‘regular’ foam one in there now. The roof of the cab is the same contour as the original headliner, and I’d like to keep that contour in the truck, and match the vinyl, but haven’t been able to find a donor headliner with the same contour (1980).
- I would like to match as close as possible the vinyl I’ve used (some kind of extreme cold snowmobile vinyl… still trying to remember/find the brand.) - There is dynamat on the roof of the cab. I’m open to fastening vinyl directly onto the dynamat/ cabroof if that’s the best way to do it. — hoping to get this work done a soon as convenient Project Bodywork / Paint: — There are a few bumps and dings and panel straightening, but mostly surface rust - except for the cab corners on there which are rusted through. I do already have two cab corners that can be used to weld on. — Got new weatherstripping for the doors, so I can strip off the interior pieces etc before bringing it in. Windshield and rear sliding glass are good. — Paint: either thinking a gloss black with red speck; or….two tone like the paint scheme picture attached 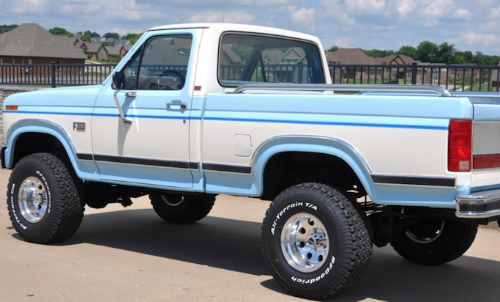 except the two tone being black on a lighter shade of black except the two tone being black on a lighter shade of black  thoughts? …. Both probably with heavy clear coat to protect from snowboards tossin around stuff in the back etc. thoughts? …. Both probably with heavy clear coat to protect from snowboards tossin around stuff in the back etc.
1980 F150 Ranger shortbox 4x4 (351M <-- Rebuild happening now)
Eaton true trac limited slip 3.50; wilwood disc brakes |
|
Greetings from the Maritimes (NS). I take it you're in BC, and the 4000 km drive was from Ontario?
Nice truck. I'd like to have a short box 4x4 Bullnose myself. On the exhaust: I had full 2.25" duals installed on my 1984 Bullnose just at the beginning of this summer. Went with a single side exit on each side, behind the rear wheels. Pretty much stock location, but one on each side. I got them to keep the tail pipes short and tight to the body, so it looks clean in my opinion. Went with stainless Magnaflows, mounted vertically side by side, with an "H" pipe just before the mufflers. I really like the sound of it. It has a nice deep rumble to it, but isn't obnoxious.
1994 F150 4x2 Flareside. 5.0 w/MAF, 4R70W, stock.
1984 F150 4X2 Flareside. Mild 302 w/ 5spd. Sold. 1980 F150 4X4 Flareside. 300i6 w/ 5spd. Sold in 2021. 1980 F100 4X2 Flareside. 351w/2bbl w/NP435. Sold in 1995 |
|
Administrator
|
gtanns, welcome to the forum! You might want to go to the thread for new comers and introduce yourself to everyone!
 You have been busy on your truck. Thanks for the photos! |
|
In reply to this post by gtanns
Got my new wheels on there today, 15x8 chrome ones, original looking.
Picked up the chrome centre caps for the back and the front. The front ones aren't snug around the hubs, but they'll do. I do like these wheels, and they were like $120/ea on LMC, which seems like a pretty good deal to me.  Rear wheels: 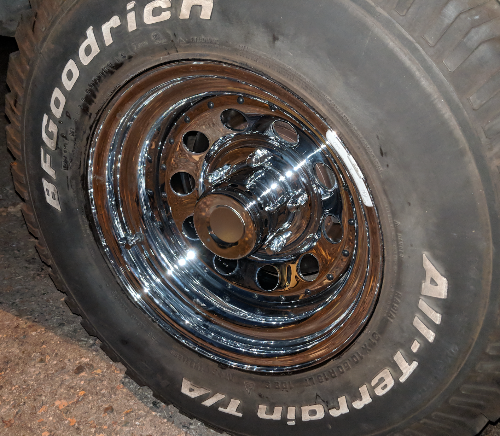 Front Wheels: 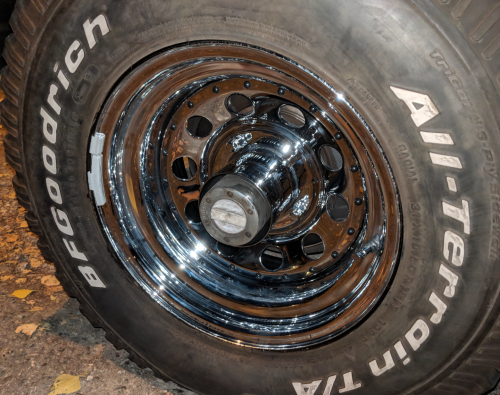
1980 F150 Ranger shortbox 4x4 (351M <-- Rebuild happening now)
Eaton true trac limited slip 3.50; wilwood disc brakes |
|
Administrator
|
The wheels do look good!
 You might want to wax them well for preservation sake. You might want to wax them well for preservation sake.
|
I agree, they do look good!. I'm currently running black 15x8 Cragar Soft-8's, but I plan to switch back to chromies once I get the truck painted and pretty looking.
1994 F150 4x2 Flareside. 5.0 w/MAF, 4R70W, stock.
1984 F150 4X2 Flareside. Mild 302 w/ 5spd. Sold. 1980 F150 4X4 Flareside. 300i6 w/ 5spd. Sold in 2021. 1980 F100 4X2 Flareside. 351w/2bbl w/NP435. Sold in 1995 |
|
In reply to this post by 1986F150Six
Did them in wax :)
Pete's Ponies
Mustang RUSToration & Performance 1982 F100 Flareside 1983 Bronco |
|
In reply to this post by gtanns
You do the gas tank yet? Really love the red interior and wheels.
1980 Ranger 351W
|
|
Thanks!
No I haven't. I was away for a month, but back now and driving across the border to Bellingham to consult with a custom fab shop to do some of the work, hopefully this week! But I think realistic completion of it will probably be like January maybe ? Also, instead of paint I've been looking at some vinyl wrap instead. It seems quite advanced these days -- and you can get gloss and speckle looking wraps. It's very durable and less $ than a good paint job - which is a big seller for me as I don't want to drop thousands in paint and have it get scratched in the bush somewhere.
1980 F150 Ranger shortbox 4x4 (351M <-- Rebuild happening now)
Eaton true trac limited slip 3.50; wilwood disc brakes |
|
Sorry I am a little late to this.
On the duel tanks there are 2 main truck wiring harness. One is made for duel tanks & the other is not. You will not find the plug to plug into the tank switch on that panel in your truck. Also know the rear harness that plugs into the main harness under the master/booster is also different as it should have the 2nd tank sender plug and the tank switch valve (that bolts to the frame) wires. Can you do with out them 2 harnesses? I am sure you can you will just have to make a harness to run along side what you have in the truck now now is all. I know all this as I converted my 81 flare side to duel tanks but I had a 81 parts truck I took it all from so it was plug-n-play. Don't know if mine works yet as I am still re-building my truck. Dave ----
Dave G.
81 F100 flare side 300 six / AA OD / NP435 / 2.75 gear http://cars.grantskingdom1.com/index.php/1980-Ford-F100?page=1 81 F100 style side 300 six/SROD parts truck -RIP http://cars.grantskingdom1.com/index.php/1981-Ford-F100 |
|
Thanks Dave!
Yes there is a female plug on the back of my donor panel near the tank switch that is not there on the panel I have in there now (with no tank switch). Re 'can you do without them 2 harnesses?' -- as you're saying do you think I could wire up my own 2nd harness to imitate the factory setup for two tanks and plug into the donor panel ive got? I have all the original wiring diagrams for the truck (with one tank) and I think I could figure it out with the right amount of hours but should probably get the diagrams for a dual tank setup to compare... Or better yet maybe get the whole wiring harness from a dual tank setup.
1980 F150 Ranger shortbox 4x4 (351M <-- Rebuild happening now)
Eaton true trac limited slip 3.50; wilwood disc brakes |
|
Engine update!
Well I've drained the piggy bank and after saving since 2012 getting a new engine built for this thing...starting in the next week ohh baby I'm excited. I have a 351M which is a Cleveland block basically. Going to wash and clean the block.. use same heads but get a new crank to stroke it out to 4.0 inches and 400 CID ... new pistons comp cam valve train .. use a camshaft setup that will give more low end torque.. it's not too often that this would ever be over 5000 rpm. Also I'm putting in one of these fitech EFI converters in lieu of a holley 650 carb.. they sound so awesome! Reliability, fuel economy...and essentially plug and play onto the engine. For en extra 500 bucks you'll earn that back in fuel savings after a year. I'm using Canadian crate engines out of Vancouver, a guy named Rob Borden. Super great dude. Attached is a pic of the dyno from a similar engine he just built. Will probably put some tri-y headers and 2.5" exhaust. Turnaround time is not that long so expect to see some updates here in the next month or so! :) Screenshot_20181117-114911.png
1980 F150 Ranger shortbox 4x4 (351M <-- Rebuild happening now)
Eaton true trac limited slip 3.50; wilwood disc brakes |
|
In reply to this post by gtanns
Look over your diagram for the single tank truck as I want to say it will also show the duel tank and if so you could follow it to make your own harness. Now we all know the easy way is to get a duel tank trucks harness, both the main in truck one and the one that runs down the frame rail. The easy one to make is the frame rail one and the easier one to get. Unplug under master/booster and follow it back along the frame rail. The main one that is inside the truck runs across the top of the dash and goes out the fire wall on each side. The right side does the heater/AC, charging system and power/solenoid. The left side does the head & parking/turn lights up front, horn, wiper & washer and everything going to the rear for lights and the fuel tank senders & valve switch. There other things I just hit the big ones. I think someone removed the main harness without removing the dash so guessing it can be done. When I did mine I was also using the dash from the parts truck as it had the AC vents (added factory AC to a non AC truck, not easy task) so I took the dash & wiring as 1 big bundle. It was when I started checking dash plug wiring for heater/AC/fuel tanks (some were cut off the parts truck harness) between the parts truck harness and my truck I found the difference in the harnesses. Now my 2 truck just happened to be the same years (1981's). I know 1980 dash gauges had some different wiring than later years. You will most likely find a different year than 80 so if you get the gauge cluster you would not have to deal with the 80 only gauge deal. I also think the mid to late 80's also changed wiring for the duel tanks so would need to watch for that. Or maybe it is for electric fuel pumps and non fuel pumps? Just wanted to give you a heads up on what you need to look out for. Dave ----
Dave G.
81 F100 flare side 300 six / AA OD / NP435 / 2.75 gear http://cars.grantskingdom1.com/index.php/1980-Ford-F100?page=1 81 F100 style side 300 six/SROD parts truck -RIP http://cars.grantskingdom1.com/index.php/1981-Ford-F100 |
|
Administrator
|
In reply to this post by gtanns
Those numbers look good.
 Do you know what pistons he's using. My understanding is that the only pistons that will get more than 8:1 compression come from Tim Meyer. But to get those power numbers surely he's got more than 8:1 compression in the engine. Anyway, congrat's! That's gonna put some spunk in the truck, for sure.
Gary, AKA "Gary fellow": Profile
Dad's: '81 F150 Ranger XLT 4x4: Down for restomod: Full-roller "stroked 351M" w/Trick Flow heads & intake, EEC-V SEFI/E4OD/3.50 gears w/Kevlar clutches
|
|
This post was updated on .
In reply to this post by FuzzFace2
Yes!
 I found in the wiring diagram (1980 F100-350) page 3 shows the the fuel gauge/sender and yes, and includes the 2nd aft tank with it. I found in the wiring diagram (1980 F100-350) page 3 shows the the fuel gauge/sender and yes, and includes the 2nd aft tank with it. 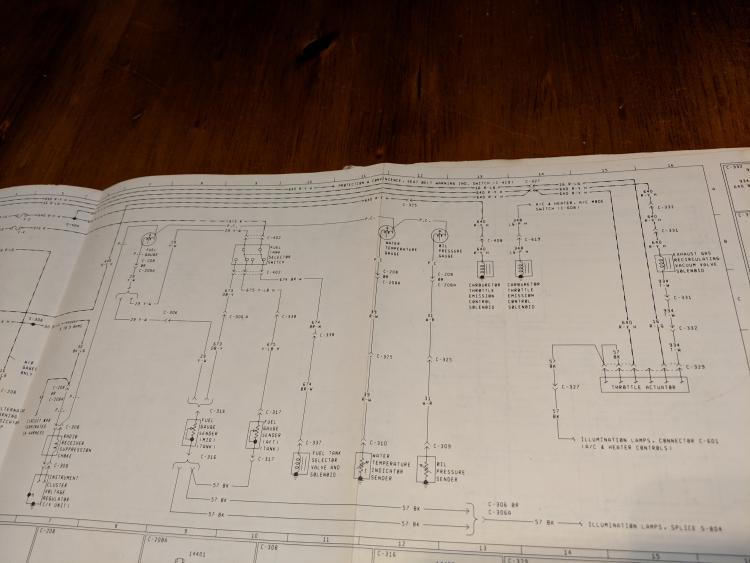 Also, if anyone wants me to upload the entire 10 page wiring diagram, i'll do that in another thread or something let me know. I got to thinking though.. I'm wondering if it'll be better in the long run to 'keep it simple' and avoid the wiring etc and instead get a custom tank cut that is dual capacity but actually only one tank. Would like to hear some thoughts on this new idea: *See pic above of current driver side mid tank and muffler IDEA: - Fabricate a custom tank - It would essentially be like running a second side side tank on the passenger side of the driveshaft (where the muffler is currently) - at the very front bottom of the tank, (leaving enough access to the u-joint) have the driver and passenger side tanks fabricated together so the bottom of the tank would be like a big horseshoe, so that they're connected - The issue is the muffler. I'm getting a custom exhaust (single side dump on driver and passenger side), and if you look at the pic of the midtank and muffler further up the thread, you'll see i'd have to squeeze a round muffler beside the transfer case or something. I'm thinking that this would save the electrical work, and then I could also use the aft tank space for a spare tire... ? Here is a pic from the passenger side where you can see I'm thinking the tanks could connect under the u-joint. (the muffler has been removed) What'r your guys thoughts? 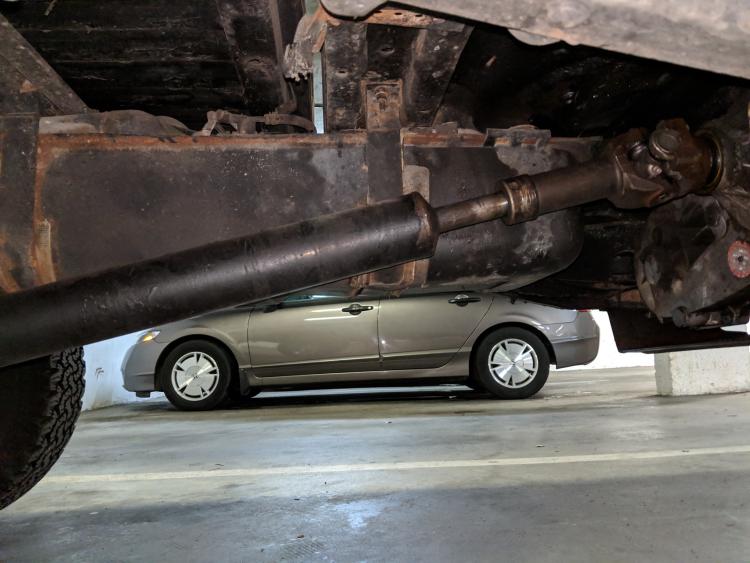 And a pic from the back: 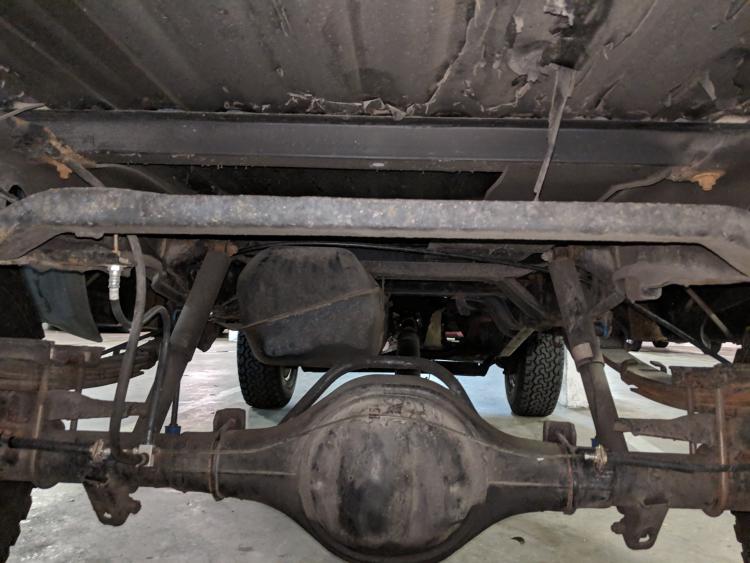
1980 F150 Ranger shortbox 4x4 (351M <-- Rebuild happening now)
Eaton true trac limited slip 3.50; wilwood disc brakes |
|
In reply to this post by Gary Lewis
Yes, I'm pretty fired up to get this thing fired up!
I was wondering the same thing RE compression: He's getting 9.2 by shaving the face of the block down, and also shaving the face of the heads down. The pistons will still still stroke ok, and there is less space to do so, so it increases the pressure  I'm Canadian but take US holiday's so had yesterday off to pull my engine with a buddy in my underground parking garage  We got it out by about 3 pm so just before everyone was gettin home We got it out by about 3 pm so just before everyone was gettin home  Rented the hoist and everything and started filling the mop buckets with fluids. Got er out and left it @ the shop today! Rented the hoist and everything and started filling the mop buckets with fluids. Got er out and left it @ the shop today!
Here are a few pics: Lots of space in the bay to take out with the header's on and no jacks. I sawzalled the old exhaust as it was rusted shut to oblivion. Man we tried to get my buddies 440 out of his 73 Challenger the night before.. lol man there is no room to move in that thing. We got hung up and had to call it another day in the rain, thankfully we had my underground garage for mine :) Bellhousing on 351M: the two holes second closest to the top are dowels, so didn't have to screw those out. We got held up pulling it out and wondered why, but amateur error didn't undo the bolts at the bottom of the bellhousing (the easiest ones) that hold the gasket on there. So we were scratching our head there for a sec then realized the gasket was holding it up. 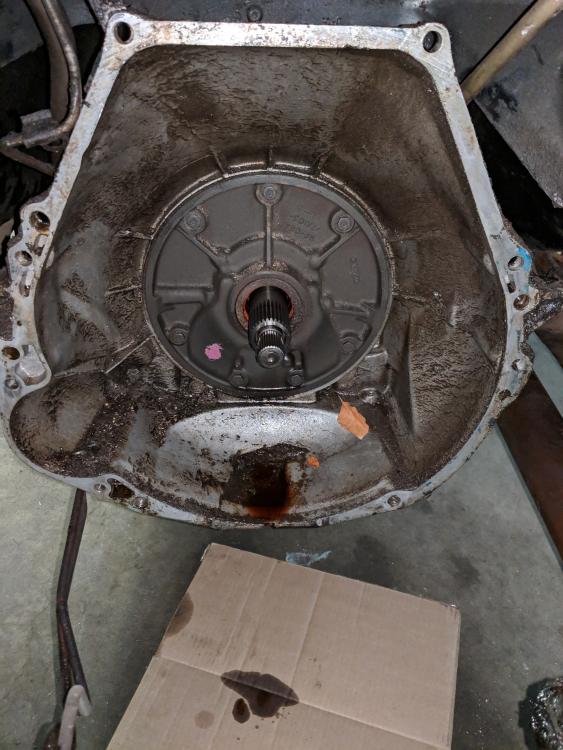 Engine Bay: 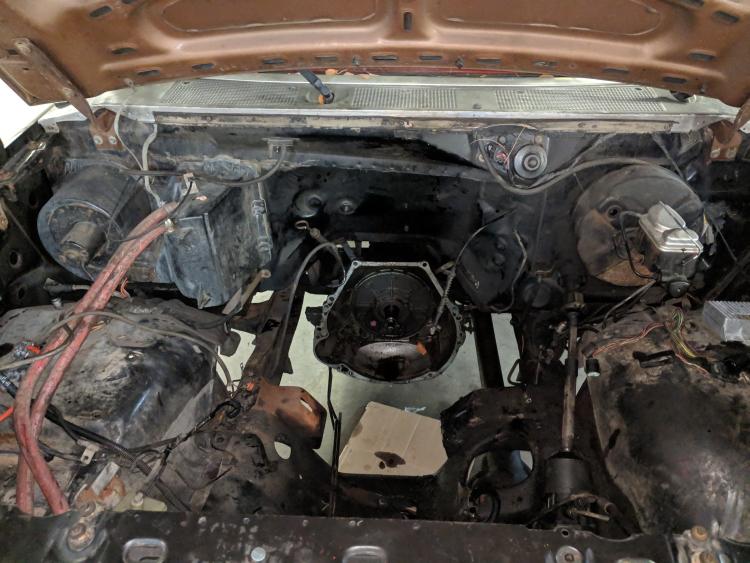 Success: 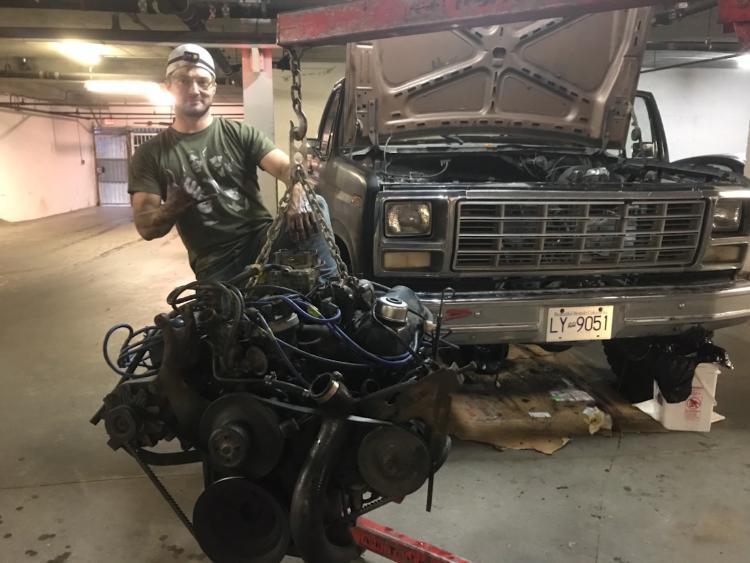
1980 F150 Ranger shortbox 4x4 (351M <-- Rebuild happening now)
Eaton true trac limited slip 3.50; wilwood disc brakes |
|
In reply to this post by gtanns
Since I only have the one small swb fuel tank, I know little the dual tank set-up...but it would seem to me the dual tank set-up would be the lesser of two evils, no? Isn't the rear tank huge (or there is a huge option)? What is troublesome about it?>..The plumbing and wiring, or?.... The downside is you lose the space for the underside spare. I guess it depends on your angle. If you have the time and ability to fab a custom dual tank in one (sort of), then maybe that is preferable over the factory dual tank set-up. I would find the plug and play part of the dual tank an easier install personally, but like I mentioned above, I've not studied the system, so I know little about it. I'm running with no spare underneath, and I'm OK with that locally. If I were to go on a trip, I'd throw the spare in the bed. I'd like to have more fuel capacity, but my current range (I believe around 400 km, or 250 miles) is about as far as I want to drive without a break anyway...in the truck at least. In any case, if you do build a custom tank, it will be interesting to see how it works out.
1994 F150 4x2 Flareside. 5.0 w/MAF, 4R70W, stock.
1984 F150 4X2 Flareside. Mild 302 w/ 5spd. Sold. 1980 F150 4X4 Flareside. 300i6 w/ 5spd. Sold in 2021. 1980 F100 4X2 Flareside. 351w/2bbl w/NP435. Sold in 1995 |
|
Administrator
|
First, on the wiring diagrams - I have the 1985 and '86 diagrams on the website (Electrical/Wiring Diagrams) and would be happy to add your 1980 diagrams to that. But, and this is a big "but", I've learned that they have to be in pdf and at least 600 dpi. They really aren't legible when you get them on a computer screen, so you have to be able to zoom way into them to make them useful. But, if you can do that I'd love to have them.
As for the fuel tank, the concern I have with a tank on both sides is the problem it creates with where you run your exhaust. But, if you can get around that then perhaps it is a viable option. Another single-tank option is either a 33 gallon Bronco tank or the 38 gallon upgrade to the Bronco tank. In either case you won't get a spare tire under the rear, but it would be a much simpler fuel system.
Gary, AKA "Gary fellow": Profile
Dad's: '81 F150 Ranger XLT 4x4: Down for restomod: Full-roller "stroked 351M" w/Trick Flow heads & intake, EEC-V SEFI/E4OD/3.50 gears w/Kevlar clutches
|
|
Ok on the tanks factory you had side tanks 16gal on the SB trucks, 19gal on the LB trucks.
Out back you had a 19gal tank and you had the spare tire under it. Now others have said what they find why not to have a side tank on the right side but one that has been missed is how to fill it. In the early days Chevy had them on both sides and part of the problem was how to get fuel in it? Hose most of the time is too short to reach and forget it if you have a cap on the bed. Could fill 1 tank the turn truck around but if you don't shut the pump off someone can sneak in and fill on your dime. If you do shut if off then start again using the same credit card the card may not work as they think it was stolen. SO to KISS use factory tanks and if you need more fuel run an after market 33gal or 38gal rear tank but you can not have the spare tire mounted under it. Dave ----
Dave G.
81 F100 flare side 300 six / AA OD / NP435 / 2.75 gear http://cars.grantskingdom1.com/index.php/1980-Ford-F100?page=1 81 F100 style side 300 six/SROD parts truck -RIP http://cars.grantskingdom1.com/index.php/1981-Ford-F100 |
|
Yes, the issues with both the space for the muffler and the filling of both tanks from one filler neck have been the biggest obstacles here. I believe there is a way to cover both those obstacles with the design i've got. I sent this off to a fabrication shop today, so we'll see what they think and of course what your guys thoughts are on it too.
Below is my truck and where the exhaust exits (passenger side only) - I’d like this same exhaust positioning, but one on both passenger and driver side: 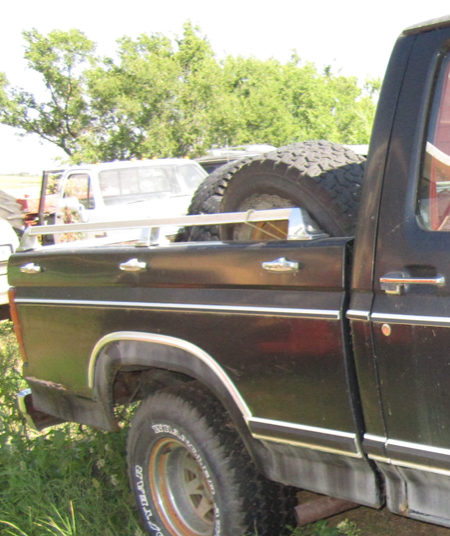 This is the view from underneath, showing the gas tank on the driver side, and the muffler and exhaust on passenger side: 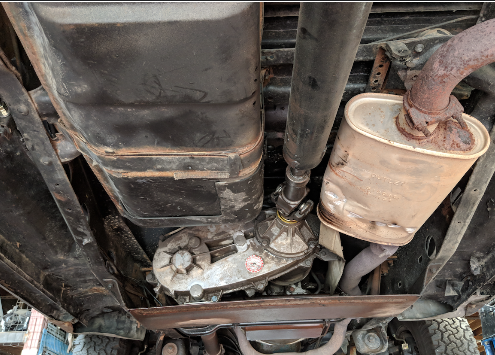 In the photo above, the space to the right of the transfer case is where I want to make space for the muffler. Below is a close of up of that space beside the transfer case. Note the bent grey metal piece on the left is just a protective sheet, can be re-fabbed or moved to make space. 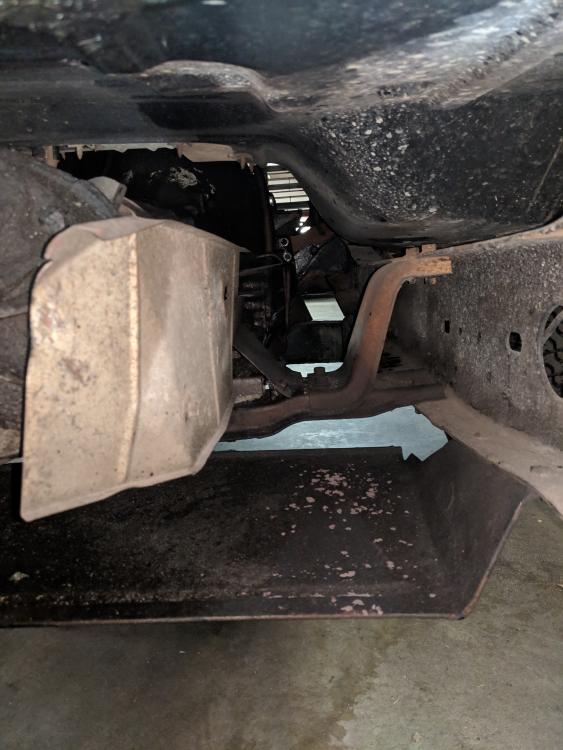 2nd photo of same space as above: 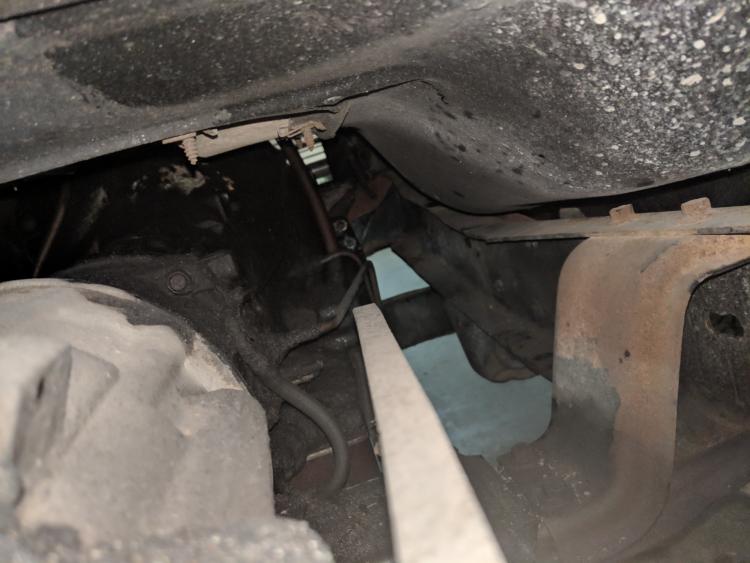 See the gas tank design below along with the dimensions of the space for the muffler. The LxWxH dimensions for each side of the driveshaft are the same dimensions as the original stock side tank. I believe the new fabricated tank could add an inch in height to the original. Tried to do it to scale. 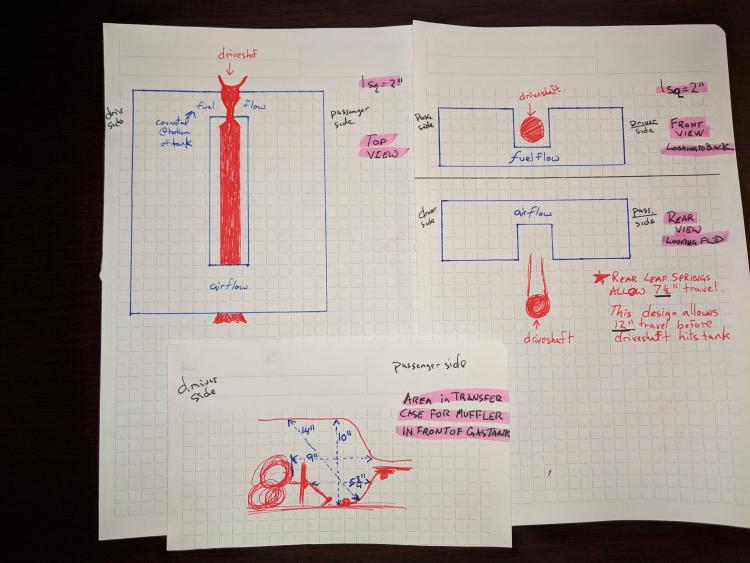 This shows the space to the back of the tank and where the tank would need to safely accomodate a 7 1/2 " travel on the driveshaft from the rear leafs. 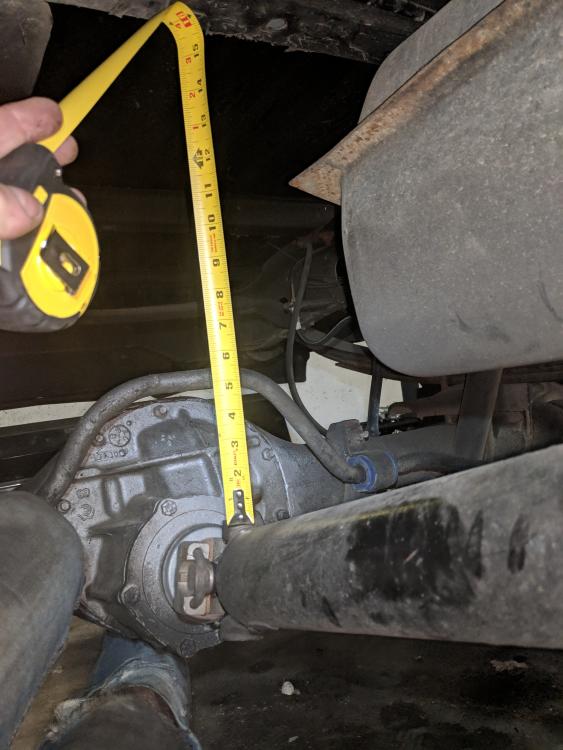
1980 F150 Ranger shortbox 4x4 (351M <-- Rebuild happening now)
Eaton true trac limited slip 3.50; wilwood disc brakes |
Bullnose Enthusiasts Forum
›
Projects
|
1 view|%1 views
| Edit this page |

